
Looking for a simple guide to iOS push alert campaigns? iOS push alerts, those handy little messages that pop up on your screen, can be a real game-changer for your business if used properly.
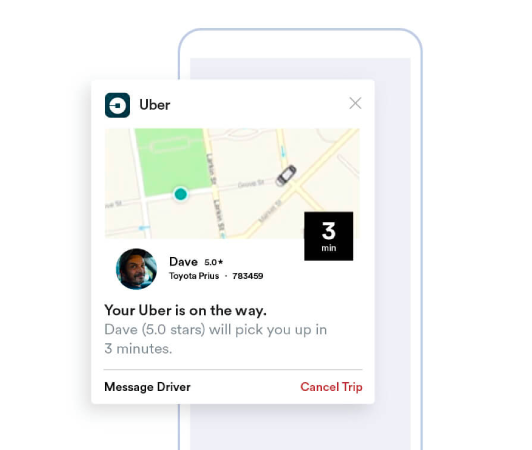
Now picture this: You’re a business owner and you’ve just launched a flash sale on your website and app. How do you get customers to immediately flock to your site? Simple, by sending out an iOS push alert. Just like that, shoppers receive a timely notification about the sale, and your website and app traffic shoots through the roof.
But what is an iOS push alert exactly? Think of it as your personal, pocket-sized billboard. It’s a brief message or notification pushed to iOS devices (iPhones, iPads) from apps installed on the device.
The best part is that you can get all this set up super fast! Sounds interesting, right? Let’s dive in.
What is an iOS Push Alert?
An iOS push alert is akin to a small digital memo that shows up on your Apple mobile devices. It could be from your favorite social media platforms, news distributors, or online shopping apps – all aiming to keep you in the loop, engaged, and connected.
Think of these mini-messages as gentle taps on your iOS device’s shoulder sent via the Apple Push Notification service (APNs). It’s almost as if the app is whispering to your device, requesting for your attention. The remarkable aspect of iOS push alerts is that you don’t even need to have the app active, or be using it. As if by a stroke of wizardry, notifications pop-up even on your locked screen, assuring you never bypass essential updates or prompts.
iOS push alerts offer a wealth of benefits. First and foremost, they are an exceptional tool for keeping you informed with up-to-the-minute information. Picture an alert from an online shopping app informing you about a current sale.

Additionally, they can save you precious time. Imagine your banking app sending an alert confirming a successful transaction, negating the need to login and check manually. On top of these pragmatic benefits, iOS push alerts enhance your overall app experience by making it more lively and interactive.
Navigating these notifications is made user-friendly by platforms such as PushEngage. Empowered with sophisticated features, PushEngage ensures these bite-sized information pieces serving your interests, reach you timely and are streamlined according to your preferences. Whether it’s notification frequency or the type of alerts; PushEngage places the control in your hands.
Armed with a basic understanding of what iOS push alerts are and their mechanics, let’s delve deeper into the variety of notifications and unravel how apps harness them to engage and convert their users.
Types of iOS Push Alert Campaigns You Can Use
There are many types of iOS push alerts that can be used to increase interaction with your audience. By understanding these different types, you can improve their effectiveness and create a more personalized and interactive user experience.
- In-App Alerts: These alerts can be sent when a user is actively using your app. For example, an e-commerce app can send an alert about a special discount on an item that the user is interested in. With PushEngage, businesses can easily send these relevant and timely messages to increase user engagement.
- Location-Based Notifications: These alerts are sent based on the user’s geographical location. They are great for businesses like retail outlets or events that want to inform nearby users about exclusive offers. PushEngage makes geo-targeting simple, ensuring businesses can effectively reach their target audience no matter where they are.
- Behavior-Based Alerts: These notifications are sent in response to specific actions taken (or not taken) by the user in the app. For example, if a user adds an item to their cart but doesn’t buy it, a behavior-based alert could remind them. With PushEngage, businesses can precisely manage these types of notifications.
- Timed Notifications: These push alerts are set to be sent at predetermined times and can be used for recurring events or notifications. With PushEngage, these notifications can be scheduled ahead of time, ensuring users stay informed about important updates or events.
A successful push alert campaign needs the right type of notification for its goals. So, if you’re looking to boost your business using iOS push alert campaigns, you need an iOS push notification service with many choices available to optimize your strategy for maximum engagement.
How Does an iOS Push Alert Work?
An iOS push alert is generated when the specific app on your iOS device communicates with the APNs. Once the notification is crafted and sent, APNs routes it to the intended device – all within the space of a few microseconds.
Now let’s dive deeper into the world of iOS push alerts. Consider checking your phone and you immediately see a notification from your favorite news app telling you about breaking news, or your go-to shopping app alerting you about a flash sale. These are the moments when iOS push alerts come into play. These notifications are small messages that apps send to appear on the device’s home or lock screen, even when the app is not currently in use.
iOS push alerts are vital parts of our day-to-day digital interaction. They are powered by Apple’s push notification service, known as APNs. This service coordinates the delivery of notifications from the servers of your apps to your Apple devices. This process ensures that you’re always in the loop, receiving real-time updates from your apps without having to check them manually.
These alerts not only provide information, but also save you time and keep you connected. Using our partner, PushEngage, businesses can send targeted iOS push alerts that enhance user dopamine and engagement levels. For instance, PushEngage-driven notifications can intelligently remind you about the items left in your e-commerce cart or alert you about the arrival of a much-awaited product. In this sense, they enrich the overall user experience by providing optimized and personalized notifications.
Think of it this way: iOS push notifications are like friendly gatekeepers, providing helpful updates right at the doorsteps of your device. And what’s more, their roles are becoming increasingly diverse and exciting with passing time. So, by using a powerful tool like PushEngage, both businesses and users can derive significant benefits from these sophisticated alert systems.
How to Add iOS Push Alerts to Your App
There are fundamentally two types of iOS push alert campaigns:
- An iOS web push alert
- An iOS app push alert
Based on your business, you might be able to send both web and app push notifications. And we highly recommend sending both types of push alerts. But before you create an iOS push alert, you need to select a push notification service. A push notification service is a software that allows you to create push campaigns without any coding.
We recommend using PushEngage.

PushEngage is the #1 push notifications plugin in the world.
Push notifications help you grow your website traffic and engagement on autopilot. And if you’re running an online store, PushEngage also helps you grow your sales by helping you create automated eCommerce push notifications.
You can get started for free, but if you’re serious about growing your business, you should buy a paid plan. Also, before buying any push notification service, you should check out this guide to push notification costs.
Here’s a quick glance at what you get with PushEngage:
- High-converting automated campaigns
- Multiple targeting and campaign scheduling options
- Goal tracking and advanced analytics
- Intelligent A/B testing
- Proven push notification templates to help you get more traffic and conversions
- A Dedicated Success Manager
You’ll see that PushEngage is hands down the best bet if you want to build traffic, engagement, and sales for your business. And if you’re on a budget, you can always get a little bit creative with your push notifications.
How to Create a Free PushEngage Account
Head over to PushEngage and click on Get Started for Free Now:
You can get started with the free plan. But if you’re looking for the most powerful browser notifications, you should select a paid plan based on your business needs. Once you know which plan you want, click on Get Started to create your PushEngage account.
Sign Up for PushEngage
Now, it’s time to create your PushEngage account. Start by signing up with an email address or a Gmail ID:

Then, fill out your account details:

And add your credit card information to buy your plan:

If you selected the free account, then your credit card will never be charged any money until you choose to upgrade your plan. And now, you’re all set to get access to your PushEngage dashboard. Just click on Complete Registration and Get Instant Access.
If you’ve used OneSignal or PushAlert before, you’ll see that PushEngage gives you a much cleaner experience from the dashboard. The OneSignal dashboard isn’t meant for advanced campaigns. For that, you’ll need the API more than the OneSignal plugin.
How to Add Web App iOS Push Alert Campaigns to Your Website
Let’s start by setting up iOS push alerts from your website. The idea behind this is simple. We turn your website into a simple web app that can send iOS and iPadOS push notifications. This approach is ideal for sending web app push notifications.
Step #1: Add a Web App Manifest to Your Website to Send Web Push Notifications
Think of a web app manifest as a special file that acts like a guidebook for your website when it’s installed on someone’s phone or computer. It’s written in a language called JSON, but you don’t have to worry about that part.
The manifest file contains important information about your Progressive Web App (PWA), like its name, description, icons, and colors. So, when someone adds your website to their home screen or installs it on their device, the browser uses this manifest to know how your app should look and behave. This allows you to send PWA push notifications.
For example, the manifest tells the browser what icon to use for your app on the home screen or app drawer, so it looks nice and recognizable. It also specifies the colors and theme of your app to give it a consistent and appealing appearance.
Additionally, the manifest includes the URL that should be opened when someone launches your app. This way, the browser knows which page or section of your website to show them first.
Creating a manifest file can be done quickly with online tools that do the hard work for you. We recommend using this free app manifest generator to build your web app manifest in a few clicks and zero coding.
Once you have the manifest ready, you usually name it “manifest.json” and upload it to the root folder of your website.
In a nutshell, the web app manifest is like a manual that makes your web app look and feel just right when people use it on their devices. It’s an essential part of creating a great user experience for your website visitors.
A typical manifest looks something like this:
{
	"name": "PushEngage",
	"short_name": "PushEngage",
	"start_url": "/",
	"display": "standalone",
	"theme_color": "#3b43ff",
	"background_color": "#ffffff",
	"icons": [
		{
			"src": "icon/icon-128x128.png",
				"sizes": "128x128",
				"type": "image/png"
		},
		{
			"src": "img/icon-192x192.png",
			"sizes": "192x192",
			"type": "image/png"
		},
		{
			"src": "img/icon-512x512.png",
			"sizes": "512x512",
			"type": "image/png"
		}
 	]
}
Once you add your manifest file to the root folder of your website server, you need to add a code snippet in the HTML head of your website. The snippet would look something like this:
<link rel="manifest" href="/manifest.json">If you’re using WordPress and need help adding this code snippet to your site’s header, you can use WPCode to upload the manifest file. It’s one of the best code snippet plugins for WordPress.
Step #2: Install PushEngage to Your WordPress Site
You’re done creating your account. So, head over to the PushEngage dashboard and follow along.
NOTE: If you’re not running a WordPress site, you should check out our other installation guides.

Click on Site Settings » Site Details and click the Click Here For Setup Instruction button:

Click on the WordPress tab and click on the Install PushEngage WordPress Plugin button to install the plugin on your website.

Here’s the cool part: When you created your PushEngage account, you already synced your website with your PushEngage account. So, click on the installation link in the PushEngage dashboard to automatically install the PushEngage WordPress plugin to your website.
Step #3: Connect Your WordPress Website with PushEngage
When you’re done installing and activating the PushEngage WordPress plugin, you’ll see the PushEngage onboarding wizard:

The wizard is fairly straightforward. If you’re a new user, click on New? Claim Your Free Account. And if you’ve already signed up, click on Connect Your Existing Account.
Next, you can select your site from the Select a Site dropdown under Connect a registered site if you’ve already registered a site during signup:

Or, you can click Register a new site to add a new site if you have a Premium pricing plan or higher. In the next step, the onboarding wizard will prompt you to install other must-have WordPress plugins.

If you followed each step correctly, you’ll see this success message from the wizard:

You are now ready to create campaigns and push notification popup modals.
Step #4: Test Your Website Manifest
Alright, let’s walk through the steps to test your web app and make sure everything is working smoothly.
First, open your website using the Safari browser on your iPhone or iPad. Make sure your device is running iOS 16.4 or a newer version. Once your website is loaded, you’ll see a Share button. It looks like a square with an arrow pointing up. Tap on that button to open the sharing menu.
In the sharing menu, you should find an option called Add to Home Screen. Click on that option.
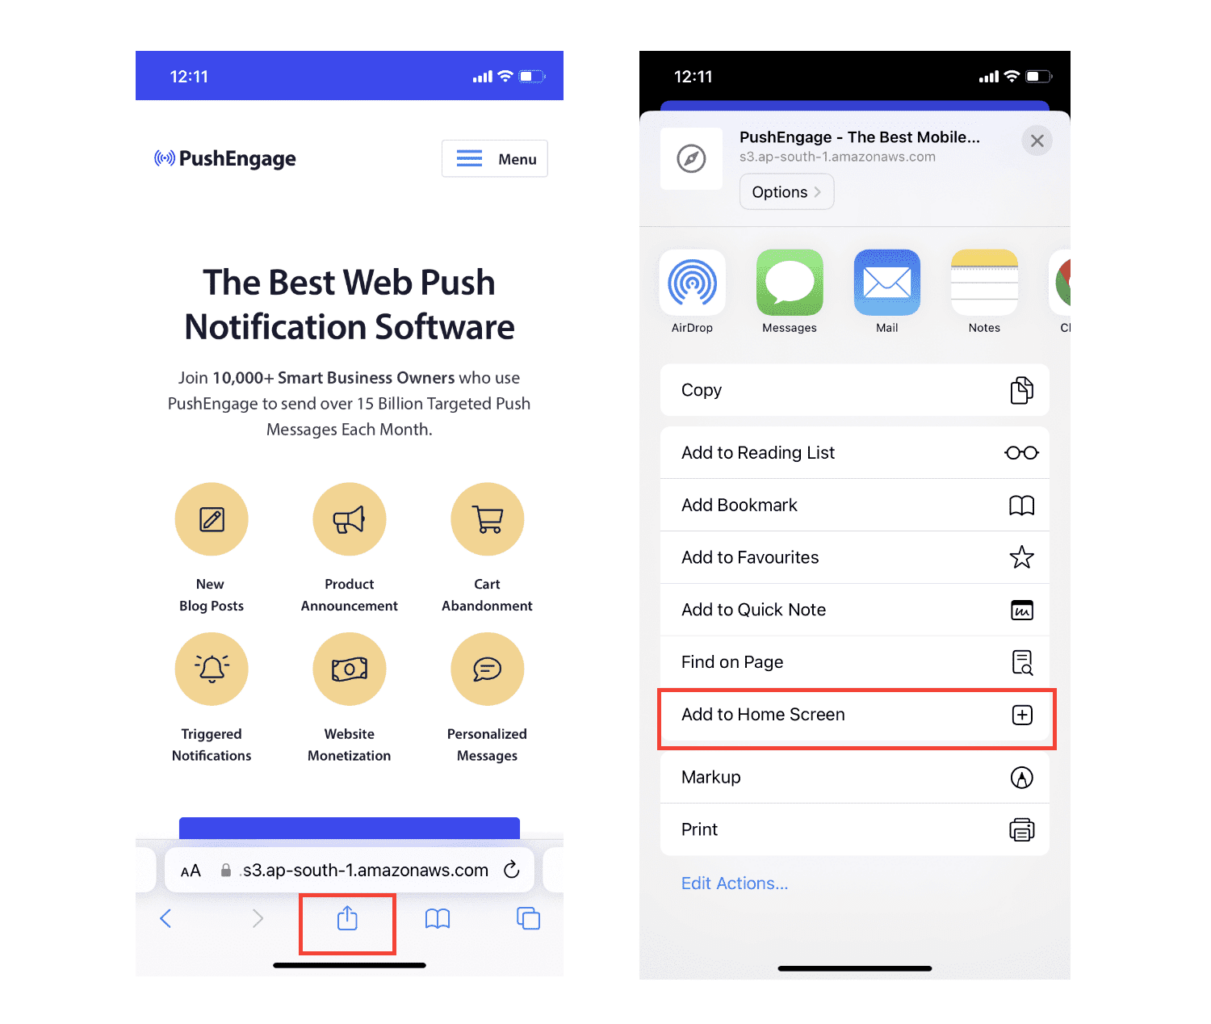
Now, the web app will be saved to your device’s Home Screen, just like any other app you download from the App Store.
If everything has been set up correctly, when you open the app from your Home Screen, it won’t open in the Safari browser anymore. Instead, it will feel like using a regular app on your iPhone or iPad.
To let your users know that they can get web push notifications from your app, you can show them a banner on the screen. This banner will prompt them to add your app to their Home Screen and subscribe to the web push notifications. It’s a handy way to keep your users engaged with your app and receive important updates.
So, follow these steps, and you’ll be all set to provide a smooth and app-like experience to your users on iOS devices! For a full walkthrough on testing your push notifications, check out our documentation on iOS web push notifications.
How to Add Mobile App iOS Push Alert Campaigns to Your App
The easiest way to send mobile iOS mobile app push alerts from your native iOS app is to use the PushEngage iOS SDK. Right till now, you had to use skeleton SDKs to send app push notifications. The problem with using those SDKs is that they are pretty bare bones.
Theoretically, you can send any type of mobile app push campaigns with them. But then, you also have to build:
- An interface to manage your campaigns
- An analytics suite to track your campaign performance
- Better support for rich media and in-app redirection links (or deep links)
- Processes to liaise both marketing and development teams
All for the sake of introducing a single channel of growth. Using the old tools to send mobile app push notifications is tedious, expensive, resource-intensive, and time consuming. And of course, it requires deep coding skills in your team to develop and manage everything you build.
With the PushEngage Android and iOS SDKs, you can send mobile app push using the same reliable software for great delivery rates. But we’ve built several layers on top that make it super easy to build custom integrations with your app. And PushEngage manages the entire SDK. So, you don’t even have to spend a ton of time and money to manage your integrations.
All you have to do is build!
You can send broadcast notifications directly from your PushEngage dashboard once you’ve set up your app to send mobile app push notifications using PushEngage’s SDK. Yes, you still have to add code to your app and develop the connectors between your app and the PushEngage API. But once that’s done, you can easily create mobile app push campaigns from a pre-built software interface that also comes with:
- Highly engaging push campaign types
- Proven campaign templates with high conversion rates
- Automated campaigns to promote your content whenever you publish
- Multiple targeting and campaign scheduling options
- Web push campaigns as a complementary growth channel
- Increased audience retention using data-based personalization
- Goal tracking and advanced analytics
- Smart A/B testing
- A Dedicated Success Manager
And so much more. PushEngage takes the pain out of developing Android and iOS mobile push campaigns for your app.
We created a detailed step-by-step guide to setting up iOS app push notifications for PushEngage. Go check that out to start sending iOS app push alerts right away.
How to Personalize Your Campaigns
Before you create a campaign, you should set up segments and audience groups to send personalized push messages.
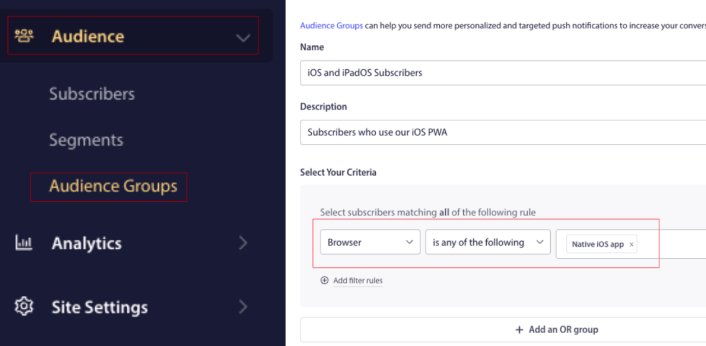
Nothing beats the level of personalization you can get by creating segments and audience groups for your push notification subscribers. Go to PushEngage » Audience and start creating segments and audience groups right away.
Under the Segments tab, you can create new segments or edit existing ones:

And if you need even deeper personalization, create an audience group in the Audience Groups tab:

If you’re new to push notification segments and personalized push notifications, you should check out our article on how to create segments and our announcement on advanced audience grouping.
The coolest bit is that you can create targeted push campaigns by creating an Audience Group for just your iOS and iPadOS users:
And you can use this Audience Group for your drip campaigns and broadcasts.
How to Create a Push Notification Drip Campaign
Go to PushEngage dashboard and head over to Campaign » Drip Autoresponders and click on Create New Drip Autoresponder:

Then, name your campaign (we suggest something like Welcome Drip), and under Content, select the option that says, “Send notification immediately after user subscribes“):

At this point, you can click on the arrow next to the notification to edit the content of your notification.
If you have a Premium or Enterprise plan with PushEngage, you’ll be able to add more than one notification to create a sequence of automated welcome messages. Just click on Add New Notification and edit the content.
Once you’re done, click on Drip Settings and select the option to send your welcome campaign to all subscribers:

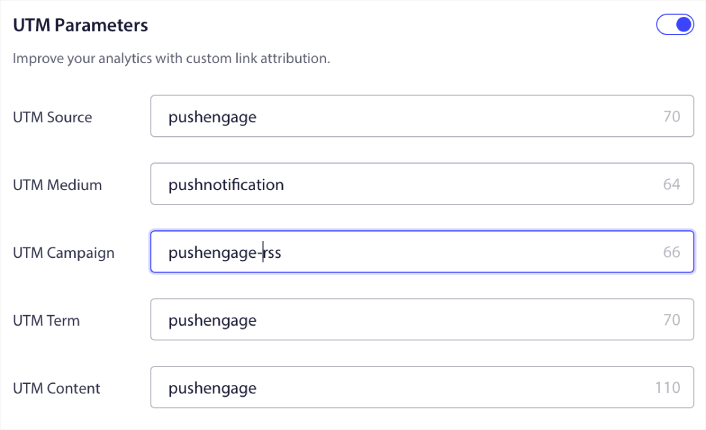
Then, scroll down to set your own UTM parameters to track the push notifications:
And when you’re done, scroll back up and click the Activate Autoresponder button:

And you’re done!
How to Send a iOS Web Push Broadcast
Head over to your PushEngage dashboard and go to Campaign » Push Broadcasts and click on the Create a New Push Broadcast button:

Under the Content tab, add your push notification content:

And you can set up an A/B test to increase your click rates or you can schedule your push broadcasts to get more views. In either case, you should check out our push notification best practices for the best results.
How to Create a iOS Push Notification Popup Modal
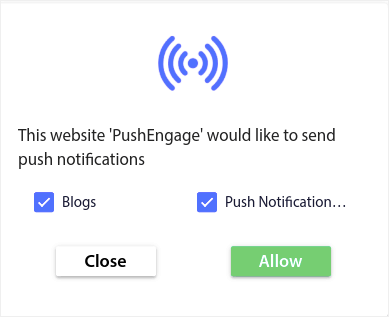
A push notification popup modal is a small window that appears on top of a website or mobile app interface to display a message or notification to the website visitor.
The popup modal can be triggered by various events. You can set up popups to get triggered on page visit, on scroll depth, and even on custom actions such as button click.
Usually, you’ll see a call to action on the popup modal such as “Subscribe” or “Allow” to get consent from visitors to send them push notifications. If you follow this tutorial, you can create a popup like this one:
You can create popup modals that can segment subscribers directly or create regular popups that simply collect subscribers with the default attributes such as geolocation and browser.
Head back to your WordPress dashboard. Go to PushEngage » Design:
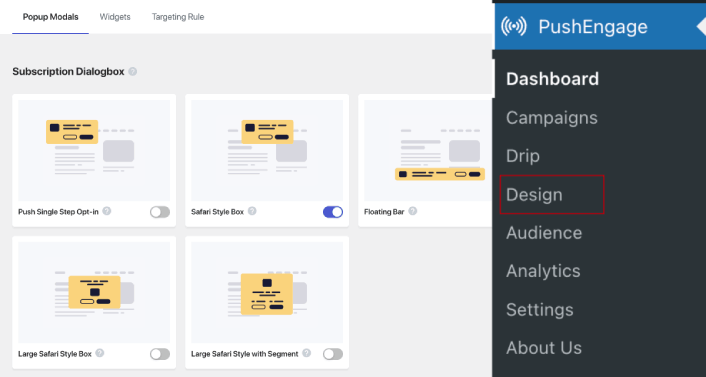
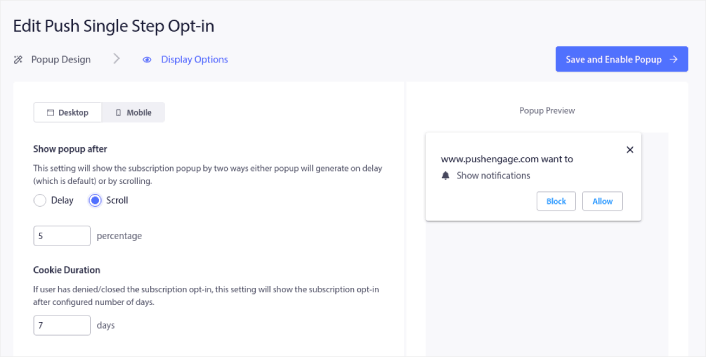
And you can set up as many popup modals as you please. Of course, you can make sure that they get triggered at different times under Display Options for each popup modal.
The idea here is to give your visitors a solid reason to subscribe. If you need some help with that check out our article on how to create a custom push notification opt-in.
And if you want to create more targeted popup modals, you can use the targeting rules under the Targeting Rule tab:
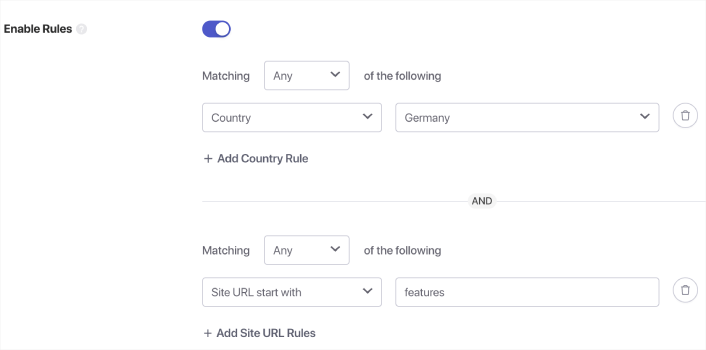
These are global targeting rules and will get preference over targeting rules for individual popup modals. But if you wish, you can create robust targeting rules for each modal by editing them.
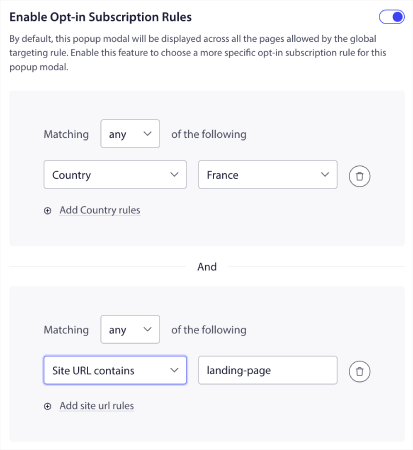
For instance, you can create popup modals in different languages to target visitors from different countries.
And if you’d like some templates with a high click-through rate to get started, you should check out this article on high-converting push notification opt-ins.
What to Do Before You Send iOS Push Alerts
You’re almost done.
Before you start sending web push notifications for iOS and iPadOS, you’ll need to set up a subscription opt-in for your website. Your opt-in will convert web visitors into push notification subscribers. So, this is a critical element.
If you need some inspiration, you can check out this article on high-converting push notification opt-ins. Once you’re done setting up the opt-in, your site can collect subscribers. But how do you even know that your opt-in is working properly?
So, the sensible thing to do is set up a welcome push notification.
Pro-Tip: You should spend some time on a full-scale test of your push notifications. This will troubleshoot the most common problems and you won’t waste your time trying to resolve issues later on.
What to Do After You Send iOS Push Alerts
That’s all for this one, folks!
If you found this article helpful, be sure to drop a comment below.
Getting started with push notifications can seem intimidating. But if you keep an eye on goal tracking and analytics, you should be fine. More importantly, you’ll make a lot more profit with the help of push notification campaigns. Here are a few cool resources to get you started:
- How to Use Retargeting Push Notifications to 2x Your Revenue
- How to Sort Your Push Notifications and Find Winning Campaigns
- How to Clean Up Push Notifications Subscriber Lists (Easy)
- How to Automatically Send RSS Push Notifications
- How to Use Push Notifications to Promote a News Site
- How to Use Cross Selling Push Notifications to 2x Your Sales
- How to Use Browse Abandonment Push Notifications (4 Steps)
If you’re new to push notifications, you should try out PushEngage. PushEngage is the #1 push notification software in the market. And your campaigns will be in safe hands.
So, if you haven’t already, get started with PushEngage today!


