Notice: There is no legacy documentation available for this item, so you are seeing the current documentation.
You can now implement push notifications for your iOS application using our iOS App SDK. You would need the help of your developer as it would be a one-time integration before you can send them push notifications using the PushEngage dashboard.
Before You Start
- You would need Xcode installed on your system.
- A valid developer account and App ID are configured on the Apple Developer Portal.
We will follow these steps to enable push notifications for your iOS Application.
- Configuring Your App
- Integrating PushEngage iOS SDK
- Initializing PushEngage iOS SDK
- Creating Notification Service Extension
- Initializing PushEngage SDK for Notification Service Extension
- Creating Notification Content Extension
- Initializing PushEngage SDK for Notification Content Extension
- Add App Groups
- Deep Linking
- Handling Notifications in the Foreground
- Troubleshooting
Configuring Your App
Enable remote Notifications
1. Open your Xcode project and select the root project in the Project Navigator. Choose your main app target.
2. Navigate to Signing & Capabilities. Ensure that the Background Modes capability is added. If not, add it by clicking the “+ Capability” button.
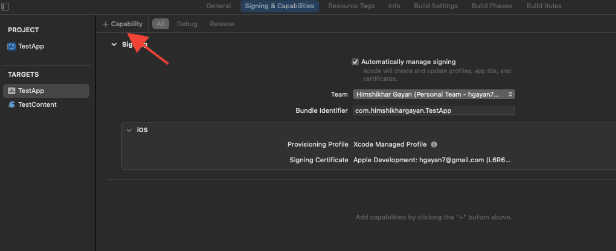
3. Similarly, ensure that the Push Notifications capability is added. If not, add it using the “+ Capability” button.

If the Push Notifications capability is not visible in Xcode. You need to follow below steps :
1. Go to your Apple Developer account.
2. Navigate to Certificates, Identifiers & Profiles.
3. Select your App identifier. Edit the configuration of your App ID and ensure that Push Notifications is enabled.
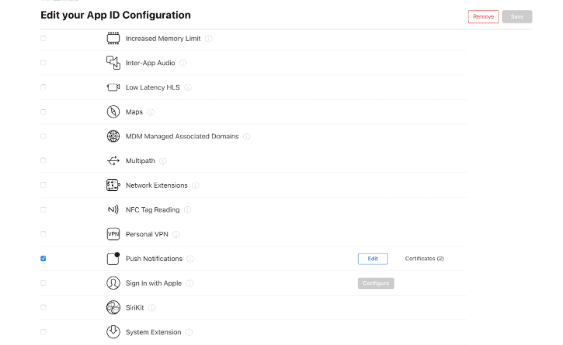
4. Return to Xcode and attempt to add the “Push Notifications” capability again.
Enable Background Modes
1. In your Xcode project, navigate to Signing & Capabilities.
2. Inside Background Modes, enable both Remote notifications and Background Fetch.
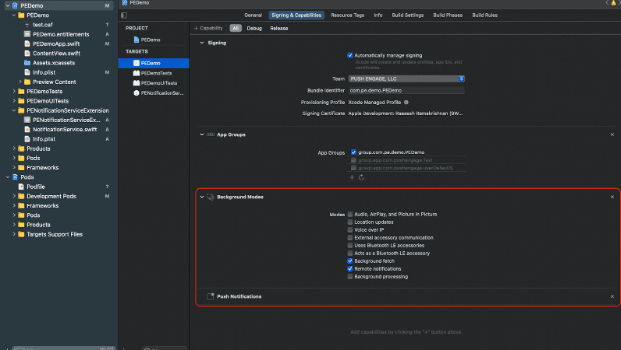
This step ensures your app can efficiently handle remote notifications and background fetches.
Here is the guide to creating your APNs certificate.
Integrating PushEngage iOS SDK
The PushEngage iOS SDK is available as a Swift package and a CocoaPods pod. We request you to go through both methods but only use one of them while completing your setup.
Integrating PushEngage iOS SDK with SPM
To integrate PushEngage iOS SDK using Swift Package Manager, follow these steps:
- Open XCode and navigate to your project. Select the package dependencies tab. Click on the + button.
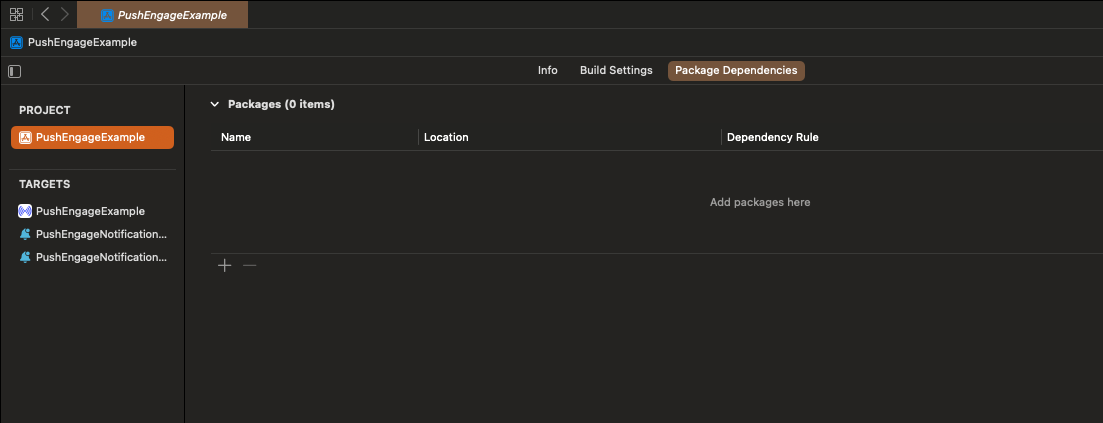
- Paste the URL
https://github.com/awesomemotive/pushengage-ios-sdkin the search bar. Click on “Add Package”.
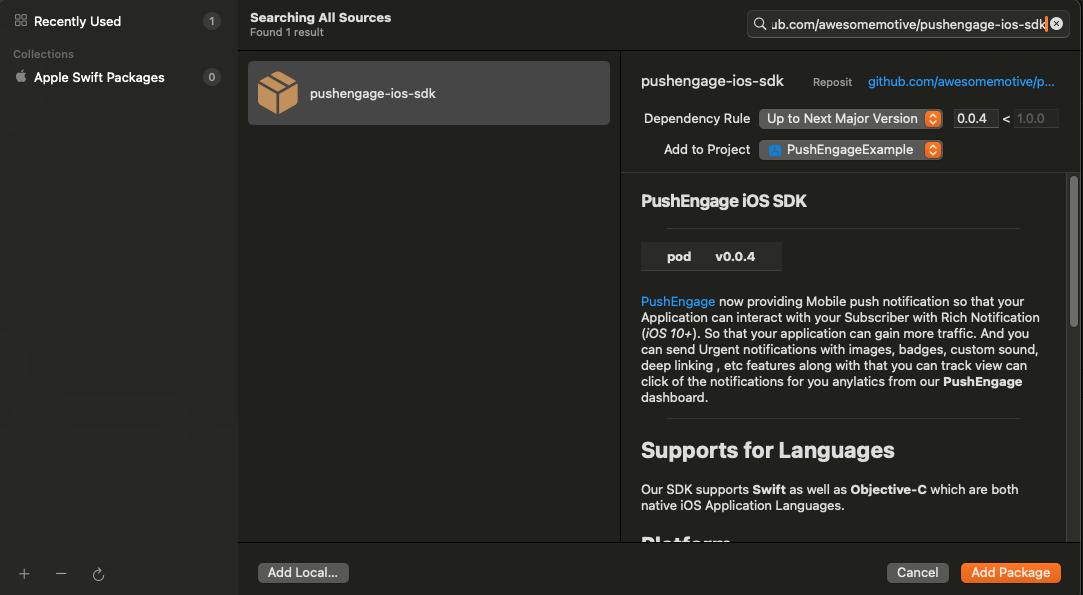
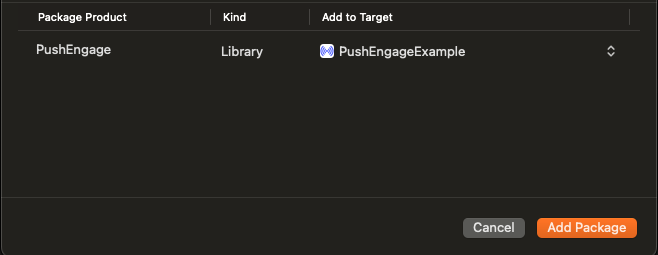
- Select your main app target under “Add to Target” and click “Add Package”.
Integrating PushEngage iOS SDK with CocoaPods
To integrate PushEngage iOS SDK using CocoaPods, you need to follow these steps :
If CocoaPods is not installed, close your current Xcode project and run the following command in your project’s root directory
sudo gem install cocoapods
Run the following command to initialize a Podfile in your project
pod initOpen the newly created Podfile using a text editor or by following the command in your terminal in the root project directory.
open PodfileAdd the PushEngage dependency under your project’s target. Ensure that your Podfile looks similar to the example below
# Uncomment the next line to define a global platform for your project
# platform :ios, '9.0'

target 'YourProjectName' do
  # Add PushEngage SDK dependency
  pod 'PushEngage'
  post_install do |installer|
    installer.pods_project.targets.each do |target|
      target.build_configurations.each do |config|
        config.build_settings['APPLICATION_EXTENSION_API_ONLY'] = 'NO'
      end
    end
  end
end
Save the Podfile and run the following commands in the terminal.
pod repo update
pod install
Open the newly created <project-name>.xcworkspace file in Xcode.
Initializing PushEngage iOS SDK
Once you have integrated the SDK, we will have to initialize the iOS SDK in your AppDelegate.
Using Swift language, here is how you can do it
import PushEngage
class AppDelegate: UIResponder, UIApplicationDelegate {
    var window: UIWindow?
    override init() {
        super.init()
        PushEngage.swizzleInjection(isEnabled: true)
    }

    func application(_ application: UIApplication, didFinishLaunchingWithOptions launchOptions: [UIApplication.LaunchOptionsKey: Any]?) -> Bool {
       // Set your PushEngage App ID (replace       "APP_ID_FROM_PUSH_ENGAGE_DASHBOARD" with your actual App ID)
        PushEngage.setAppId(key: "APP_ID_FROM_PUSH_ENGAGE_DASHBOARD")
        // Start PushEngage initial info
        PushEngage.setInitialInfo(for: application, with: launchOptions)
        // Enable logs for debugging (optional)
        PushEngage.enableLogs = true
        return true
    }
}
Using Objective-C language, here is how you can do it
#import "AppDelegate.h"
@import PushEngage;
@implementation AppDelegate

- (instancetype)init {
    self = [super init];
    if (self) {
       [PushEngage swizzleInjectionWithIsEnabled:YES];
    }
    return self;
}

- (BOOL)application:(UIApplication *)application didFinishLaunchingWithOptions:(NSDictionary *)launchOptions {
// Set your PushEngage App ID (replace "APP_ID_FROM_PUSH_ENGAGE_DASHBOARD" with your actual App ID)
    [PushEngage setAppIdWithKey:@"APP_ID_FROM_PUSH_ENGAGE_DASHBOARD"];
    // Set initial info
    [PushEngage setInitialInfoFor:application with:launchOptions];
    // Enable logs for debugging (optional)
    [PushEngage setEnableLogs:YES];
    return YES;
}

@end
Sometimes, when using SwiftUI, the AppDelegate might not be available by default. In such cases, you can initialize the PushEngage SDK in your main App File. Here is an example in SwiftUI
import SwiftUI
import PushEngage

@main
struct PEDemoApp: App {
    @UIApplicationDelegateAdaptor(AppDelegate.self) var appDelegate
    var body: some Scene {
        WindowGroup {
            ContentView()
        }
    }
}

class AppDelegate: NSObject, UIApplicationDelegate {

    override init() {
        super.init()
        PushEngage.swizzleInjection(isEnabled: true)
    }

    func application(_ application: UIApplication, didFinishLaunchingWithOptions launchOptions: [UIApplication.LaunchOptionsKey : Any]? = nil) -> Bool {
        PushEngage.setAppId(key: "APP_ID_FROM_PUSH_ENGAGE_DASHBOARD")
        PushEngage.setIntialInfo(for: application,
                                             with: launchOptions)

        PushEngage.enableLogs = true
        return true
    }
}
Note : While developing your application, you might find it useful to enable logs from the PushEngage SDK for debugging purposes. However, it’s essential to disable logs in the production build to avoid exposing sensitive information.
Creating Notification Service Extension
The Notification Service Extension enhances your iOS app’s capability to receive notifications. This is used to modify the notification’s content or fetch/process any data on receiving the notification. You can follow the below steps to create a Notification Service Extension:
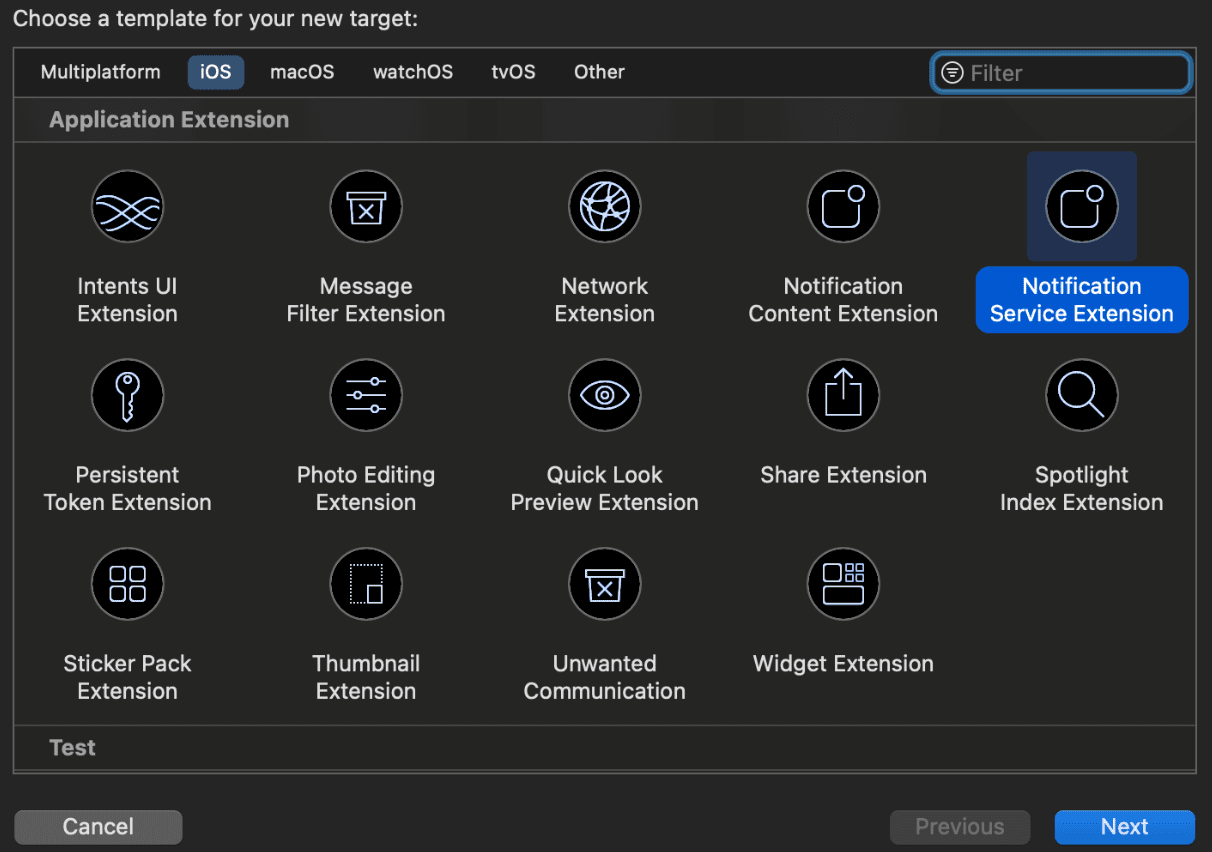
1. Open Xcode and navigate to your project. Choose File » New » Target from the menu.
2. In the template selection window, choose Notification Service Extension and click Next.
3. Provide a name for your extension, for example, PushEngageNotificationServiceExtension, and click Finish.
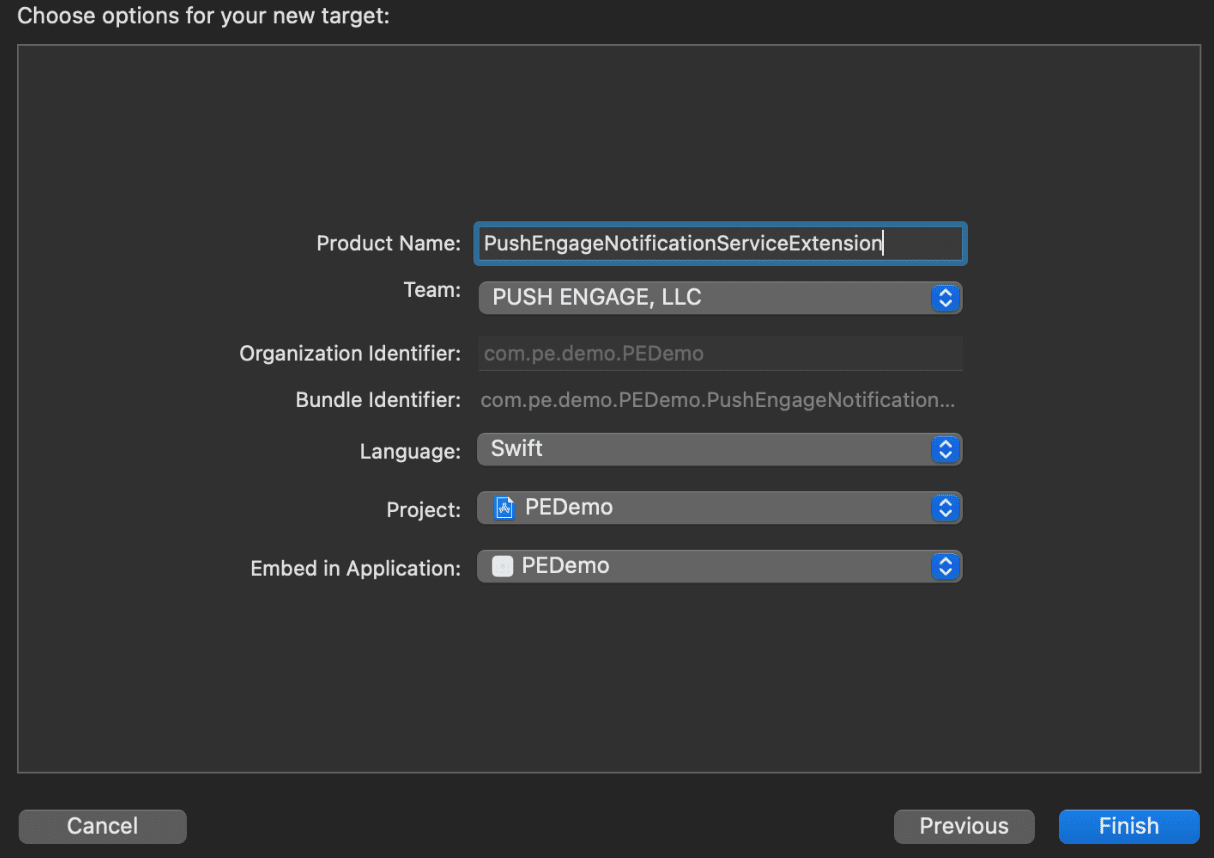
4. When you finish creating the Notification Service Extension, you might be prompted to activate it. Do not activate it immediately.
Activating the extension would shift Xcode’s debugging focus from your app to the extension. If you activate it by accident, don’t worry; you can switch back to debugging your app within Xcode.
Initializing PushEngage SDK for Notification Service Extension
To ensure the proper functioning of PushEngage SDK in your iOS Notification Service Extension, you need follow these steps:
1. Open the Podfile associated with your project.
2. Then you need to add Dependency. Insert the following code snippet into your Podfile:
target 'Your_Main_Application_Target' do
      pod 'PushEngage'
      post_install do |installer|
          installer.pods_project.targets.each do |target|
            target.build_configurations.each do |config|
              config.build_settings['APPLICATION_EXTENSION_API_ONLY'] = 'NO'
          end
        end
      end

      target 'Your_Notification_Service_Extension_Target' do
              pod 'PushEngage'
      end
end
3. Run the following commands in your terminal within your root project directory:
pod repo update
pod install
4. In your Notification Service Extension target, import the PushEngage framework and add the necessary initialization code. Here’s how you can do it.
Using Swift
import UserNotifications
import PushEngage

@available(iOSApplicationExtension 10.0, *)
class PushEngageNotificationServiceExtension: UNNotificationServiceExtension {

    var contentHandler: ((UNNotificationContent) -> Void)?
    var bestAttemptContent: UNMutableNotificationContent?
    var request : UNNotificationRequest?

    override func didReceive(_ request: UNNotificationRequest, withContentHandler contentHandler: @escaping (UNNotificationContent) -> Void) {
        self.request = request
        self.contentHandler = contentHandler
        self.bestAttemptContent = (request.content.mutableCopy() as? UNMutableNotificationContent)

        if let bestContent = bestAttemptContent {
            PushEngage.didReceiveNotificationExtensionRequest(request, bestContentHandler: bestContent)
            contentHandler(bestContent)
        }
    }

    override func serviceExtensionTimeWillExpire() {
        // Called just before the extension will be terminated by the system.
        // Use this as an opportunity to deliver your "best attempt" at modified content, otherwise the original push payload will be used.
        if let contentHandler = contentHandler, let request = request ,let bestAttemptContent =  bestAttemptContent {
            guard let content = PushEngage.serviceExtensionTimeWillExpire(request, content: bestAttemptContent) else {
                contentHandler(bestAttemptContent)
                return
            }
            contentHandler(content)
        }
    }

}
Using Objective-C
#import "NotificationService.h"
@import PushEngage;

@interface NotificationService ()

@property (nonatomic, strong) void (^contentHandler)(UNNotificationContent *contentToDeliver);
@property (nonatomic, strong) UNMutableNotificationContent *bestAttemptContent;
@property (nonatomic, strong) UNNotificationRequest *request;

@end

@implementation NotificationService

- (void)didReceiveNotificationRequest:(UNNotificationRequest *)request withContentHandler:(void (^)(UNNotificationContent * _Nonnull))contentHandler {
    self.request = request;
    self.contentHandler = contentHandler;
    self.bestAttemptContent = [request.content mutableCopy];

    if (self.bestAttemptContent) {
        [PushEngage didReceiveNotificationExtensionRequest:request bestContentHandler:self.bestAttemptContent];
        contentHandler(self.bestAttemptContent);
    }
}

- (void)serviceExtensionTimeWillExpire {

    if (self.contentHandler && self.request && self.bestAttemptContent) {
        UNNotificationContent *content = [PushEngage serviceExtensionTimeWillExpire:self.request content:self.bestAttemptContent];
        if (content) {
            self.contentHandler(self.bestAttemptContent);
            return;
        }
    }
    self.contentHandler(self.bestAttemptContent);
}

@end
Creating Notification Content Extension
To improve the way by adding custom UI, you’ll need to create a Notification Content Extension. Follow the steps below to set up the extension:
1. In Xcode, go to File » New » Target.
2. Select Notification Content Extension and click Next.
3. Do not select “Activate” on the dialog that appears after clicking Finish. Canceling keeps Xcode debugging your app instead of the extension. If you accidentally activate it, switch back to debugging your app within Xcode (next to the run button).
4. In the project navigator, select the top-level project directory and select the NotificationContentExtension target in the project from the targets list created in step no. 2.
5. Set the Deployment Target to iOS 10 or above, which is the version of iOS that Apple released the support for this extension.
Initializing PushEngage SDK for Notification Content Extension
To ensure the proper functioning of PushEngage SDK in your iOS Notification Content Extension, you need to follow these steps:
1. Open the Podfile associated with your project.
2. Add Dependency, insert the following code snippet into your Podfile:
target 'Your_Main_Application_Target' do
  pod 'PushEngage'
  target 'Your_Notification_Content_Extension' do
    pod 'PushEngage'
  end
end
3. Run the following commands in your terminal within your root project directory:
pod repo update

pod install
4. In your Notification Content Extension target, import the PushEngage framework and add the necessary initialization code. Here’s how you can do it with some examples of UI elements:
Using Swift
import UIKit
import UserNotifications
import UserNotificationsUI
import PushEngage

@available(iOSApplicationExtension 10.0, *)
class NotificationViewController: UIViewController, UNNotificationContentExtension {

    fileprivate var hostingView: UIHostingController<ContentView>?

    override func viewDidLoad() {
        super.viewDidLoad()
        self.view.backgroundColor = .white
    }

    func didReceive(_ notification: UNNotification) {
        if(notification.request.content.categoryIdentifier == "your_identifier"){
            let payLoad = PushEngage.getCustomUIPayLoad(for: notification.request)
  //pass the payload to your custom View
            let view = CustomView(payLoadInfo: payLoad)
            hostingView = UIHostingController(rootView: view)
If let customView = self.hostingView {
            addChild(hostingView!)
}
        }
    }

}
Objective-C:
#import "NotificationViewController.h"
#import <UserNotifications/UserNotifications.h>
#import <UserNotificationsUI/UserNotificationsUI.h>

@import PushEngage;
@import UIKit;

@interface NotificationViewController () <UNNotificationContentExtension>

@property IBOutlet UILabel *label;
@property (weak, nonatomic) IBOutlet UIImageView *imageView;
@property (weak, nonatomic) IBOutlet UIButton *firstButton;
@property (weak, nonatomic) IBOutlet UIButton *secondButton;

@end

@implementation NotificationViewController

- (IBAction)firstbuttonAction:(id)sender {
    // do what action you want to perform.
}

- (void)viewDidLoad {
    [super viewDidLoad];
    // Do any required interface initialization here.
}

- (void)didReceiveNotification:(UNNotification *)notification {

    NotificationViewController * __block blockSelf = self;
    CustomUIModel *object = [PushEngage getCustomUIPayLoadFor:notification.request];
    dispatch_async(dispatch_get_main_queue(), ^{
        blockSelf.label.text = object.title;
        blockSelf.imageView.image = object.image;
        [blockSelf.firstButton setTitle:object.buttons.firstObject.text forState:UIControlStateNormal];
        [blockSelf.secondButton setTitle:object.buttons.lastObject.text forState:UIControlStateNormal];
        blockSelf = NULL;
    });
}

@end
Add App Groups
App Groups are essential for communication between the main app, notification service extension, and content extension. You can follow these steps to add App Groups to your iOS project :
If you have an existing app group and want to use that only, skip to step no. 5.
1. In your Xcode project, in the project navigator, select the top-level project directory and select the main target of the app.
2. Navigate to the Signing & Capabilities tab.
3. Click the “+ Capability” button and select App Groups from the list.
4. Click on the + button to add an App Group. Add a unique name to your App Group and click on OK.

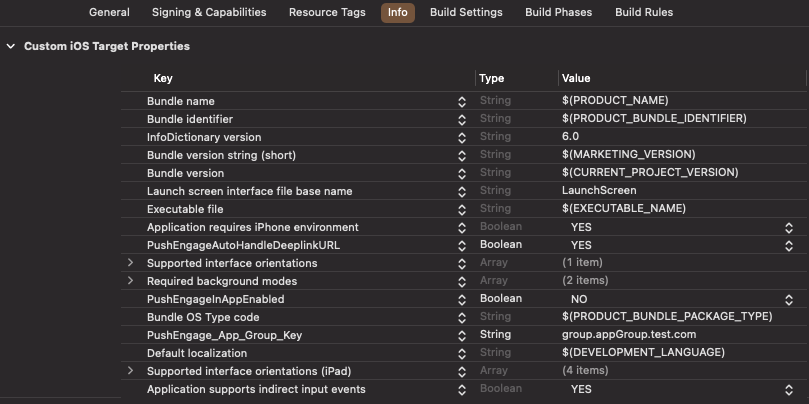
5. In the main editor area, select the main target of your app and create an app group. Please provide the name of the group in your application Info.plist with the key PushEngage_App_Group_Key.
6. Add the same key and value in the Notification Service Extension’s Info.plist file.
7. Select the same app group in the Main Application Target and the YourNotificationServiceExtension.
Do ensure that you are choosing your notification service extension in the above step.
Deep Linking
Deep linking enables your subscribers to navigate directly to a specific screen within the application or a designated webpage when interacting with push notifications. By default, if you provide a valid URL, the subscriber will be redirected to that webpage.
Handling Web URLs:
- Provide the
PushEngageInAppEnabledto YES in Info.plist, then the URL will load within the application using WKWebview. - Provide the
PushEngageInAppEnabledto NO in Info.plist, if you want your subscriber to redirect to safari to load the URL. - Provide the
PushEngageAutoHandleDeeplinkURLto YES in Info.plist, then the SDK will handle the deep link according toPushEngageInAppEnabledconfiguration. - Provide the
PushEngageAutoHandleDeeplinkURLto NO in Info.plist, then the control of handling the deep link will be given to the client app from the SDK. - If the deeplink is not a valid URL, you need to configure navigation by using
setNotificationOpenHandlerin theAppDelegatewithin thedidFinishLaunchingWithOptionsmethod. This allows you to navigate to a specific screen based on the provided string, as shown below. If not configured, the SDK will simply open the application.
Using Swift:
class AppDelegate: UIResponder, UIApplicationDelegate {

    var window: UIWindow?


    override init() {
        super.init()
        // method Swizzling enabled for the application.
        PushEngage.swizzleInjection(isEnabled: true)
    }

   func application(_ application: UIApplication, didFinishLaunchingWithOptions launchOptions: [UIApplication.LaunchOptionsKey: Any]?) -> Bool {

     PushEngage.setAppId(key: "APP_ID_FROM_PUSH_ENGAGE_DASHBOARD")
     PushEngage.setInitialInfo(for: application,with: launchOptions)


     // Notification open handler.
     // deep linking screen
     // here ShoesScreen and pepay are example deep link texts
     PushEngage.setNotificationOpenHandler { (result) in
            //replace this block with your own handling
            let additionData = result.notification.additionalData
            if result.notificationAction.actionID == "ShoesScreen" {
                print(additionData ?? [])
                let storyBoard = UIStoryboard(name: "Main", bundle: .main)
                let viewController = storyBoard.instantiateViewController(withIdentifier: "SportViewController")
                let navcontroller = application.windows.first?.rootViewController as? UINavigationController
                navcontroller?.popToRootViewController(animated: true)
                navcontroller?.pushViewController(viewController, animated: true)
            } else if result.notificationAction.actionID == "SalesScreen" {
                let storyBoard = UIStoryboard(name: "Main", bundle: .main)
                let viewController = storyBoard.instantiateViewController(withIdentifier: "NotificationApiTestViewconttoller")
                let navcontroller = application.windows.first?.rootViewController as? UINavigationController
                navcontroller?.popToRootViewController(animated: true)
                navcontroller?.pushViewController(viewController, animated: true)
            } else if result.notificationAction.actionID == "pepay" {
                let storyBoard = UIStoryboard(name: "Main", bundle: .main)
                let viewController = storyBoard.instantiateViewController(withIdentifier: "PEPay")
                let navcontroller = application.windows.first?.rootViewController as? UINavigationController
                navcontroller?.popToRootViewController(animated: true)
                navcontroller?.pushViewController(viewController, animated: true)
            }
        }

        PushEngage.enableLogs = true

        return true
    }
}
Using Objective-C :
@implementation AppDelegate


- (instancetype)init
{
    self = [super init];
    if (self) {
       [PushEngage swizzleInjectionWithIsEnabled: YES];
    }
    return self;
}

typedef void (^PEnotificationOpenHandler)(PENotificationOpenResult * nonnull);

- (BOOL)application:(UIApplication *)application didFinishLaunchingWithOptions:(NSDictionary *)launchOptions {
    UNUserNotificationCenter.currentNotificationCenter.delegate = self;
    PEnotificationOpenHandler actionHandler = ^void(PENotificationOpenResult *result) {
       //replace this block with your own handling
        if ([result.notificationAction.actionID isEqualToString: @"ShoesScreen"]) {
            AddToCart *controller = [AddToCart new];
            UINavigationController *navigationController = (UINavigationController *) application.windows.firstObject.rootViewController;
            [navigationController popToRootViewControllerAnimated:YES];
            [navigationController pushViewController:controller animated:YES];
        } else if ([result.notificationAction.actionID isEqualToString: @"SalesScreen"]) {
            SportsViewcontroller *controller = [SportsViewcontroller new];
            UINavigationController *navigationController = (UINavigationController *) application.windows.firstObject.rootViewController;
            [navigationController popToRootViewControllerAnimated:YES];
            [navigationController pushViewController:controller animated:YES];
        }
    };
    application.applicationIconBadgeNumber = 0;
    [PushEngage setAppIdWithKey:@"APP_ID_FROM_PUSH_ENGAGE_DASHBOARD"];
    [PushEngage setInitialInfoFor:application with:launchOptions];
    [PushEngage setNotificationOpenHandlerWithBlock:actionHandler];
    [PushEngage setEnableLogs:true];
    return YES;
}
@end
Handling Notifications in the Foreground
When notifications come in the foreground you have to make a decision whether or not to show the notification alert to the device.To handle notifications in foreground use the setNotificationWillShowInForgroundHandler
If the completion block is not called by you at all SDK will call the completion block after 29 seconds. In any case, silent or alert notification when the application is in foreground mode.
Using Swift
class AppDelegate: UIResponder, UIApplicationDelegate {

    var window: UIWindow?


    override init() {
        super.init()
        // method Swizzling enabled for the application.
       PushEngage.swizzleInjection(isEnabled: true)
    }

    func application(_ application: UIApplication, didFinishLaunchingWithOptions launchOptions: [UIApplication.LaunchOptionsKey: Any]?) -> Bool {

        PushEngage.setAppId(key: "APP_ID_FROM_PUSH_ENGAGE_DASHBOARD")
        PushEngage.setInitialInfo(for: application, with: launchOptions)

        // Notification handler when notification deliver's and app is in foreground.

        PushEngage.setNotificationWillShowInForgroundHandler { notification, completion in
            if notification.contentAvailable == 1 {
                // in case the developer failed to set the completion handler. After 29 sec the handler will call from the SDK after 29 sec.
                completion(nil)
            } else {
                completion(notification)
            }
        }

        PushEngage.enableLogs = true

        return true
    }
}
Using Objective-C
@implementation AppDelegate


- (instancetype)init
{
    self = [super init];
    if (self) {
       [PushEngage swizzleInjectionWithIsEnabled: YES];
    }
    return self;
}
// please create this handlers
typedef void (^ _Nonnull PENotificationDisplayHandler)(PENotification * _Nullable);

-(BOOL)application:(UIApplication*)application didFinishLaunchingWithOptions:(NSDictionary *)launchOptions {
    UNUserNotificationCenter.currentNotificationCenter.delegate = self;

    [PushEngage setNotificationWillShowInForgroundHandlerWithBlock:^(PENotification * _Nonnull notification, PENotificationDisplayHandler completion) {
        if (notification.contentAvailable == 1) {
            completion(nil);
        } else {
            completion(notification);
        }
    }];
    [PushEngage setAppIdWithKey:@"APP_ID_FROM_PUSH_ENGAGE_DASHBOARD"];
    [PushEngage setInitialInfoFor:application with:launchOptions];
    [PushEngage setEnableLogs:true];
    return YES;
}
@end
Troubleshooting
Problem:
You’re experiencing build issues related to sandboxing.
Solution:
- Open your project in Xcode.
- Navigate to Build Settings.
- Locate the User Script Sandboxing option.
- Set it to No.
Problem:
You’re using both the Firebase SDK and PushEngage SDK with method swizzling enabled for both, and it’s causing issues.
Solution:
Disable method swizzling for the PushEngage SDK and follow the manual steps for handling PushEngage methods. You can find detailed instructions at:
PushEngage iOS SDK Documentation
If you want to explore more of the capabilities of iOS SDK, you can go through our detailed API documentation.
If you run into any issues, please contact us by clicking here. Our support team will be able to help you.


