Push notifications are a great way to get more sales and engagement. But how do you make the most of them? A simple way to get better results is to schedule push notifications. If your notifications get seen at the right time by the right people, you can maximize your marketing impact.
The only problem is…
What kind of push notification scheduler should you use? There are so many options! What do these options even mean and which one should you use for your campaign?
This article answers all these questions in detail. And don’t worry! You can still get a lot out of this article:
- Even if… you’ve never used push notifications before and you have no idea how to schedule push notifications;
- Even if… you’ve only discovered a handful of scheduling options and you’re sure which one does what;
- Even if… you know what a push notification scheduler does but you’re not sure which type of schedule to use for your campaigns;
We’re going to show you how to schedule push notifications for iOS, Android, and browsers.
Let’s dive in!
How to Schedule Push Notifications By Date and Time
The first thing you need to know is that you can schedule your push notifications well ahead of time. If you know when your subscribers are most active, you can send them the notifications at that exact time.
Pro Tip: An easy way to uncover the best time to send notifications to your subscribers is to simply try sending it at different times to see if you get a better open rate.
If you’ve ever sent out any campaign online, then you know how stressful it can be if you leave it for the last second to send out the notifications.
To be clear, you can send out push notifications manually whenever you want.
But there’s a good chance that you won’t:
- Get enough time for testing the campaign for bugs and missed wins
- Have your campaign manager available when the campaign goes live
- Know how to manage the chaos if something goes wrong
Honestly, this is a primitive way of doing things.
It’s way easier to plan ahead and schedule your push notifications so that your campaigns can keep selling even while you sleep.
Here’s the good news:
You can schedule push notifications for all your campaigns right from the PushEngage dashboard.
PushEngage is the best mobile and web browser push notifications service in the market. We help you create custom push notifications that generate more traffic and sales for your brand with very little effort.
Every time you create a new push notification on PushEngage, you get the option to schedule it by date and time:
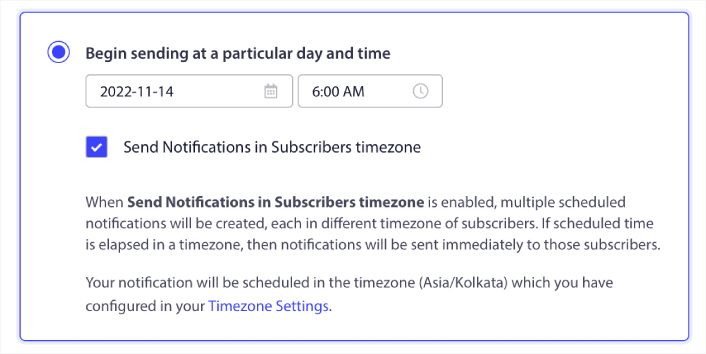
Of course, you can see some advanced settings here such as Send Notifications in Subscriber’s Timezone and Repeat Schedule but we’ll cover those options later.
This one’s just for the basic date and time scheduling option. It’s perfect for someone who’s just starting out and it’s really not that complicated.
A great use case for date and time scheduling option is to automatically send out push notifications for your monthly content calendar.
You can also use it to send out invites for flash sales or holiday sales. We usually recommend using Repeat Scheduling (more on this later) for such events. But if it’s a one-time thing, you can use the date and time scheduling settings.
The good thing is that you can change the links and copy for your notifications any time you want. So, pre-scheduling your notifications to generate repeat traffic is a great idea. It really takes the pressure of creating a push notification every alternate day off your shoulders.
How to Schedule Push Notifications By Subscriber Timezone
We already got a sneak peek at this feature in the previous section.
So, what is it, exactly?
In very simple words: subscriber timezone scheduling means sending the notification at an exact time according to the subscriber’s timezone.
For instance, if you’d like all your subscribers to get the notification and 11:00 am, just before they start their workday, you can schedule the push notification so that is sent whenever the subscriber’s timezone hits 11:00 am.
No matter where your subscribers are, they’ll get it at exactly 11:00 am even if it’s 3:00 pm in your timezone at the same time!
Why is it a good idea to schedule push notifications by subscriber timezone?
Simple — so that you don’t waste your time and money on sending push notifications at times when you know your subscribers won’t click.
It’s actually really simple to do with PushEngage. In fact, we can use the same image as the last section to understand how to schedule push notifications by subscriber timezone:
When you create a new notification, head to the Scheduling Options section and click on the checkbox that says Send Notifications in Subscriber Timezone.
It’s that simple!
You can still schedule your notifications by date and time. Only with this option, you can send out notifications when it’s that date and time in your subscriber’s time zone instead of your own time zone.
Very cool!
This sort of scheduling is perfect for push notifications that are evergreen. In other words, any time you send a push notification that’s not meant for live events, we recommend that you schedule the push notifications by subscriber timezones.
For instance, this option is perfect for product update notifications.
How to Schedule Push Notifications on Repeat
That’s right! You can schedule push notifications to keep repeating every week. Or every few days. Loads of PushEngage customers use repeat scheduling and they absolutely love this feature. It’s made an especially significant difference for ecommerce sites.
Why would you use repeat scheduling?
Imagine that you have a weekly sale for a flea market. Or a weekend sale. Or a stock clearance sale. Or even a monthly flash sale.
These are live events that keep repeating like clockwork.
Do you honestly want to create a different push notification every week? Especially if you know ahead of time that these sales are going to be a major part of your marketing strategy?
Or, would you rather just create the notification once and schedule it to fire off every week at a fixed time?
That’s exactly what repeat scheduling does for you. It’s the perfect way to save a lot of time and energy. Instead of wasting time with new notifications, you can simply keep optimizing the old one. If you like, you can even change different elements of your push notification over time.

As you can see, you can select which days the notification gets sent out, at what time and for how long. Just click on the days to select and set a schedule. You can also click on the clock to set a time to send the notification.
If you’d like to select for how long the repeat schedule will work, click on the calendar next to Schedule Between to set the dates. And that’s all there is to it!
If you’d like to get some pointers on how to get started yourself, check out our case study on how Saleduck used scheduled notifications to get more sales.
Pro-Tip: You should also learn how to create an event registration page on your WordPress website. This way, you can generate a lot of email subscribers as well to make the most of your weekly events.
How to Schedule Drip Push Notifications
If you’ve ever used automatic drip campaigns before, then it’s time to start using drip notification campaigns as well. The best part is that you can schedule your drip push notifications as well. Although, it works in a pretty different way from regular push notifications.
Don’t worry if you’ve never heard of drip campaigns before. We’re going to help you make the most of your push notifications no matter what.
Drip campaigns are a series of emails or notifications that get sent automatically when some event occurs. This event could be anything from clicks to simply browsing specific pages on your website. In simple terms, you can create an autoresponder sequence that keeps making you money on autopilot.
If you’d like to learn more about drip notifications, check out our article on the use cases of drip push notifications.
Some great reasons to schedule drip notifications include:
- Getting people to actually buy the things on their wishlist
- Sending an onboarding sequence to new customers
- Educating customers using a free course series
- Upselling similar products to existing buyers
- Sending out reminders for live events
Scheduling drip notifications works in a completely different way. Instead of selecting specific dates and times to send out the notifications, you set a delay between two notifications instead.
For instance, this onboarding drip series:
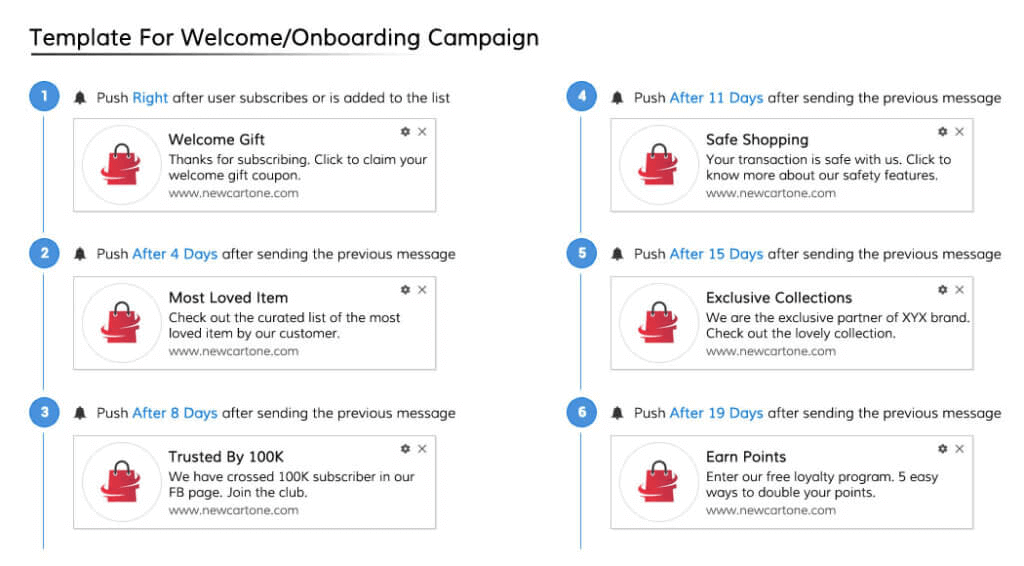
… Uses delays to time the notification sequence perfectly once they get triggered.
There are actually three settings to set up the timing every time you create a new drip push notification series:
- Immediately
- After
- Next
The settings are fairly straightforward. When you select After, you can set a time limit after which the notification gets sent automatically. Or, you can select Next to trigger it on a day of the week, say, next Sunday.
One reason to do this might be to send a course. It’s a great way to build tension and anticipation. Educators like Andre Chaperon have used this idea before for drip email campaigns. The idea is to have a fixed, predictable schedule for the entire sequence.
Check out how Intex increased click rates by 312% using drip push notifications.
How to Send Offline Notifications
PushEngage uses the most cutting-edge technology to send push notifications. One of the biggest problems that old school push notification campaigns face is that the notifications end up getting sent during times when the subscribers aren’t even online.
The old way of sending notifications was to send out push notifications letting them pile up.
And when your subscribers are finally online, they get bombarded with so many notifications that your brand becomes annoying.
What do you think happens next?
Loyal subscribers unsubscribe. Immediately.
That’s why PushEngage only sends out offline notifications with an expiry date and time!
So, what does this mean?
Offline notifications are push notifications that only show up when your subscribers come online. Once you factor in expiry times for your notifications, your notifications only get seen when they’re more effective.
The best part? You don’t have to do anything at all to use offline notifications in PushEngage. All of your notifications are offline notifications by default! Simply set up the expiry time for each notification as you create them and you’re done!

The default expiry time is 28 days but you can set this time to whatever you want.
To clarify, offline notifications aren’t special campaigns or a type of push notifications. It’s just a very simple and efficient way to schedule push notifications and manage them without having to do anything at all!
Check out our feature page on offline notifications to learn more.
How to Schedule Your Push Notifications in WordPress
We recommend everyone with a WordPress site to use PushEngage to grow their business.
PushEngage is the only push notification service that comes with a fully functioning WordPress plugin to send push campaigns directly from your WordPress dashboard. With other solutions, you’ll have to go back and forth between multiple dashboards for each campaign.
If you’re using the PushEngage WordPress plugin, you can also create and manage your notifications inside the post editor.
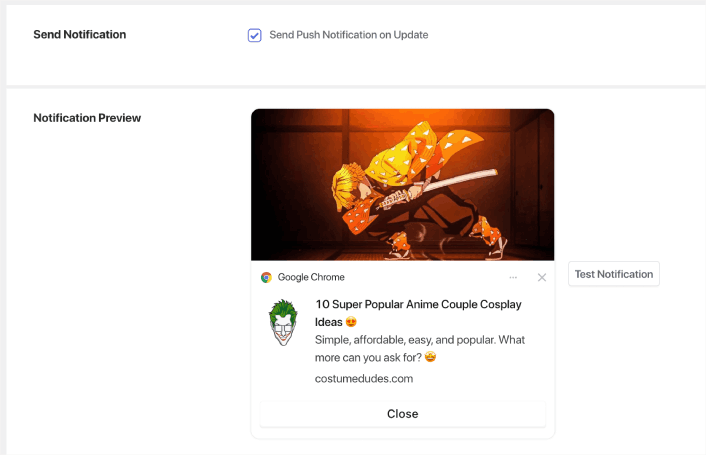
You can set these notifications to get sent whenever you publish or update your post. And of course, you can schedule your post updates and publishes in WordPress with complete flexibility.
What to Do After You Schedule Push Notifications Like a Pro
We hope that this article helped you understand everything you needed to know about how to schedule push notifications. More importantly, we hope that you have a better understanding of which type of scheduling you should use for different campaign types.
If you’re just getting started with push notifications, you should also check out these amazing resources:
- How to Use Retargeting Push Notifications to 2x Your Revenue
- How to Sort Your Push Notifications and Find Winning Campaigns
- How to Clean Up Push Notifications Subscriber Lists (Easy)
- How to Automatically Send RSS Push Notifications
- How to Use Push Notifications to Promote a News Site
- How to Use Cross Selling Push Notifications to 2x Your Sales
- How to Use Browse Abandonment Push Notifications (4 Steps)
So, why don’t you give it a whirl in PushEngage and try to schedule your push notifications to see the difference first hand?
If you haven’t already, get started with PushEngage for FREE right now!


