Looking for a quick guide to set up browse abandonment push notifications?
Browse abandonment push notification campaigns are automated campaigns that can nudge your website visitors to add products to their cart. But how do you set one up? Is it a complicated process? What push notification service do you use? Do browse abandonment campaigns work that well?
In this article, we’ll answer all these questions. We’ll also show you how to set up browse abandonment push notifications in less than 10 minutes with no coding.
Let’s dive in.
What are Browse Abandonment Push Notifications?
A browse abandonment notification is an automated push notification that gets sent when someone browsing your website decides to bounce without taking any action. Sending the visitor a reminder that they were interested in something on your website can hugely increase your conversion rates.

Browse abandonment campaigns are most commonly used by eCommerce sites. But that’s not to say that a travel portal or a news site (or any website, really) can’t use them. If you’re selling anything at all, you need to set up browse abandonment push notifications to recover lost sales.

A browse abandonment notification ends when your visitor adds something to their cart. After that, a cart abandonment notification takes over to convert them into paying customers.
That’s where browse abandonment campaigns come into play. You can target, convince, and convert customers who:
- Added a product to a Wishlist, but not their Cart
- Viewed a product more than once
- Browsed more than 3 products in the same category
- Searched the site for a specific product
- Stayed on a product page for at least 3 minutes and didn’t buy
The coolest bit is that you can set up browse abandonment emails to support your browse abandonment push notifications. As long as you can afford one of the best email marketing services, you can set up automated campaigns easily.
And trust us when we say it, you will get awesome returns on your marketing efforts with browse abandonment campaigns.
Pro Tip: Check out our list on the most powerful eCommerce push notifications you can use. Set up as many of these automated campaigns as you can.
How to Set Up Browse Abandonment Push Notifications
Now that we understand what a browse abandonment campaign is and why you should create one, let’s dive into how you can set one up. We’re going to use PushEngage to set up your browse abandonment campaign.
PushEngage is the #1 push notification software in the world.
Push notifications help you grow your website traffic and engagement on autopilot. And if you’re running an online store, PushEngage also helps you grow your sales by helping you create automated eCommerce push notifications.
You can get started for free, but if you’re serious about growing your business, you should buy a paid plan. Also, before buying any push notification service, you should check out this guide to push notification costs.
Here’s a quick glance at what you get with PushEngage:
- High-converting automated campaigns
- Multiple targeting and campaign scheduling options
- Goal tracking and advanced analytics
- Smart A/B testing
- A Dedicated Success Manager
You’ll see that PushEngage is hands down the best bet if you want to build traffic, engagement, and sales for your business. And if you’re on a budget, you can always get a little bit creative with your push notifications. Let’s create our browse abandonment push notifications now.
Step #1: Create a New Browse Autoresponder
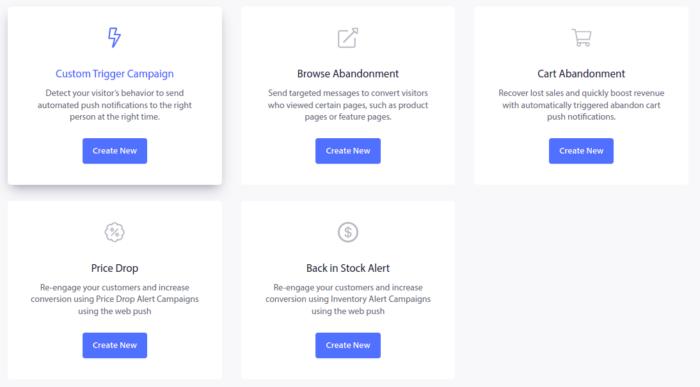
Head over to your PushEngage dashboard and go to Campaign » Triggered Campaigns. Then click on Create New Browse Autoresponder:

And then, select the Browse Abandonment Campaign type from the list of campaign types and click on Create New:
Step #2: Create a Series of Push Notifications
By now, you should be able to see a campaign setup dashboard. Create your campaign under Content:
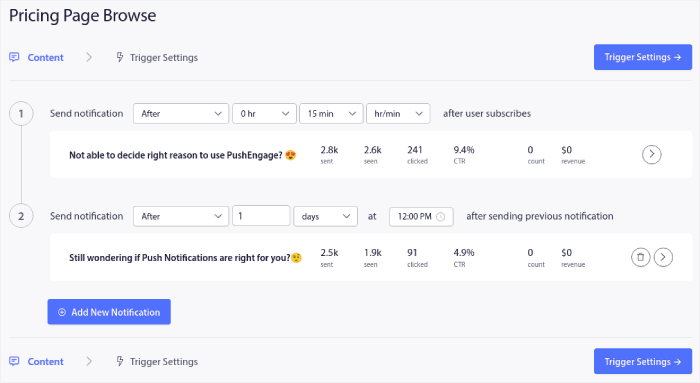
Most of this is straightforward. Give your campaign a name and create a sequence of browse abandonment push notifications.
Step #3: Configure the Browse Abandonment Trigger
When you’re done, click on Trigger Settings. It’s time to set up the trigger for browse abandonment:

These are default values for the browse abandonment campaign template. So, you don’t have to change anything here. You can set Trigger Limits based on how often you want to send push notifications:

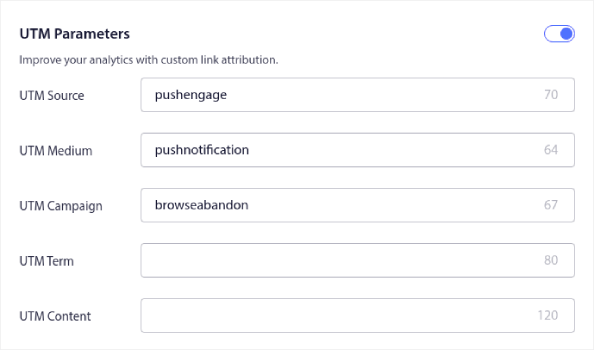
And you can also set up UTM parameters here:
And enable Goal Tracking as well:
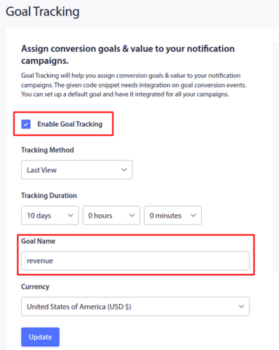
If you’re new to push notification analytics, check out our guide to goal tracking for push notifications.
Step #4: Configure Your Push Notification Popup Modal
Finally, in your PushEngage dashboard, go to Design » Popup Modals:
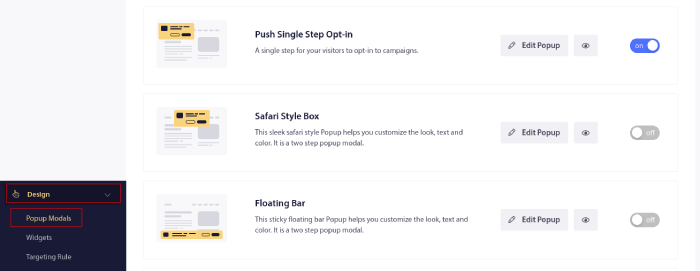
From here, you can customize your push notification opt-in. If you need help with that, you should check out this article on how to create a custom push notification opt-in.
If you need some inspiration, you can check out this article on high-converting push notification opt-ins.
What to do After You Create Browse Abandonment Push Notifications
Now that you know the power of eCommerce push notifications, it’s time for you to start creating your own campaigns. But before you get started with the campaigns, you should study some great push notification examples first.
And if you’re new to push notifications, you should check out our article on push notification best practices before you start creating campaigns. Some of the best practices that we actively recommend include:
- Boost Clicks With Curiosity
- Personalize Each Push Notification
- Stand Out With Rich Media
- Reactivate Dormant Push Subscribers
- Keep Customers Informed
- Use Emojis Wherever You Can
- Create a Sense of Urgency
Pro Tip: If you’re new to eCommerce push notifications, you should also check out this article on how to get more reviews.
We recommend using PushEngage to create your push notification campaigns. PushEngage is the #1 push notification software in the market and your campaigns will be in safe hands.
So, if you haven’t already, get started with PushEngage today.

