Looking for a guide to send retargeting push notifications?
Retargeting notifications are gaining a lot of popularity these days. For a long time, you could only send retargeting email drip campaigns. But now, you can recreate the same effective campaigns and use the targeting options in push notification software as well.
But how do you get started? Do you need experience with retargeting campaigns? Do you need any experience setting up push notification campaigns?
In this article, we’re going to help you create retargeting push notifications in less than 10 minutes. We’ll also answer all your questions about retargeting push notifications.
Sounds good? Let’s dive in.
Why Use Retargeting Push Notifications?
With any business your run, you’ll see a group of subscribers who are extremely engaged. They buy anything you sell, happily offer testimonials and reviews, and refer new customers to you.
And then again, you’ll see subscribers who simply aren’t interested in anything about your business.
Retargeting push notifications help you focus on subscribers who want to be sold to. You can retarget them for cross-selling, upselling, renewals, or just give them enough incentive to buy from you using a welcome offer or coupon.
One methodology for sending retargeting push notifications is to use waterfall push campaigns.
Push notification campaigns come with detailed analytics. So, you can see both groups pretty clearly in your subscriber list. And the cool thing is that you can create Audience Groups in PushEngage to retarget both types of subscribers.
Then, you can create targeting options for your push notifications to retarget specific behavior on each notification you send. All retargeting push notifications have two core components:
- A set of push notifications with a common goal
- Audience groups to retarget different types of subscribers
Let’s get you started with creating your own retargeting push notifications next.
How to Send Retargeting Push Notifications
Now that we know what a retargeting push campaign is and why you should create them, let’s take a look at a real example with step-by-step instructions to create one.
Before you get started with sending retargeting notifications, you need to select a push notification service. We recommend using PushEngage.
Step #1: Create a Free PushEngage Account
Head over to PushEngage and click on Get Started for Free Now:

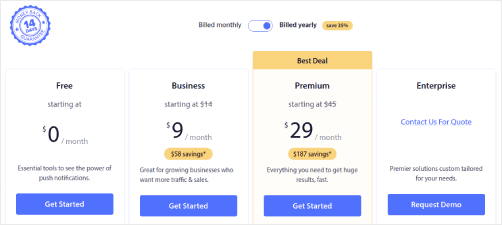
You can get started with the free plan. But if you’re looking for the most powerful browser notifications, you should select a paid plan based on your business needs:
Once you know which plan you want, click on Get Started to create your PushEngage account.
Step #2: Sign Up for PushEngage
Now, it’s time to create your PushEngage account. Start by signing up with an email address or a Gmail ID:

Then, fill out your account details:

And add your credit card information to buy your plan:

If you selected the free account, then your credit card will never be charged any money until you choose to upgrade your plan. And now, you’re all set to get access to your PushEngage dashboard. Just click on Complete Registration and Get Instant Access.
Step #3: Install the Web Notifications WordPress Plugin
You’re done creating your account. So, head over to the PushEngage dashboard and follow along:

Click on Site Settings » Site Details and click the Click Here For Setup Instruction button:

Click on the WordPress tab and click on the Install PushEngage WordPress Plugin button to install the plugin on your website.

Here’s the cool part: When you created your PushEngage account, you already synced your website with your PushEngage account. So, click on the installation link in the PushEngage dashboard to automatically install the PushEngage WordPress plugin to your website.
Step #4: Connect Your WordPress Website with PushEngage
When you’re done installing and activating the PushEngage WordPress plugin, you’ll see the PushEngage onboarding wizard:

The wizard is fairly straightforward. If you’re a new user, click on New? Claim Your Free Account. And if you’ve already signed up, click on Connect Your Existing Account.
Next, you can select your site from the Select a Site dropdown under Connect a registered site if you’ve already registered a site during signup:

Or, you can click Register a new site to add a new site if you have a Premium pricing plan or higher. In the next step, the onboarding wizard will prompt you to install other must-have WordPress plugins.

If you followed each step correctly, you’ll see this success message from the wizard:

You are now ready to create campaigns.
Step #5: Create Retargeting Push Notifications
Finally, it’s time for our example. To show you a real use case for retargeting push notifications, we’re going to take the example of Black Friday promotions. Our objective is to maximize the conversions on our Black Friday offer.
To retarget our subscribers based on their behavior, we’re going to send a broadcast to all our subscribers. Then, based on their engagement levels, we’re going to create different Audience Groups for retargeting.
How to Send Your Notification to All Subscribers
We want the maximum reach for 3 notifications:
- Early Black Friday Announcement
- Black Friday Flash Sale
- Cyber Monday Sale
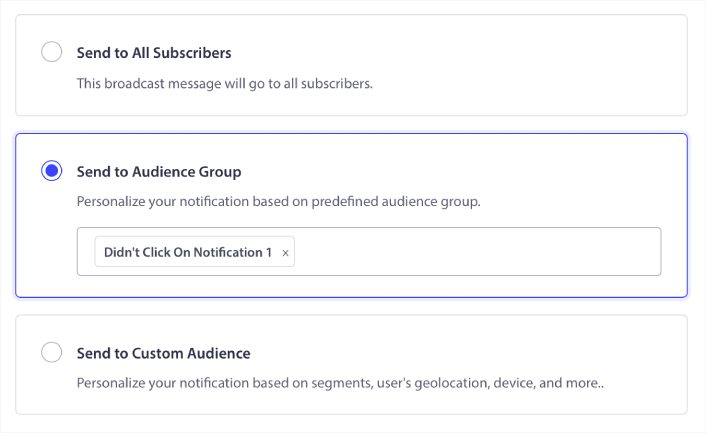
So, we’re sending those 3 notifications to everyone. In the Audience tab, select Send to All Subscribers:

How to Retarget Subscribers Who Didn’t Click the Broadcast to Everyone
If you’re not sending the notification to all subscribers, you’ll need to create an Audience Group. For instance, if you want to target the subscribers who didn’t click on the broadcast to everyone, you’ll need to create a new Audience Group.
In your WordPress dashboard, go to Audience » Audience Groups and click Create New Audience Group:

To target subscribers who didn’t click the last notification, you’ll need to filter by Last click date:
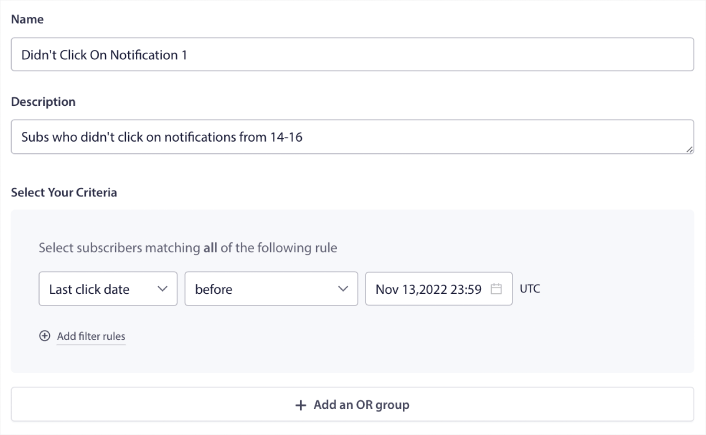
Filter by last click date before the date you sent your previous notification. So, if you sent the last push notification on 14th November, filter for subscribers who clicked on notifications only before 13th November at midnight.
NOTE: Unlike an email campaign, you can’t actually filter by click rate on the last notification. The closest approximation is to filter for clicks in a date range.
When you’re done, click on Save Notification.
Then, head back to your push notification broadcast and select Send to Audience Group. From the dropdown, select your Group:
How to Retarget Subscribers Who Clicked the Broadcast to Everyone
If you want to target subscribers who clicked on your last notification, you can create another Audience Group.
Filter your subscribers by Last click date after the date you sent your previous notification AND before the date you want to send your next notification:
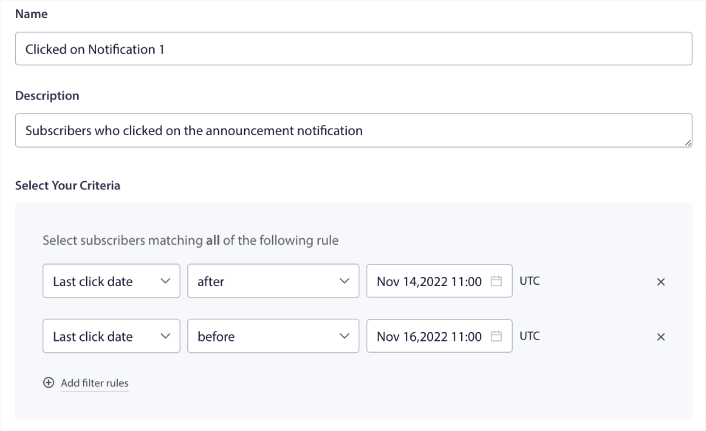
You can add AND criteria to your filter by clicking on Add filter rules. A filter like this is great for cross-selling push notifications.
The outcome of these Audience Groups is more granular targeting. So, each time, you can send different offers to improve your conversion rates.
What to do After You Create Retargeting Push Notifications
One of the most important things to remember about retargeting push notifications is that you can only use this methodology on broadcast push notifications. Drip campaigns in push notifications don’t have targeting options that granular yet.
So, make sure to A/B test your push notifications. We also suggest that you take some time to read our articles and learn how to supercharge your automated push notifications. Start with our article on push notification best practices.
If you’re new to push notifications, you should follow a full-blown push notification testing process before you go live. It’ll help you troubleshoot common issues before your visitors see them and start complaining about a broken user experience. And most definitely you should set up Google Analytics to track push notifications.
Retargeting push notifications to target the subscribers who clicked on them or didn’t. Let us know how that works for you. In the meantime, check out these resources:
- How to Boost Clicks on Your Push Notifications With Curiosity
- How to Personalize Each Push Notification
- How to Stand Out With Rich Media in Your Push Notifications
- How to Reactivate Dormant Push Subscribers
- How to Use Push Notifications to Keep Customers Informed
- How to Use Emojis in Your Push Notifications for Higher Click Rates
- How to Increase Conversions by Creating a Sense of Urgency
And if you haven’t already, get started with PushEngage.


