Looking for a guide on how to send automated notifications?
Automated notifications are single web push notifications or a series of push notifications that keep working in the background. Unlike push notification broadcasts, they work without any manual action on your part. You can simply set them up once and they’ll keep working forever.
But what notifications should you send? How do you know if they’ll work for your business? And how do you get started?
In this article, we’ll show you how to use simple, actionable tricks to bring in traffic and sales on autopilot.
Sounds good? Let’s just dive right in.
Broadcast vs. Triggered vs. Automated Notifications
Broadcasts are push notifications that you send out as a single notification. You can schedule them, but they will only fire off once. Triggered campaigns involve setting up a push notification, defining a trigger to set it off, and a workflow to control its scheduling. Automated notifications are a series of notifications that set off automatically at specific or when specific conditions are met.
For all intents and purposes, they look the same from the outside. The critical difference is that trigger campaigns are way more flexible and customizable. If you consider that push notifications cost way less than most other channels, then triggered campaigns are the way to go.
However, most triggered campaigns need some experience with development. You’d need to use an API to make the best use of triggered notifications. If you’re curious, check our article on eCommerce push notifications for a better idea.
What Service Should You Use to Send Automated Notifications?
Let’s start things off by saying that most of the “free push notification services” out there are actually free trials. Some of the providers we’ve listed here are trial software, while others have a forever-free plan that you can opt for.
There are some other freemium options such as Firebase Cloud Messaging (FCM), but that’s not really a good option at all. You can read more about why FCM can’t compete with a service provider like PushEngage. But for now, just take our word for it and jump into the better options.
We recommend using PushEngage.

PushEngage is the best push notifications service in the world. And we’re not just talking about the free version. It allows you to connect with visitors after they leave your site with targeted push messages.
Why? It’s…
- Super-easy for both beginners and advanced users to set up;
- Effective on HTTP and HTTPS sites;
- Got a bunch of automated push notification campaigns you can use (in the paid versions);
- Full of options to send personalized push notifications (in the paid version);
- Equipped with goal tracking and advanced analytics (in the paid version);
And this is barely scratching the surface. Check out PushEngage’s full list of features before you go any further.
But the most attractive part about PushEngage is that you can get started with a forever-free plan. And you can use it to actually grow your business using multiple customization options.
The free version allows up to 200 subscribers and 30 lifetime notifications. That’s good enough to get your business to a point where you can easily afford the paid plans that start at $9/month for 100,000 subscribers.
And don’t worry if you know absolutely nothing about coding. You can install PushEngage using one of the many installation guides for any website and CMS.
How to Send Automated Notifications
Now that you know what automated notifications are and what service you need to send them, it’s time to check out how to send different notifications. For practical purposes, we aren’t talking about custom triggered campaigns you can create using an API service here. If you’re more interested in custom notifications, you should check out our documentation.
#1. Automated Welcome Push Notification
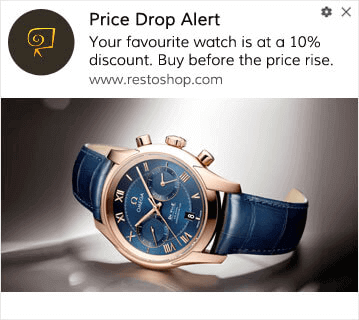
A welcome notification is a simple push notification meant to appreciate any new subscriber.
You can also an offer or gift for subscribing to your push notifications. This is pretty common with a lot of our customers. You can use your welcome push notifications to:
- Share a Welcome Coupon
- Offer Premium Features
- Send a Free Delivery
- Offer Free Gifts
- Onboard Your Subscriber with a Walkthrough
Now, let’s set up your first welcome push notification using PushEngage.
Here is how to Enable Welcome Notifications in PushEngage. Go to PushEngage dashboard and head over to Campaign » Drip Autoresponders and click on Create New Drip Autoresponder:

Then, name your campaign (we suggest something like Welcome Drip), and under Content, select the option that says, “Send notification immediately after user subscribes“):

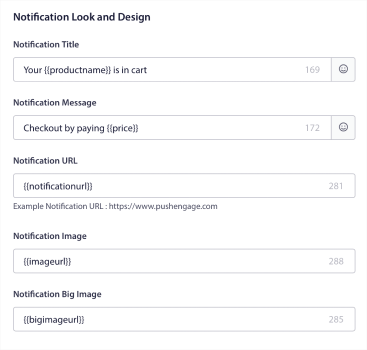
At this point, you can click on the arrow next to the notification to edit the content of your notification. If you have a Premium or Enterprise plan with PushEngage, you’ll be able to add more than one notification to create a sequence of automated welcome messages. Just click on Add New Notification and edit the content.
Once you’re done, click on Drip Settings and select the option to send your welcome campaign to all subscribers:

Then, scroll down to set your own UTM parameters to track the push notifications:

And when you’re done, scroll back up and click the Activate Autoresponder button:

Now you know why welcome push notification is important. You also know how to set it up. Go ahead and activate welcome push notifications to re-engage new subscribers or check out this article on website welcome messages for inspiration.
#2. Abandoned Cart Campaigns
Shopping cart abandonment occurs when a potential customer adds a product to the shopping cart and doesn’t complete the checkout process.
Your job is to reduce cart abandonment as much as possible.
One way to recover your lost sales is to use cart abandonment push notification campaigns. Cart abandonment recovery campaigns target subscribers with an abandoned cart and send them follow-ups, reminders, offers, coupons, and discounts.

It’s a simple idea: Get as many people as possible to buy something.
Cart abandonment push notifications have a very real impact on your bottom line. For instance, WickedWeasel gets $2,000 – $4,000 per week in added sales from their cart abandonment push campaign.
Now, let’s go and set up your very first cart abandonment campaign with PushEngage.
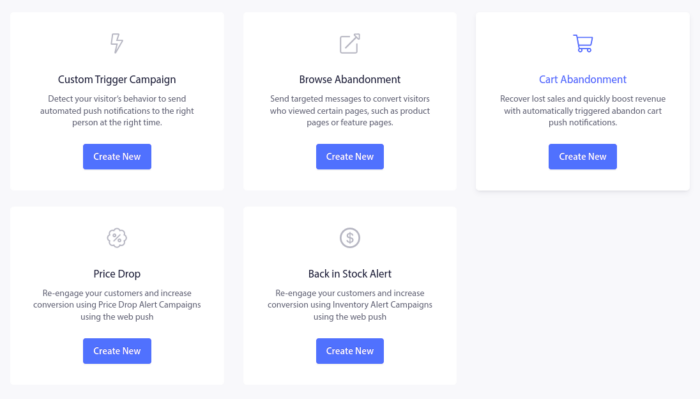
Go to the PushEngage dashboard and head over to Campaign » Triggered Campaigns and click on Create New Triggered Campaign:

Then, select the Cart Abandonment template and click on Create New:
And you can start drafting an abandoned cart autoresponder. Under the Content tab, you can create a series of push notifications:
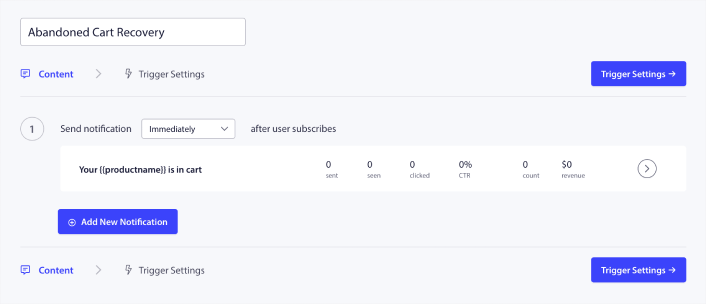
To edit a notification, simply click the arrowhead next to it and you can customize the push notification:
For a more tutorial, check out this article on how to set up abandoned cart push notifications.
#3. Browse Abandonment Campaigns
Browse abandonment is exactly what it sounds like. It’s when a website visitor is browsing your website and decides to suddenly go away. These incidents are also known as funnel abandonment by other vendors.
Browse abandonment is a really common occurrence in almost every industry.
And it’s really difficult to reduce or control because there’s no way to incentivize a random user to stay on your website. This is where browse abandonment campaigns are so powerful.
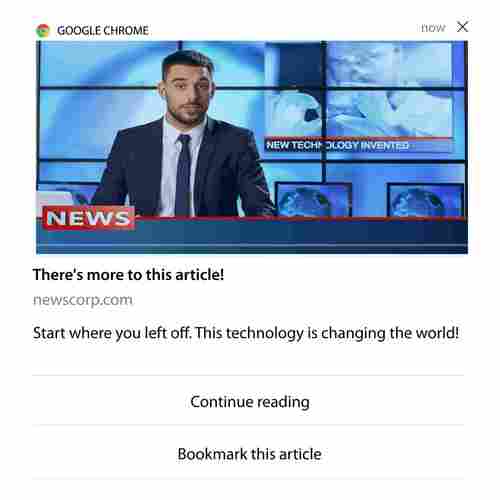
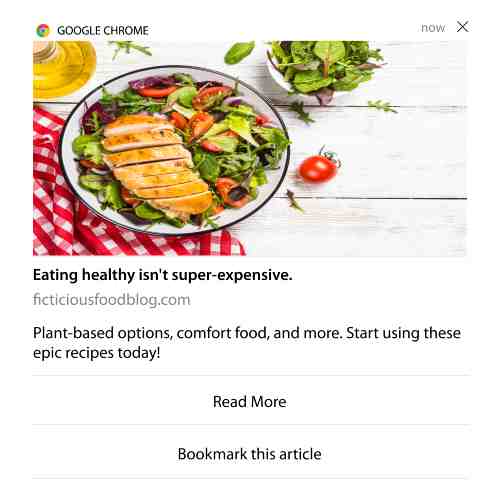
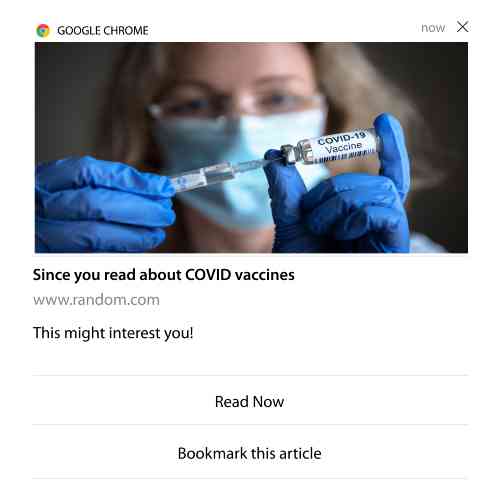
Here’s an example of browse abandonment push notifications for a publisher:
The impressive part about PushEngage is that you can set up campaigns for pretty much any industry. So, you can send browse abandonment push notifications for SaaS and travel websites as well.
So, how do you set up browse abandonment campaigns?
With cart abandonment, there’s a very clear parameter to fire your push notifications. For browse abandonment, you may want to consider parameters such as:
- Added the product to Wishlist
- Looked at the same product more than X times
- Browsed more than X products in the same category
- Searched the site for a specific product
- Stayed on site for at least X minutes before bouncing
The idea behind this campaign for an eCommerce site is to get the subscriber to add the product to their cart. For publishers, it could be a click or a download on the article they were reading.
Head over to the PushEngage dashboard again and go to Campaign » Triggered Campaigns to create a new triggered campaign:

Then, create a new Browse Abandonment campaign by click on the Create New button:

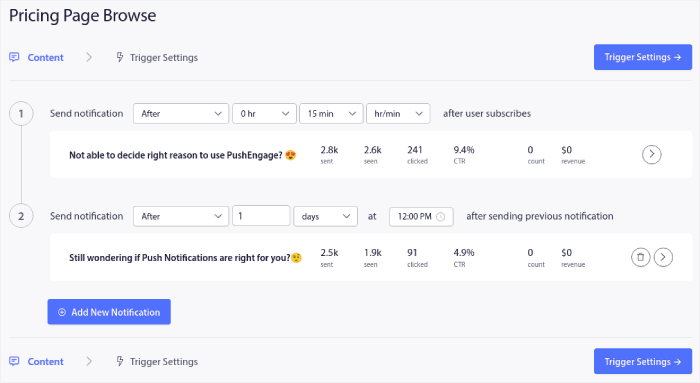
Next, you’ll be able to set up your entire sequence of push notifications along with a delay in between each notification:
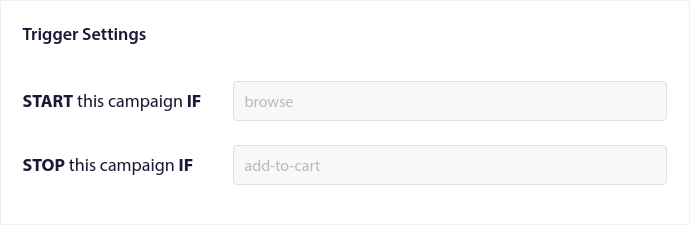
If you’re new to push notifications, you should check out our article on push notification best practices. When you’re happy with your push notification content, click on Trigger Settings. You’ll see that the conditions for a browse abandonment campaign have been pre-configured into the sequence.
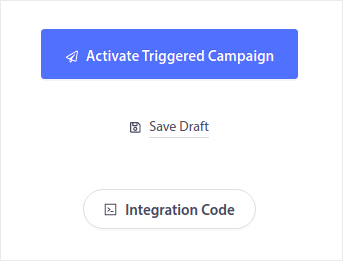
Click on the Integration Code button to get the code snippet you need to embed the browse abandonment campaign on your site.
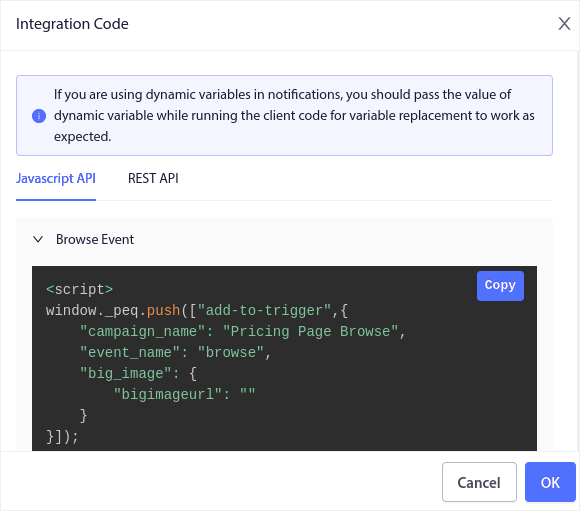
Then, copy the code and paste it into your site. You want to paste that code into the HTML <head> section of the page that you want to track. Finally, click on the Activate Triggered Campaign button:
And you’re done!
#4. RSS Feed Campaigns
RSS Auto Push allows you to automate your notifications via RSS.
PushEngage checks every 10 minutes for a new post added to your RSS feed. If a new post is found, PushEngage converts it into a push notification and sends it out to all your subscribers. The best part is that it happens on complete autopilot.
RSS Feed campaigns are perfect for publishers and news sites:
If you’re a big publisher and you publish more than 1 post every 30 minutes, PushEngage keeps a delay of 5 minutes between 2 post notifications.
Before we go any further, you should check out this article on how to use RSS feeds for more epic tips and tricks.
Now, let’s go set up an RSS feed campaign on PushEngage.
Head over to Campaign » RSS Auto Push and just turn it on:
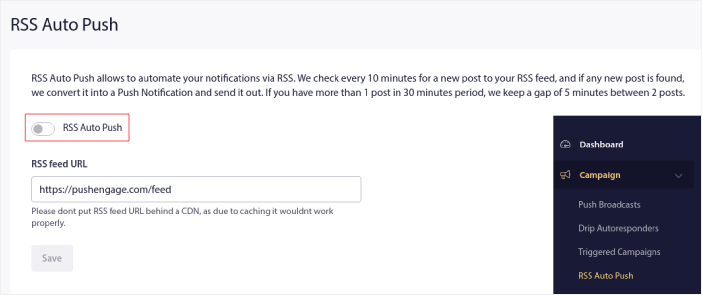
You’ll have to paste in your RSS feed URL. For a WordPress site, it’s usually in the format of:
Then, click on Verify RSS. And finally, click on Save.
That’s it! You’re all set. Every time you publish a new post, it will automatically go to all your subscribers.
#5. Automated Re-engagement Notifications
You can set up automated re-engagement campaigns for subscribers who haven’t engaged with your content for a while.
But why would you do it in the first place?
How about this:
- The cost of acquiring new customers is 5 times more than the cost of retaining existing customers
- It’s easy to target and remarket to a known audience whose personal preferences we already understand.
- In the long run, engaged customers give more business to the company than someone who barely connects with your brand.
Ofertia was able to increase their repeat users by 39% using push notifications offering personalized deals. They’re not the only ones either. You can use this for an eCommerce website to great effect:
There are lots of ways to re-engage your subscribers.
But one of the most effective ways is to use Segmentation. Using dynamic segments, you can figure out a lot about your subscribers and send them personalized content that they’ll love.
In your PushEngage dashboard, head over to Segmentation and create a new Segment:
This allows you to create segments based on behavior and browsing patterns. You can actually set up a sequence of AND/OR operations that decide when certain segments receive automated push notifications.
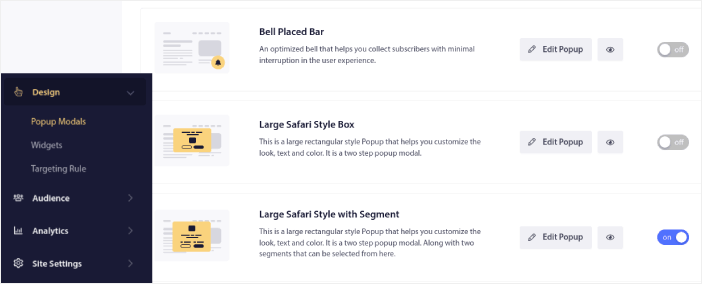
You can even segment your users when they subscribe to push notifications. Head over to Design » Popup Modals and select the Large Safari Style with Segment.
If you need even more ways to segment your users, you can create custom segments based on user actions using the PushEngage Javascript API.
#6. Page Visit Trigger Campaigns
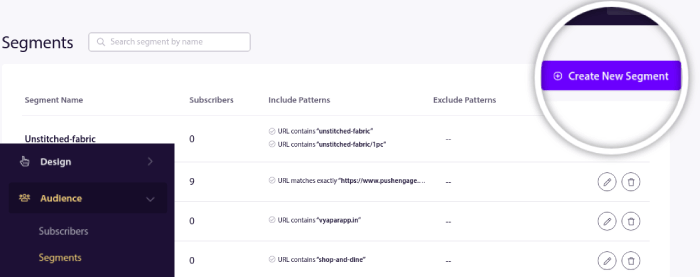
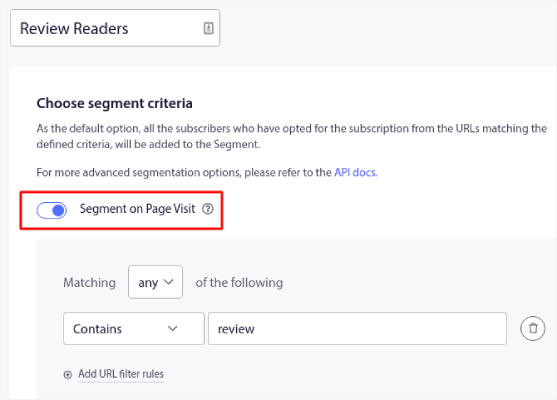
Page visit triggers are an extension of push notification segments. All you have to do is create a segment when a web visitor browses a URL with a particular phrase or pattern.
Then, you just head over to Audience » Segments and set your audience to a specific segment:
This allows you to create really personalized and automated push notifications.
And the best part is that you can create custom segments in PushEngage in a couple of minutes.
#7. Automated Push Notifications from Click-Through
You can’t create push notifications that get triggered when your subscribers click on a delivered notification using PushEngage.
But there’s a very clever workaround.
You can create a segment based on the URL that a particular notification leads to. Every time someone lands on this URL, they get added to the segment and you can use this segment to send targeted notifications.
Push notification click campaigns are essentially an extension of the standard audience segmentation for drip campaigns.
Check out this tutorial on how to create a click-to-subscribe button.
#8. Repeating Automated Push Notifications
Imagine that you have…
- A weekly sale for a flea market;
- Or a weekend sale;
- Or a stock clearance sale;
- Or a monthly flash sale.
How inconvenient would it be to have to create push notifications for every event manually?
Fortunately, you can set repeating notifications with PushEngage.
Repeat notifications are scheduled and automated push notifications for a recurring event. You can set them up once, specify a schedule, and you’re done.
That’s just one of the ways in which MyDeal uses push notifications. Be sure to read the full case study!
Head over to Campaign and add an automated notification in your PushEngage dashboard. Then, scroll down to the scheduling section and go to the Send/Schedule tab:
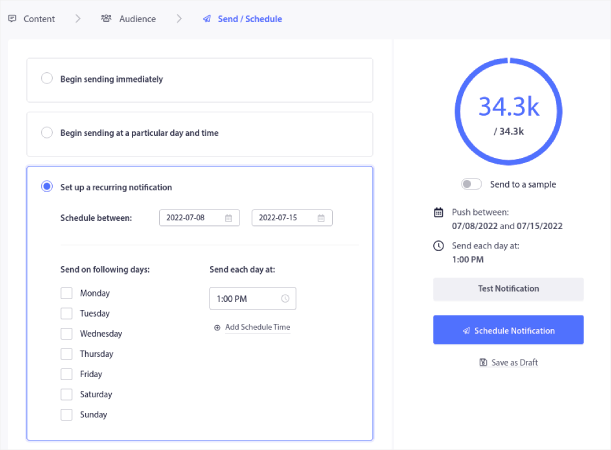
Just set up the timing and you’re done!
#9. Subscriber Timezone Notifications
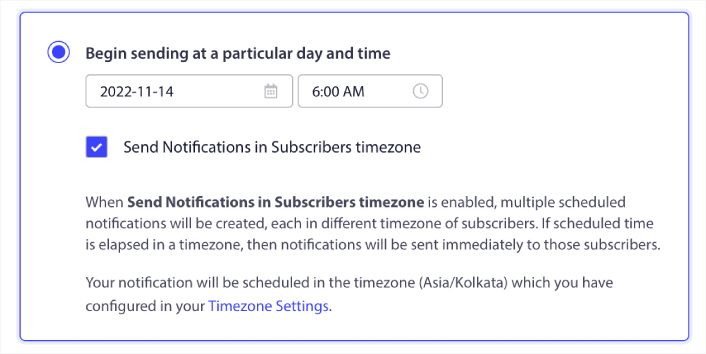
Subscriber timezone notifications are exactly what they sound like. You send automated push notifications to your subscribers in their timezone.
Why’s this such a big deal?
Subscriber timezone notifications have higher open rates. Typically, any push notification gets delivered even if your subscriber is offline. These notifications then pile up and get ignored when your subscriber finally comes online.
On the other hand, subscriber timezone notifications get delivered when you KNOW your subscriber is most likely online.
Pro-Tip: Use A/B testing to figure out the perfect time to send your subscribers a push notification.
Subscriber timezone notifications feel way more personalized. And if you’re smart about it, you can combine it with geolocation data to personalize your notifications even further. This is exactly what Phooto did when they used local languages to skyrocket their open rates.
Let’s set up subscriber timezone notifications in PushEngage now.
When you create a new notification, head to the scheduling options and click on the checkbox that says Send Notifications in Subscriber Timezone:
That’s all! You’ll have to do the same for your drip campaigns as well, but the results are well worth the effort of click one button for each campaign.
Pro-Tip: The last two tactics were all about scheduling push notifications. But these two aren’t the only ways to schedule automated push notifications. Check out our article on how to schedule push notifications for more epic tricks.
#10. Email Opt-In Notifications
Email marketing has long since been the best way to generate and nurture leads. The best part about automated push notifications is that you can generate more email subscribers using them.
It’s really simple to set up and using a combination of email and push notifications is way more effective than using one or the other.
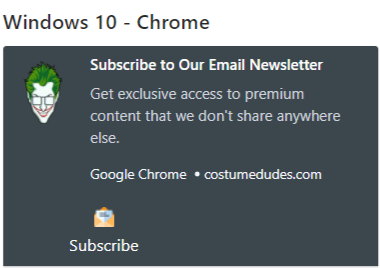
All you have to do is send a trigger notification that asks the user to opt for email notifications.
Just create a custom call to action (CTA) button and insert a subscription link as the button’s URL. That’s really all you need to. If you’re not sure how to get a subscribe button, just follow along.
In any notification, you can scroll down and turn on Multi-action buttons:
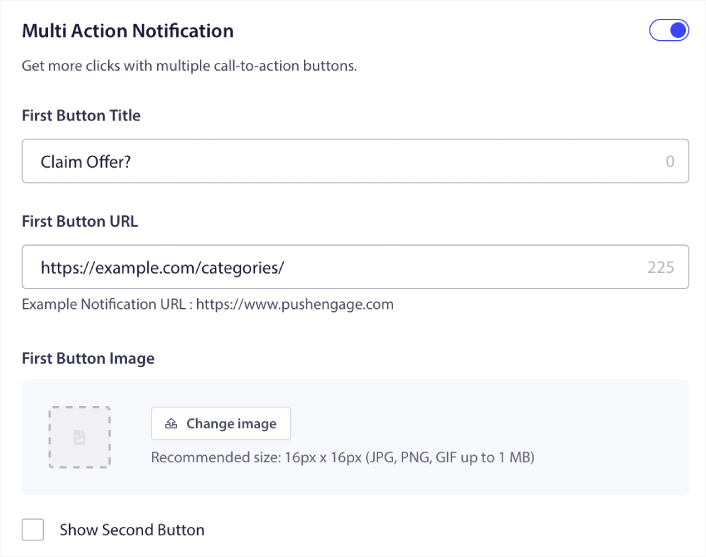
The URL should be a link to an email signup form. You can create one using pretty much any email service provider such as Drip. All you have to do is click on the sharing options for the signup form and copy that URL. Then, paste it into the button URL for your push notification.
Check out our tutorial on multi-action buttons for more details. You can even add an email icon to your button to make it super-clear that you’re asking your users to subscribe to your email notifications:
Pro-Tip: You can use the same idea to grow your YouTube channel as well. Just add ‘?sub_confirmation=1’ at the end of your channel URL and paste it into your push notification button URL.
Every time someone clicks on the subscribe button on your push notification, they will get redirected to your YouTube channel and get prompted to subscribe to it.
What to do After You Set Up Automated Notifications
Automated notifications don’t guarantee success. As with any marketing tool, you need to test and improve your messaging and your segments. Unfortunately, you can’t A/B test automated notifications directly. But these resources will help you get on the fast track:
- How to Install a Web Notifications WordPress Plugin to Your Site
- How to do Push Notification A/B Testing (Best Practices)
- 7 Push Notification Best Practices to Get Instant Traffic
- 21 Best eCommerce WordPress Plugins in 2022 (Free and Paid)
- 7 Best WordPress News Plugins in 2022 (Compared)
Also, PushEngage comes with its fair share of integrations. You can even set up some custom triggers using Zapier. These are fairly advanced campaigns and we recommend setting them up only once you’re familiar with our other built-in automation.
You should also know that the PushEngage Javascript API is very flexible and you can set up custom triggers for pretty much any action on your website.
Once you go through all these resources, you’ll realize that PushEngage is the #1 push notifications software in the market.
So, if you haven’t already, get started with PushEngage today!


