Looking for a way to send personalized push notifications on autopilot?
The simplest way to do it is to use automated drip campaigns with attributes. Attributes are custom variables that you can use to dynamically send personalized push notifications.
Don’t worry if that seemed a little bit complicated.
We’ll explain everything in this article and how you can easily set up personalized push notification drip campaigns using attributes.
Sounds good? Let’s dive in.
What Are Push Notification Attributes?
Push notification attributes are variables that automatically fetch subscriber details and personalize your notification messages. You can customize your drip campaign by adding data such as:
- The first name of the user
- Their hobbies
- Their location
And more, depending on the type of campaign you’re running.
We recommend that you use PushEngage to send your push notification campaigns. PushEngage is the #1 push notification software in the world. So, your campaigns will be in safe hands.
Even without using push notification attributes, PushEngage allows you to send personalized web push notifications using the County and the City name of your subscribers. If you want, you can send a drip push notification sequence to all your subscribers or a custom segment. You can even run drip campaigns with geo segmentation in PushEngage.
But if you want to take it one step further, you can offer a whole different level of personalization using the PushEngage Attributes API.
How to Send Personalize Drip Push Notifications
A Drip Campaign is a series of push notifications that are sent out automatically. Typically, a drip sequence gets triggered in one of two conditions:
- When someone subscribes for the first time
- When a subscriber is added to a segment
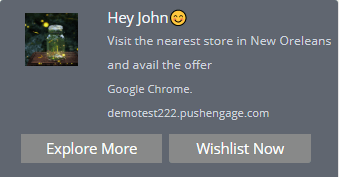
You can trigger the drip notification based on the subscriber’s action. Now that you understand what a drip campaign is and how you can turn the trigger on, let’s check out how you can use the Attribute API to send personalized drip notifications like this one:
Case #1: Send to All Subscribers
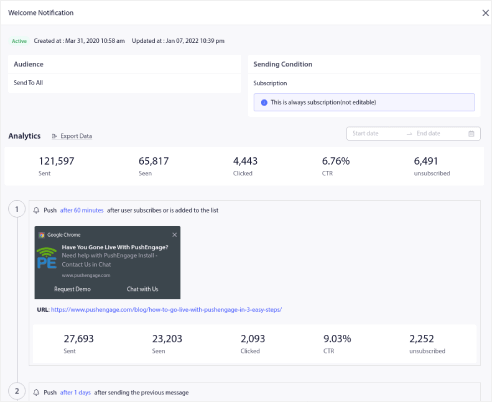
If you send your drip campaign to all subscribers, everyone subscribed to your push notifications will get personalized drip notifications. The cool part is that you can create your entire sequence along with a delivery schedule.
In this condition as soon as the user subscribes, you can pass the values or set the attributes against the subscriber hash. This can be done using the response of the hash.
Case #2: Send to Custom Segments
You can also send a drip campaign to custom segments. If you’re not sure what that is, check out our article on how to create custom segments. For this trigger condition, you can pass the values or set the attributes against the response of the segment as soon as the subscriber enters a segment.
Case #3: Attributes and Geo-Location
With PushEngage you can send custom drip notifications to your users by using their country and city name attributes in the notification title and message. These are pre-defined attributes that you can use for all your subscribers without any coding. In the same way, you can add the first name of the user and other details in the notification fields.
For geolocation attributes, you would need to set the attributes against the subscriber hash as soon as the subscriber is subscribed.
Take a quick look at the sample code you can use:
 var newAttributes = {
 'name': 'Jon smith',
 'isAdmin': true,
 'lastActive': "2019-09-19T05:41:53.150Z",
};
This code snippet is meant to create three new attributes for a user. In simple terms, the code is trying to assign a name, administrative privilege labels, and their last active timestamp. These are all data points that can be used to create personalized push notifications.
window._peq.push(['init', false, function(res) {
   if(res.statuscode==1) {
     //Get your subscriber hash in response
     console.log(res.subscriber_hash);
     window._peq.push(['set-attributes', newAttributes, function(res) {
       if(res.statuscode == 1) {
         // handle response
         console.log(res);
       }
     }]);
   }
}]);
Here, you’re simply trying to get the new attributes defined in the previous code block for a new subscriber and send them to the PushEngage server. You can also fetch the attributes when the subscriber logs in to the website as a user. Once these attributes are sent, you can use the attributes in your PushEngage campaigns.
If you want to understand attributes in more detail, check out the PushEngage Attributes API documentation.
How to Set Up A Drip Autoresponder with Attributes
Now that you understand a little more about the types of drip campaign attributes you can use, let’s go ahead and set it up using PushEngage. If you’re not already using PushEngage, get started today.
Log into your PushEngage dashboard and head over to Campaign » Drip Autoresponders and click on Create Drip Autoresponder:

Start creating your campaign by giving it a name and adding notifications to your drip:
Now, it’s time to start using the attributes. Let’s say that you want to add the first name of the subscriber in your notification. You can use the tag {{name||there}}.
The attribute tag does a very simple thing here. For each subscriber, PushEngage checks for their name saved as the attribute name. If it doesn’t find valid name data for any subscriber, PushEngage will use the fallback option there instead.
As you can see, the example is also using the attribute {{PE_CITY}} in the Notification Message field to personalize the notification by the subscriber’s location. There’s no need to create geolocation attributes as PushEngage stores the location of each subscriber against their hash. So, {{PE_COUNTRY}} and {{PE_CITY}} are default attributes.
You can also use attributes in the multi-action buttons of the Drip Campaign:
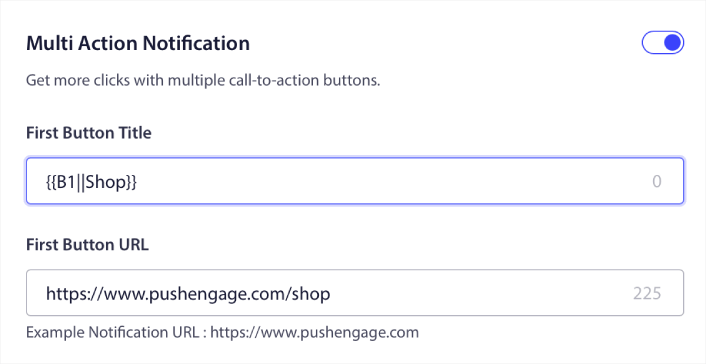
NOTE: Make sure you pass a default value just in case the attribute value is missing.
Here’s what the personalized push notifications would look like using the attributes in our example:
When you send such personalized and targeted notification you’ll notice a higher CTR as compared to any push broadcast notification or drip campaign.
What’s Next?
That’s all for this one, folks!
The attributes you create can also act as a way to segment your subscribers. Or, you can create segments dynamically through GTM. Maybe check that out next?
If you’re new to push notifications, you should follow a full-blown push notification testing process before you go live. It’ll help you troubleshoot common issues before your visitors see them and start complaining about a broken user experience.
And if you haven’t already, go ahead and give PushEngage a try. PushEngage is the #1 push notification service in the world. So, if you’re serious about growing your business, you should invest in PushEngage.


