Looking for a simple guide on how to accept WordPress recurring payments on your site?
Whether you’re running a service site, an eCommerce store, or a membership platform, you need to allow credit card payments on your WordPress site. And one of the simplest ways to grow your business is to accept recurring payments.
But integrating a payment gateway to your site can be a real hassle if you have to code it from scratch. So, what do you do when you don’t know how to code? Which plugins are worth looking into?
In this article, we’re going to go show you how to accept WordPress recurring payments with writing a single line of code. And we’ll do it in less than 10 minutes.
Sounds good? Let’s dive in.
Why Use a WordPress Recurring Payments Plugin on Your Site?
Ever wondered why some of the coolest sites out there use WordPress recurring payments plugins? Well, buckle up because we’re about to spill the beans on why having one on your site might just be a game-changer.
PushEngage is the #1 push notifications plugin in the world. Get it for free!
1. Smooth Subscription Management: Imagine a world where billing is as easy as a Sunday morning. Recurring payments plugins do just that – making it a breeze to set up and manage subscription plans. Your customers get what they want without the headache, and you get happy subscribers.
2. Predictable Revenue: Who doesn’t love a steady income? Recurring payments bring predictability to your cash flow, making financial planning a walk in the park. It’s like having your own financial crystal ball.
3. Customer Retention Magic: Convenience is key, and automated payments offer just that. Customers stick around when it’s hassle-free, and with automatic renewals, there’s no chance of accidentally losing subscribers. It’s a win-win.
4. Billing Flexibility: Let your customers dance to their own billing rhythm. Recurring payments plugins let you offer various billing cycles, giving your users the freedom to choose what works best for them.
5. Less Admin Stress: Who needs extra work? Automation is your new best friend. Manage subscriptions, send invoices, and handle payments effortlessly. Plus, integration with other tools means less juggling and more time for the fun stuff.
6. Cash Flow Bliss: Say goodbye to financial rollercoasters. Recurring payments contribute to a smooth cash flow, helping you sleep soundly knowing that your revenue is on a steady path.
7. Fort Knox Security: Security first! Reputable recurring payments plugins come with top-notch security features, ensuring that your customer’s payment details are locked down tighter than Fort Knox.
8. Scalability for the Win: Growing pains? Not here. Recurring payments systems are like growth spurt champions, scaling effortlessly with your business. Handling a growing subscriber base has never been so stress-free.
9. Marketing Goodies: Spice things up with promotions and trials. Some plugins offer features that let you attract new customers with free trials and promotional pricing. It’s like giving your subscribers the VIP treatment.
10. Stay Compliant: Rules are meant to be followed. Reputable recurring payments plugins ensure that you’re playing by the book, keeping your payment processes in line with industry standards and regulations.
So, there you have it! If you want to take your WordPress site to the next level, consider adding a WordPress recurring payments plugin. Your subscribers will thank you, and your business will be riding the wave of success.
Accepting credit card payments will improve your conversion rate. If you’re running an eCommerce site, this can reduce your cart
How to Accept WordPress Recurring Payments (Easy)
Now that we understand why you should be using a WordPress recurring payments plugin and the benefits of using Square, it’s time to add Square payments to your site. There are multiple WordPress plugins to integrate Stripe into your site.
We recommend using WPForms to accept recurring payments on WordPress.

WPForms is the most powerful drag-and-drop WordPress form builder. It’s super easy to build a fully custom form for your WordPress site in a few minutes using the plugin. WPForms can help you create any type of contact form, payment form, survey form, registration form, and newsletter optin form you can think of.
They have over 300 templates in the Pro version that are proven to work. You can instantly import these templates and launch the form in minutes. WPForms is completely beginner-friendly. Anyone can use it to create powerful forms.
The plugin comes only with core essentials. So, if you need more functionality in your forms, you can always install an addon. This keeps the plugin lightweight and simple to use.
With WPForms, you get:
- A Beginner-Friendly Form Builder
- Order Forms
- Multi-step Forms
- Email Marketing Integrations
- Conditional Field Logic
- Form Abandonment Campaigns
- Form Landing Pages
- Popup Contact Forms
And more. The best part is that you can directly create WordPress payment forms that accept recurring payments using Square. All you need is a Square account and the WPForms plugin to get started. Check out our WPForms review for more details or simply follow along.
Step #1: Install and Activate the WPForms Plugin
The first thing you need to do is install and activate the WPForms plugin. If you’ve never installed a WordPress plugin before, check out this guide on how to install a WordPress plugin.
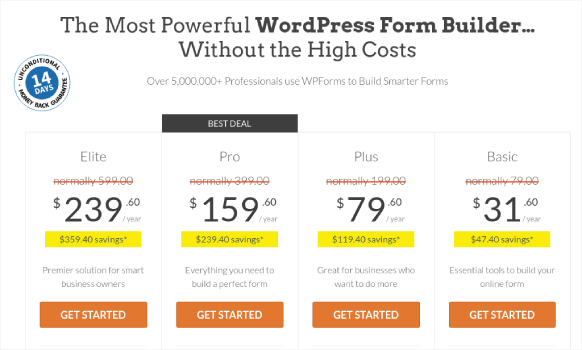
Start by heading over to WPForms and choose a plan:
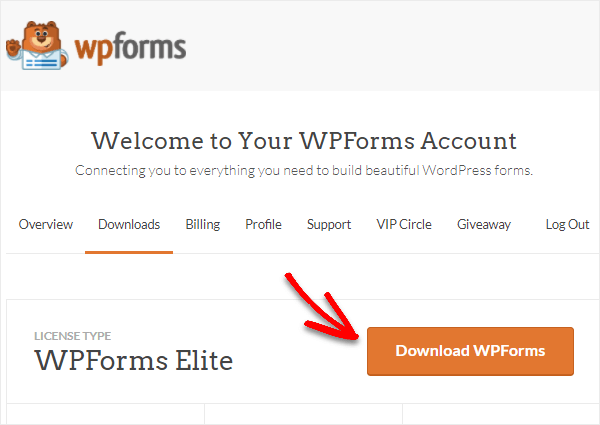
Once you’ve installed the plugin, go to your WPForms dashboard and download the plugin:
Then, upload the zip file to your WordPress site and you’re ready to get started!
Step #2: Install and Activate the WPForms Square Addon
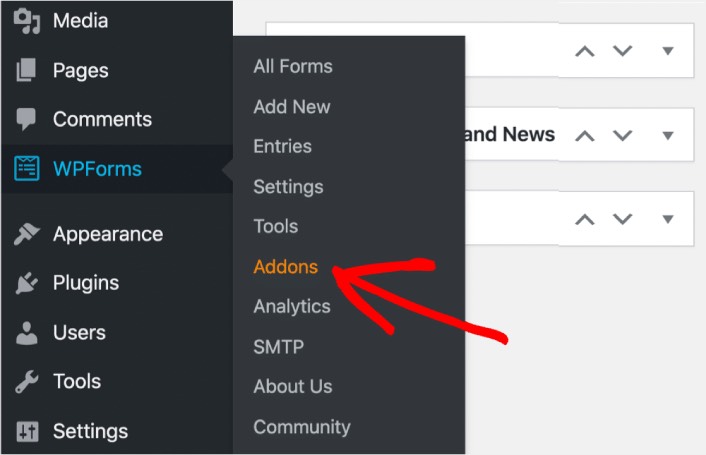
Head over to your WordPress dashboard and click WPForms » Addons:
Scroll down to the Square addon and click on Install:

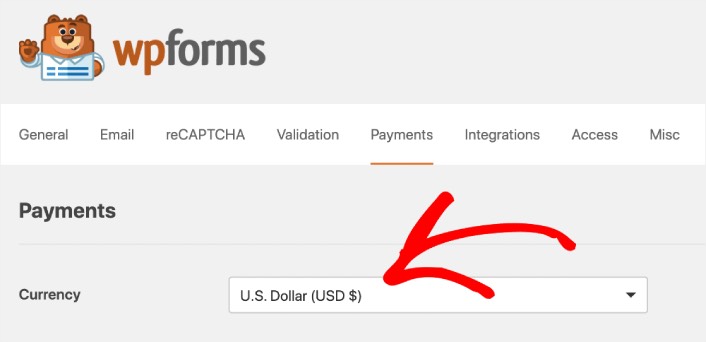
Once you’re done installing the addon, click on Activate. Next, we’re going to configure the payment settings. Go to your dashboard, click WPForms » Settings, then click the Payments tab. Under Currency, select your currency:
Next, we’re going to connect Square to WPForms.
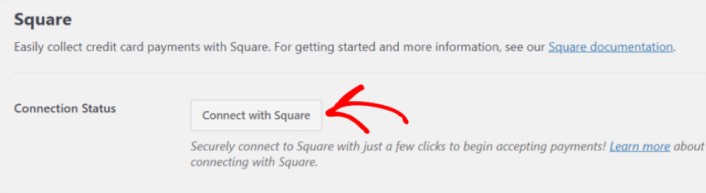
Step #3: Connect Your Square Account to Your WordPress Site
In the payment settings page, scroll down to the Square section and go to the Connection Status tab. Click the Connect with Square button:
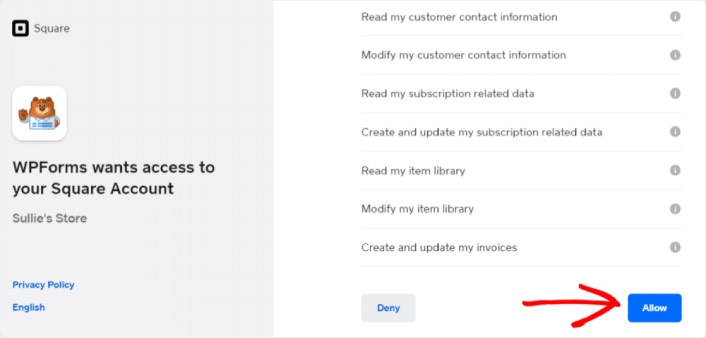
Sign in to your Square account and allow WPForms access to the specific information that it requests:
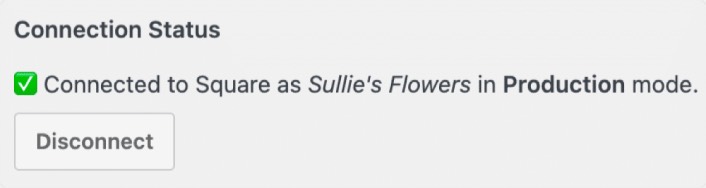
When it’s done, you will automatically get redirected back to the payment settings page and you should see the Connection Status as Active.
Step #4: Create a Square Payment Form
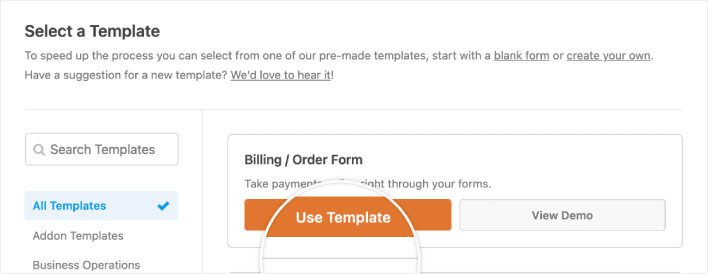
Now that WPForms is installed and activated, it’s time to create an order form. Head over to WPForms » Add New:

This will open the WPForms drag and drop form builder. To create a new form, give it a name and select your form template. To create an order form, we’re going to go ahead and select the Billing/Order Form template:
Next, you’ll want to modify what items are available to order. Scroll down to the Available Items section on the right that the template includes and click on it.
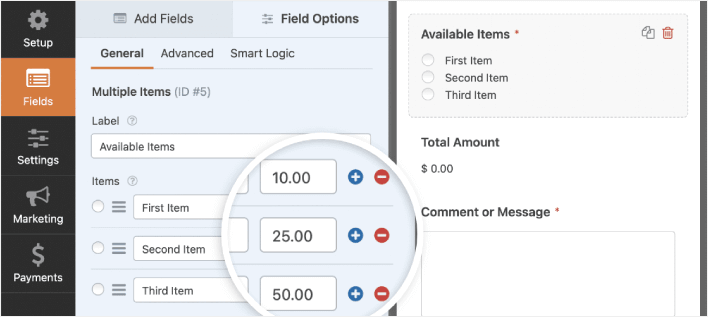
This will open up the Field Options in the left panel. Here you can rename the field, add or remove order items, and change the prices. When you’re done customizing your WordPress order form, click Save.
You can also make forms look great by following the steps in our post on how to create a multi-step form in WordPress. It’s a great way to improve the user experience and reduce cart abandonment rates. But we’ll stick with a single page for this tutorial.
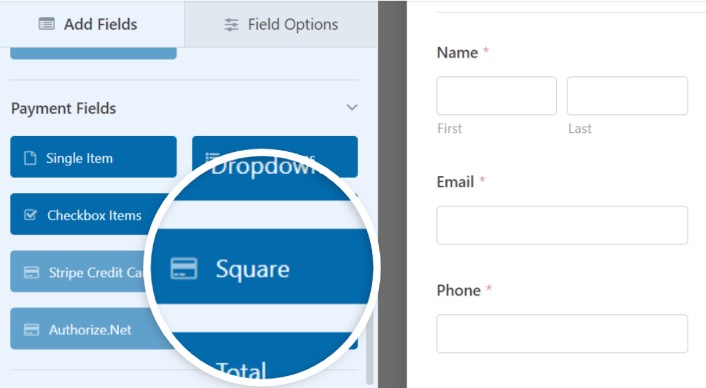
WPForms integrates with PayPal, Authorize.Net, Square, and Stripe for accepting credit card payments. We’ve already installed the Square addon. So, simply add a Square payment field:
As soon as you add the Square filed, you will see a popup message to enable the Square Payments.
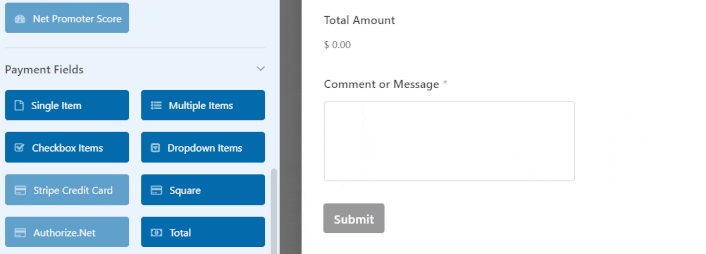
Click on the OK button to close the pop-up.
Step #5: Enable Square Recurring Payments
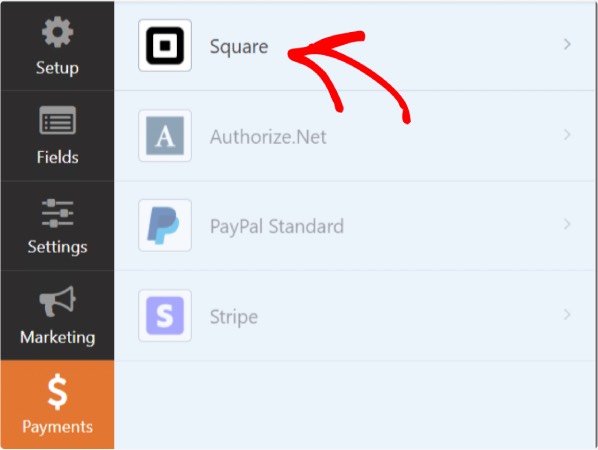
In your WPForms dashboard, click on Payments » Square:
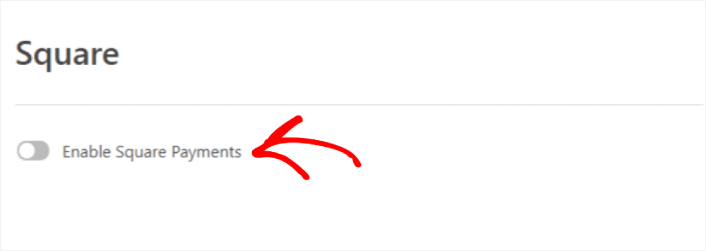
Simply toggle on the Enable Square Payment:
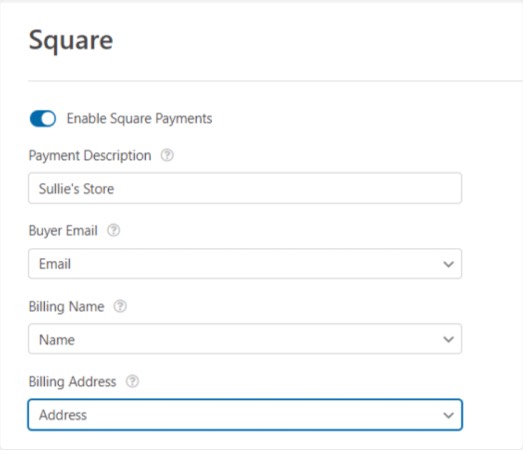
Fill in your payment details:
And you’re done! Next, let’s scroll down to Subscriptions and toggle on the option labeled Enable recurring subscription payments.

Don’t forget to hit Save.
Step #6: Configure WordPress Recurring Payments Form Settings
Next, you’ll want to set up notifications and confirmations. Head over to Settings » Confirmations to configure confirmation settings:

And then in the same menu, go to Notifications to configure your notification messages:

By default, the notifications are sent to the WordPress admin email. So, if you’d like the emails to be sent somewhere else, such as the email ID of your Head of Sales, you can do that right here.
What to do After Accepting WordPress Recurring Payments
That’s all for this one, folks!
By now, you’ve created a WordPress recurring payments form. Next, you should set up form abandonment tracking to reduce your form abandonment rates.
After that, all that’s left is generating traffic to your site so that your form can get to work and start converting. A simple way to do that is to start using push notifications. Sending push notifications is a great way to generate repeat traffic for your site. If that’s something you’re interested in, you should check out these articles as well:
- Push Notification Cost: Is It Really Free? (Pricing Analysis)
- How to Get More Traffic to Your WordPress Blog (9 Easy Ways)
- How to Boost Your Web Push Notification Opt-In Rate (7 Ways)
- How to Add a Web Notifications WordPress Plugin to Your Site
We recommend using PushEngage to send your push notifications. PushEngage is the #1 push notification software in the world. So, if you haven’t already, get started with PushEngage today.


