Looking for a quick way to add and edit your app push notification icon?
It’s actually super easy. The notification icon tells your subscribers who you are. It’s a brand mark on each push notification you send. And that can be priceless because it helps your audience remember your brand.
The cost of making sure that each push notification you send helps you become more memorable? Less than 5 minutes.
In this article, we’re going to show you how to add and edit your app push notification icon. And like we said, it’s super easy.
Let’s dive in.
Why Add an App Push Notification Icon?
A app push notification icon is a small, distinctive image that represents an app on a user’s device. It appears alongside push notifications to visually identify the source app of the message or alert.
Your branding is a big component of your app push notification strategy. And your app icon helps users quickly recognize which app or website is communicating with them without having to read the notification’s text.
Adding an app push notification icon is a smart move for a few reasons:
- Recognition: Just like seeing a familiar face in a crowd, we instantly recognize icons. When your app sends a notification, the icon acts like a little wave, saying, “Hey, it’s me!” This helps users quickly identify which app is calling for their attention.
- Branding: Your icon is like a tiny billboard for your app. It’s a part of your brand identity. Each time users see it, they’re reminded of your app. This can help keep your app top-of-mind.
- User Experience: Users often have many apps installed, and it can be a real jumble. A unique icon helps them manage their notifications more efficiently. They can see at a glance which notifications they want to check out first.
- Professionalism: An app with its own notification icon looks more polished and professional. It shows that you’ve put thought into even the small details, which can improve overall user satisfaction.
- Functionality: Sometimes, the icon can also convey additional information. For example, a messaging app might show different icons for a new message vs. a missed call. This adds an extra layer of functionality and user convenience.
So, an app push notification icon might be small, but it plays a big role in how users interact with your app and perceive it!
How to Add an App Push Notification Icon
Now that we understand what an app push notification icon is and why you should add it, let’s check out how you can add it easily without any coding at all.
Step #1: Select a App Push Notification Service
Push notifications are a marketing tool that helps you to connect with web visitors even after they leave your website. You can send targeted notifications to your push subscribers and even personalize your notifications for difference customer segments. But which push notification service should you choose?
We recommend using PushEngage to send push notification campaigns.

PushEngage is the best push notifications service in the world. And we’re not just talking about the free version. It allows you to connect with visitors after they leave your site with targeted push messages.
PushEngage is our first choice for push notification serives and tools because it’s:
- Super easy to use
- Got a visual campaign builder with pre-built templates which requires little to no coding to set up
- Easy to set up fully automated push notification campaigns for any kind of site
- Fully equipped with Android and iOS SDKs to quickly develop, deploy, analyze, and manage app push campaigns
- Built with multiple options to send personalized push notifications for higher click rates
- Equipped with custom goal tracking, UTM parameters, and advanced analytics
- Got powerful push notification A/B testing options
And this is barely scratching the surface. Check out PushEngage’s full list of features before you go any further.
The most incredible part about PushEngage is that it has a forever-free plan that you can try out before making a purchase decision.
Pro Tip: Check out our article on push notification cost analysis before you buy any service.
Step #2: Set Up PushEngage App Push Notifications
Right till now, you had to use skeleton SDKs to send app push notifications. The problem with using those SDKs is that they are pretty bare bones.
Theoretically, you can send any type of mobile app push campaigns with them. But then, you also have to build:
- An interface to manage your campaigns
- An analytics suite to track your campaign performance
- Better support for rich media and in-app redirection links (or deep links)
- Processes to liaise both marketing and development teams
All for the sake of introducing a single channel of growth. Using the old tools to send mobile app push notifications is tedious, expensive, resource-intensive, and time consuming. And of course, it requires deep coding skills in your team to develop and manage everything you build.
With the new PushEngage Android and iOS SDKs, you can send mobile app push using the same reliable software for great delivery rates. But we’ve built several layers on top that make it super easy to build custom integrations with your app. And PushEngage manages the entire SDK. So, you don’t even have to spend a ton of time and money to manage your integrations.
All you have to do is build!
You can send broadcast notifications directly from your PushEngage dashboard once you’ve set up your app to send mobile app push notifications using PushEngage’s SDK. Yes, you still have to add code to your app and develop the connectors between your app and the PushEngage API. But once that’s done, you can easily create mobile app push campaigns from a pre-built software interface that also comes with:
- Highly engaging push campaign types
- Proven campaign templates with high conversion rates
- Automated campaigns to promote your content whenever you publish
- Multiple targeting and campaign scheduling options
- Web push campaigns as a complementary growth channel
- Increased audience retention using data-based personalization
- Goal tracking and advanced analytics
- Smart A/B testing
- A Dedicated Success Manager
And so much more. We just took the pain out of developing Android and iOS mobile push campaigns for your app.
Step #3: Add or Edit Your App Push Notification Icon
You can easily set an icon for iOS and Android mobile app push notifications. Go back to your PushEngage dashboard and head over to Campaign » Broadcasts and click on Create a New Push Broadcast.

Under Android Options, check the Large Icon Image checkbox:
You can do the same for iOS mobile app push as well. Set a media image for your iOS app push notification to make your campaign more eye-catching:
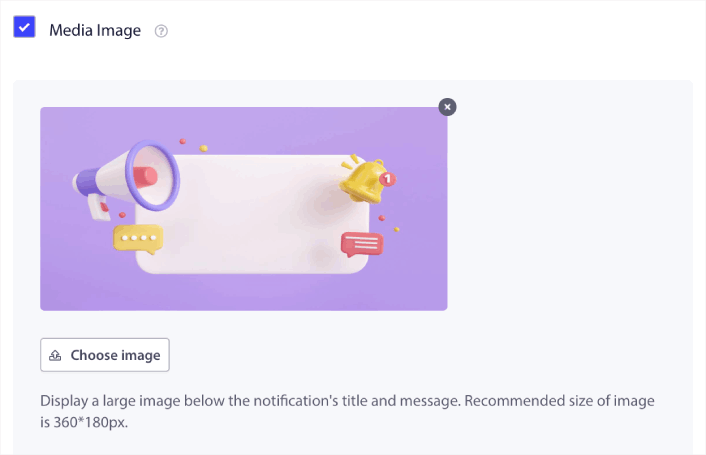
The image you upload is your app push notification icon. Keep the dimensions of the image at 192px x192px for the best results and make sure that the image size is less than 1MB. You can use a JPG, PNG, or even a GIF for animated brand marks. Just makes sure that the icon is consistent with brand marks that you use on social network sites.
If you need to edit your icon later, this is where you do it. Simply upload a different image and you’re done!
In other words, you can preserve your brand design guidelines pretty easily when you send mobile push notifications. And all that, from an easy to use interface that you’ll never have to manage!
Step #4: Send a Test Notification to Check Your Notification Icon
Head over to your PushEngage dashboard and go to Campaign » Push Broadcasts and click on Choose from Templates:

Next, you can select a template to get started with from the library:
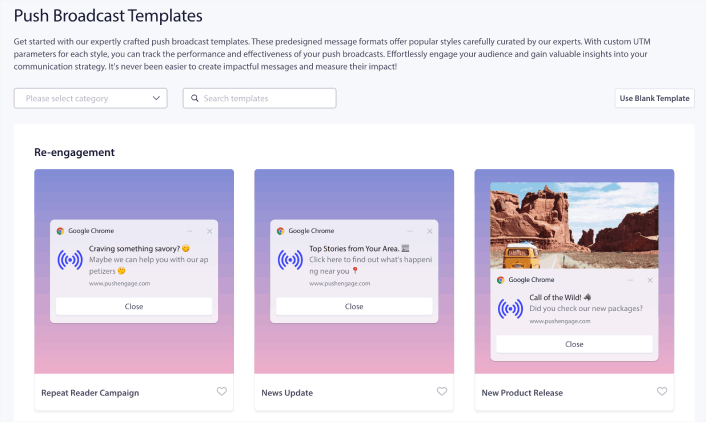
Simply hover on any of the templates and click the Use Template button to create a new push broadcast using that template:

When you use the template, it will automatically fill out all the fields you need to create a new push broadcast by fetching it from the template. Of course, you can edit all the fields to suit your brand more. But you can also send out the broadcast as is if you like.
Currently, we have push notification templates for:
- Re-engagement push notifications
- Announcement campaigns
- Promotional offer campaigns
- New blog post promo camapigns
- Seasonal offer push notifications
- Upselling and Cross-Selling push notifications
- Flash Sale push campaigns
And the coolest part is that even our free users will get access to some free templates. Of course, you can always upgrade your PushEngage account to access rich push notifications with more powerful features.
Let’s create a welcome push notification campaign now. Head over to your PushEngage dashboard and go to Campaign »
And as you can see, the notification icon is pretty prominent in our example!
If you’re new to push notifications, you should follow a full-blown push notification testing process before you go live. It’ll help you troubleshoot common issues with the functionality before your visitors see them and start complaining about a broken user experience.
What to do After You Add an App Push Notification Icon
Now that you know how to add an app push notification icon, it’s time for you to start creating your own campaigns. But before you get started with the campaigns, you should study some great push notification examples first.
And if you’re new to push notifications, you should check out our article on push notification best practices before you start creating campaigns. Some of the best practices that we actively recommend include:
- Boost Clicks With Curiosity
- Personalize Each Push Notification
- Stand Out With Rich Media
- Reactivate Dormant Push Subscribers
- Keep Customers Informed
- Use Emojis Wherever You Can
- Create a Sense of Urgency
We recommend using PushEngage to create your push notification campaigns. PushEngage is the #1 push notification software in the market and your campaigns will be in safe hands.
So, if you haven’t already, get started with PushEngage today.


