82% of companies agree that retention is cheaper than acquisition. In simple terms, it’s easier to retain a customer than it is to find a new one. The good news is that you can use push notifications for customer retention.
Push notifications are short, clickable popups that you can send to a subscriber to promote offers and other content. And you can use push notifications to retain your customers using automated campaigns.
In this article, we’re going to show you 7 simple but effective ways to use push notifications for retention.
Are you ready? Great! Let’s dive right into the good stuff.
#1. Stay Relevant With Dynamic Segmentation
Dynamic segmentation means automatically updating the marketing list segments a customer is included in based on their behavior or actions. A segment is a small group in your subscriber list that you create to send notifications that your subscribers will be interested in.
Let’s say that your site has content on how to put on costumes and reviews on different costume kits. So, if a subscriber likes to read the how-to articles you should send them more content related to their interest. And a simple way to do that is to create a segment in your push notification list that only contains subscribers who like how-to articles.
Segmenting your push notification subscribers is easy.
The best part? You can ask them to choose the kind of content they want to see from you:
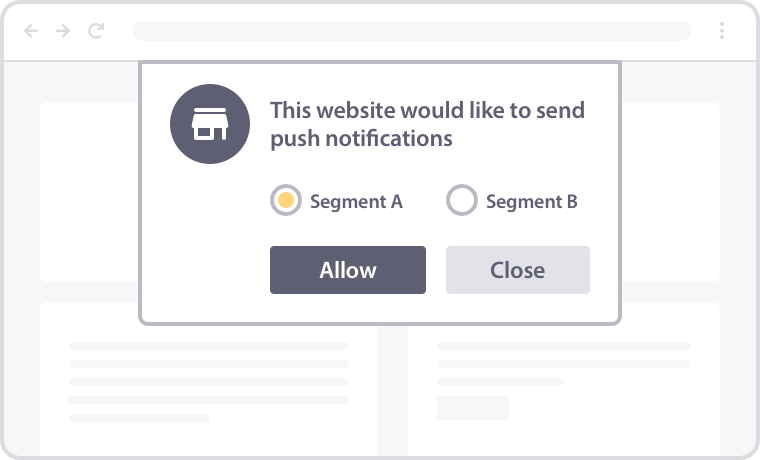
This improves your click rates dramatically and with very little effort.
Dynamic segmentation occurs when a subscriber shows interest in other content as well. In that scenario, you want to either remove the subscriber from the old segment to add them into a new segment. Or, you can add the subscriber to both segments.
But what does this mean for eCommerce businesses?
A simple example is when someone using the free version of PushEngage upgrades to a paid version. They no longer get our nudges to upgrade to a paid plan. Or, let’s say that someone with an abandoned cart finally checks out. They should no longer get reminders for their old abandoned cart.
In simple terms: They’re no longer part of the same audience segment. The subscriber was automatically reallocated to another audience segment.
Head over to your PushEngage dashboard and go to Audience » Segments to create your own segments:
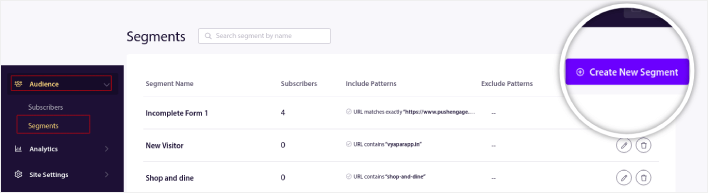
Check out this article if you need a detailed tutorial on how to create segments.
For even more powerful segmentation options, you should use the PushEngage Javascript API. The API gives you access to custom segmentation that goes a long way towards personalization:
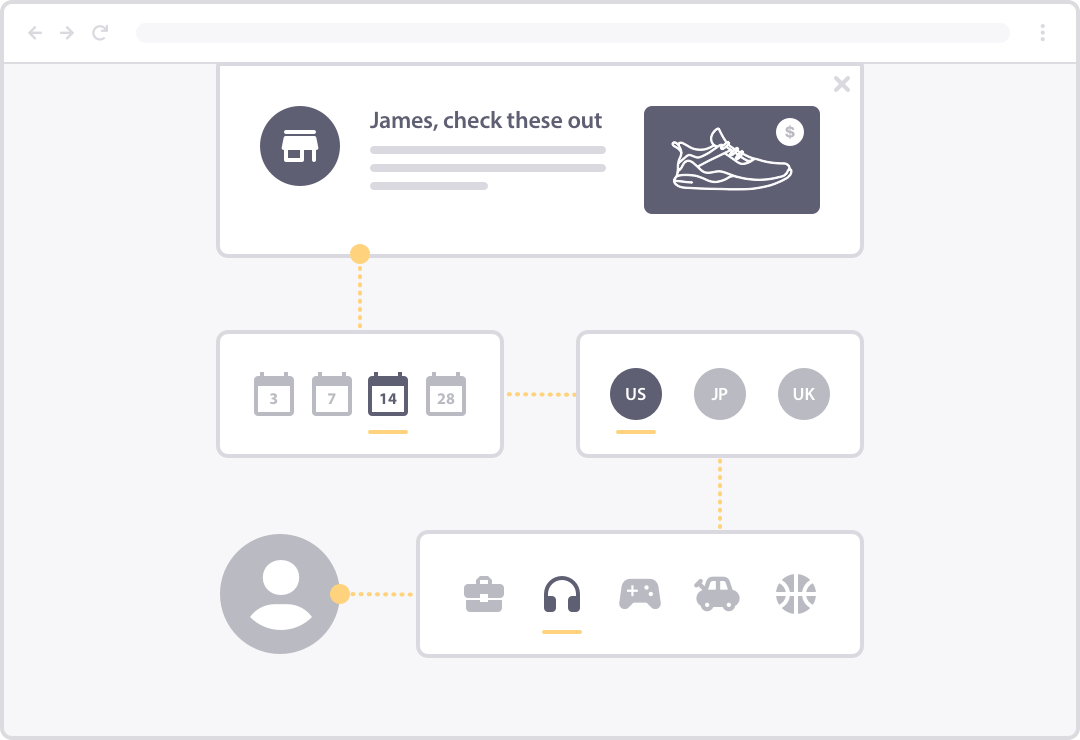
You could even connect PushEngage to your CRM to import any pre-built customer segments you already have and use.
#2. Use Automation for Follow-Ups and Campaigns
Automated drip push notifications are like email autoresponders with a better click rate. You can send out an automated series of push notifications to convince and convert casual browsers into paying customers.
Drip push notification campaigns are an extension of segmentation. You can create custom drip campaigns for each segment you create.
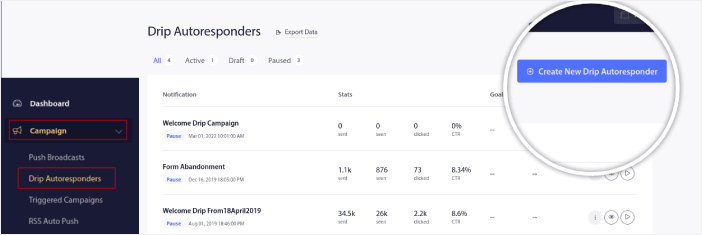
Go to Automation » Drip Autoresponder » Create New Drip Autoresponder to create a new drip campaign in PushEngage:
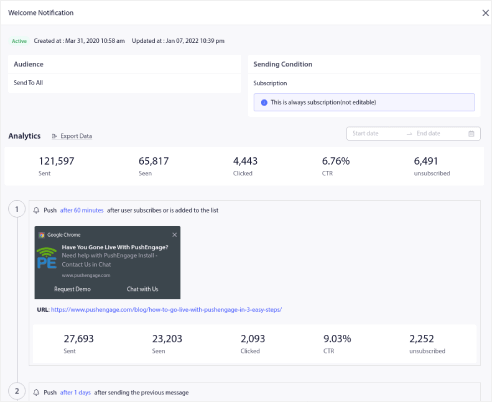
Here, you can create your entire campaign along with delays between each notification:
You can create a bunch of different drip campaigns. This includes:
- Automated welcome campaigns
- Abandoned cart recovery campaigns
- Automated re-engagement campaigns
- Form abandonment campaigns
And more!
You can get super creative with your push notifications as well.
#3. Personalize Your Push Notifications
You’ve probably seen push notifications like this one before:
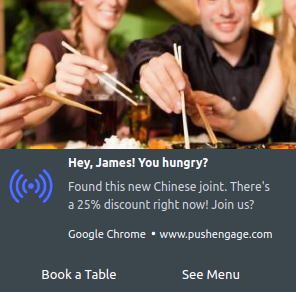
These are personalized push notifications and you can send the same kind of campaign to your subscribers as well. You should check out our article on personalized push notification campaigns that work for more creative ideas. It’s also easy to create this sort of personalization.
With PushEngage, you can customize your notifications using push notification attributes. Attributes are variables that fetch saved personal details such as your subscriber’s name, location, and more.
The best part is that you can personalize automated push notification campaigns just as much as personalized broadcast notifications. Check out our article on how to send personalized drip notifications using attributes.
#4. Use Expiration Dates For A Better Subscriber Experience
To give your subscribers a better user experience, you should send offline push notifications with an expiry date.
PushEngage uses offline notifications by default for all its push notifications. You don’t have to enable it. Offline notifications get delivered even if your subscriber is not online. They can see the messages in their notification tray when they come online.
All you have to do is set up a push notification with an expiration date. You can set up expiration dates and times for each notification so that if it becomes irrelevant or outdated, it won’t confuse the subscribers.
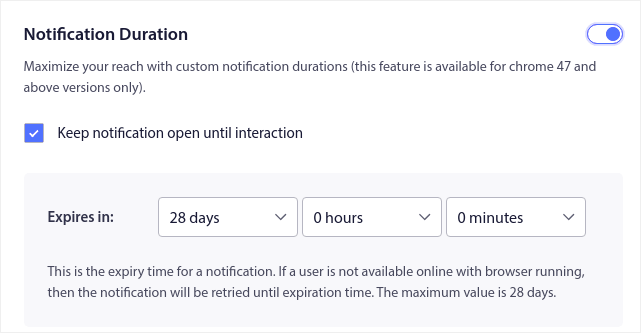
Once the expiry date is hit, your subscribers won’t see the notification even if it was delivered. This is super useful when you’re running a limited-time offer.
#5. Use Custom Scheduling To Get More Clicks
If your subscribers don’t see your push notifications at the right time, they’re not going to engage with you. You want to send notifications at a time when your subscribers want to see it and are actually online.
Intex increased click rates by 312% using drip push notifications and they did it by perfecting their campaign scheduling.
In short: Scheduling push notifications at the right time can mean the difference between push notifications your users click and notifications they ignore.
We wrote a full article on the best time to send push notifications. But you can do so much more with PushEngage’s scheduling options. You can schedule push notifications to:
- Get sent in subscriber timezones
- Go out on repeat for recurring events
- Get sent out with delays between two consecutive notifications
And a lot more!
Check out our article on ways to schedule push notifications to make the most of your scheduling options.
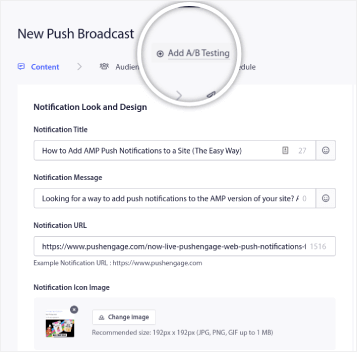
#6. Optimize for Conversions Using A/B Testing and Goal Tracking
It’s super easy to get lost with the wrong numbers when you look at your analytics data. Of course, you’ll want to increase your push notification subscribers but you’ll need to experiment a lot to increase your sales along with it.
When’s the right time to send a push notification? What kind of images should you use? Which headlines perform the best? What emojis should you include in your push notification? Is your offer good enough to get subscribers to engage with you?
How do you know if you’re on the right track?
You can use PushEngage’s Goal Tracking and Smart A/B Testing features so that you can grow your business using push notifications.
Smart A/B Testing helps you test out different ways to convert your subscribers into paying customers. You can test between images, buttons, titles, and URLs to see what converts best for your campaigns.
Goal tracking keeps you on track with what you want to achieve. You can keep tabs on how much revenue your push notification campaigns are making right from the PushEngage dashboard.
Using these two features can make push notification analytics so much simpler for you. And you can get a clear picture of your engagement and retention rates with every push notification you send.
#7. Create Campaigns That Get Triggered By Specific Actions
The only way to use push notifications for retention at scale is to automate your campaigns. With PushEngage, you can create smart triggers that automatically launch push notification campaigns.

A trigger includes any action your web traffic takes on any of your URLs such as scrolling, clicking, and downloading files! Once you create a trigger, you can use it to send out drip push notifications.
For instance, abandoned cart recovery campaigns use the default PushEngage triggers. If you want to create a custom user action to trigger notifications, you can use the PushEngage Javascript API to create custom events that fire off campaigns.
What’s Next?
That’s all for this one, folks!
If you’re just starting out with push notifications, you should get started with PushEngage. PushEngage is the best push notification software in the world. It’s super easy to get started with push notification campaigns and you can check them out next:
So, if you haven’t already, get started with PushEngage today


