Looking for a tutorial on how to install conversion tracking pixel in WordPress?
Conversion tracking pixels might sound a bit technical, but it’s actually not that hard. Pixels help you track how your ads are performing. You can even use them to create retargeting ads because a pixel tracks who’s landing on your website. So, it’s a super easy way to increase your conversions and track your performance at the same time.
But how do you install a pixel on your site? The manual way requires you to edit the HTML on your site. So, do you need to learn how to code? Thankfully, no! There’s a super simple and easy to use plugin that allows you to add conversion pixels without any coding.
In this article, we’ll show you how to install conversion tracking pixel in WordPress. And we’ll do it using a simple plugin so that you don’t have to get into coding yourself.
Let’s dive in.
Why Install a Conversion Tracking Pixel in WordPress?
Are you running a website on WordPress and wondering how to track your visitors’ actions? Enter the conversion tracking pixel – your secret weapon for understanding your audience and boosting your site’s performance.
PushEngage is the #1 push notifications plugin in the world. Get it for free!
Let’s break down why installing a conversion tracking pixel in WordPress is a game-changer.
1. Keep an Eye on What Visitors Do: Ever curious about what happens after someone lands on your site? Whether they’re downloading your e-book, signing up for a newsletter, or making a purchase, a tracking pixel keeps you in the loop.
2. Measure Your Ads’ Success: If you’re spending money on ads, you want to know they’re working, right? Conversion pixels show you exactly how many people are taking action because of your ads. It’s like having a crystal ball for your marketing efforts!
3. Get to Know Your Audience: These pixels are like detectives, gathering clues about the people who love your site. This info is gold for tweaking your content and ads to speak directly to your audience’s interests.
4. Bring Back Window Shoppers: Some visitors leave without buying anything. But, with conversion pixels, you can ‘remind’ them about your site through targeted ads. It’s like saying, “Hey, remember us? We’ve got just what you need!”
5. Make Your Site Even Better: Which parts of your site are hot, and which are not? Conversion pixels help you figure this out, so you can make your website more user-friendly and fun to visit.
6. Perfect Your Website’s Look and Feel: Test different page styles and see what works best. Do your visitors like big, bold buttons? Or maybe they prefer simpler designs? With conversion pixels, you’re not guessing anymore.
So, there you have it! Conversion tracking pixels are not just about numbers; they’re about making smarter decisions, understanding your audience, and ultimately, making your WordPress site a place people love to visit. Happy tracking!
How to Install Conversion Tracking Pixel in WordPress (No Code)
The simplest way to install conversion tracking pixel in WordPress is to simply paste the code snippet into your site. The cool bit is the code is completely done for you. So, all you have to do is install a WordPress code snippets plugin to add your conversion pixel.
We recommend using WPCode to do it.
WPCode is a fully free WordPress plugin that allows you to insert code snippets on your site without any coding knowledge.
It allows you to easily add code snippets like Google Analytics, custom CSS, and Facebook Pixel to your WordPress site’s header and footer without having to edit your theme’s functions.php file.
You can also use WPCode to insert custom PHP, JavaScript, CSS, HTML, and text snippets with full conditional logic and code priority support. If you’ve ever managed a WordPress site before, you’ll know how incredibly useful this plugin is. You can use the plugin for:
- Google Search Console verification
- Google Analytics tracking
- Custom CSS code
- Adding push notifications
- Adding conversion tracking pixels in WordPress
And any code snippet you can think of inserting into your WordPress site.
The best part about WPCode is that there’s an involved developer community to prepare a code library for you. All you have to do is find the right code snippet for you from a verified developer and click on the recipe. The plugin will automatically install everything for you.
Step #1: Install and Activate the WPCode Plugin
Once you buy WPCode from the website, go ahead and download the plugin from your account page. Then, install it like any WordPress plugin. If you’re never done it before, check out this tutorial on how to install a WordPress plugin.
When you’re done, head over to Code Snippets » Settings in your WordPress site and paste in the API key you get from WPCode to activate the plugin:
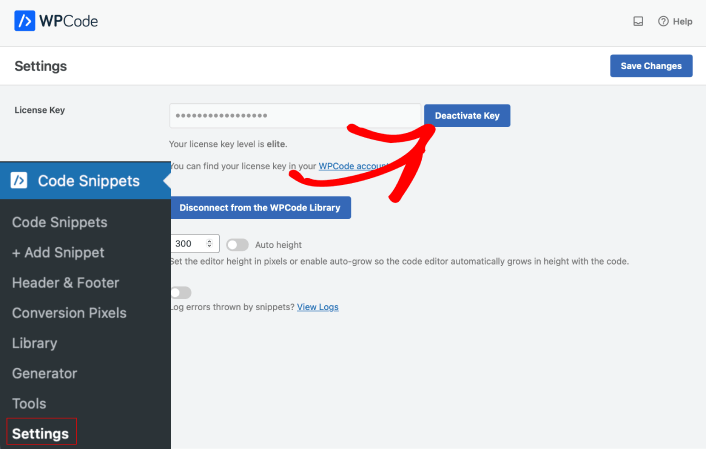
When you’re done, hit the Save Changes button.
Step #2: Add the Conversion Pixels Addon
Head over to Code Snippets » Conversion Pixels from your WordPress dashboard. Then select Install Addon Now:
If you don’t see the option to install the addon, you likely need to upgrade to a higher WPCode plan.
Step #3: Install Conversion Tracking Pixel in WordPress
Once you install the Conversion Pixels addon, you’ll be able to view the various platforms WPCode supports as well as the pixel ID settings:
As you can see, you get support for Facebook, Google, Pinterest, TikTok, Snapchat, and custom click tracking pixels. All you have to do is add your Pixel ID and the enable tracking for registered Pixel Events using a simple toggle. If you want to track conversions, you can use that platform’s Conversions API Token.
Pro Tip: WPCode can automatically track eCommerce events for Easy Digital Downloads. You can automatically track specific conversions/events:
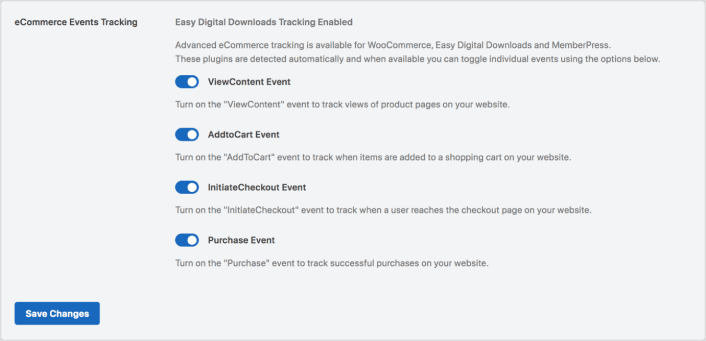
Again, all this is without a single line of code. And if you’re running a digital products store, Easy Digital Downloads is the best WordPress eCommerce plugin for you. Check out our full review of Easy Digital Downloads before you get started.
When you’re done, click on Save Changes.
To add conversion pixels from other platforms, you can simply add the Pixel ID in the appropriate field. It’s super easy.
What to do After You Install a Conversion Tracking Pixel in WordPress
That’s all for this one, folks!
Now that you know how to install a conversion tracking pixel in WordPress, it’s time to optimize your site to increase conversions.
And if you’re looking for a simple, affordable way to grow your repeat traffic and conversions, we recommend using push notifications. Push notifications can help you bring in more repeat traffic and site engagement. You can also create automated push notification campaigns that generate sales.
Not convinced? Check out these resources:
- 7 Smart Strategies to Boost Customer Engagement
- Are Push Notifications Effective? 7 Stats + 3 Expert Tips
- How to Set Up Abandoned Cart Push Notifications (Easy Tutorial)
- How to Add a Web Notifications WordPress Plugin to Your Site
We recommend using PushEngage to create your push notification campaigns. PushEngage is the #1 push notification software in the world. So, if you haven’t already, get started with PushEngage today!


