
Looking for a guide on how to install WordPress push notifications without a plugin?
You’re definitely in the right place.
In this article, we’ll show you how to install push notifications to a WordPress without using a push notifications plugin:
- Even if… you’ve never customized anything on WordPress without a plugin;
- Even if… you’ve never written a single line of code;
- Even if… you’ve tried to do it before and already failed;
We’ll get push notifications installed on your site.
Sounds good? Let’s dive right in!
How to Install Push Notifications Without A Plugin
Installing push notifications to WordPress without a plugin isn’t difficult. But it does have a few steps and you’ll want to follow along with this guide step-by-step.
Don’t jump ahead in time at any time and you’ll be fine.
Let’s go!
Step 1: Set Up Your PushEngage Account
Let’s get started. You can start from the PushEngage home page. Just click the Get Started button:

You can select the free plan to try out PushEngage, or choose a paid plan if you’re serious about growing your business.
Once you’ve signed up for an account, head over to the PushEngage dashboard and go to Settings » Site Settings » Installation Settings:
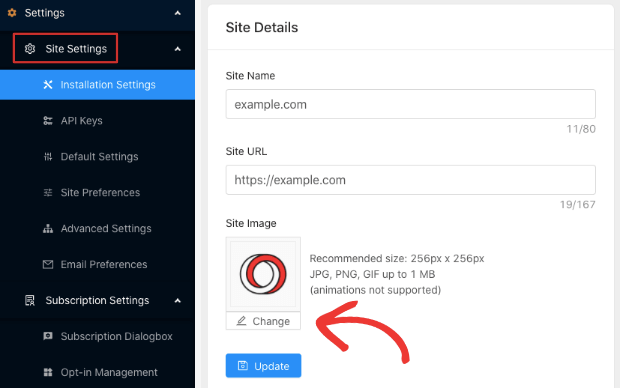
This is where you configure your site details and branding. Go ahead and set a logo and site URL for your push notifications. You should do this right now so that you can test your push notifications properly.
Step 2: Get the Installation Code
Next, you’ll need to head over to the PushEngage dashboard and get the installation code. Go to Settings » Site Settings » Installation Settings:
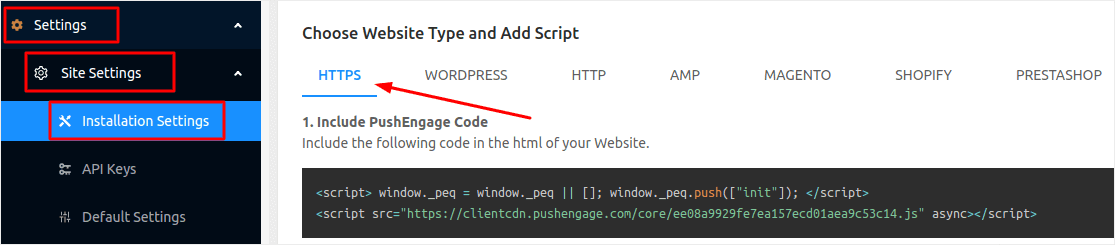
Depending on whether your site has SSL installed or not, you’ll have to go to either HTTPS or HTTP tab to get the installation code.
Pro-Tip: If you don’t have an HTTPS website, you should definitely install an SSL certificate.
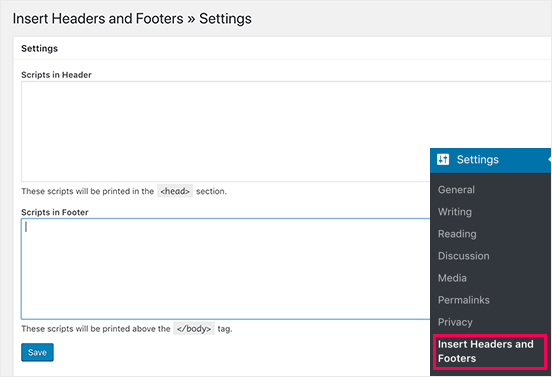
Step 3: Add A Plugin to Insert Your Code to WordPress
Once you have your installation code from the last step, copy it. We’re going to insert this code into your WordPress site next.
But first, we’ll need a plugin to do it easily.
You can insert the code by editing header.php file in the WordPress Theme Editor. But this is an incredibly risky method if you don’t know how to code. A single semi-colon out of place could wreck your site completely.
So, we’ll use the Insert Headers and Footers plugin. It’s 100% free and very easy to use.
Go ahead and install the plugin. If you’re not sure how to do that, follow along with this step-by-step guide to installing WordPress plugins.
Once the plugin is activated, you’ll want to add the code from the PushEngage dashboard to the header section:
And you’re done!
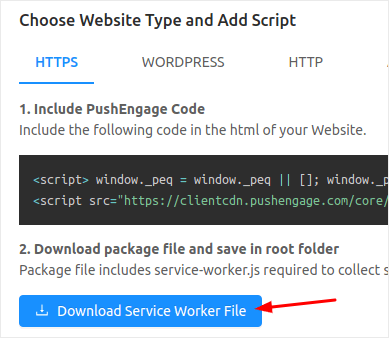
Step 4: Add the Service Worker File (Only For HTTPS Sites)
If you’re running a site without an SSL certificate, go ahead and skip this step.
For HTTPS sites, there’s one extra step: adding the service-worker.js file to your website root directory.
Head back to your PushEngage dashboard and go to Settings » Site Settings » Installation Settings. Under the HTTPS tab, you’ll see the option to download the service-worker.js file:
Once downloaded, you’ll have to extract the file from the zip folder. Next, you’ll have to upload this to your WordPress site’s root folder. If you’re not sure how to do this, check out this article on how to upload files to WordPress using FTP.
Once you upload the file to WordPress, head over to example.com/service-worker.js in your browser. If everything went well, you’ll be able to access the file from your browser and you should see something like this:

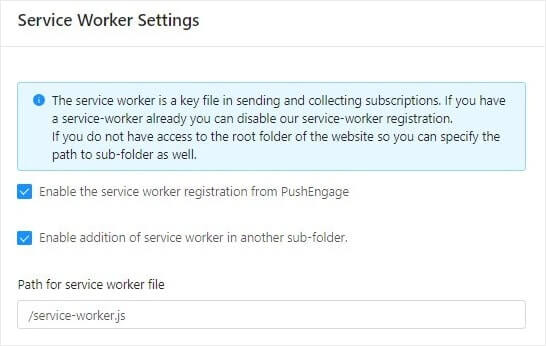
NOTE: If you can’t upload the service-worker file to the root folder, you have the option to upload the file to another folder. Go to PushEngage Dashboard » Settings » Site Settings » Advanced Settings.
Just follow the instruction in the Service Worker Settings and you’re golden:
And that’s all!
You’ve successfully installed web push notifications to WordPress without using a plugin.
What to Do Before Sending Push Notifications
You’re almost done.
Before you start sending push notifications, you’ll need to set up a subscription opt-in for your website. Your opt-in will convert web visitors into push notification subscribers. So, this is a critical element.
If you need some inspiration, you can check out this article on high-converting push notification opt-ins. Once you’re done setting up the opt-in, your site can collect subscribers. But how do you even know that your opt-in is working properly?
So, the sensible thing to do is set up a welcome push notification.
Pro-Tip: You should spend some time on a full-scale test of your push notifications. This will troubleshoot the most common problems and you won’t waste your time trying to resolve issues later on.
Wrapping Up
That’s all for this one, folks!
If you found this article helpful, be sure to drop a comment below.
Getting started with push notifications can seem intimidating. But if you follow the best practices, you should be fine. More importantly, you’ll make a lot more profit with the help of push notification campaigns.
If you’re new to push notifications, you should try out PushEngage. PushEngage is the #1 push notification software in the market. And your campaigns will be in safe hands.
So, if you haven’t already, get started with PushEngage today!


Thank you for sharing this informative post.
Thank you for sharing this informative post.