Stop losing sales to unanswered customer questions. Here’s how to add live chat to your WordPress site—for $49/year instead of $200/month.
By the end of this guide, you’ll have:
- A professional chat widget on your WordPress site
- Customer messages sent straight to your email, SMS, or WhatsApp
- Zero new inboxes to check (conversations go to YOUR DMs)
- Everything set up in under 5 minutes
Let’s dive in.
Send Multichannel Messages Today!
Push and WhatsApp messaging are super effective, low-cost marketing tools to help you grow your repeat traffic, engagement, and sales on autopilot.
- Before You Start
- Installation Methods
- Common Issues & How to Fix Them
- Pro Tips to Close More Sales
- Next Steps
- Frequently Asked Questions
- How much does PushEngage Chat Widget cost?
- Do I need a PushEngage paid plan?
- Can I use this with WooCommerce?
- Does this work on mobile?
- What if I'm already using LiveChat or Intercom?
- Can I customize which pages show the widget?
- How many messages can I receive?
- Is there a mobile app?
- What languages does the widget support?
- Can I remove the "Powered by PushEngage" branding?
- Still Need Help?
Before You Start
What you need:
- A WordPress website (any hosting provider works)
- A PushEngage account (sign up free here)
- 5 minutes
What you don’t need:
- Coding skills
- Developer help
- Technical knowledge
- Expensive tools
Installation Methods
Choose the method that works best for you:
Method 1: Plugin Installation (Recommended – Easiest)
This is the fastest way. Perfect if you’ve never installed a WordPress plugin before.
Step 1: Install the PushEngage Plugin
- Log into your WordPress dashboard
- Go to Plugins → Add New
- In the search bar, type “PushEngage”
- Find the official PushEngage plugin
- Click Install Now
- Once installed, click Activate

That’s it for the plugin. Now let’s connect it to your account.
Step 2: Connect Your PushEngage Account
- In your WordPress dashboard, go to PushEngage → Settings
- Click Connect with PushEngage
- Log into your PushEngage account (or sign up if you haven’t yet)
- Click Authorize to give WordPress permission
- Your site is now connected
Step 3: Enable the Chat Widget
- Log into your PushEngage dashboard
- Go to Chat Widget → Settings
- Toggle the widget ON
- Customize your widget appearance:
- Widget Position: Choose bottom-right or bottom-left
- Widget Color: Match your brand colors
- Welcome Message: Write something friendly (e.g., “Hi! Need help? Ask me anything”)
- Team Name: Your business name or “Support Team”
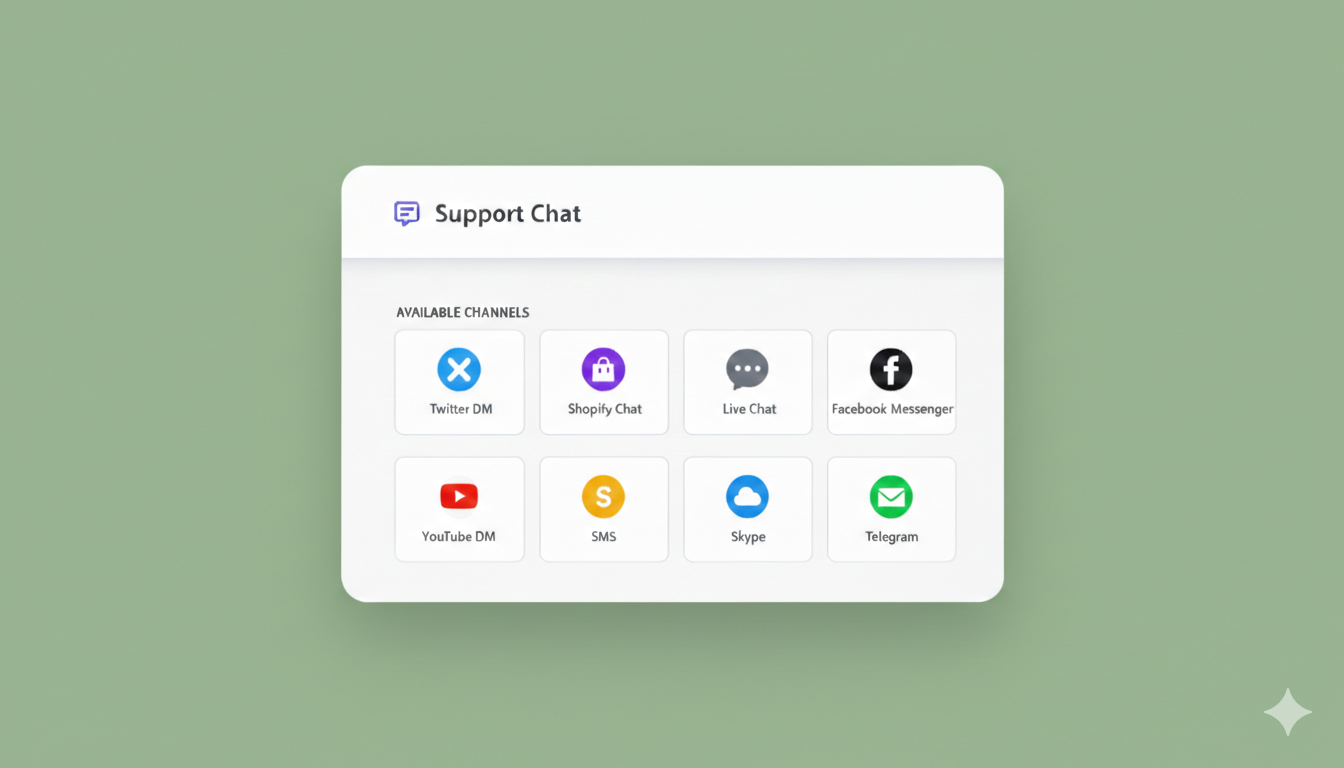
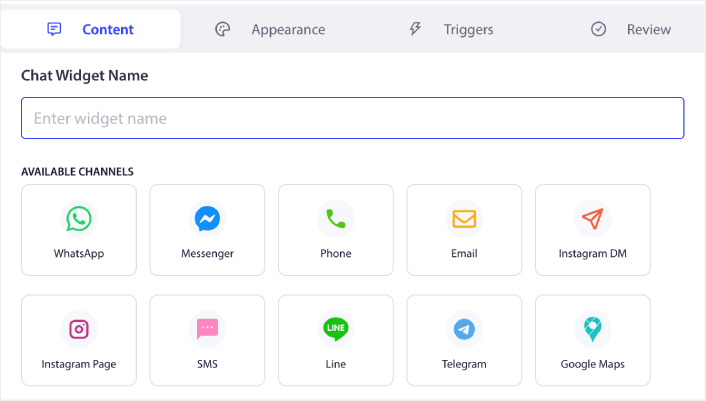
Step 4: Connect Your Preferred Channels
This is where the magic happens — no separate inbox to check.
- In your PushEngage dashboard, go to Chat Widget → Channels
- Connect your preferred messaging channels:
Email (Recommended for starters):
- Click Add Email
- Enter your email address
- Verify it (check your inbox)
- Done—customer messages now go straight to your email
SMS (Get notified on your phone):
- Click Add SMS
- Enter your phone number
- You’ll receive a verification code
- Enter the code—you’re connected
WhatsApp (Chat where your customers already are):
- Click Add WhatsApp
- Scan the QR code with WhatsApp
- Customer messages now route to WhatsApp
Other options:
- Slack (for team collaboration)
- Telegram (for privacy-focused conversations)
You can connect multiple channels and route different types of inquiries to different team members.
Step 5: Test Your Chat Widget
- Open your website in a new browser window (or incognito mode)
- You should see the chat widget in the corner you chose
- Click it and send yourself a test message
- Check your connected channel (email, SMS, WhatsApp)—your test message should arrive within seconds
If you see the message, you’re done. Your chat widget is live and working.
Method 2: Manual Code Installation (For Advanced Users)
If you prefer to add code manually or your theme requires it, here’s how.
Step 1: Get Your Installation Code
- Log into your PushEngage dashboard
- Go to Chat Widget → Installation
- Copy the installation code snippet (looks like this):
<!-- PushEngage Chat Widget Code -->
<script>
  (function(w,d,s,u){
    w.PushEngage=w.PushEngage||[];
    w.PushEngage.push(function(){
      PushEngage.init({
        appId: "your-app-id-here"
      });
    });
    var js = d.createElement(s);
    js.src = u;
    js.async = 1;
    var fjs = d.getElementsByTagName(s)[0];
    fjs.parentNode.insertBefore(js, fjs);
  })(window,document,"script","https://clientcdn.pushengage.com/core/chat.js");
</script>
<!-- End PushEngage Chat Widget Code -->
Step 2: Add Code to WordPress
Option A: Using Theme Header/Footer Plugin
- Install the “Insert Headers and Footers” plugin (free)
- Go to Settings → Insert Headers and Footers
- Paste your PushEngage code in the Footer section
- Click Save
Option B: Editing theme files directly
- Go to Appearance → Theme File Editor
- Find footer.php in the right sidebar
- Paste your code just before the closing
</body>tag - Click Update File
⚠️ Warning: Editing theme files directly can break your site if done incorrectly. Use Option A unless you’re comfortable with code.
Step 3: Configure Chat Widget Settings
Follow Steps 3-5 from Method 1 above to:
- Enable and customize your widget
- Connect your messaging channels
- Test that everything works
Common Issues & How to Fix Them
“I don’t see the chat widget on my site”
Try this:
- Clear your browser cache (Ctrl+Shift+Delete on Windows, Cmd+Shift+Delete on Mac)
- Check if the widget is toggled ON in your PushEngage dashboard
- Make sure you’re not logged into WordPress while testing (the widget might be hidden for admins)
- Try opening your site in an incognito/private browser window
Still not working?
- Check if another plugin is conflicting (try disabling other chat/popup plugins temporarily)
- Verify the code is installed correctly (view your page source and search for “pushengage”)
“I installed it but I’m not getting messages”
Check these:
- Did you verify your email/phone number in the Channels settings?
- Is your email going to spam? (Check your spam folder, mark as “not spam”)
- Test with a different channel (try SMS or WhatsApp)
- Make sure you completed the test in Step 5
“Can I customize the widget appearance?”
Yes! In your PushEngage dashboard:
- Go to Chat Widget → Settings
- Change colors, position, text, and avatar
- Upload your logo or team photo
- Customize the greeting message
“How do I add multiple team members?”
- Go to Chat Widget → Team
- Click Add Team Member
- Enter their email, name, and role
- Choose which channel they’ll receive messages on
- They’ll get an invite to join
Each team member can connect their own preferred channel. You might handle email inquiries while a teammate handles WhatsApp messages.
“Can I set up automatic replies?”
Not yet—but you can set a welcome message that appears instantly when someone opens the chat. This sets expectations while you respond. For now, PushEngage Chat Widget focuses on getting conversations to you quickly so you can respond personally and close more sales.
Pro Tips to Close More Sales
1. Write a compelling welcome message
Instead of “Hi, how can I help?”
Try: “Hey! Got questions about [your product]? I’m here to help you find exactly what you need 😊”
This feels personal and tells visitors you’re ready to assist.
2. Add chat widget to key pages
Your chat widget appears site-wide by default, but pay special attention to:
- Product pages (catch purchase questions)
- Checkout page (reduce cart abandonment)
- Pricing page (answer objections immediately)
- Homepage (first-time visitor support)
3. Respond fast
The faster you respond, the more sales you close. Aim for:
- Under 5 minutes: Excellent (customers are still engaged)
- Under 1 hour: Good (many will still convert)
- Over 3 hours: You’re losing sales
Enable SMS or WhatsApp notifications so you catch inquiries on your phone.
4. Track which messages lead to sales
Keep a simple spreadsheet:
- Customer question
- Your response
- Did they buy?
- Order value
Over time, you’ll spot patterns. Maybe “Do you ship to Canada?” questions convert at 80%, while “What’s your return policy?” questions convert at 20%. This tells you which objections to address proactively on your site.
5. Use saved responses for common questions
Not built into the widget yet, but you can:
- Keep a Google Doc with answers to FAQs
- Copy-paste when customers ask
- Saves time and ensures consistent, quality responses
Common questions to prepare for:
- Shipping costs and times
- Return/refund policy
- Product compatibility
- Discount codes
- Stock availability
Next Steps
Your chat widget is live. Here’s what to do now:
Today:
- Send yourself a test message from your website
- Verify you received it in your preferred channel
- Customize your welcome message
- Set up notification preferences (email alerts vs instant)
This Week:
- Add team members if you have them
- Prepare responses to your 5 most common questions
- Enable WhatsApp or SMS for instant mobile notifications
- Test the widget on mobile and desktop
This Month:
- Track which chat inquiries lead to sales
- Adjust your welcome message based on customer feedback
- Explore adding multiple channels for different departments (sales vs support)
Frequently Asked Questions
How much does PushEngage Chat Widget cost?
$49/year—that’s it. No monthly fees, no per-agent charges, no hidden costs.
Compare that to LiveChat at $200+/month ($2,400/year). You save over $2,350 annually.
Do I need a PushEngage paid plan?
The chat widget works on both free and paid plans. The free plan includes:
- Unlimited chat conversations
- 1 connected channel (email, SMS, or WhatsApp)
- Basic widget customization
Paid plans add:
- Multiple channels simultaneously
- Multi-agent routing
- Advanced customization
- Priority support
Most small businesses start with the free plan and upgrade as they grow.
Can I use this with WooCommerce?
Yes! The chat widget works on any WordPress site, including:
- WooCommerce stores
- Blog sites
- Business websites
- Membership sites
- Landing pages
No special configuration needed.
Does this work on mobile?
Absolutely. The chat widget is fully responsive and works on:
- Smartphones (iOS and Android)
- Tablets
- Desktop computers
Your customers can reach you from any device, and you can respond from your phone via SMS or WhatsApp.
What if I’m already using LiveChat or Intercom?
You can run PushEngage alongside them (though that’s overkill), or simply replace them and save thousands per year.
To switch:
- Install PushEngage following this guide
- Test that it works
- Once you’re confident, deactivate your old chat plugin
- Cancel your old subscription
Done. You’re now saving $2,000+ per year.
Can I customize which pages show the widget?
Yes. In your PushEngage dashboard:
- Go to Chat Widget → Display Rules
- Choose Show on specific pages or Hide on specific pages
- Enter the URLs
For example, hide it on your thank-you page (they already bought) or admin pages.
How many messages can I receive?
Unlimited. There are no message limits on any plan.
Whether you get 5 messages per month or 500, it’s all included.
Is there a mobile app?
Not yet — but you don’t need one. That’s the whole point.
Messages go straight to your existing email, SMS, or WhatsApp apps. No extra app to download, install, or remember to check.
What languages does the widget support?
The widget interface supports multiple languages. You can translate:
- Welcome message
- Button text
- Placeholder text
- Automated messages
Just write them in your language in the settings. The widget displays whatever text you enter.
Can I remove the “Powered by PushEngage” branding?
Yes, on paid plans. Free plans include the small branding badge, but it’s unobtrusive.
To remove it:
- Upgrade to any paid plan
- Go to Chat Widget → Branding
- Toggle off “Show PushEngage branding”
Still Need Help?
If you run into issues during installation:
Option 1: Contact PushEngage Support
- Email: [email protected]
- Live chat: Visit pushengage.com (use their own chat widget!)
- Response time: Usually within 24 hours, often much faster
Option 2: Check the Knowledge Base
- Visit: help.pushengage.com
- Search for: “WordPress installation” or your specific issue
- 100+ articles covering setup, troubleshooting, and best practices
Option 3: Community Forum
- Connect with other PushEngage users
- Share tips and ask questions
- Learn from successful implementations
Try PushEngage’s chat widget free and see how many sales you’ve been leaving on the table.
- How to Set Up Multilingual Chat Support on Your Site
- How to Add Custom Icons for Chat Widgets (And Why It Matters)
- How to Get More People to Start Live Conversations (5 Tips)
- A Complete Guide to Page-Level Chat Targeting for WordPress Stores
- Why Inbox-Free Chat Widgets Work Better
Ready to stop missing customer questions?
The best time to add live chat was when you launched. The second best time is right now.


