Are you looking for a simple way to send out a price drop notification from your eCommerce site?
How often do you see “notify me when price drops” in your comments section?
No worries, let’s help you create a price drop alert in less than ten minutes.
Sounds good?
Let’s dive right in!
- How to Create a Basic Price Drop Push Notification Campaign
- How to Create Price Drop Push Notifications in Shopify
- How to Create Price Drop Push Notifications with Custom Attributes
How to Create a Price Drop Notification Using PushEngage
Before we dive right into creating price drop alerts, you need to know something. Shopping price alerts are pretty advanced. You can still create the campaign yourself, but you may need a developer to install it for you.
Alternatively, you can use Google Tag Manager to fire the code snippet.
How to Create a Basic Price Drop Notification Campaign
Let’s start things off with a basic price drop push notification campaign using PushEngage. There are a few advanced features that we’ll look at later on. For now, let’s understand the basics of how a price drop alert works.
Step #1: Create a New Price Drop Campaign
Head over to your PushEngage dashboard and go to Campaigns » Triggered Campaigns:

Select the Price Drop campaign type and click on Create New. And you should see a new screen to create your campaign that looks like this:
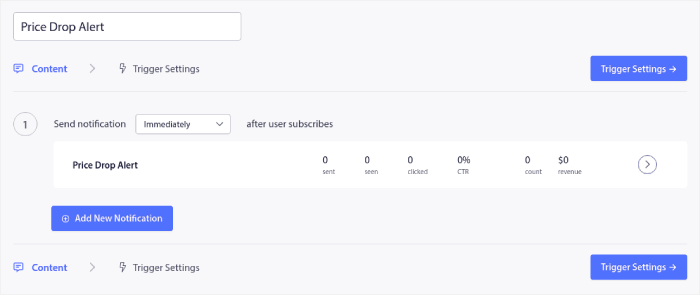
Fill out the Content section. This is where you’d create your entire campaign. If you like, you can also create a series of push notifications or a single one.
Step #2: Draft Campaign Details
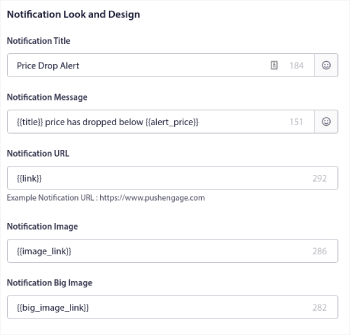
When you click on any of the push notifications in the sequence, you get to customize the notification to any degree you want:
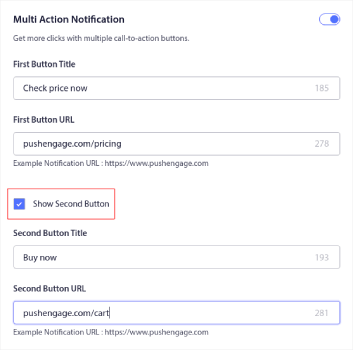
You can also add multiple buttons for a smoother conversion:
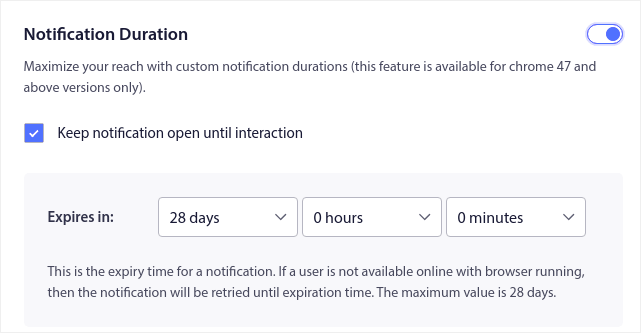
And you can set a custom notification duration under Notification Duration:
When you’re done with the Content tab, click on the Trigger Settings button and configure when your push notifications get sent.
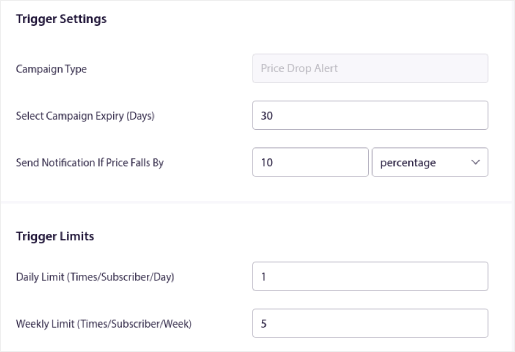
- The Campaign Type is a Price Drop Alert.
- The Select Campaign Expiry puts a hard expiry date on your push notification because a price drop is usually time-limited.
- The Send Notification If Price Falls By field is what triggers your campaign. You can create a percentage drop or an absolute drop in price to trigger the campaign.
- The Trigger Limits can put a cap on the maximum number of notifications you send to your subscribers.
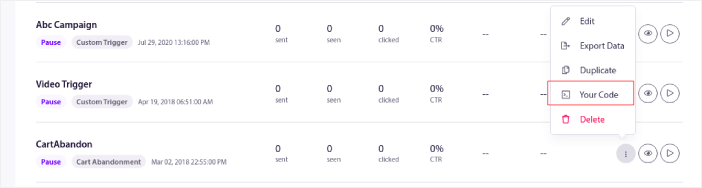
Step #3: Copy the Campaign Code Snippet
You’re mostly done.
Now, you’ll need to copy the generated code snippet. Click on the ‘Your Code’ button at the bottom right corner.
Then, just copy the code:
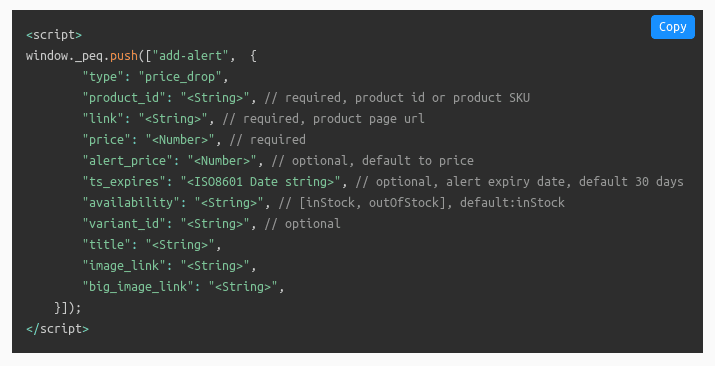
And edit it as required.
You will need to pass the variables from your end for the following as mentioned on your website:
- Product ID: This is your product’s unique identity such as the SKU.
- Link/URL: You’ll need to use the product URL as listed on your website.
- Price: This is the current product price (inclusive of all discounts).
- Title: The title is essentially the name of the product.
- Image Link: You’ll need to send the URL for any image you want to display as the brand’s identity. It’s typically the logo or favicon for your website.
- Alert Price (Optional): The alert price is the reduced price that will trigger your price drop notifications.
- ts_expires/ Alert Expiry Date (In ISO Format): You can also set an expiry date for your notifications. This value is set to 28 days by default.
- Availability: This is an optional property and takes “Out Of Stock” as default value in Inventory Alert, “In Stock” in Price Drop Alert.
- Variant ID: Again, this is optional. But you can set the exact variant ID in case there are multiple variants to the same product.
- Big Image Link: You’ll need to send the URL for any image you want to display as the product image.
NOTE: You leave the optional field unchanged because they all have default values. But you’ll need to replace the values for required fields. For instance, you will need to replace the <String> field for the link property in this code with the actual product URL. The same goes for other fields such as price and product_id.
You can use the PushEngage Product Update API to send price drop updates to the PushEngage servers.
What does this achieve?
Let’s say you have 2 customers. One of them subscribes for a price drop alert at $90 for a product priced at $100. Then another customer creates a price drop alert at $80 for the same product which is now priced at $90.
Using the PushEngage Product Update API, you can send the price drop notification to each of these customers at the price point that they opted for.
In simple words: You can create an automated process where your customers will get updates for a price drop alert as and when it was set up.
And all you have to do is paste it into your website.
If you’re not 100% sure how to do this, we highly recommend that you talk to our Customer Success team and we’ll walk you through the process.
And paste it into your website.
Also, you can create highly customizable campaigns using the tags we mentioned earlier. But you’ll need a developer to use the PushEngage API for that.
We’ll talk more about tags and APIs in an upcoming section.
But for now, your basic campaign is ready to be published.
Step #4: Save and Launch the Campaign
Now, all you have to do is hit the ‘Activate Triggered Campaign’ button:
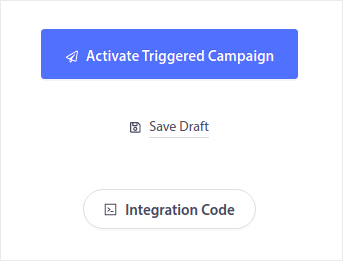
And you’re done!
How to Create Price Drop Push Notifications in Shopify
Shopify has a lot of advanced features built into its framework. Since it’s completely focused on eCommerce websites, you won’t have to worry about editing any code.
Instead, you simply have to install the PushEngage app for Shopify from the Shopify App Store.
If you’re not sure how to do that, check out this article on how to enable Shopify push notifications in less than 10 minutes.
After the initial setup, all you have to do is create the price drop notification on your PushEngage dashboard. This is the same process as any other website. The only difference is that you can also set up a price alert notification bell from the PushEngage dashboard:
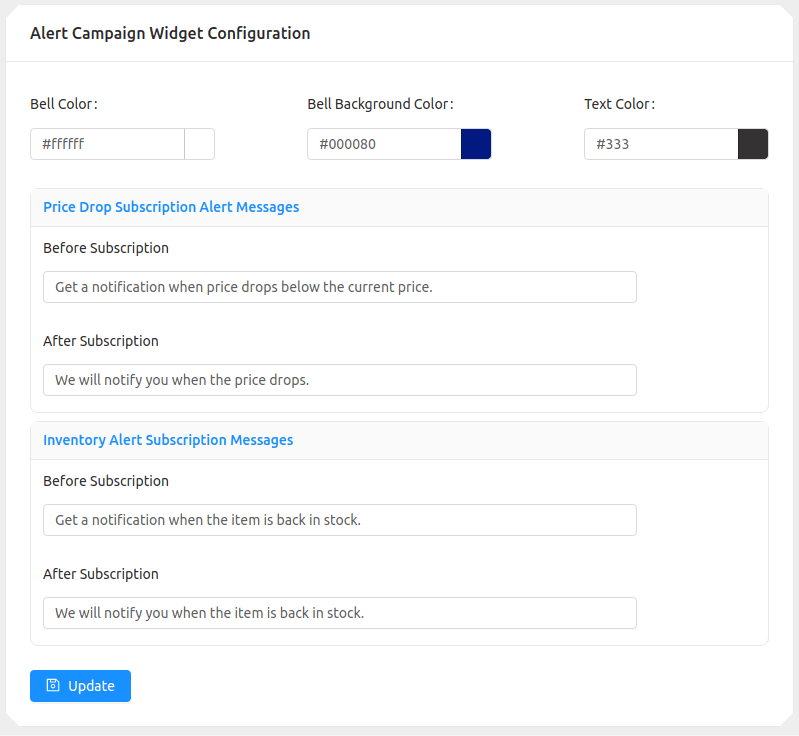
NOTE: Do NOT change any of the tags in the price drop alerts. Tags are anything with the double braces such as {{title}} or {{link}}. These tags fetch specific eCommerce product details from Shopify (or whatever Content Management System you use). Changing the tags can break the process and send out notifications with a bunch of problems.
How to Create Price Drop Push Notifications with Custom Attributes
For all the developers reading this article: Yes, you can create price drop push notifications with custom attributes on PushEngage.
You can do this by using our PushEngage Attributes API.
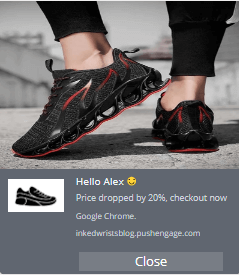
Using the Attributes API, you can sync your PushEngage notifications with your Customer Relationship Management (CRM) software to create highly personalized push notifications.
For instance, you can use the name of your customer send them a personalized notification like this one:
Pro-Tip: You can also create a ‘Notify Me’ button on your eCommerce website and trigger the price drop notification campaign when the button is clicked. By default, the campaign is activated when the page loads, but you can customize that as well.
Wrapping Up
One of the biggest problems with marketing campaigns is how confusing it can be to automate the process. There’s usually a huge learning curve and you’ll probably give up halfway through setting it up.
Thankfully, push notifications are not that complicated to set up. And you can always check out this article on automated campaigns that actually work for inspiration.
We recommend that you use PushEngage to start your journey into push notifications. PushEngage is the #1 push notifications software in the market and it’s really easy to create powerful automated notifications using PushEngage.
So, if you haven’t already, get started with PushEngage today.


