Looking for an easy way to set up WooCommerce cart abandonment campaigns for your website?
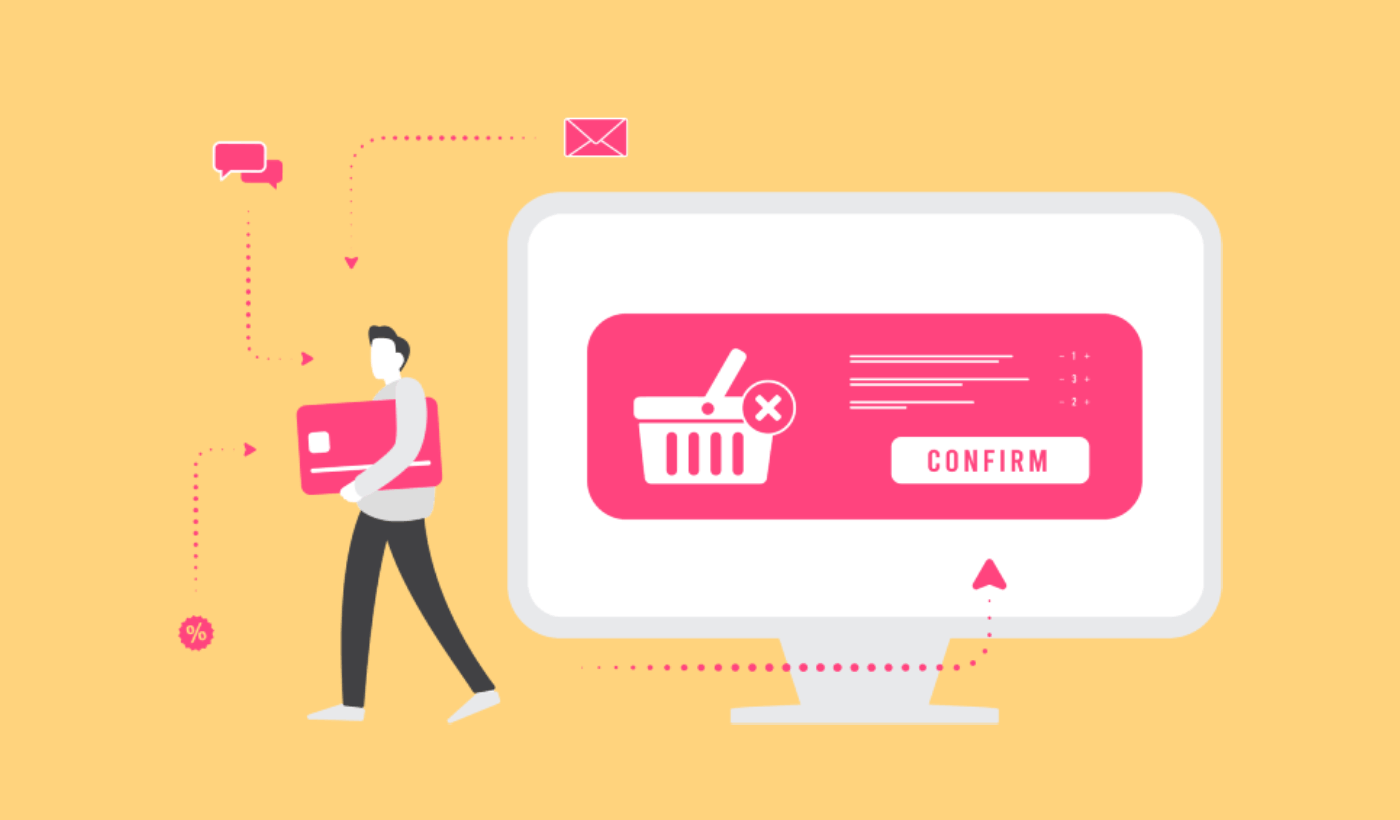
Cart abandonment is a serious problem for most eCommerce businesses. According to a study by Baymard Institute, the average documented cart abandonment rate is 70.19%.
That means that you’re losing at least 70% of your sales every day that you don’t take action right now. But I get it. Handling cart abandonment can seem technical and complex. That’s exactly why I wrote this article.
In this article, I’m going to walk you through setting up WooCommerce cart abandonment recovery campaigns with zero technical experience and expertise. Sounds good?
Let’s dive in.
NOTE: This article is meant only for WooCommerce users. But if you’re running a Shopify store, you should check out our article on Shopify cart abandonment instead.
What is WooCommerce Cart Abandonment Recovery?
Cart abandonment has a significant impact on eCommerce businesses, as it results in lost sales and revenue.
But it is possible to recover some of these lost sales by implementing cart abandonment campaigns. These campaigns involve sending targeted emails and push notifications to customers who have abandoned their carts, reminding them of the items they left behind and encouraging them to complete their purchase.
Send WooCommerce Order Notifications Today!
Push notifications are a super-effective, low-cost marketing tool to help you grow your repeat traffic, engagement, and sales on autopilot.
By using WooCommerce cart abandonment campaigns, you can increase your chances of recovering lost sales and improving your overall revenue.
Technically, the way cart abandonment works is that your website or app visitors added something to their cart, but didn’t checkout. So, every time someone adds something to their cart and don’t buy it within the next hour, you want to send them a reminder to buy it.
For push notification campaigns, there’s a little bit more. Before you create a cart abandonment campaign, you should also set up a browse abandonment campaign.
Browse abandonment campaigns start when your visitors and users browse something on your site or web app, but don’t add anything to their cart. You can target, convince, and convert customers who:
- Added a product to a Wishlist, but not their Cart
- Viewed a product more than once
- Browsed more than 3 products in the same category
- Searched the site for a specific product
- Stayed on a product page for at least 3 minutes and didn’t buy
A browse abandonment notification ends when your visitor adds something to their cart. After that, a cart abandonment campaign takes over to convert them into paying customers.
A good way to get more conversions from your cart abandonment campaigns is to use offers and discounts. This might be something to think of as part of your coupon marketing strategy or even your push notifications strategy.
In the next section, we will discuss how to set up WooCommerce cart abandonment campaigns and improve your chances of recovering lost sales.
How to Create WooCommerce Cart Abandonment Push Campaigns
I’m going to show you how to create a WooCommerce cart abandonment campaign using PushEngage. PushEngage is the #1 push notification software in the world, and you can set up cart abandonment campaigns right from the PushEngage dashboard.
So, if you haven’t done it already, go ahead and create a PushEngage account. To set up cart abandonment recovery campaigns, you’ll need to get the Growth Plan of PushEngage. So, select the Growth Plan and finish setting up your PushEngage account.
Then, head over to the dashboard to follow along with this tutorial.
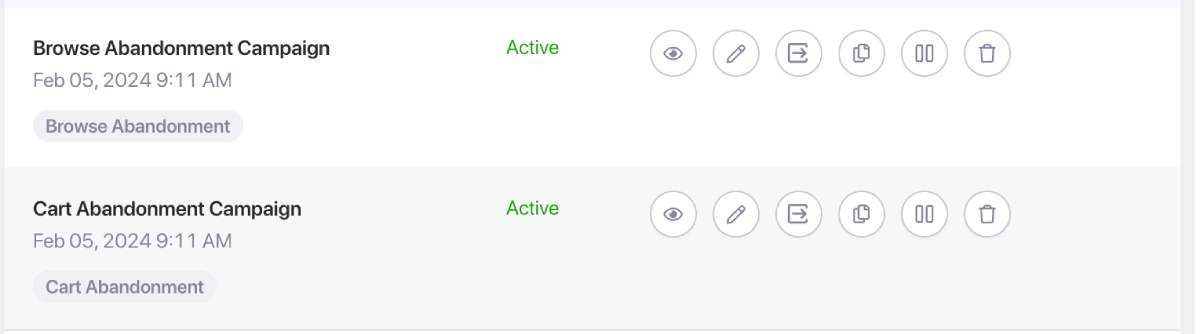
Step #1: Enable Browse and Cart Abandonment Push Campaigns
PushEngage comes with pre-built browse and cart abandonment push notification campaigns. All you have to do is install the PushEngage WordPress plugin and activate your campaigns!
Head over to Settings » Integrations tab and under the WooCommerce section.
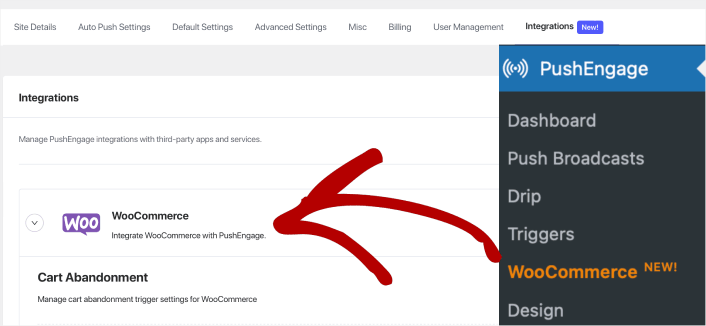
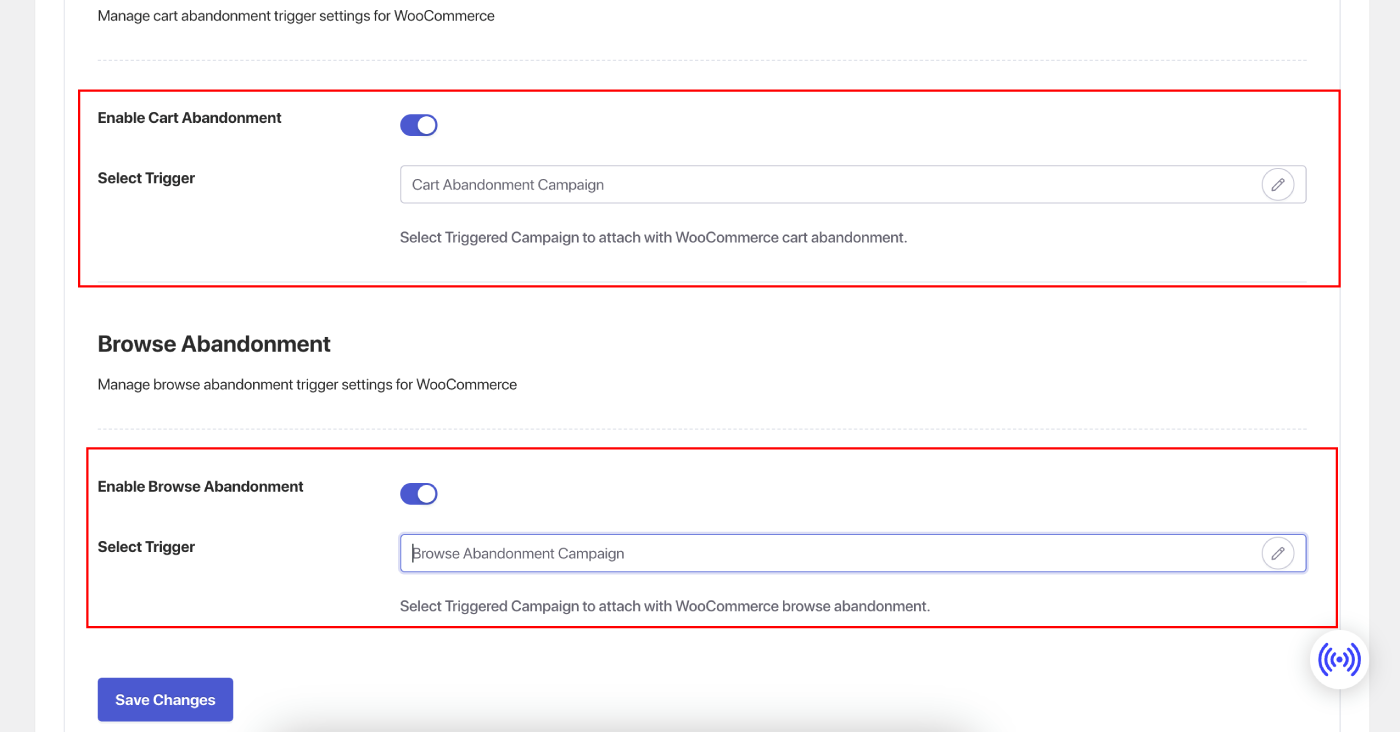
Enable ‘Cart Abandonment‘ and ‘Browse Abandonment‘ by toggling the switch on.
And it’s done! You now have automated push notification campaigns that will turn casual browsers into shoppers and recover lost sales on autopilot.
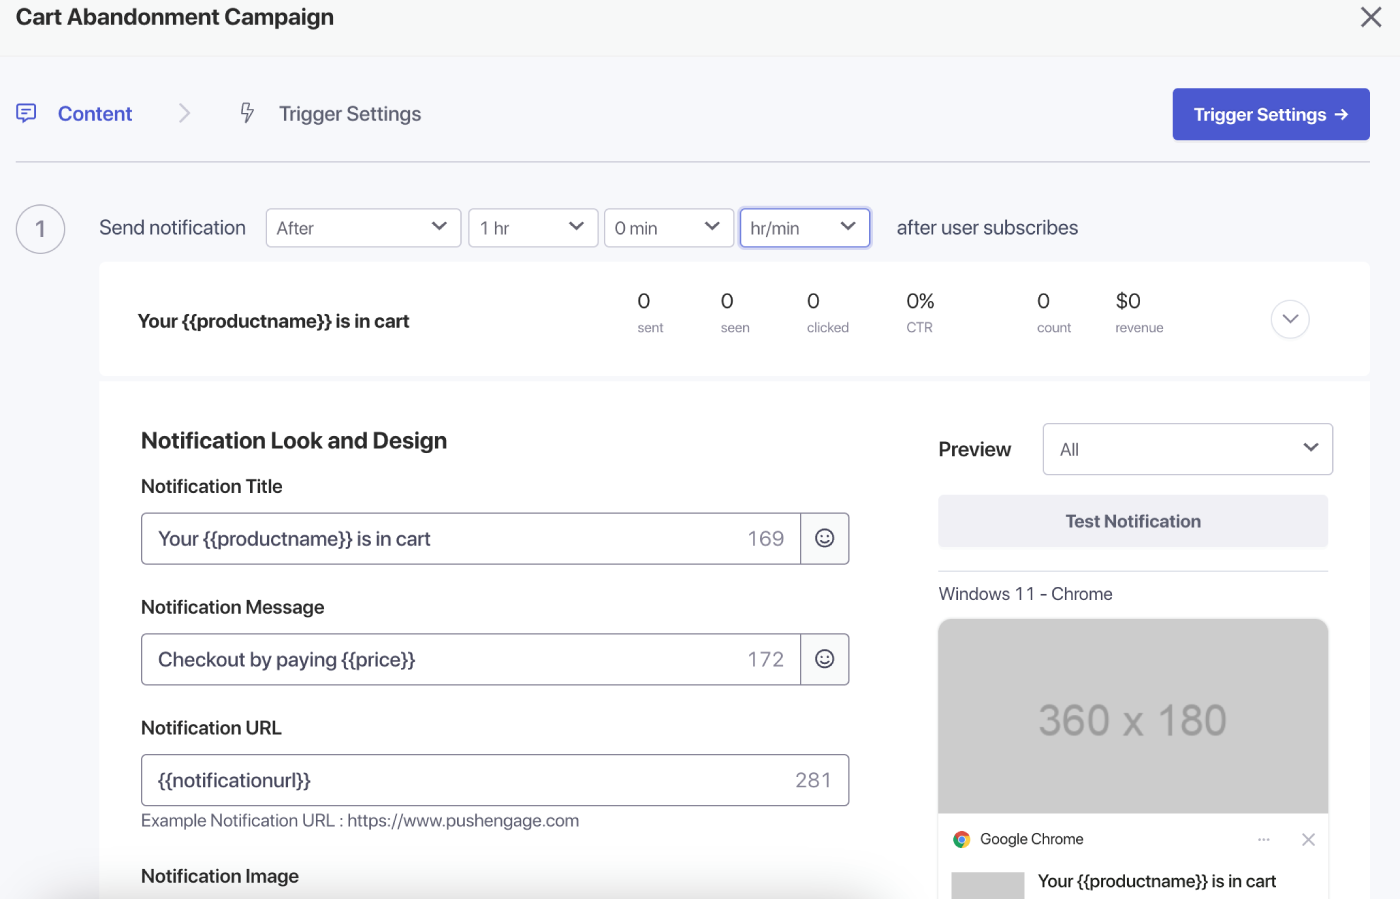
Step #2: Edit Your Push Notification Campaigns
If you want, you can edit the automated push notification campaigns to recover abandoned carts. PushEngage gives you full control over your campaigns.
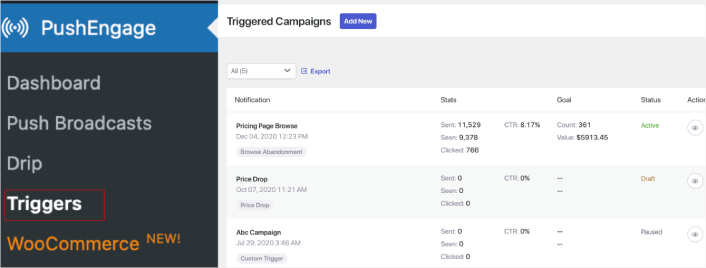
Go to Triggered Campaigns and add multiple notifications to your campaign.
Specify the delay and conditions for each notification and add fallback variables.
Step #3: Prevent Notification Overload
Under Trigger Settings, limit the frequency of notifications to prevent spamming your customers. Here, you can choose a daily or weekly limit.
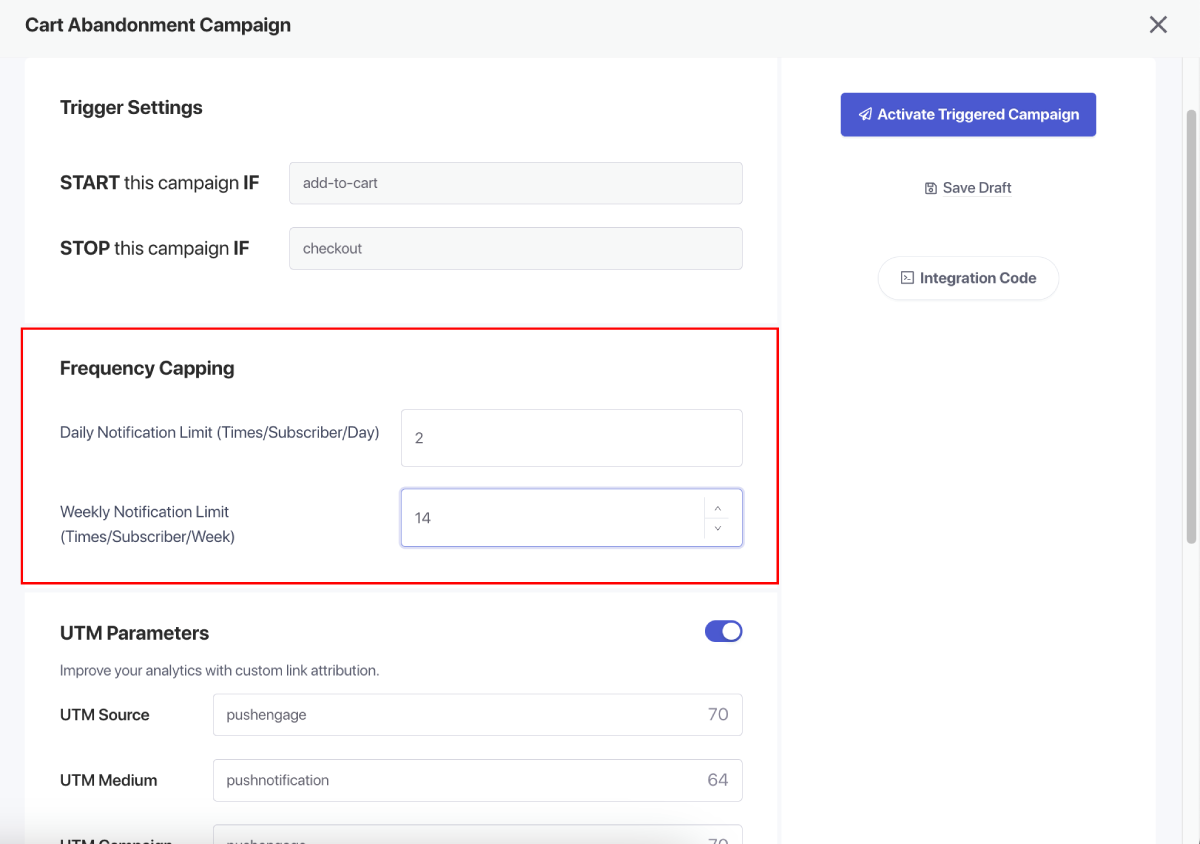
For example, if you have 2 notifications for a daily limit, then add 14 for the weekly limit, so that even if people abandon more than 2 products a day, they are not spammed with all push notifications.
You can also add the UTM Parameters for these campaigns so it is easier for you to track in Google Analytics.
After setting up the triggers, save your changes and activate the campaigns. If enabled, you can view the campaign analytics and see the conversion of the goal revenue.
And that’s all there is to making more money from your business!
How to Create Personalized Cart Abandonment Campaigns
You can create personalized cart abandonment campaigns using custom attributes.
This means that you can hook up PushEngage with your Customer Relationship Management (CRM) software to fetch personal details for each customer. By default, PushEngage captures the device and geolocation information for each customer. But you can extend the range of personalization using the PushEngage Attributes API.
You can create custom abandoned cart push notifications with the user’s name, like this one:

Or add more elements, such as a price drop or unused loyalty points:

Or even cross-sell other products:

There are really no limits to the type of campaign you can set up using our APIs. Go nuts!
You Set Up WooCommerce Cart Abandonment: What’s Next?
That’s all for this one, folks!
If you found this helpful, you should also check out our article on how to reduce cart abandonment. There are some really helpful ideas there.
And if you’re just starting out with push notifications, you should try out PushEngage. PushEngage is the #1 push notification software in the world, and you can create a whole range of push notification campaigns using PushEngage.
If you’re not 100% convinced, you should check out these resources on how to effectively use push notifications:
- 7 Smart Strategies to Boost Customer Engagement
- Are Push Notifications Effective? 7 Stats + 3 Expert Tips
- 7 Proven Ways to Monetize Your Blog in 2021
- When To Use (And When NOT To Use) Push Notifications (2021)
- 15 Push Notification Copy Examples to Inspire You
So, if you haven’t already, get started with PushEngage today.


