
Looking for a way to create an exit intent popup for your WordPress site?
An exit intent popup can be incredibly effective for capturing leads. They’re designed to convince and convert by pulling the visitor’s entire focus on themselves.
But having to code one from scratch is a real pain. For one thing, you’d have to know enough HTML, CSS, and Javascript to create the popup along with trigger rules for when to show it. Then, you’d have to create a manual integration with your email service provider. And finally, you’d have to deal with any privacy and security issues.
Good news: there’s a much simpler way.
In this article, we’re going to show you how to launch a full screen popup in WordPress with zero coding in less than 10 minutes.
Let’s dive in.
What is an Exit Intent Popup?
An exit intent popup is an opt-in form that pops up when your visitors try to leave your site. Your exit intent popup typically gives any abandoning visitors an offer in exchange for their email address. But if you want, you can also redirect them to a product with a discount code or even your most high-converting content.
In short: an exit intent popup is built to convert visitors who would have otherwise left without converting.
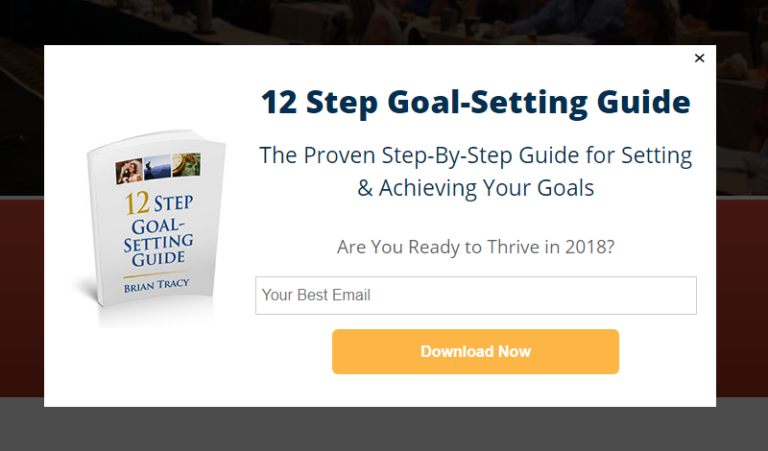
Here’s an example:
You can use exit intent popups to:
- Welcome new visitors
- Offer a discount coupon
- Point visitors to your best content
- Send visitors to your social media profiles
And more. You can even create popup contact forms. Popups are super flexible and as long as you’re creative, you can set up high-converting ones easily.
How to Create an Exit Intent Popup in WordPress
Now that you understand what an exit intent popup is and why you’d want to create one, how do you create one? We recommend using OptinMonster to create all your popups.
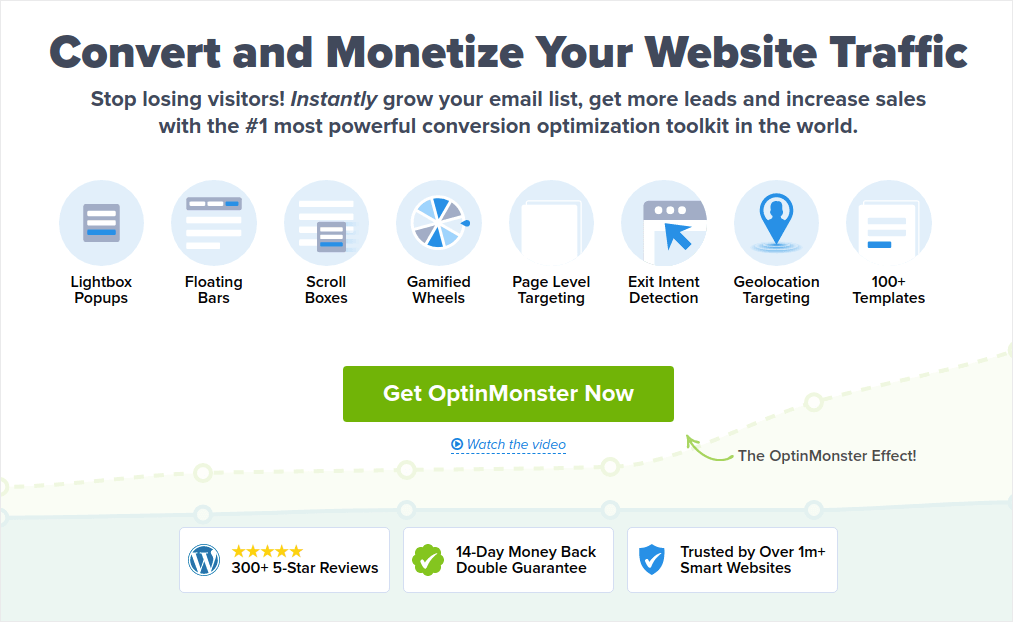
OptinMonster is the #1 conversion toolkit in the world and we’ve used it ourselves. OptinMonster makes it super simple to create powerful popups that convert. And you’ll never have to use any coding at all.
OptinMonster has pretty much everything you need to start, grow, and scale your email lead generation process.
Here’s a quick rundown of what you can do using the toolkit:
- Grow your email list smoothly for remarketing
- Convert first-time visitors into regular readers
- Reduce cart abandonment and browse abandonment rates
- Create limited-time offers with actual countdown timers
- Increase eBook downloads and digital product sales
- Create a funnel for live events
- Improve site engagement using gamified popups
- Redirect your traffic to pages and posts that make you money
- Create a list of genuine leads and remove fake emails using two-step opt-ins
We use OptinMonster quite a lot and we even wrote a full review of OptinMonster. You can check that out, or get started with your campaign right now. All you have to do is signup for OptinMonster and follow along with the rest of this article.
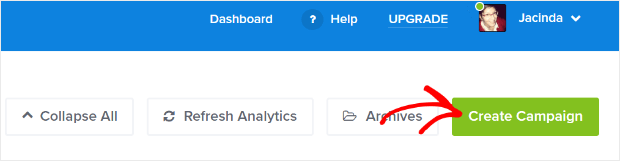
Step #1: Create a Campaign
Head over to your OptinMonster dashboard and hit the Create button:
Select the Template option to start creating an optin using a pre-designed template:
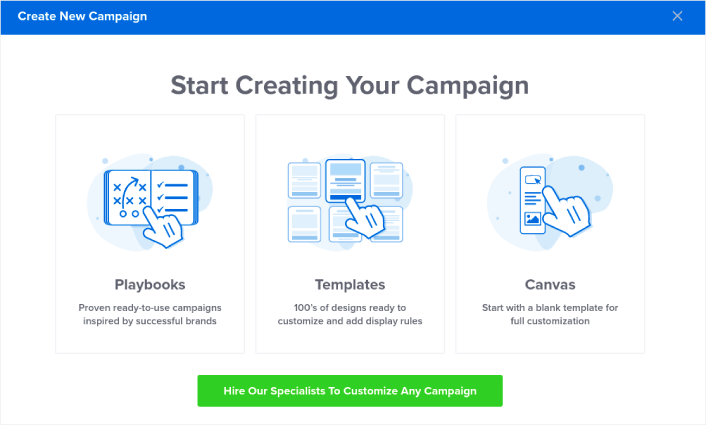
For this tutorial, we’re going to create a full screen popup. Select the Fullscreen to get started with full screen popup templates:
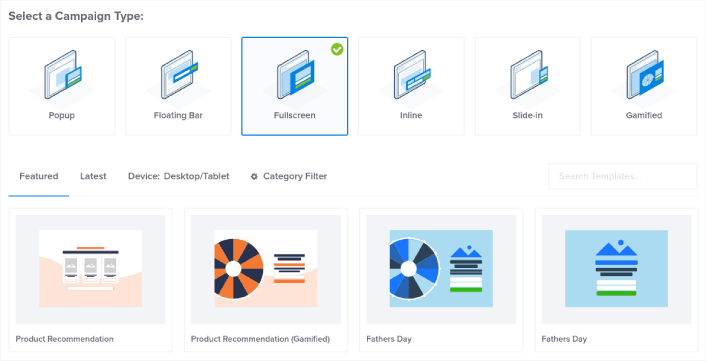
Then, choose a campaign template. You can choose whatever template you like, but we’re going with the Product Recommendation (Gamified) campaign template for this tutorial.
After you select your template, give your campaign a name. Remember, this campaign name is for you and you’ll likely create a whole bunch of these popups with different targeting options. So, give the campaign a meaningful name or you’ll end up really confused later on.
Also, depending on your plan, you can also use OptinMonster on multiple sites. So, select the website where you want to display your campaign as well.
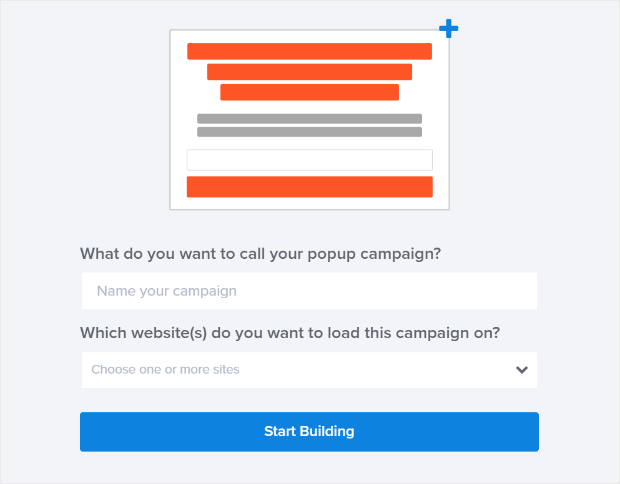
Press Start Building when you’re done.
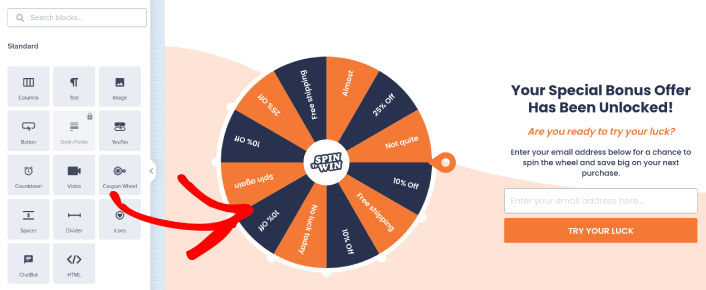
Step #2: Edit Your Popup
With OptinMonster, you’ll get a visual drag and drop popup builder. Once you’re done creating your campaign, you’ll be able to edit even the tiniest details about your popup. Start by editing your popup headline:
The most amazing part here is that you just click whatever text you want to edit and change it inline. There’s no need to fill out a form or edit any HTML code in the popup.
You can edit everything you want about your popup. When you’re happy with the optin’s appearance, you can move on to more advanced settings.
Step #3: Add a Click to Subscribe Button to Your Popup
Push notifications help you grow your website traffic and engagement on autopilot. And if you’re running an online store, PushEngage also helps you grow your sales by helping you create automated eCommerce push notifications.
You can get started for free, but if you’re serious about growing your business, you should buy a paid plan. Also, before buying any push notification service, you should check out this guide to push notification costs.
Here’s a quick glance at what you get with PushEngage:
- High-converting automated campaigns
- Multiple targeting and campaign scheduling options
- Goal tracking and advanced analytics
- Smart A/B testing
- A Dedicated Success Manager
You’ll see that PushEngage is hands down the best bet if you want to build traffic, engagement, and sales for your business. And if you’re on a budget, you can always get a little bit creative with your push notifications.
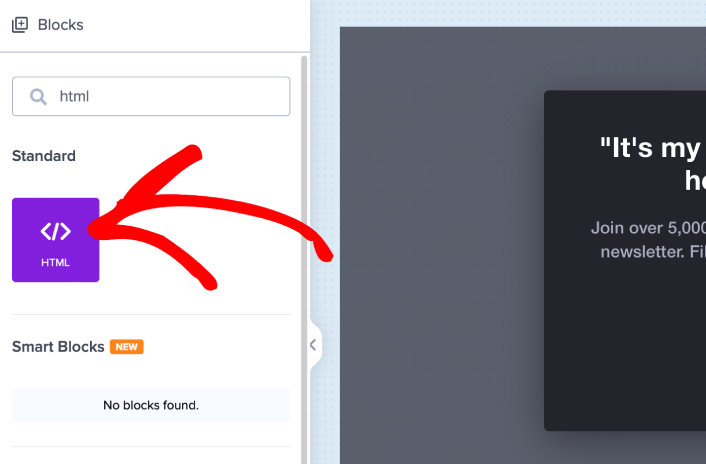
First, add an HTML block to your popup from the sidebar in OptinMonster.
This is where we’re going to add the code to collect push notification subscribers. First, paste in the following code to create a clickable button:
<button onclick="subscribeOnClickButton()" style="border: none; width: 100%; padding-left: 15%; padding-right:15%; text-align: center; display: inline-block; color: white;">Get Updates via Push Notifications</button>Paste the code where it says you can add HTML:
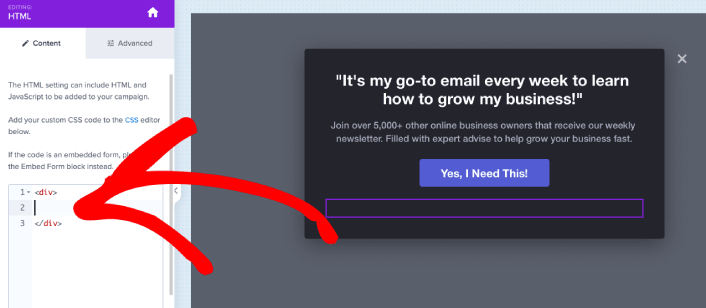
Of course, you can play around with the styles to make it look more appealing. Next, we’re going to make the button collect push notification subscribers when clicked.
Head over to the PushEngage home page and click the Get Started button:

Then, you’ll want to select the free plan to try out PushEngage or choose a paid plan if you’re serious about growing your business. The paid plans come with more campaign options and the ability to build even bigger subscriber lists.
In your PushEngage dashboard, head over to Site Settings » Site Details and click the Click Here for Setup Instructions button. Under Any Site, you’ll get your installation code:

WARNING: You need to copy the code you get from your dashboard. The code is unique for each PushEngage user. You won’t be able to copy the code in the image and collect push notification subscribers.
Once you have the code in your PushEngage dashboard, take the second script and add some extra code to it. Your final code should look something like this:
<script src="https://clientcdn.pushengage.com/core/02a6e92667ae2279fcba8932356c1d93.js" async></script>
<script> window._peq = window._peq || [];
function subscribeOnClickButton(){
window._peq.push(['subscribe',{}.pe,function(res){
console.log(res);
}]);
}
</script>
Add this code to the HTML block in OptinMonster right after the code for your button and in between the <div></div> code block and you’re done!
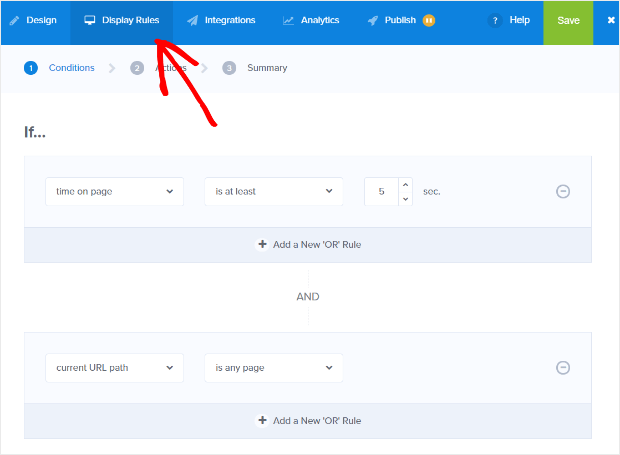
Step #4: Set Exit Intent Popup Display Rules
Display rules are meant to define when your campaign shows up on your site and who sees it.
Our recommendation is that you set the popup to display if exit detected:
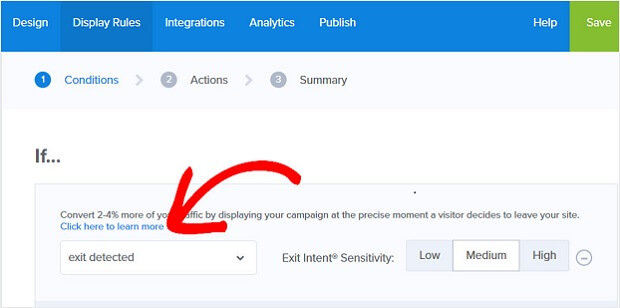
This creates an exit intent popup. Your popup doesn’t have to be a full screen popup to get triggered by exit intent. Simply by changing the display rules, you can convert any popup into an exit intent popup.
Click Next Step to choose the Action. Here, we recommend that you set Show the campaign view to Optin View, set the show with MonsterEffect to any entry animation you like, and play sound effect to any sound effect for your popup.
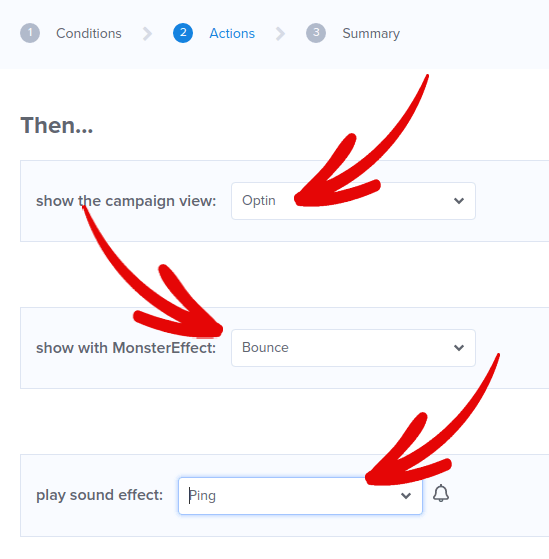
And then, click the Next Step button. You can see the full extent of your settings in the Summary tab.
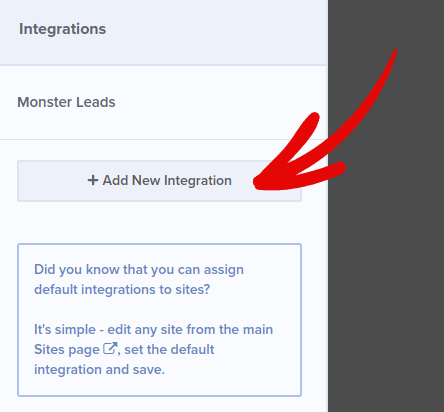
Step #5: Setup Your Email Integration
The next step is to set up your email integration. Click Add New Integration from the Integrations tab and select your email service provider:
We recommend using Drip for your email marketing if you don’t already have an email service provider.
Step #6: Publish Your Exit Intent Popup in WordPress
When you create a new campaign, it’s Paused by default.
Go to the Publish tab from the top menu to see the Publish Options. Then, set the status to Publish and select the website platform:
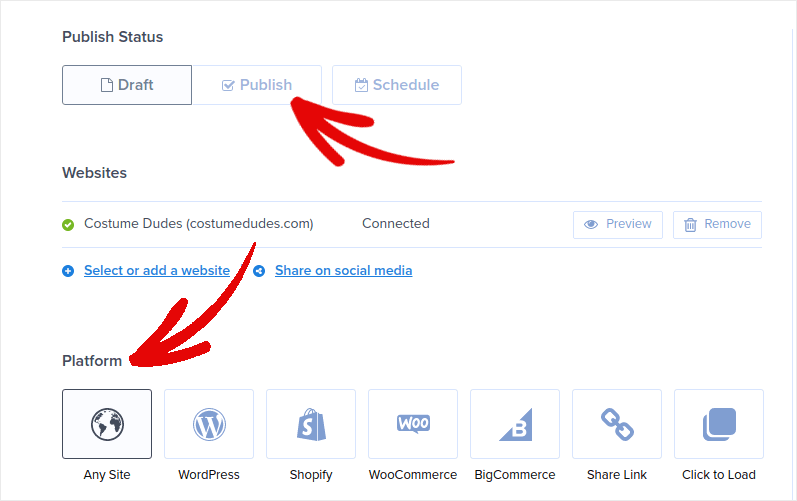
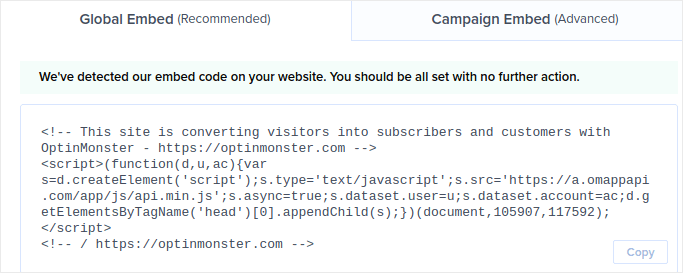
If you’re running a WordPress site, the OptinMonster plugin handles the rest of the setup automatically. It’s the same for Shopify and BigCommerce. For any other site, click on Any Site and paste the embed code in your website’s head:
And you’re done!
What to do After Creating an Exit Intent Popup in WordPress
That’s all for this one, folks!
Let us know if this article helped. Creating popups on your site can help you convert your traffic into email subscribers and genuine business leads. And we highly recommend that you start creating exit intent popups right away.
And if you’re looking for an affordable way to grow your traffic, we recommend using push notifications. Push notifications can help you bring in more repeat traffic and site engagement. You can also create automated push notification campaigns that generate sales.
Not convinced? Check out these resources:
- 7 Smart Strategies to Boost Customer Engagement
- Are Push Notifications Effective? 7 Stats + 3 Expert Tips
- How to Set Up Abandoned Cart Push Notifications (Easy Tutorial)
- How to Add a Web Notifications WordPress Plugin to Your Site
We recommend using PushEngage to create your push notification campaigns. PushEngage is the #1 push notification software in the world. So, if you haven’t already, get started with PushEngage today!


