
Are you trying to figure out how to create a WordPress member site?
Membership sites let you charge users for access to restricted content so you can skyrocket your website’s revenue. In other words, you can easily monetize a community and sell products, courses, and merchandise to your community. You can even sell exclusive access to specific content or your time by creating site memberships.
But how you do it?
In this article, we’ll show you exactly how to easily create a WordPress member site with no code.
Sounds good? Let’s dive in.
Why Should You Create a WordPress Member Site?
A WordPress member site is a website that requires visitors to log in or sign up in order to access certain pages, posts, or features. This makes it a great option for businesses, organizations, or individuals who want to keep certain information or content private and only available to members.
So, why should you create a WordPress member site? Well, here are a few good reasons:
- Protect sensitive information: If you have information that you don’t want just anyone to see, a WordPress member site can keep that information secure. Only the people who have signed up and logged in will be able to access it.
- Build a community: By having a member site, you can create a sense of community among your members. They’ll be able to connect with each other and share information or ideas.
- Offer exclusive content: By having a member site, you can offer exclusive content or resources that are only available to members. This could be anything from premium blog posts, special discounts, or early access to new products.
- Charge for access: If you have valuable information or resources, you can charge people a membership fee to access them. This can be a great way to generate income for your business or organization.
- Easy management options: WordPress makes it easy to manage your member site. You can add and remove members, control who can see what content, and even send out emails to all of your members with just a few clicks.
So, those are just a few reasons why you might want to create a WordPress member site.
Whether you’re looking to protect sensitive information, build a community, offer exclusive content, generate income, or just make your website easier to manage, a WordPress member site can help you get it done!
How to Build a WordPress Member Site
The good news is that building a WordPress member site is pretty easy even without any coding. All you need is a WordPress membership plugin to import powerful features to your site directly. We’ll talk about this in more detail soon. But for now, let’s take it step by step.
Step #1: Get Powerful Hosting for Your WordPress Member Site
Before you start building a WordPress member site, you need a reliable WordPress hosting service. We recommend using Bluehost to create your WordPress site.

Bluehost is one of the most popular WordPress web hosting services. It’s officially recommended by both WordPress and WooCommerce as a WordPress hosting service. The beautiful part is that you can get shared hosting to run a WordPress site, which is pretty affordable.
Over time, as your site scales, you can also upgrade to a higher plan to accommodate your growth. And yes, you get an SSL certificate and a domain name for a year as part of your hosting plan with Bluehost.
You don’t have to worry about your website being slow just because there’s a spike in traffic. And any WordPress hosting plan with Bluehost comes with an amazing 1-click install for WordPress.
If you’ve never built a WordPress site before, check out this tutorial on how build a WordPress website from scratch.
Again, keep in mind that this is only the cost of setting up your site. You’ll need to spend more money to extend your store’s functionality using themes and plugins.
On top of that, prices start at just $2.75 per month.
- Speed: 689 ms
- Uptime: 99.99%
- Customer Support: 4/5
Get started with Bluehost today!
Step #2: Install a WordPress Membership Plugin
WordPress membership plugins convert a regular WordPress site into a member site just by clicking a few buttons. You don’t have to code anything into your site. So, they will reduce the time it takes to launch your members-only site.
Not to mention, you get all the support you need from the plugin developers. In simple terms, you won’t need a development team to maintain your site for you.
We recommend using MemberPress to create your WordPress member site.
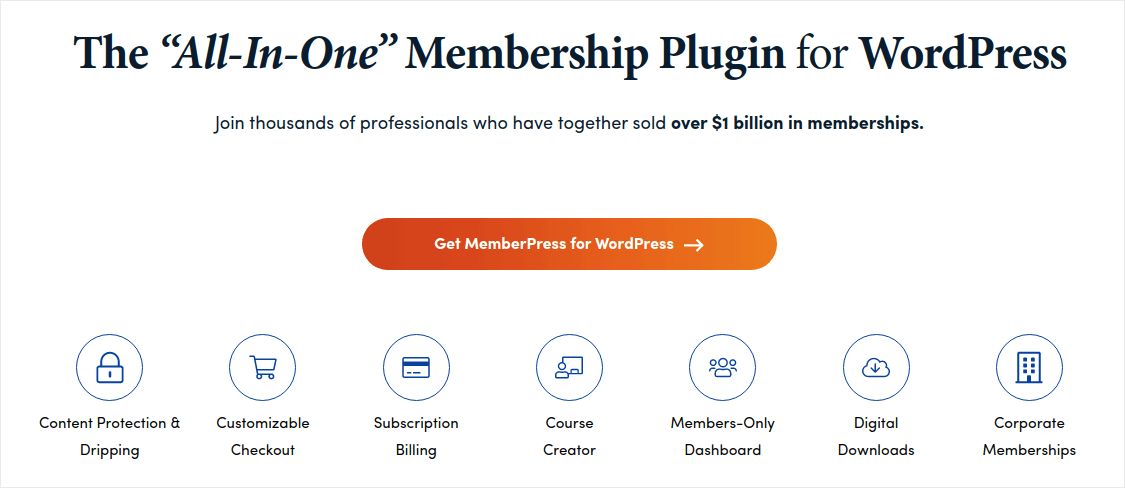
MemberPress is one of the easiest WordPress membership site plugins to use. It also comes with an entire suite of great features to help you grow and monetize your members’ community.
To get started all you need to do is:
- Install the plugin
- Configure your payment gateway
- Create different membership levels
- Add perks to each membership level
- Add some products
And you’re good to go! After that, it’s a matter of inviting people to join your membership program.
You can also restrict access to different pages, post types, tags, and categories based on your membership levels. The best part is that you get a course builder as well. So, if you’re thinking of creating courses for your members, you can do that without having to install any other plugin.
Click here to get started with MemberPress.
Step #3: Configure MemberPress on Your Site
Setting up MemberPress is super easy. If you’ve never used WordPress plugins before, check out this tutorial on how to install a WordPress plugin. Once you’re done installing the plugin, head over to your WordPress dashboard and go to MemberPress » Settings.

This will take you to the License settings, where you can enter your MemberPress license key.
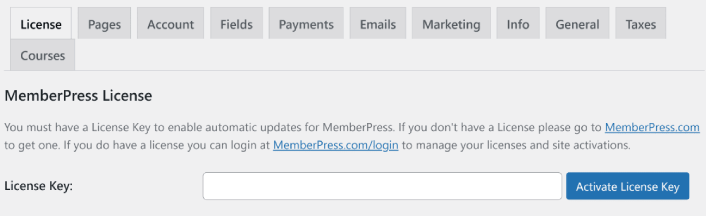
Paste in your license key and hit the Activate License Key button. You will now get full access to all MemberPress features.
Step #4: Set Up Payment Methods for Your WordPress Member Site
For any member site to work, you need to accept and process payments to allow access to your premium content. So, we’re going to set up payment options for your subscribers next.
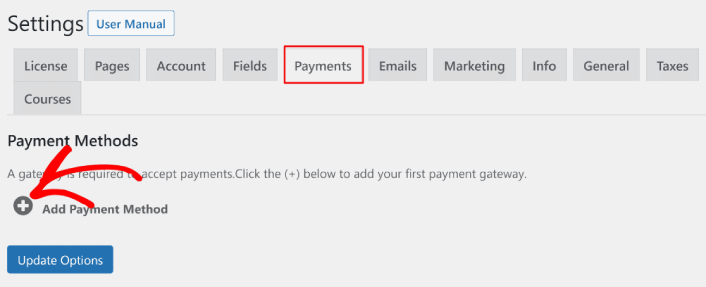
To add a payment method, visit the Settings page of MemberPress. Click on the Payments tab and click on Add Payment Method.
MemberPress lets you accept payments with Stripe, PayPal, and Authorize.net. We recommend using WP Simple Pay to accept Stripe payments on your site.
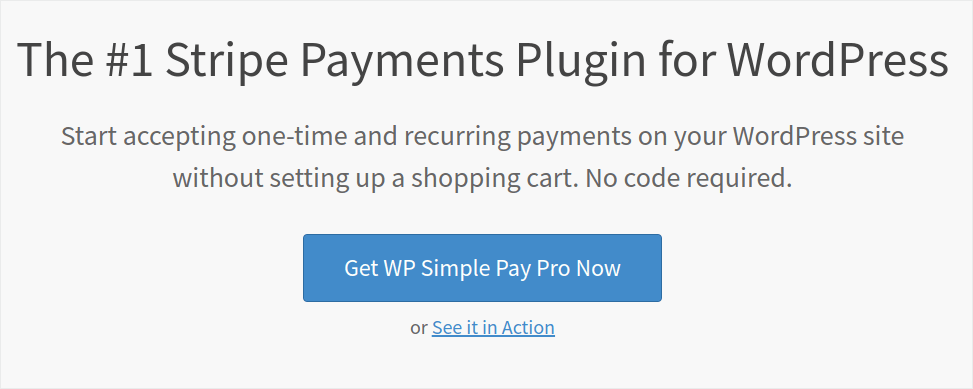
WP Simple Pay is exactly what it sounds like. It makes online payments simple on your WordPress site. It’s easy to use, highly reliable, and requires zero coding to set up.
The best part? WP Simple Pay helps you focus on creating products and selling them without having to worry about accepting payments from across the world.
All customer and payment information is stored on your Stripe account, not on your WordPress website. As a result, the plugin won’t bloat your site like other alternatives. WP Simple Pay offers the simplest way to add Stripe payments to your WordPress site.
If you’re not sure if it’s the right Stripe plugin for you, check out our review of WP Simple Pay.
Step #5: Create Membership Levels
Once you’re done setting up the payment gateway on your site, go ahead and create membership levels for your members. If you’re a streamer, or if you’ve watched live streamers on Twitch or YouTube before you probably know how Patreon and YouTube memberships work.
You need to create varying levels or tiers of membership at different price points. Each level should have different perks for your members. If you’re a Twitch or YouTube streamer, then creating a WordPress member site is way better than Patreon or YouTube memberships because you get more control over your content and earnings.
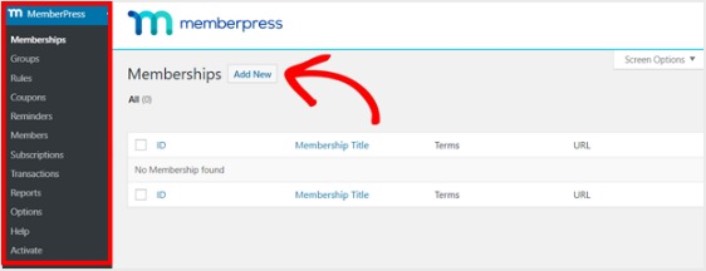
Head over to MemberPress » Memberships and click Add New to create your membership tiers.
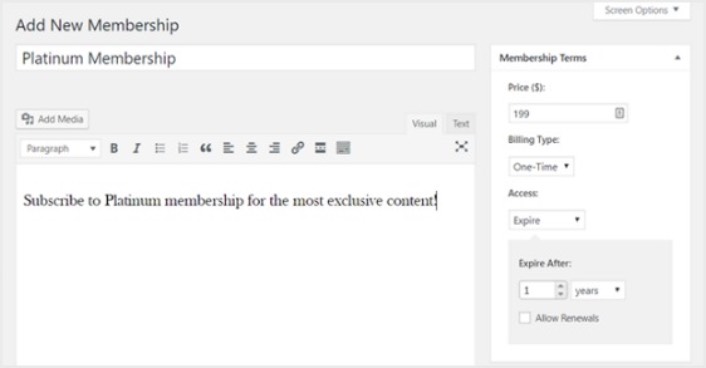
Next, enter a title and description for your membership level in the editor. Then, set the price, billing type, and access time from the Membership Terms section on the right.
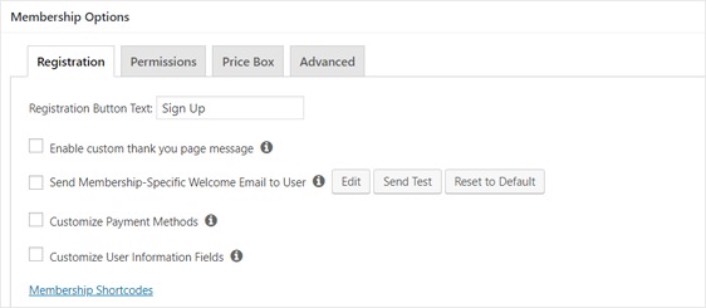
After that, you’ll want to scroll down to the Membership Options section to customize it the way you want it. And don’t forget to click on the other tabs to configure the Permissions and Price Box as well.
Then, simply publish your membership tiers.
Step #6: Set Membership Access Levels
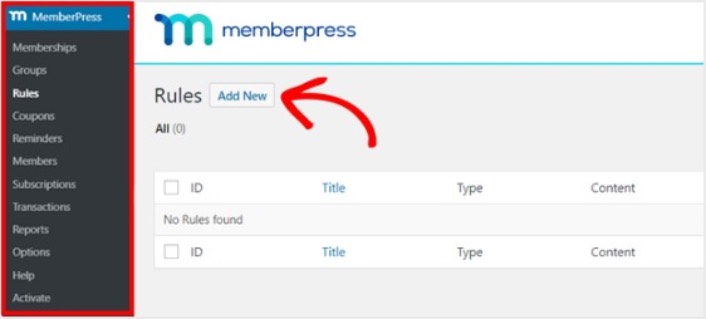
Not every member should get access to everything if you have multiple membership tiers. So, you’ll need to restrict access on your membership website. Go to MemberPress » Rules and click on Add New.
You can select all the content under a specific category be accessible only by users with the 2 most expensive membership plans. In this example, we selected the Advanced WordPress Guide category.
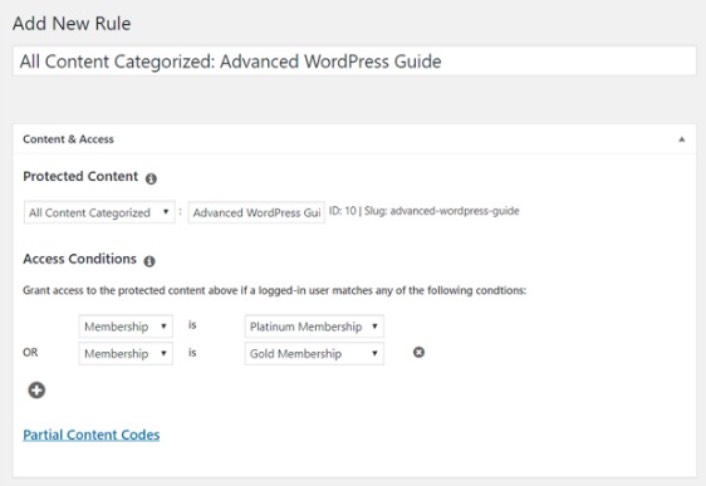
Next head to the Drip/Expiration settings.

If you choose to enable the Drip option, this will let you gradually release content. The Expiration option lets you choose the time when the content is no longer available.
Step #7: Create Members Only Content
Next, you want to upload the content for your paying members. You’ll also need to restrict access to it based on membership levels. You can add content with a post or page. So for this example, we’ll create content to link to the access rule we created in the last step.
Create a new post and add the content you want to it. Next, select the Advanced WordPress Guide category.

Next, scroll down to the MemberPress Unauthorized Access section.
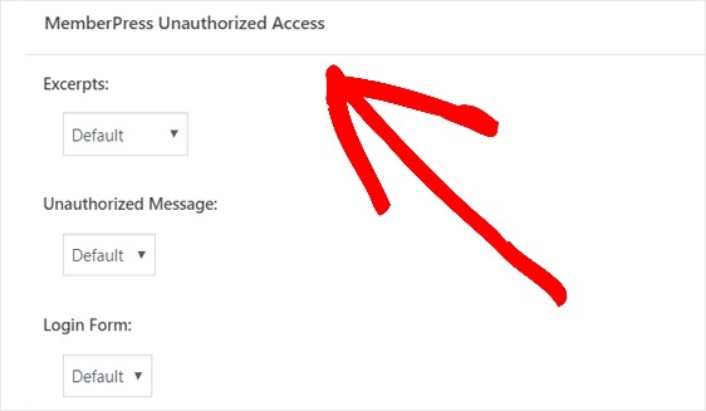
This is where you can set up how much of your members only content your non-members can see. And when everything is configured the way you’d like it, publish your page. Then, you can head to Posts » All Posts to see which content access is restricted to certain membership levels.

You can even create full-blown online courses using MemberPress.
Step #8: Create a Pricing Page
We’re almost all the way through. By now, you have membership tiers and premium content for each tier. Next, you’ll need to create a pricing page for your memberships.
Go to MemberPress » Groups and click on the Add New button.
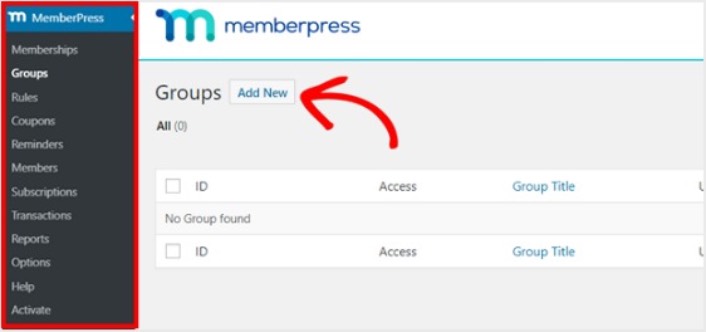
Name your group something like ‘Pricing Plans’ so people know what the page is about. After that, scroll down to the Group Options section. Here, you can add the memberships you want to show on your pricing page.
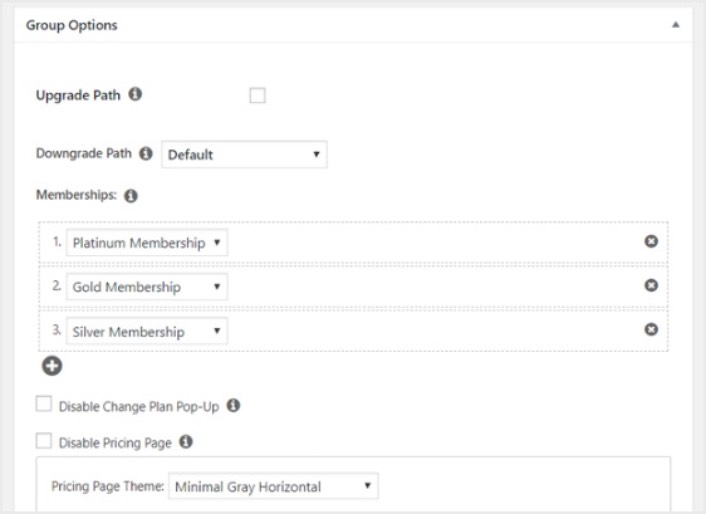
Pro Tip: You can also change the pricing page theme on this page.
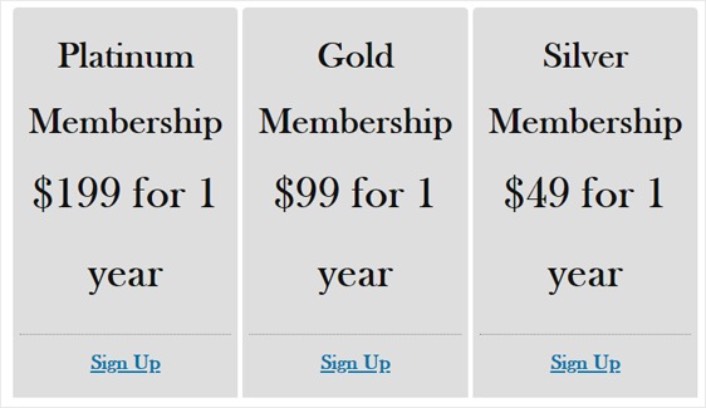
Publish this page when you’re ready, and preview it to check it out. If you followed every step, it should look something like this:
Now, you need to make sure that your WordPress member site redirects unauthorized users to the pricing page. Copy the URL for your pricing page and go to MemberPress » Options and scroll down to the Unauthorized Access section.
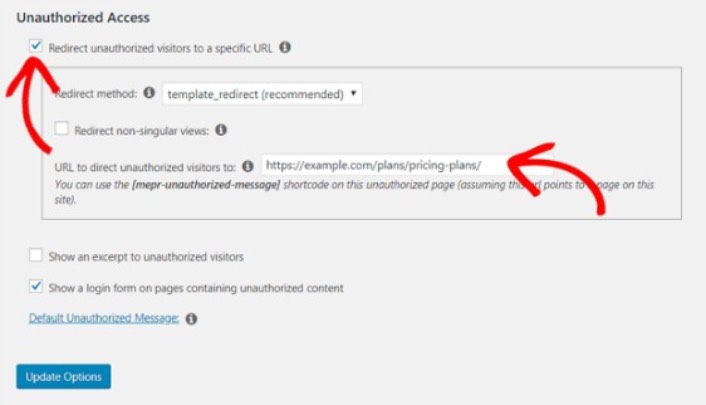
Check the box next to Redirect unauthorized visitors to a specific URL and paste the URL to your pricing page. Finally, click on Update Options to save your changes.
Step #9: Create a Login and Signup Form
You need to give your registered users a way to sign in and access their content. And you also need to create a form to accept new members.
The simplest way to do this is to use the MemberPress login widget. MemberPress already has a login and signup form module that you can simply import without any custom coding.
Go to Appearance » Widgets in your WordPress dashboard and drag the MemberPress login widget to a widget-ready area on your site.
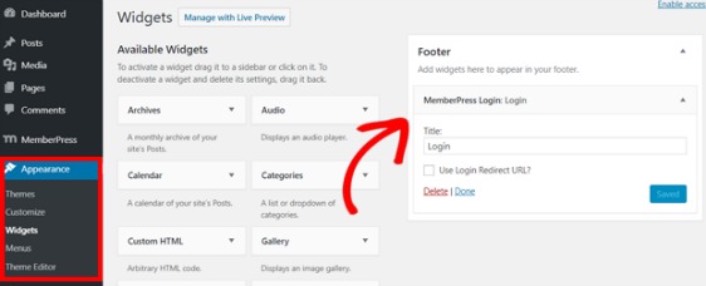
The example shows us adding it to the footer. But you can also add it to the sidebar if your like.
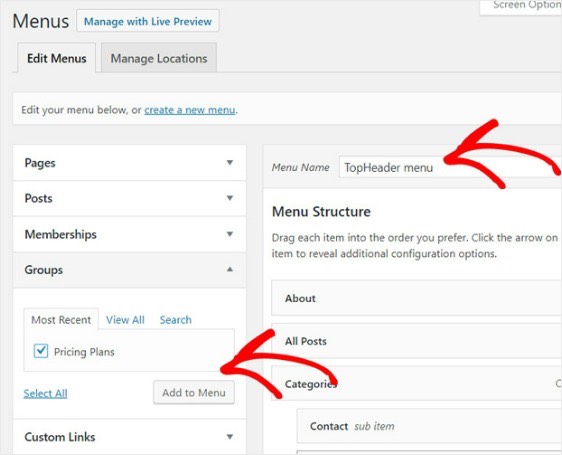
Finally, you need to advertise your Pricing Plans page by adding it to the site navigation menu. Go to Appearance » Menus and create a new menu or choose an existing one. Then, select Pricing Plans from the left under Groups and click on the Add to Menu button.
And that’s it! You’ve successfully created your WordPress member site.
What to do After You Create a WordPress Member Site
You should consider using push notifications with your membership plugin. Most membership plugins come with automated email campaigns to engage and retain members. But we recommend using push notifications to grow traffic, engagement, and sales on your memberships alongside your email campaigns.
Did you know that push notifications come with a lot of automated campaigns as well? Take a look at a few that could help you grow your memberships quickly:
- Drip Campaigns and Autoresponders For Web Push Notifications
- 5 Benefits of Using Cart Abandonment Push Notification Campaign
- How to Convert Subscribers To Buyers Using Web Push Notifications
- How to Add a Web Notifications WordPress Plugin to Your Site
And if you’re just starting out with push notifications, we recommend using PushEngage. PushEngage is the #1 push notification software in the world. So, your campaigns will be in safe hands.


