
Looking for a tutorial on how to disable XML-RPC in WordPress?
XML-RPC might sound a bit technical, but it’s actually a nifty tool at the heart of WordPress that lets you link up your WordPress website with other apps, tools, and services. The not-so-great part is that there were instances in the past where sneaky hackers managed to use XML-RPC to break into WordPress sites.
In this article, we’ll show you how to easily disable XML-RPC in WordPress. And we’ll do it using a simple plugin so that you don’t have to get into coding yourself.
Let’s dive in.
DISCLAIMER: This is not the only method to disable XML-RPC in WordPress. You can also edit the .htaccess file in your WordPress server using Apache code. But that involves custom coding and we don’t recommend that method unless you’re a seasoned coder.
How Disable XML-RPC in WordPress with a Code Snippet
The simplest way to disable XML-RPC in WordPress is to simply paste a code snippet into your site. The cool bit is the code is completely done for you. So, all you have to do is install a code snippets plugin for WordPress to install it.
We recommend using WPCode to do it.
WPCode is a fully free WordPress plugin that allows you to insert code snippets on your site without any coding knowledge.
It allows you to easily add code snippets like Google Analytics, custom CSS, and Facebook Pixel to your WordPress site’s header and footer without having to edit your theme’s functions.php file.
You can also use WPCode to insert custom PHP, JavaScript, CSS, HTML, and text snippets with full conditional logic and code priority support. If you’ve ever managed a WordPress site before, you’ll know how incredibly useful this plugin is. You can use the plugin for:
- Google Search Console verification
- Google Analytics tracking
- Custom CSS code
- Adding push notifications
- Inserting Facebook tracking pixel
And any code snippet you can think of inserting into your WordPress site.
The best part about WPCode is that there’s an involved developer community to prepare a code library for you. All you have to do is find the right code snippet for you from a verified developer and click on the recipe. The plugin will automatically install everything for you.
Step #1: Install and Activate the WPCode Plugin
Once you buy WPCode from the website, go ahead and download the plugin from your account page. Then, install it like any WordPress plugin. If you’re never done it before, check out this tutorial on how to install a WordPress plugin.
When you’re done, head over to Code Snippets » Settings in your WordPress site and paste in the API key you get from WPCode to activate the plugin:
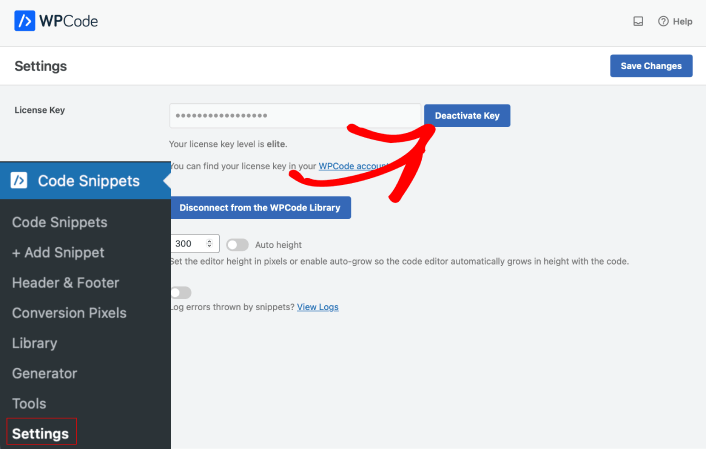
When you’re done, hit the Save Changes button.
Step #2: Activate the Code Snippet to Disable XML-RPC in WordPress
Head over to Code Snippets » Library and look for the code snippet to Disable XML-RPC under Most Popular:
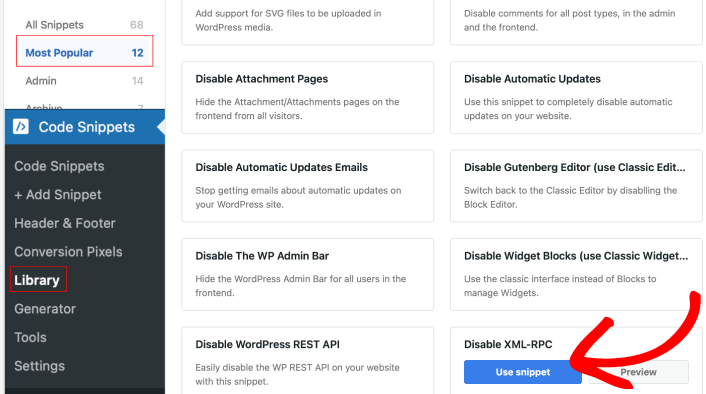
All you have to do is click on the Use snippet button and switch the code snippet toggle to Active.
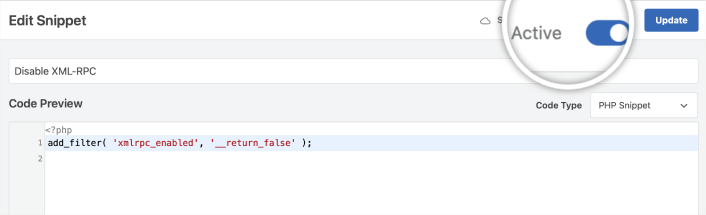
When you’re done, just hit the Update button and you’re all set. WPCode will automatically disable XML-RPC in WordPress for you. The cool thing about WPCode is that it can replace a ton of plugins by using code snippets.
To be clear, you can install a plugin to only disable XML-RPC. But if we recommend that you check out WPCode’s library of code snippets before you do. You’ll be shocked to see how much you can do with that simple, lightweight plugin.
That’s why we recommend WPCode so heavily. You can reduce a lot of code bloat on your site by simply installing this one plugin.
Now That You Know How to Disable XML-RPC in WordPress
That’s all for this one, folks!
Now that you know how to disable XML-RPC in WordPress, it’s time to optimize your site to increase conversions.
And if you’re looking for a simple, affordable way to grow your traffic, we recommend using push notifications. Push notifications can help you bring in more repeat traffic and site engagement. You can also create automated push notification campaigns that generate sales.
Not convinced? Check out these resources:
- 7 Smart Strategies to Boost Customer Engagement
- Are Push Notifications Effective? 7 Stats + 3 Expert Tips
- How to Set Up Abandoned Cart Push Notifications (Easy Tutorial)
- How to Add a Web Notifications WordPress Plugin to Your Site
We recommend using PushEngage to create your push notification campaigns. PushEngage is the #1 push notification software in the world. So, if you haven’t already, get started with PushEngage today!


