Looking for an easy way to set up abandoned cart push notifications for your website?
Using abandoned cart software is the perfect solution for you.
But setting up abandoned cart push notifications can be really difficult. Most of the tutorials out there are about abandoned cart emails and even those can be pretty complicated.
That’s exactly why we published this article.
We’re going to show you step-by-step how to set up an abandoned cart software in simple and easy steps.
And you don’t need a lot of technical expertise to understand the steps in this article.
Also, if you ever get stuck with any of the steps, all you have to do is get in touch with our Customer Success team and we’ll set up an abandoned cart campaign for you!
Sounds good?
Let’s dive in.
Why Push Notifications for Cart Recovery
Roughly 70% of shoppers who add a product to their cart leave without paying for it. Baymard Institute puts the long-run average at 69.57%. That is the single largest leak in your funnel, and it sits between traffic you already paid to acquire and revenue you never collected. Recovering even a slice of it is cheaper than any acquisition campaign you will run this quarter.
Push notifications are the strongest first-touch channel for that recovery, for three measurable reasons:
- Reach. Web push opt-in is one click on a browser prompt, so your reachable audience grows far faster than an email list. On the same traffic, cart abandonment push campaigns reach roughly 5 times more abandoners than email.
- Speed. The average email sits unread for over 6 hours. A push notification lands on the shopper’s screen in real time, while the cart is still on their mind and often while the tab is still open.
- Conversion. Across our campaign data, cart abandonment push campaigns run about 37% more effective than the equivalent email sequence, and every notification reports its recovered revenue so you can defend the channel in a budget review.
Each notification carries the abandoned product’s name, image, price, and a link straight back to checkout, personalized per shopper. The results compound at real stores: MyDeal grew revenue 20% with this exact campaign type, and SuperJeweler converts 8% of its abandoners back into buyers. Cart recovery is one piece of the larger picture. For the full prevention-plus-recovery playbook, see our guide on how to reduce cart abandonment.
Below you will find two ways to set the campaign up: the standard dashboard method, and a Google Tag Manager method if you prefer to manage your scripts in GTM. At the end, nine ready-to-use notification templates cover the copy.
How to Create An Abandoned Cart Campaign Using PushEngage
In this article, we’re going to show you how to create an abandoned cart campaign using PushEngage. PushEngage is the #1 push notification software in the world and you can set up cart abandonment campaigns right from the PushEngage dashboard.
So, if you haven’t done it already, go ahead and create a PushEngage account. To set up abandoned cart campaigns, you’ll need to get the Enterprise Plan of PushEngage. So, select the Enterprise Plan and finish setting up your PushEngage account.
Then, head over to the dashboard to follow along with this tutorial.
Step #1: Create A New Abandoned Cart Push Notifications Campaign
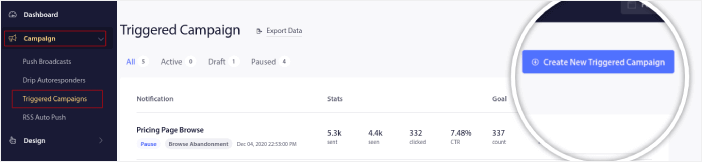
Go to the PushEngage dashboard and head over to Campaign » Triggered Campaigns and click on Create New Triggered Campaign:
Then, select the Cart Abandonment template and click on Create New:
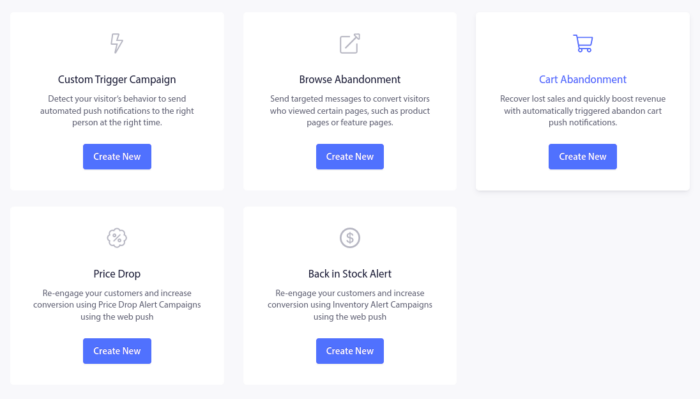
And you can start drafting an abandoned cart autoresponder.
Step #2: Draft Campaign Details
Next, you’ll want to draft the campaign inside the PushEngage dashboard. Under Content, you can create a series of push notifications:
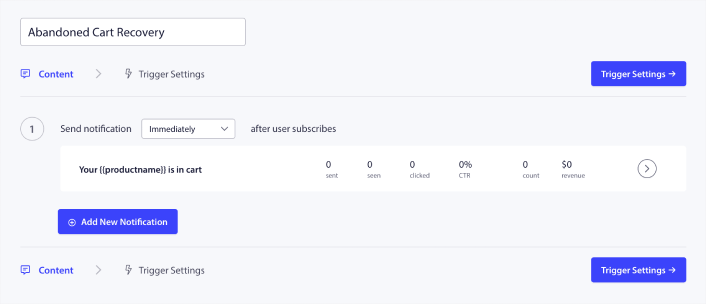
To edit a notification, simply click the arrowhead next to it and you can customize the push notification:
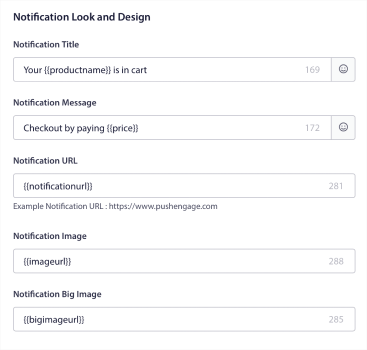
You can automatically fetch most of these fields using variables.
If you notice, there are multiple variables in brackets like {{productname}} and {{price}}. You can use these, later on, to define parameters for your code snippet. These fields will help you personalize your push notifications. For instance, {{bigimageurl}} fetches the product image automatically based on what product was abandoned.
As with any push notification, you can customize everything about the content here.
You can also add checkout buttons:
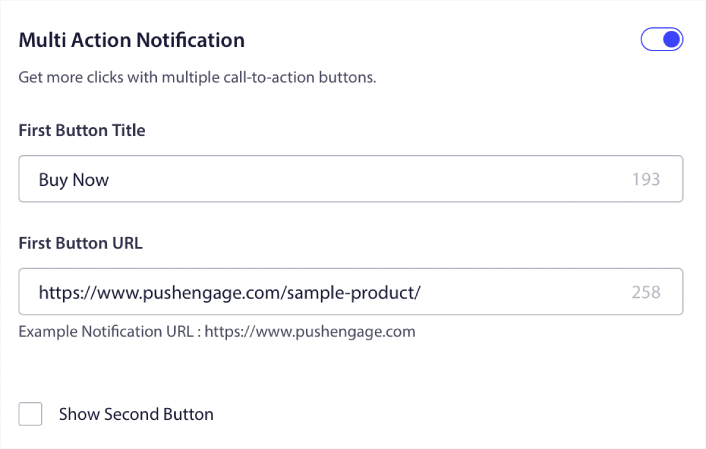
Or, you can add a custom notification duration:
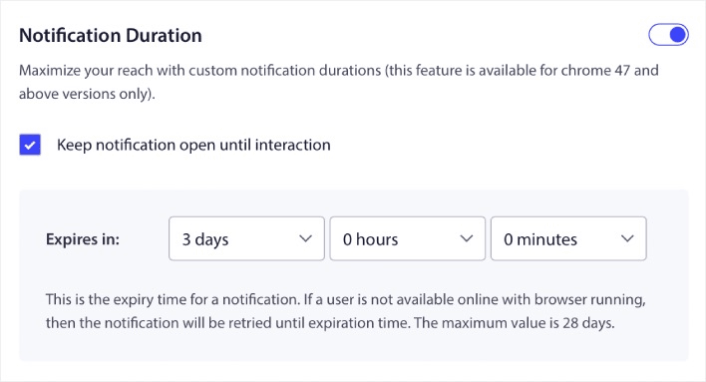
When you’re done, go to the Trigger Settings tab to activate you campaign.
Step #3: Copy the Campaign Code Snippet
We don’t really recommend changing anything in the Trigger Settings because the cart abandonment template already takes care of everything for you.
So, just click on the Integration Code button and copy the code:
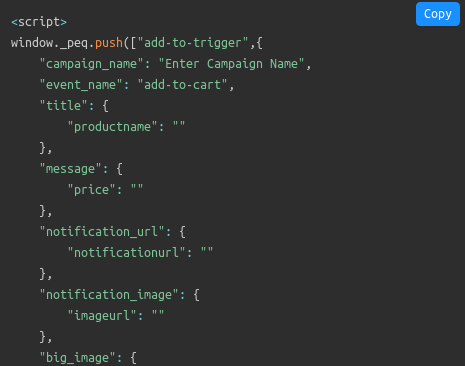
NOTE: You’ll need to copy multiple code snippets here. There are snippets for an Add to Cart Event, a Checkout Event, and a Goal Tracking mechanism that you’ll need to add.
You’ll need to have your developer fill out this code snippet with the variables used on your website before using them. But if you don’t have a developer, just talk to our Customer Success Team. We’ll set up the campaign for you. It’s completely free!
For instance, variables such as product name and price are completely dynamic. So, your developer will have to pair the fields in this code snippet with actual values.
You can customize your code further to send out personalized push notifications, but that’s fairly advanced (more on this later).
And then, place the code snippets on your website.
Step #4: Save and Launch the Campaign
That’s it!
Just hit the Activate Autoresponder button:
And you’re done.
Method 2: Set Up Cart Abandonment via Google Tag Manager
If your team already manages tracking scripts in Google Tag Manager, you can run the whole cart abandonment setup through GTM instead. Nothing in your site’s HTML needs hand-editing, and your product data flows to the campaign through a dataLayer. This method is slightly more technical than the dashboard method above, but it keeps every script in one governed container.
Step 1: Install PushEngage Through GTM
Your site needs the PushEngage snippet collecting subscribers before any campaign can fire. Follow our tutorial on how to install PushEngage using Google Tag Manager, then come back here.
Step 2: Create the Cart Abandonment Campaign
In your PushEngage dashboard, go to Campaigns » Triggered Campaigns, click Create New Triggered Campaign, select the Cart Abandonment template, and click Create New. Draft your notification sequence exactly as in Method 1. The difference is only in how the trigger data reaches the campaign.
Step 3: Create a dataLayer Object
The dataLayer is the product feed GTM reads from. It is a JavaScript object holding the attributes of the product in the cart, such as name, ID, price, and image URL. Add the dataLayer object to the HTML body of your site, then attach a trigger event to your Add to Cart and Buy Now buttons so a click activates the campaign. The campaign does not fire instantly on click. It fires only if the shopper still has not purchased after the delay you set, typically 30 minutes.
Step 4: Create dataLayer Variables in GTM
In GTM, go to Workspace » Variables » Configure, scroll to Clicks, and enable all click variables. Then, under User-Defined Variables, click Create New and add one variable for each product attribute in your dataLayer: products.name, products.id, products.price, products.productname, and products.image. Match the syntax exactly. A mismatched variable name is the most common reason a GTM cart abandonment campaign never fires.
Step 5: Create the Trigger
Go to Triggers » Add New and create a Custom Event that fires when a shopper clicks a button with the text “Buy Now” (or your store’s equivalent). This is the event that marks a cart as at-risk.
Step 6: Configure the Tag and Go Live
Back in the PushEngage dashboard, open Campaigns » Triggered Campaigns, click Your Code, and copy the campaign code. Paste it into your site’s HTML just above your Buy Now buttons, wire it to the dataLayer variables and trigger you created, and publish the GTM container. Abandon a test cart with your own device before you call it done.
Either method ends in the same place: a live campaign that fires automatically. Next, the copy that goes inside it.
How to Create Personalized Cart Abandonment Campaigns
You can create personalized cart abandonment campaigns using custom attributes.
This means that you can hook up PushEngage with your Customer Relationship Management (CRM) software to fetch personal details for each customer. By default, PushEngage captures the device and geolocation information for each customer. But you can extend the range of personalization using the PushEngage Attributes API.
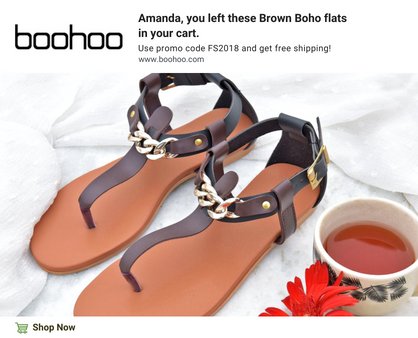
You can create custom abandoned cart push notifications with the user’s name like this one:
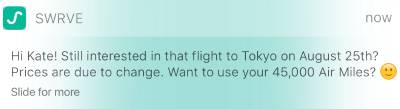
Or add more elements such as a price drop or unused loyalty points:
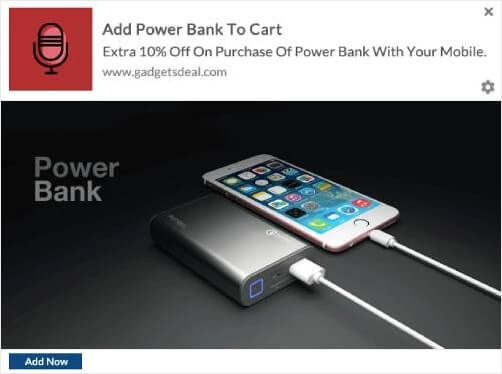
Or even cross-sell other products:
There are really no limits to the type of campaign you can set up using our APIs. Go nuts!
Ready-to-Use Cart Abandonment Push Templates
Your campaign is only as good as the copy inside it. These nine templates cover the psychological angles that recover carts, and each fits the 40-to-120 character envelope of a push notification. Use the personalized reminder as touch one, then pick two more angles for touches two and three based on your margin and your audience. Swap the bracketed fields for your campaign variables, such as {{productname}} and {{price}}.
1. Personalized Reminder
The default first touch. Name, product, image, nothing else. It reads as a helpful nudge rather than a promotion.
Title: Still thinking it over, [name]?
Body: Your [product] is saved in your cart. Checkout takes under a minute.
2. Scarcity
Works when stock is genuinely limited. Never invent it. Subscribers who catch a fake stock warning stop clicking everything you send.
Title: Only [count] left in stock
Body: The [product] in your cart is nearly sold out. Complete your order while it lasts.
3. Time-Limited Discount
A discount with a deadline outperforms an open-ended one. Keep the window short, two to 24 hours, and honor it.
Title: 15% off your cart, today only
Body: Use code CART15 on your [product] before midnight. After that, full price.
4. Bundle Offer
Protects margin better than a straight discount. Show the shopper what they save by buying more, not less.
Title: Make it two, save more
Body: Add a second [product] and save [amount]. Your cart is ready when you are.
5. Positive Emotion
Signals that you are holding the item for the shopper, not chasing them. A warm tone here builds brand equity even when it does not convert. An emoji or two fits this template naturally.
Title: We saved it for you
Body: Your [product] is waiting in your cart, reserved until you decide.
6. Confidence Builder
Best for apparel and gifts, where second-guessing kills the sale. Affirm the choice they already made.
Title: Good eye, honestly
Body: The [product] you picked is one of our most-loved styles. It is still in your cart.
7. Use Case
For products whose value needs a scenario. Show the shopper the product in their life, not in your catalog.
Title: Weeknight dinners, upgraded
Body: The [product] in your cart preps a full meal in 15 minutes. See it in action.
8. Free Shipping
Unexpected shipping cost is a top abandonment cause, so waiving it removes the exact objection that stalled the order. Add a deadline to force the decision.
Title: Shipping is on us
Body: Free shipping on your [product] for the next 24 hours. No code needed.
9. Surprise Gift
Curiosity does the work. A small unnamed gift costs less than a discount and converts the fence-sitters a discount misses.
Title: A little something extra
Body: Complete your [product] order today and we will tuck a surprise gift in the box.
Whichever templates you pick, segment before you send. Segmented cart abandonment notifications earn twice the click-through rate of one-size-fits-all sends in our campaign data. For the strategy layer above the copy, see the full guide on how to reduce cart abandonment.
Wrapping Up
That’s all for this one, folks!
If you found this helpful, you should also check out our article on how to reduce cart abandonment. There are some really helpful ideas there.
And if you’re just starting out with push notifications, you should try out PushEngage. PushEngage is the #1 push notification software in the world and you can create a whole range of push notification campaigns using PushEngage.
So, if you haven’t already, get started with PushEngage today.


cool post
thanks for the info this is really helpful to implement
nice post.. very useful for ecommerce websites who have push engage installed on them