Looking for a simple way to add web app push notifications that can help you grow your business?
Setting up push notifications for web apps can be a little bit tricky. There’s always some conflict with sending web push notifications. Usually, the biggest problem is the delivery rates. You can add web push to your web app in many ways. But how do you send web push notifications that actually get delivered from your web app?
Don’t worry! In this article, we’re going to show you step-by-step how you can send web app push notifications with reliable delivery rates in less than 10 minutes.
Ας ξεκινήσουμε.
How to Install Web App Push Notifications
Adding push notifications to a web app is quite simple. Just follow the steps in this article. If you follow every step, by the end of this article, you should be able to send push notifications like this one:

The main challenge is that all web push notification software uses a Javascript file called service_worker.js. The service worker helps you collect push notification subscribers through popup modals. But all web apps already have a service worker file that serves a different purpose. And at a time, your web app can only use one service worker.
In simple words, web push services confuse your web app. So, sometimes it will collect push notification subscribers and sometimes, it won’t. Sometimes you can send notifications and sometimes you can’t. You might even end up sending push messages to your entire subscriber list and have it delivered only to a few subscribers.
Of course, web app builders like Mendix come with their own push notification system. But what if you want to migrate to some other push notification service? What if you want more flexibility and control over your push notification campaigns?
We recommend using PushEngage to send web app push notifications. PushEngage is the #1 push notification software in the world. So, you know that your campaigns are in safe hands.
Ας ξεκινήσουμε.
Βήμα #1: Ρυθμίστε τον Λογαριασμό σας PushEngage
Μεταβείτε στην αρχική σελίδα του PushEngage και κάντε κλικ στο κουμπί Έναρξη:

You can try out PushEngage for free. If you’re running a small blog that needs repeat traffic and engagement, that’s probably good enough. But if you’re serious about sales, you should get the Enterprise package and unlock the automated campaigns.
Μόλις εγγραφείτε στον λογαριασμό σας PushEngage, κατευθυνθείτε στον πίνακα ελέγχου PushEngage και πηγαίνετε στο Ρυθμίσεις Ιστοτόπου » Λεπτομέρειες Ιστοτόπου:

Μπορείτε να ορίσετε το λογότυπό σας, το όνομα του ιστοτόπου και τη διεύθυνση URL του ιστοτόπου εδώ. Είναι πραγματικά σημαντικό να τακτοποιήσετε αυτά τα πράγματα τώρα, ώστε να μπορείτε να δοκιμάσετε ολόκληρη τη ρύθμισή σας αργότερα.
Βήμα #2: Λάβετε τον Κωδικό Εγκατάστασης από το PushEngage
Για να εγκαταστήσετε τις ειδοποιήσεις push, θα χρειαστεί να λάβετε έναν κωδικό εγκατάστασης. Στην οθόνη Ρυθμίσεις Ιστοτόπου, κάντε κύλιση προς τα κάτω και κάντε κλικ στο κουμπί Κάντε Κλικ Εδώ για Οδηγίες Εγκατάστασης:

Στη συνέχεια, κάντε κλικ στην καρτέλα Οποιοσδήποτε Ιστότοπος:

Μπορείτε να χρησιμοποιήσετε τον κωδικό Javascript για να αρχίσετε να στέλνετε ειδοποιήσεις push.
Step #3: Add the Service Worker Code For Web App Push Notifications
The most tricky part of the process is finally here. In the PushEngage dashboard under Setup Instructions, you’ll also see an option to download the service worker file.
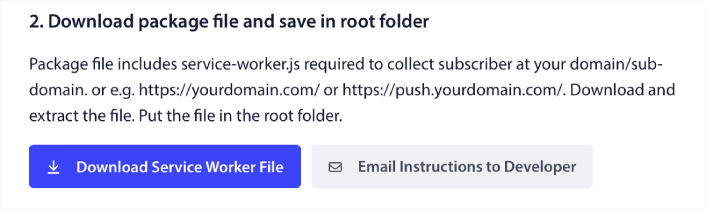
IMPORTANT: By default, a web app doesn’t require a service worker file. All you need to turn any site into a web app is a manifest file. So, if your web app doesn’t have a service worker file, then you can simply add the PushEngage service worker to the root directory of your website or web app.
But if your web app already has a service worker in place, then DO NOT directly upload the PushEngage service worker file as is. Open the PushEngage service worker in a text editor like Notepad and copy the code in the PushEngage service worker file. Then, find the service worker file for your web app and simply add the PushEngage service worker code to the file.
If you neglect this step, you won’t be able to collect push notification subscribers.
Βήμα #4: Διαμορφώστε την εγγραφή στο PushEngage
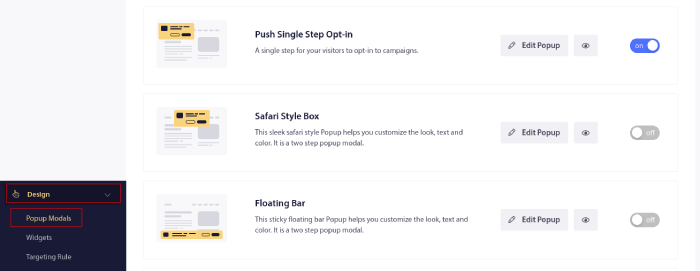
Τώρα, επιστρέψτε στον πίνακα ελέγχου PushEngage. Πηγαίνετε στο Σχεδίαση » Αναδυόμενα Παράθυρα και επιλέξτε την επιλογή εγγραφής της επιλογής σας:
Η ιδέα εδώ είναι να δώσετε στους επισκέπτες σας έναν ισχυρό λόγο για να εγγραφούν. Εάν χρειάζεστε βοήθεια με αυτό, ελέγξτε το άρθρο μας σχετικά με το πώς να δημιουργήσετε μια προσαρμοσμένη φόρμα εγγραφής για ειδοποιήσεις push.
Και αν θέλετε κάποια πρότυπα για να ξεκινήσετε, θα πρέπει να δείτε αυτό το άρθρο σχετικά με πρότυπα εγγραφής ειδοποιήσεων push με υψηλές μετατροπές.
Βήμα #5: Δημιουργήστε την πρώτη σας καμπάνια
Now that your web app can send push notifications, you should create an actual campaign.
Μια καμπάνια εγκαταλελειμμένου καλαθιού βοηθά στη δημιουργία επιπλέον εσόδων μετατρέποντας τα εγκαταλελειμμένα καλάθια. Είναι μια απλή υπενθύμιση που πουλάει πολλά προϊόντα αυτόματα. Έτσι, είναι μια εξαιρετική καμπάνια για να υποστηρίξετε οποιαδήποτε σελίδα προορισμού που φέρνει άμεσες πωλήσεις.
Just head over to your PushEngage dashboard and go to Campaigns » Triggered Campaigns » Create A New Triggered Campaign:

And then, select the Cart Abandonment campaign template:

Αν είστε νέος στη δημιουργία αυτοματοποιημένων καμπανιών μάρκετινγκ, μπορείτε απλώς να ακολουθήσετε το άρθρο μας σχετικά με το πώς να ρυθμίσετε μια καμπάνια ειδοποιήσεων push για εγκαταλελειμμένο καλάθι. Ακολουθήστε κάθε βήμα και μπορείτε να ρυθμίσετε ειδοποιήσεις push όπως αυτή:
Και για κάθε ενδεχόμενο να αναρωτιέστε, δεν χρειάζεται να είστε ένα γνωστό όνομα για να είναι αποτελεσματικές οι καμπάνιες ειδοποιήσεων push. Στην πραγματικότητα, το PushEngage δημιουργήθηκε για να βοηθήσει τις μικρές επιχειρήσεις να αναπτυχθούν χρησιμοποιώντας ειδοποιήσεις push.
But before you start marketing your site, you should fix any issues with your push notification subscription process. Check out this article on testing your push notifications. If everything’s working perfectly, you’re done!
What To Do After Adding Web App Push Notifications?
Αυτό ήταν για αυτό το θέμα, φίλοι!
You can now send web app push notifications. By now, you’ve also created a powerful web push notification campaign to boost your growth. All that, in less than 10 minutes!
Check out how to create other automated push notification campaigns as well. Most push campaigns are simple and effective. So, we recommend setting up multiple campaigns for your site. Here are a few great ones to start with:
- Πώς να στέλνετε αυτόματα ειδοποιήσεις push RSS
- Πώς να Ρυθμίσετε Ειδοποιήσεις Push Εγκατάλειψης Καλαθιού Χρησιμοποιώντας το GTM
- Πώς να Προγραμματίσετε Ειδοποιήσεις Push με τον Εύκολο Τρόπο [Οδηγός 5 Λεπτών]
Και αν δεν το έχετε κάνει ήδη, ξεκινήστε με το PushEngage. Το PushEngage είναι το λογισμικό ειδοποιήσεων push #1 στον κόσμο. Έτσι, οι καμπάνιες σας είναι σε ασφαλή χέρια.


