In-app messages are messages that appear inside your app while someone is using it, sitting over the screen without interrupting what the app is doing. You can use them to earn push permission, onboard new users, recover carts, announce updates, win back lapsing users, and ask for ratings, all at the moment the message is relevant. This guide shows you how to create and target an in-app message.
Before You Start
- You need the PushEngage mobile SDK integrated in your app. In-app messages are delivered through the app SDK, and support starts with the PushEngage Android SDK 1.0.0.
- Users do not need a push notification subscription to see in-app messages.
- In-App Messages is a Pro feature. If your plan does not include it, you see an upgrade prompt.
- To use event triggers, your app needs to fire the event to PushEngage.
What You Can Do With In-App Messages
An in-app message sits over your app while it keeps running, so you can reach people in context. Common goals include:
- Earn push permission before you spend the operating system prompt.
- Walk new users to first value, and resume anyone who stalls.
- Recover carts and price-drop intent in the same session.
- Announce what shipped on the screen it affects.
- Win back lapsing users with a return offer.
- Ask for ratings, feedback, and referrals at the right moment.
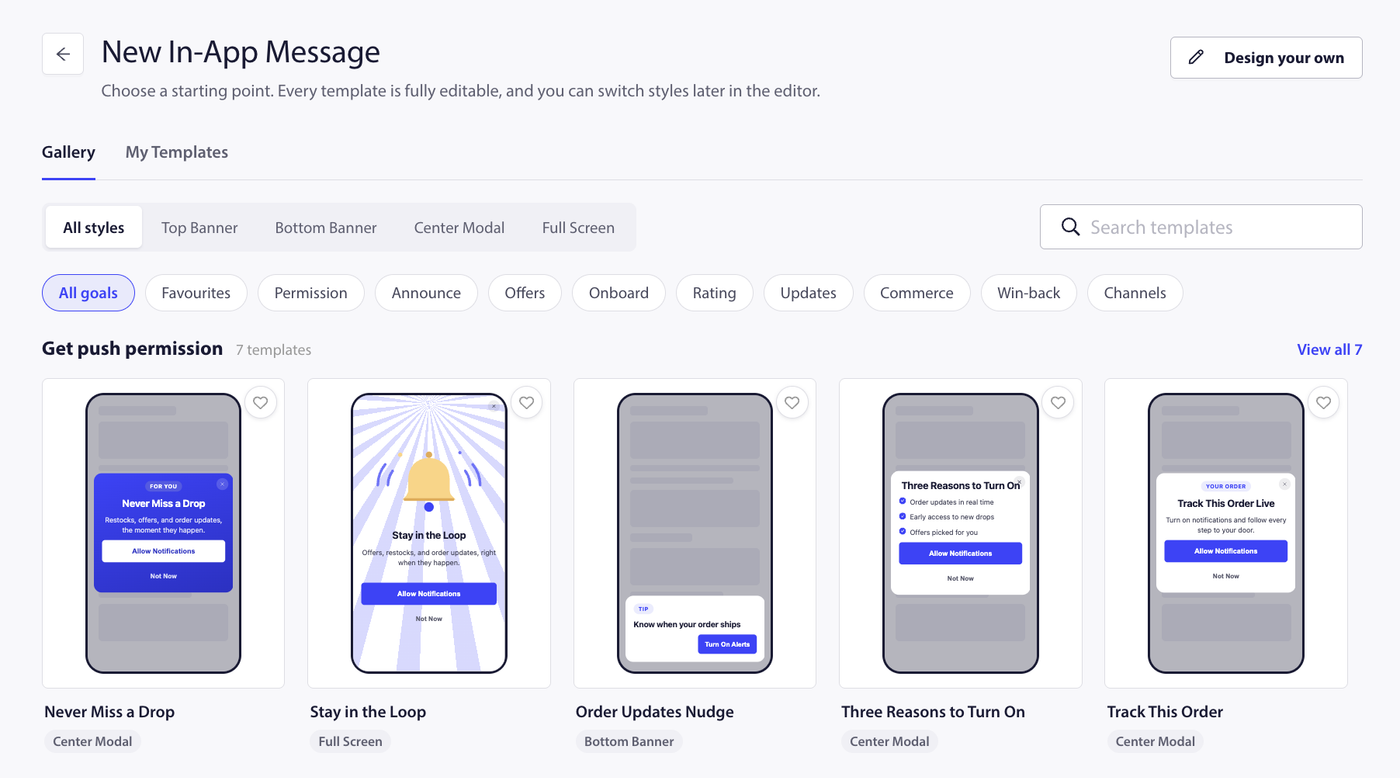
Each message uses one of four formats:
| Format | What it is |
|---|---|
| Top Banner | A banner across the top of the screen. |
| Bottom Banner | A banner across the bottom of the screen. |
| Center Modal | A card in the center of the screen. |
| Full Screen | A message that covers the whole screen. |
Create an In-App Message
- In the PushEngage dashboard, go to Campaign » In-App Messages and click Create New Message.
- Pick a template from the gallery of ready-to-edit templates, or start from a blank message. You can filter templates by goal, such as Get push permission, Announce, Offer and promo, Onboard and educate, Rating and feedback, Updates and notices, Cart and commerce, Win-back and engagement, and Grow other channels, or search templates by keyword.
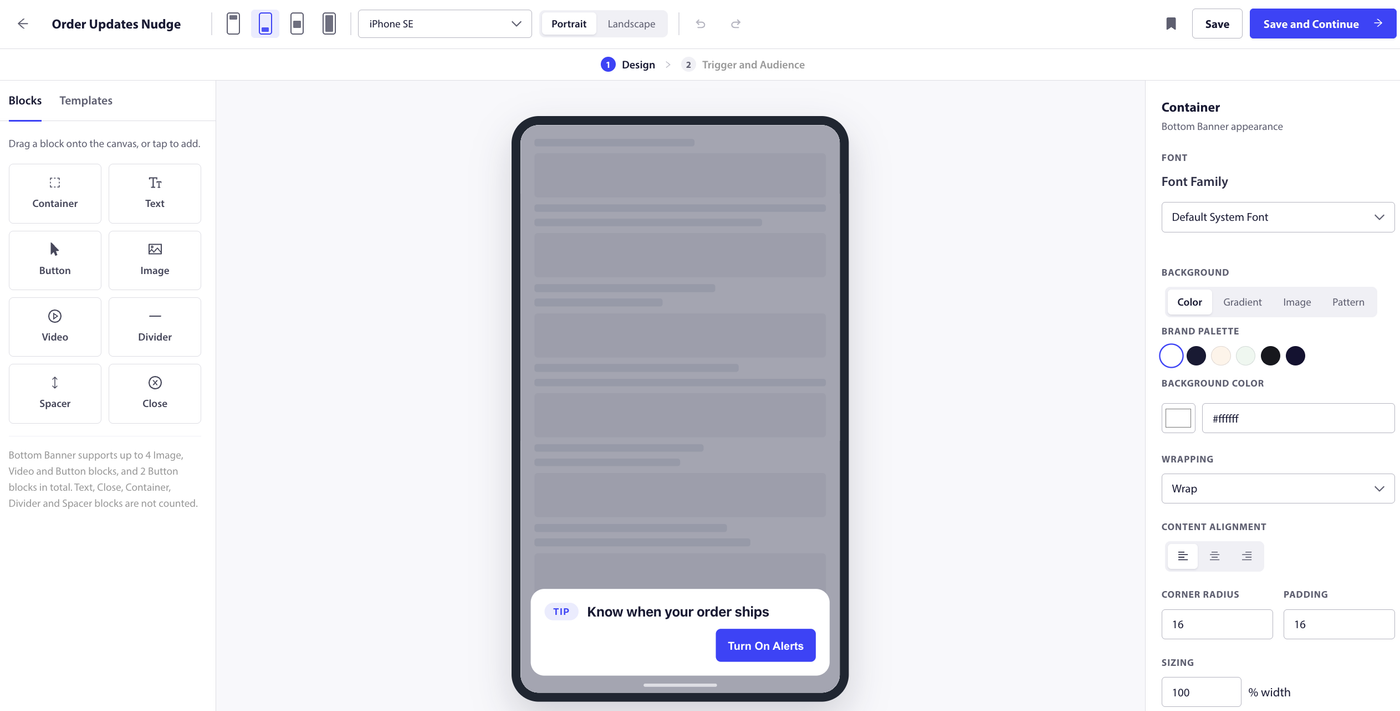
- Design the message on the Design step.
- Set the trigger and audience on the Trigger and Audience step.
- Click Save and Activate to make it live.
Design the message
The Design step is a block-based editor. Add and arrange blocks such as text (title, body, caption, stat, or checklist), a badge, an image, up to two buttons, a divider, and a spacer, and include a close button. A button can open a URL, dismiss the message, ask the user for notification permission, or run a custom action your app handles. A live preview shows the message in the format you chose. You can also save your design to My Templates to reuse later.
Set the trigger
Choose when the message shows:
- App open. The message shows when the app opens after you activate it. You can add a delay in seconds so it appears a moment after the app opens.
- On event. The message shows when your app fires a specific event (using
triggerIAMEvent). Enter the event name, and optionally add conditions on the event’s parameters so it only fires when those match. This requires your app to send the event to PushEngage.
Choose the audience
By default the message can show to everyone. To narrow it, target segments, and build audience conditions on built-in fields such as OS version and app version and on your own subscriber attributes, combining them to match all or any of the conditions.
Set display and frequency
- Position. Top Banner, Bottom Banner, Center Modal, or Full Screen.
- Dismiss after. How long the message stays on screen, in seconds, and whether it dismisses when tapped.
- Priority. Set a priority so PushEngage knows which message to show first when more than one qualifies.
- Frequency. Show it One time, Recurring on an interval, or Capped at a set number of times.
- Schedule. Set a start and end time so the message only shows during a window.
Track Performance
Once a message is active, its analytics show impressions, clicks, and closes, along with per-button click counts and a trend over time, so you can see how each message performs and refine it. Events are queued on the device while it is offline and reported once it reconnects, so counts settle after connectivity returns.
Frequently Asked Questions
Do users need a push subscription to see in-app messages?
No. In-app messages show inside your app regardless of whether the user has subscribed to push notifications, so you can even use one to ask for notification permission.
Do I need to add code to use in-app messages?
You need the PushEngage mobile SDK integrated in your app, since in-app messages are delivered through it. Messages built with the App open trigger work once the SDK is in place. Messages built with the On event trigger also need your app to fire that event with triggerIAMEvent, and a button that runs a custom action needs your app to handle it with setIAMCustomActionHandler.
Which message formats can I use?
Four: Top Banner, Bottom Banner, Center Modal, and Full Screen. Each sits over your app while it keeps running.
What can trigger a message?
Either the app opening (optionally after a delay), or a custom event your app sends, optionally filtered by conditions on the event’s parameters.
How do I control how often someone sees a message?
Use the frequency setting. Show it one time, on a recurring interval, or capped at a set number of times, and use priority to decide which message wins when more than one qualifies.
Why is In-App Messaging labeled a Pro feature?
In-App Messages is included on Pro and above. If your plan does not include it, you see an upgrade prompt when you open the feature.
If you run into any issues, please feel free to contact us by clicking here. Our support team will be able to help you.