Notice: There is no legacy documentation available for this item, so you are seeing the current documentation.
Implementing push notifications for your Android application is now possible with PushEngage. Simply integrate the SDK once, and empower your marketing team to send contextual and personalized messages to your Android app users. You would need help of your developer to get this running for you.
Setup Firebase Project
Before you get started with app push notifications, you need to ensure that you have an existing Firebase account.
1. You need to log in into Firebase console, using your Google account.
2. You need to then click Add Project or select an existing project. Skip to step 4 if you choose an existing project.

3. Enter a project name and click Continue. On the next screen, click Create project with all details mentioned.


4. Click on the Android icon to add an Android app to the project.

5. On the following screen, enter your Android applications package name give the name of the Android App you are trying to integrate, and click register.

6. Download the google-services.json file and place it into your Android app module root directory.

7. In the Firebase console, click the Settings icon next to Project Overview in the top left and Select Project Settings. Click on Generate new private key.
Save the .json file downloaded from the previous step safely as this will be required to set up in the PushEngage dashboard.
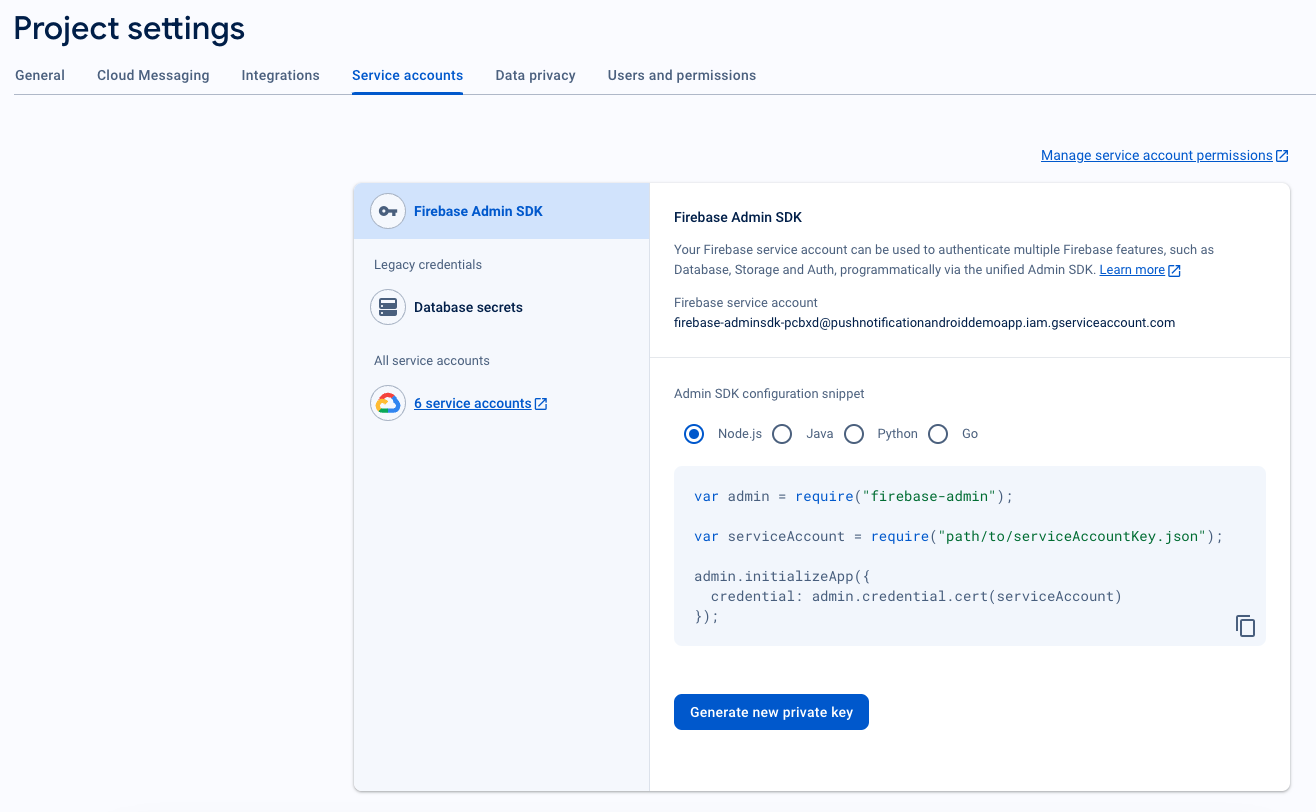
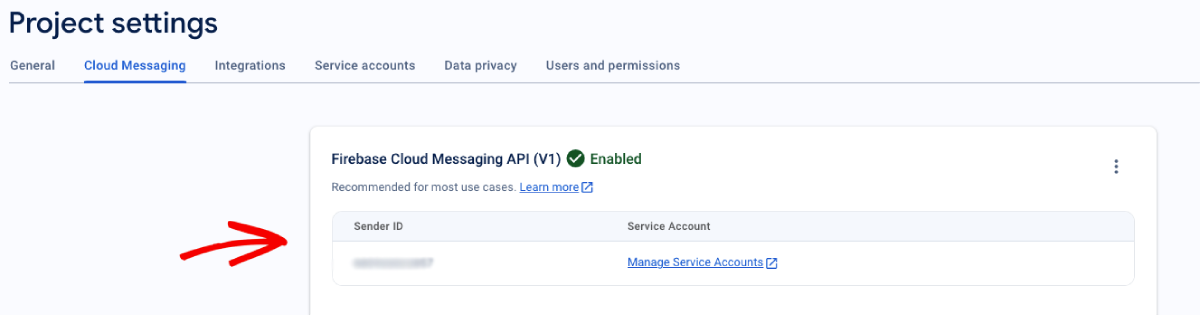
8. In the Firebase console, click the Settings icon next to Project Overview in the top left and select “Project settings.”
Select the Cloud Messaging tab, under which will be the Sender ID.
Integrating FCM with PushEngage Dashboard
Once you have created the project in Firebase, you can then integrate the sender ID in the PushEngage dashboard.
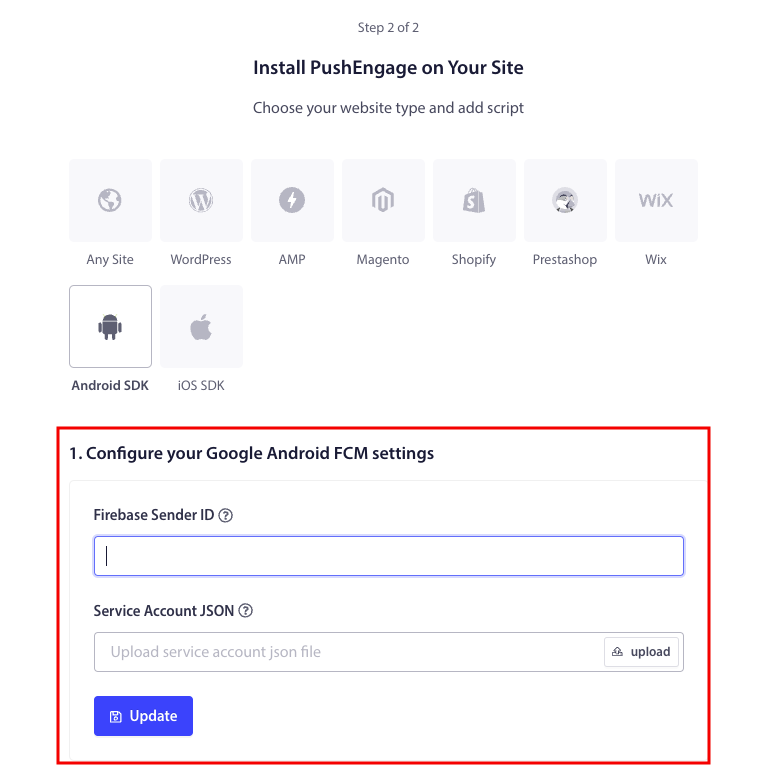
1. In your PushEngage account, navigate to Site Settings » Installation
2. While choosing your platform, select the Android SDK Tab.
3. Configure your Sender ID and Service Account JSON
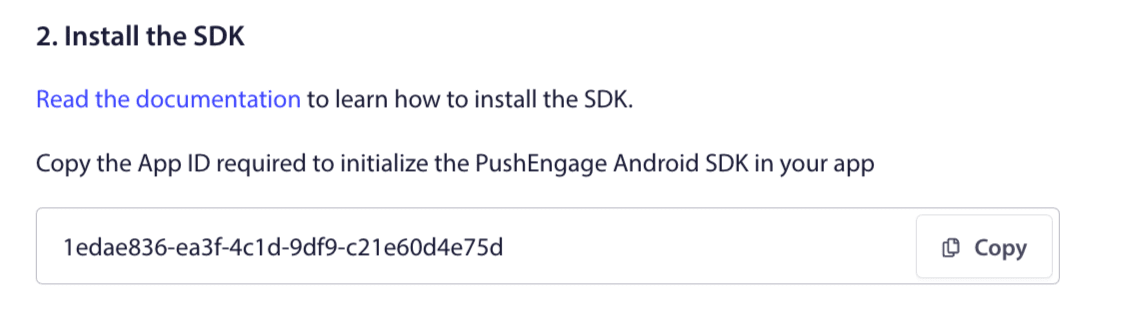
4. Copy the App ID required to initialize the PushEngage Android SDK in your application.
Adding SDK Dependencies
Now is the time to add SDK Dependencies. We add the following line in your root build.gradle.
1. If your project is not using centralized repository declaration then In project level build.gradle file, add the following lines. Otherwise you can skip to the second section.
// Project level build file where you can add configuration options common to all sub-projects/modules.
buildscript {
   repositories {
       google()
       jcenter()
   }
   dependencies {
       // ...
       // Add this line
       classpath "com.google.gms:google-services:4.3.10"

   }
}

allprojects {
   repositories {
      // ...
      // Check that you have the following line (if not, add it):
      google()
      maven {url 'https://jitpack.io' }
   }
}
If your project uses centralized repository declaration, add the following to your settings.gradle file.
dependencyResolutionManagement {
    repositoriesMode.set(RepositoriesMode.FAIL_ON_PROJECT_REPOS)
    repositories {
        //add this line
        maven { url 'https://jitpack.io' }
    }
2. In the application level build.gradle file then add the following:
plugins {
   id 'com.android.application'
   // Add this line
   id 'com.google.gms.google-services'
}

dependencies {
   // ...
   // Add the following lines
   implementation 'com.github.awesomemotive:pushengage-android-sdk:0.0.5'
   implementation platform('com.google.firebase:firebase-bom:26.1.1')
}
Initializing the SDK
Add the PushEngage SDK initialization code block to the onCreate method in the Application class. PUSHENGAGE_APP_ID should be replaced by the App Id you got from the PushEngage dashboard.
Note : If your mobile application does not have a custom class extending the Application class for PushEngage, you need to create a class which extends Application class.
Here is an example in Java
public class PEApplication extends Application {
@Override
public void onCreate() {
super.onCreate();

// PushEngage SDK Initialization code
PushEngage pushEngage = new PushEngage.Builder()
.addContext(getApplicationContext())
.setAppId("PUSHENGAGE_APP_ID")
.build();
// The small icon is displayed on the top status bar and in the notification.
// By default PushEngage displays a bell icon, however It is recommended to
// customize this so users easily recognize notifications from your app.
PushEngage.setSmallIconResource("your_icon_name");
}
}
Here is an example in Kotlin
class PEApplication : Application() {
   override fun onCreate() {
       super.onCreate()
       // PushEngage SDK Initialization code
       val pushEngage = PushEngage.Builder()
           .addContext(applicationContext)
           .setAppId("PUSHENGAGE_APP_ID")
           .build()
        // The small icon is displayed on the top status bar and in the notification.
       // By default PushEngage displays a bell icon, however It is recommended to
       // customize this so users easily recognize notifications from your app.
       PushEngage.setSmallIconResource("your_icon_name");
   }
}
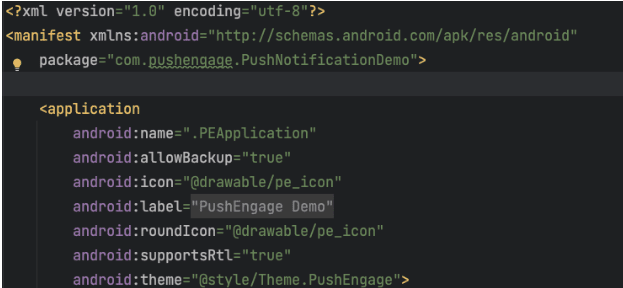
To register your custom class name, which extends the Application class, navigate into your application’s Manifest.xml file. Find the line that says “android:name=.”PEApplication”,” and swap out “PEApplication” with the name of your custom class. This is how it would look like –
Once you have configured all the above steps, you can send push notifications to your Android application. Build and run the application on a physical device and send test push notifications from the PushEngage Dashboard.
Handling Notification Permission for Android 13 and Above
The Android 13 requires permission for some devices before sending them any notifications. So, if you are willing to set, add this. Here is the code that would be needed.
Use the built-in SDK method to request notification permission.
 /**
 * Request notification permission using the PushEngage SDK
 * SDK automatically calls subscribe when permission is granted
 */
private void requestNotificationPermissionUsingSDK() {
    PushEngage.requestNotificationPermission(this, new PushEngagePermissionCallback() {
        @Override
        public void onPermissionResult(boolean granted, Error error) {
            if (granted) {
                // Permission granted - SDK automatically calls subscribe
                Log.d("MainActivity", "Notification permission granted");
                Toast.makeText(MainActivity.this, "Permission granted and subscribed!", Toast.LENGTH_SHORT).show();
            } else {
                // Permission denied, handle accordingly
                Log.d("MainActivity", "Notification permission denied");
                Toast.makeText(MainActivity.this, "Permission denied!", Toast.LENGTH_SHORT).show();
                if (error != null) {
                    Log.e("MainActivity", "Permission error: " + error.getMessage());
                }
            }
        }
    });
}
Check Permission Status
You can also check the current notification permission status:
String permissionStatus = PushEngage.getNotificationPermissionStatus();
switch (permissionStatus) {
    case "granted":
        Log.d("Permission", "Notifications are allowed");
        break;
    case "denied":
        Log.d("Permission", "Notifications are denied");
        break;
    default:
        Log.d("Permission", "Unknown permission status");
        break;
}
If you want to explore more of the capabilities of Android SDK, you can go through our detailed API documentation.
If you run into any issues, please contact us by clicking here. Our support team will be able to help you.


