Notice: There is no legacy documentation available for this item, so you are seeing the current documentation.
A Drip Campaign is a sequence of push notifications sent to a subscriber on a schedule that starts when they subscribe, such as a welcome message right away, a follow-up a day later, and an offer three days after that. Unlike a trigger, which fires on a shopper action, a drip runs on time delays between steps. This guide shows you how to create, schedule, and activate a drip campaign in the PushEngage Shopify app.
Before You Start
- Install and connect PushEngage on your Shopify store before you create a drip.
- Confirm your plan includes Drip Campaigns. The builder shows an upgrade prompt when you open it if your plan does not. [Confirm: exact plan tiers for base drip access versus the multi-step, large-image, action-button, custom-audience, and goal add-ons.]
- Know that some controls inside the builder, including multi-step sequences, large images, action buttons, custom audience targeting, and goal tracking, may be gated separately by plan. Locked controls show an upgrade prompt when you interact with them.
How Drips Work
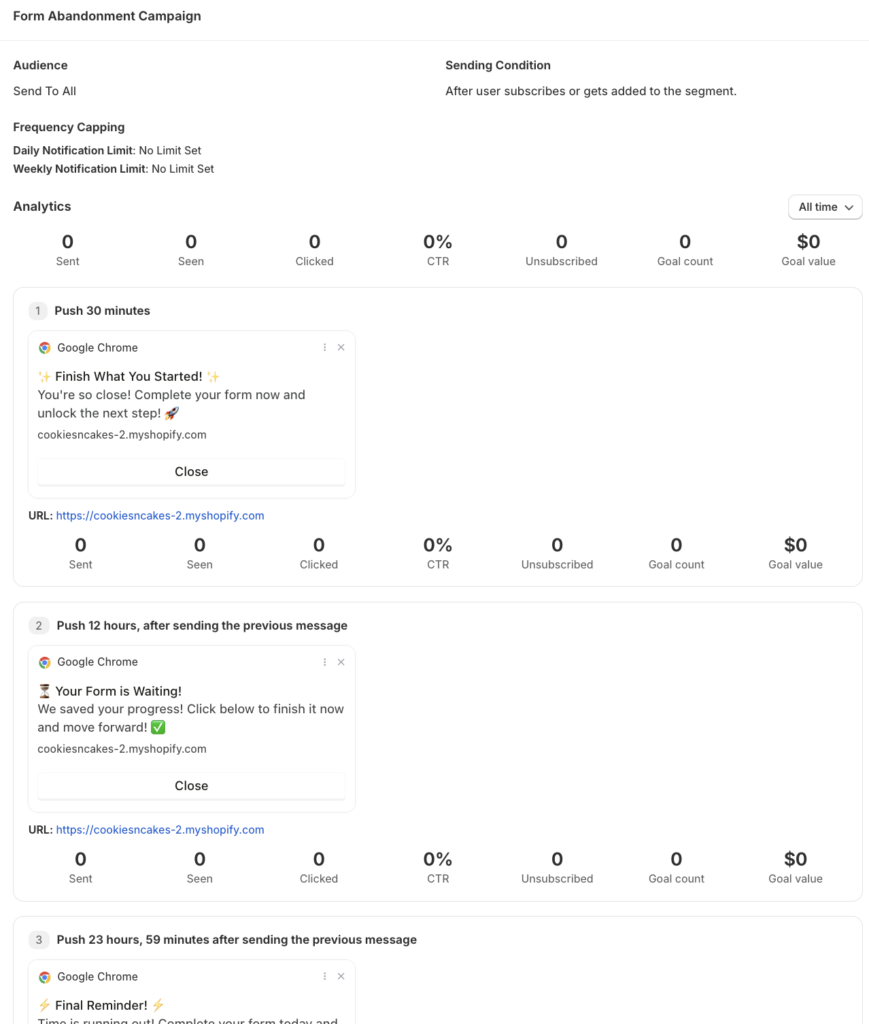
A drip sends its notifications in order. Step 1 fires immediately when a subscriber enters the drip, and each later step follows a delay you set relative to the previous step. You write the notifications on the Content step and choose who receives them on the Settings step.
| Delay type | Meaning | Example summary in the builder |
|---|---|---|
| Immediately | Step 1 only. Fires as soon as the subscriber enters the drip. | Fires immediately |
| After a number of days | Waits the set number of days after the previous step. | Fires 3 days after previous notification |
| After hours or minutes | Waits the set hours and minutes. | Fires 2 hr 30 min after previous notification |
| Next weekday | Waits until the next occurrence of a chosen weekday. | Fires next Monday after previous notification |
Default Drip Campaigns
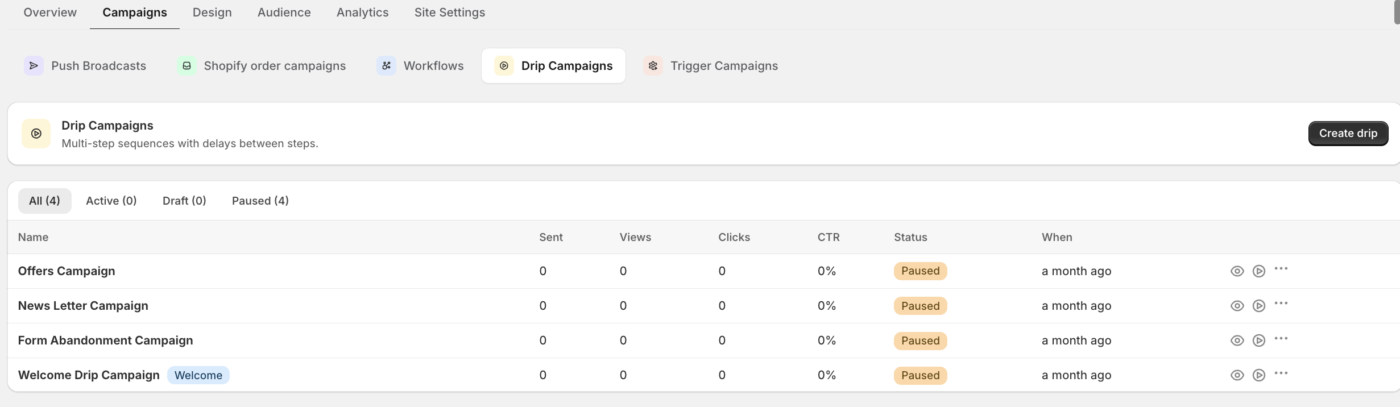
In Shopify we have integrated some popular use cases as default drip campaign. You can review any of the below and simply hit the play button to enable these campaigns.
- Welcome Drip Campaign – This targets every new subscriber who is getting added to your Shopify Store.
- News Letter Campaign – The sending condition is after it gets added to a segment.
- Form Abandonment Campaign – The sending condition is to send to a segment, you can use pre-created Leads segment to target them to make customers.
- Offers Campaign – You can send offers to everyone or to a specific segment.
Create a Custom Drip Campaign
- Go to Web Push » Campaigns and select Drip Campaigns from the campaign-type strip.
- Click Create.
- Enter a name at the top of the builder, up to 150 characters.
- Build your notification sequence on the Content step.
- Set your audience, tracking, and goals on the Settings step.
- Click Save draft to finish later, or Activate to start the drip.
[Screenshot: Campaigns page with the campaign-type strip and the Drip Campaigns list, with the Create button highlighted.]
Write the notification sequence
On the Content step, add the notifications in order. Step 1 fires immediately, and each additional step follows the delay you set. New drips prefill step 1 with sample copy so you can edit rather than start from scratch.
| Field | Notes | Limit |
|---|---|---|
| Notification title | Required. Supports variables like {{first_name}} and {{city}}. | 85 characters |
| Notification message | Required. | 135 characters |
| Notification URL | Required. Must be a valid http or https URL. | 1600 characters |
| Notification image | Optional small icon. | |
| Large image | Optional and paid. Required if you enable it. | |
| Action buttons | Optional and paid. Up to two, each a label and URL. | Label 12, URL 256 |
Set audience, tracking, and goals
On the Settings step, choose who enters the drip. Select All subscribers to include everyone who subscribes, or Custom to target specific segments. With Custom, you add one or more segment groups, each matching all, any, or none of the chosen segments, and you can narrow further by country, state, city, device type, or browser. Custom audience is a paid capability.
Enable UTM parameters to append tracking tags to notification URLs, where Source, Medium, and Campaign are required. Enable Goal tracking to attribute conversions with a goal name of 1 to 64 characters using letters, numbers, hyphens, and underscores.
Edit and Duplicate a Drip
Open any drip from the Drip Campaigns list to change its content or settings. To reuse a drip as a starting point, use Duplicate. The copy is created as a new draft named with a Copy suffix and starts fresh, so activating the copy does not disturb the original.
Frequently Asked Questions
Why will the builder not let me save?
The builder highlights the first field that fails validation. Common causes are a blank title, message, or URL, a URL that is not http or https, a delay of zero on a later step, or a name longer than 150 characters.
Why is a control greyed out with an upgrade prompt?
That capability is not included on your current plan. Multi-step sequences, large images, action buttons, custom audience targeting, and goal tracking can each be gated separately, so the control stays locked until you upgrade.
Why are subscribers not receiving later steps?
Check that each step’s delay is set correctly and that the drip is Active rather than a draft. A draft drip does not send, and a misconfigured delay can hold a step longer than you expect.
Why will the large image not save?
When you enable Show Large Image, an image is required. Add a large image URL and the step saves.
If you run into any issues, please feel free to contact us by clicking here. Our support team will be able to help you.


