Looking for a way to create a lightbox popup for your site?
A lightbox popup can be incredibly effective for capturing leads. They’re designed to convince and convert.
But having to code one from scratch is a real pain. For one thing, you’d have to know enough HTML, CSS, and Javascript to create the popup along with trigger rules for when to show it. Then, you’d have to create a manual integration with your email service provider. And finally, you’d have to deal with any privacy and security issues.
Good news: there’s a much simpler way.
In this article, we’re going to show you how to launch a lightbox popup with zero coding in less than 10 minutes.
Plongeons dans le vif du sujet.
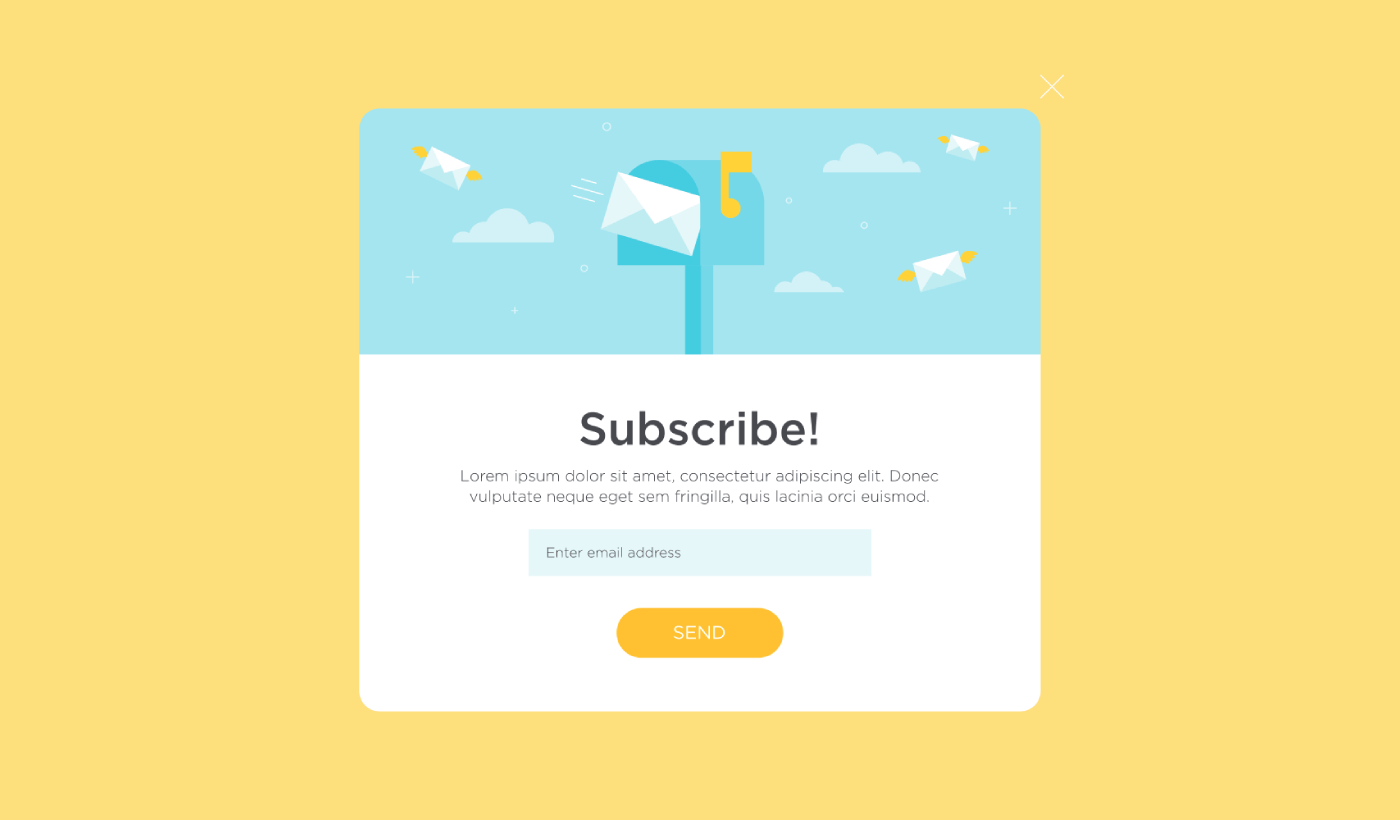
What is a Lightbox Popup?
A lightbox popup is an opt-in form that popups up with a cinematic effect. When a lightbox pops up, it blurs out the rest of the site in the background. This way, your entire focus is on the popup.
Originally, the concept of lightboxes come from outdoor advertising:
And then, some developers thought that this was a really cool effect and they created a Javascript library to recreate the same effect on web assets. Later on, the idea of using lightbox popups came into play.
Why Lightbox Popups Work
Lightbox popups capture more emails than a traditional email optin form.
But why do they work?
Let’s take a quick look at the main reasons why lightbox popups work so well.
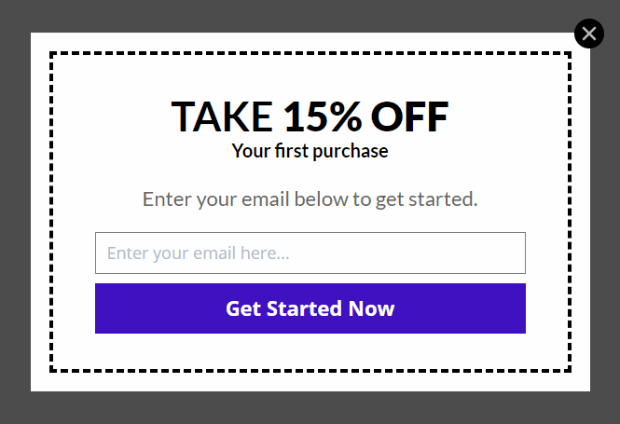
#1. Lightbox Popups Feature a Clear Call to Action
Most people believe that it’s a great thing to give their customers a lot of options.
But that’s not really true.
If you’re looking for direct conversions, you want a single, clear call to action that your audience can focus on. This way, you remove all distractions from the user’s mind. And lightbox popups do a great job of highlighting your core offer and getting people to focus on your call to action.
So, naturally, the conversion rates are pretty great.
#2. Lightbox Popups Are Impossible to Ignore
Lightbox popups take up the entire screen and blur out everything else. So, it’s practically impossible to ignore them.
This is especially true if they’re animated:
Of course, you have to ensure that your popups aren’t intrusive. And you can do that by customizing when to trigger different popups on your site. As long as your audience isn’t annoyed by the interruption, you can very easily convince and convert them.
#3. Lightbox Popups Have Personalized Triggers
You shouldn’t be showing the same offer to all your web visitors. If you’re running an eCommerce store, you’ll need very different offers for new and returning customers.
For a new customer, you can trigger a welcome campaign:
But for a returning customer, you may want to send them a different offer:
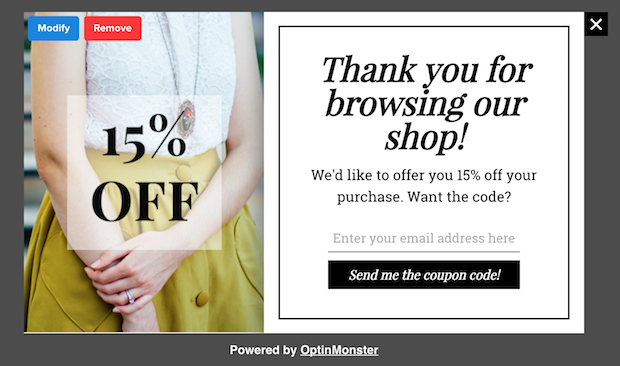
Notice how the discount amounts for both offers are exactly the same. But the way in which the offer is framed is drastically different. And this is super important because lightbox popups are built for theatrical effects. So, a more personalized approach will get you much better results for sure.
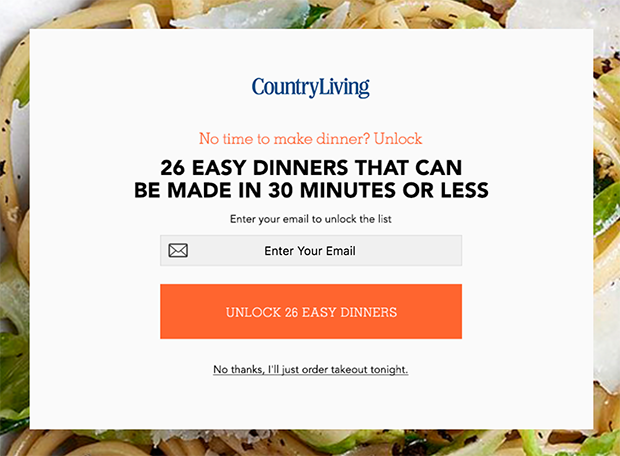
You could even personalize the offer based on your user’s content preferences. If they’re reading an article on dinner recipes, it makes more sense to show them an offer related to dinner recipes rather than showing them an offer for cars.
#4. Lightbox Popups Can Capture Abandoning Visitors
Lightboxes are just a method of displaying your popup. So, there’s really nothing stopping you from customizing the trigger to any extent you like. We recommend creating exit-intent lightbox popups.
Exit-intent popups get triggered when your visitors try to exit your website. As a result, you retain a huge number of visitors who would have otherwise abandoned your site. So, if you’re suffering from site abandonment, you should definitely create an exit-intent lightbox popup.
How to Create a Lightbox Popup
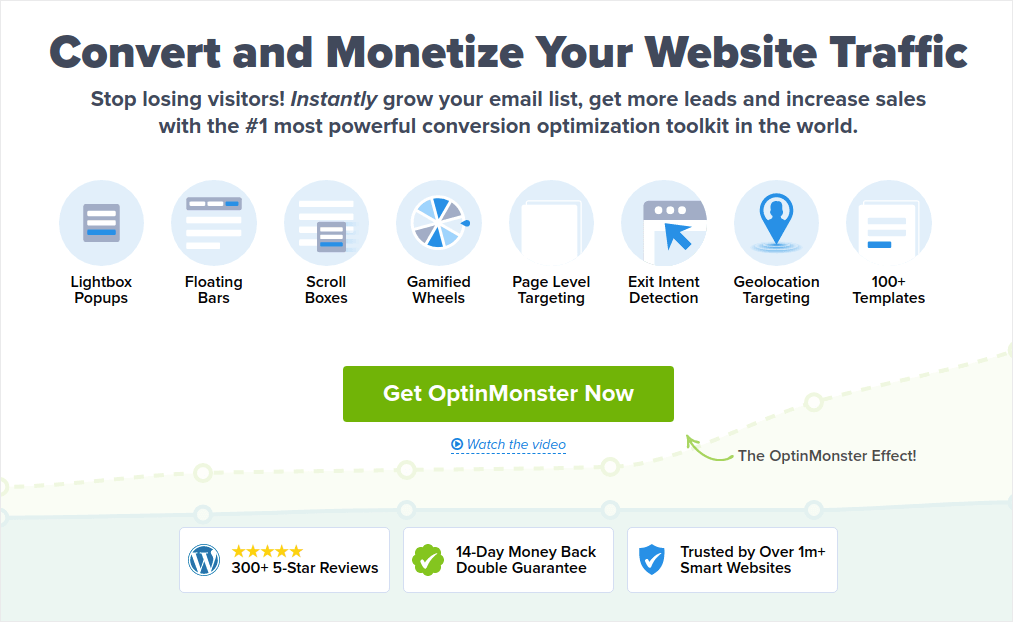
Now that you understand what a lightbox popup is and why you’d want to create one, how do you a lightbox popup? We recommend using OptinMonster to create your popups.
OptinMonster est la boîte à outils de conversion n°1 au monde et nous l'utilisons nous-mêmes. OptinMonster rend très simple la création de popups puissantes qui convertissent. Et vous n'aurez jamais besoin d'utiliser de code.
We even wrote a full review of OptinMonster.
You can check that out, or get started with your campaign right now. All you have to do is signup for OptinMonster and follow along with the rest of this article.
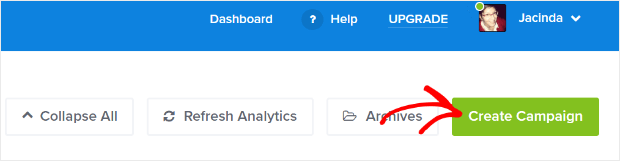
Step #1: Create a Campaign
Rendez-vous sur votre tableau de bord OptinMonster et cliquez sur le bouton Créer :
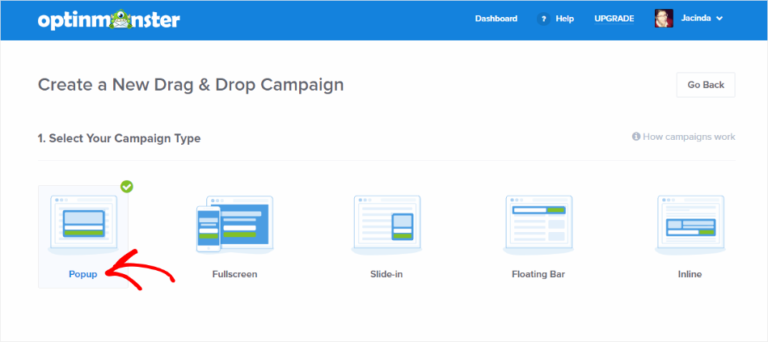
Select the Lightbox Popup campaign type:
Then, choose a campaign template. You can choose whatever template you like, but we’re going with the Simple campaign type for this tutorial.

Now, give your campaign a name. Remember, this campaign name is for you and you’ll likely create a whole bunch of these popups with different targeting options. So, give the campaign a meaningful name or you’ll end up really confused later on.
De plus, selon votre forfait, vous pouvez également utiliser OptinMonster sur plusieurs sites. Sélectionnez donc le site Web où vous souhaitez afficher votre campagne.
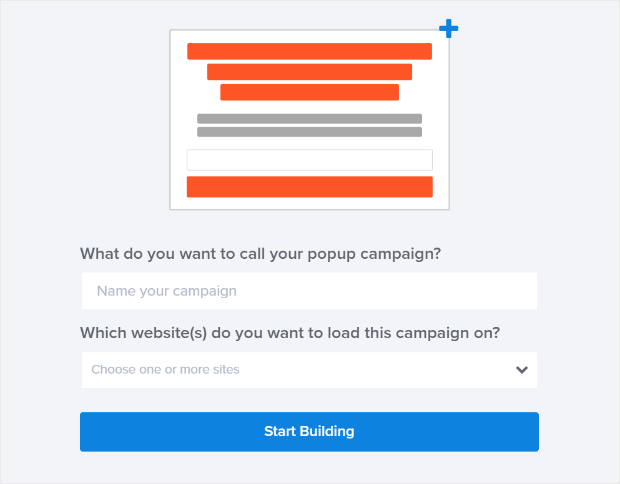
Appuyez sur Commencer la création lorsque vous avez terminé.
Step #2: Edit Your Lightbox Popup
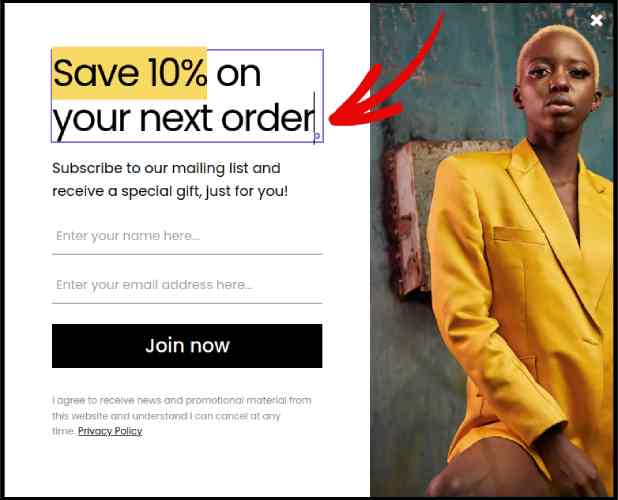
With OptinMonster, you’ll get a visual drag and drop popup builder. Once you’re done creating your campaign, you’ll be able to edit even the tiniest details about your popup. Start by editing your popup headline:
La partie la plus incroyable ici est que vous cliquez simplement sur le texte que vous souhaitez modifier et vous le changez en ligne. Il n'est pas nécessaire de remplir un formulaire ou de modifier du code HTML dans la popup.
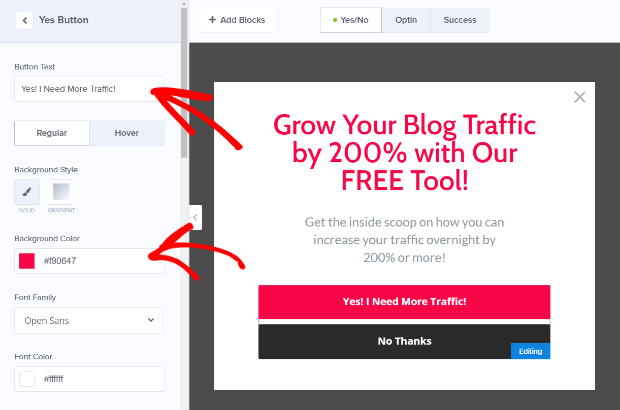
And then, adjust your button text and appearance to create a clear call to action:
When you’re happy with your popup’s appearance, you can move on to more advanced settings.
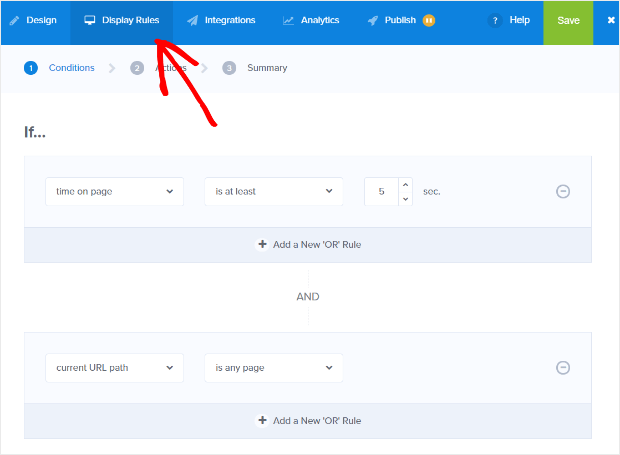
Step #3: Set Display Rules
Display rules are meant to define when your campaign shows up on your site and who sees it.
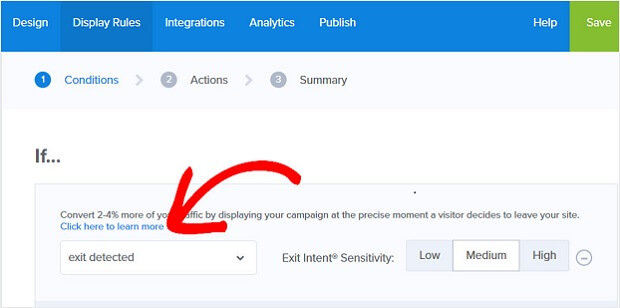
Our recommendation is that you change the trigger condition to exit-intent:
Click Next Step to choose the Action. Here, we recommend that you set Show the campaign view to Optin View, set the show with MonsterEffect to any entry animation you like, and play sound effect to any sound effect for your popup.
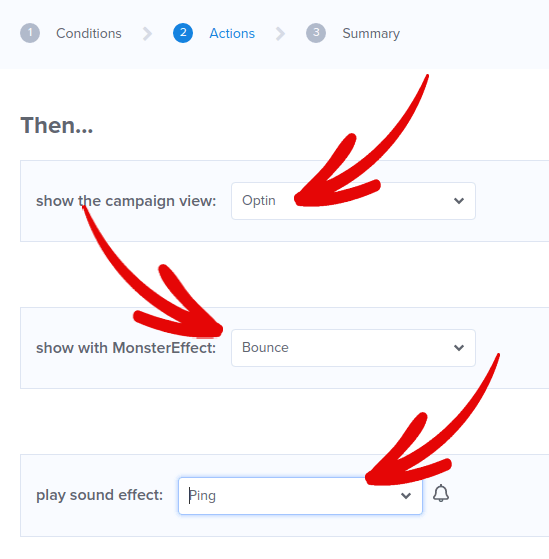
And then, click the Next Step button. You can see the full extent of your settings in the Summary tab.
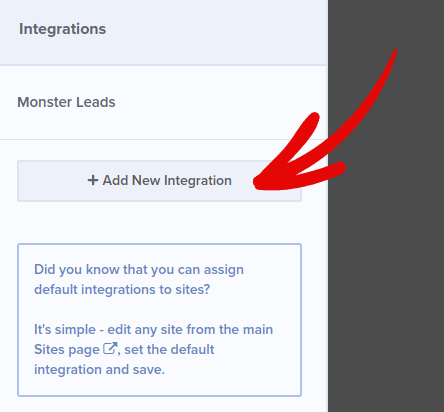
Step #4: Setup Your Email Integration
The next step is to set up your email integration. Click Add New Integration from the Integrations tab and select your email service provider:
We recommend using Drip for your email marketing if you don’t already have an email service provider.
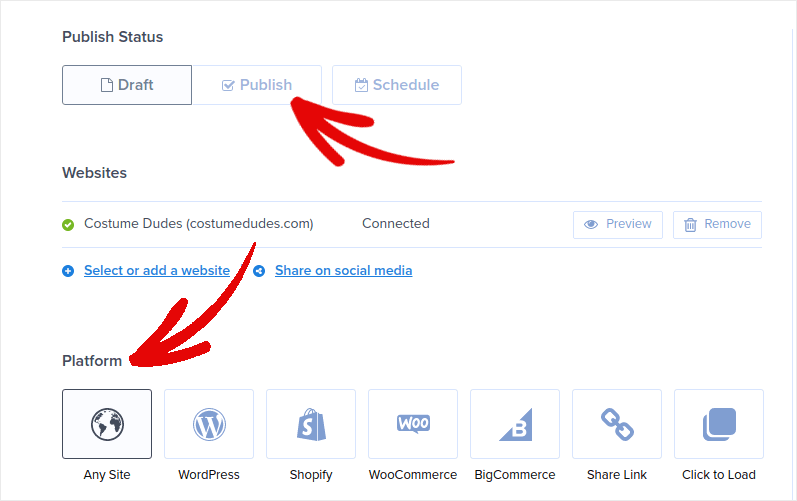
Step #5: Publish Your Lightbox Popup
Lorsque vous créez une nouvelle campagne, elle est En pause par défaut.
Accédez à l'onglet Publier depuis le menu supérieur pour voir les Options de publication. Ensuite, définissez le statut sur Publier et sélectionnez la plateforme de site Web :
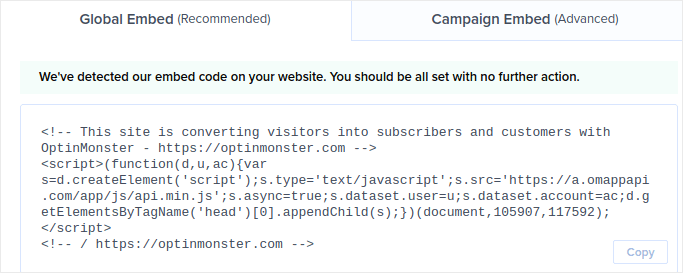
Si vous utilisez un site WordPress, le plugin OptinMonster s'occupe du reste de la configuration automatiquement. Il en va de même pour Shopify et BigCommerce. Pour tout autre site, cliquez sur N'importe quel site et collez le code d'intégration dans l'en-tête de votre site Web :
Et voilà !
BONUS: Collect Push Notification Subscribers from Your Popup
Push notifications help you grow your website traffic and engagement on autopilot. Web push notifications are an effective way to bring back users who may have abandoned their session or left the website. It helps in re-engaging users by notifying them of new content, offers, or events.
Push notifications also include clear and actionable messages and call to action buttons, encouraging users to take specific actions, such as reading an article, completing a purchase, or participating in an event.
Vous pouvez adapter les notifications push en fonction des préférences, du comportement et des intérêts des utilisateurs, afin de vous assurer que les messages sont pertinents et précieux pour chaque utilisateur. Les utilisateurs doivent accepter de recevoir des notifications push Web. Cela garantit que les messages ne sont pas considérés comme du spam et qu'ils sont envoyés avec la permission des utilisateurs.
The coolest part is that you can collect push notification subscribers from your email popup. So, just in case your site visitors don’t want to give up their email ID, you can still get them to subscribe using web push notifications.
And that’s what we’re going to work on.
Étape n°1 : Sélectionner un service de notification push
We recommend using PushEngage to send web push notifications.

Here’s a quick glance at what you get with PushEngage:
- Campagnes automatisées à forte conversion
- Multiple targeting and campaign scheduling options
- Suivi des objectifs et analyses avancées
- Smart A/B testing
- Un responsable du succès dédié
Vous pouvez commencer gratuitement, mais si vous êtes sérieux au sujet de la croissance de votre entreprise, vous devriez acheter un plan payant. De plus, avant d'acheter un service de notification push, vous devriez consulter ce guide sur les coûts des notifications push.
Et si vous gérez une boutique en ligne, PushEngage vous aide également à augmenter vos ventes en vous aidant à créer des notifications push e-commerce automatisées.
Vous verrez que PushEngage est de loin le meilleur choix si vous voulez générer du trafic, de l'engagement et des ventes pour votre entreprise. Et si vous avez un budget limité, vous pouvez toujours faire preuve d'un peu créativité avec vos notifications push.
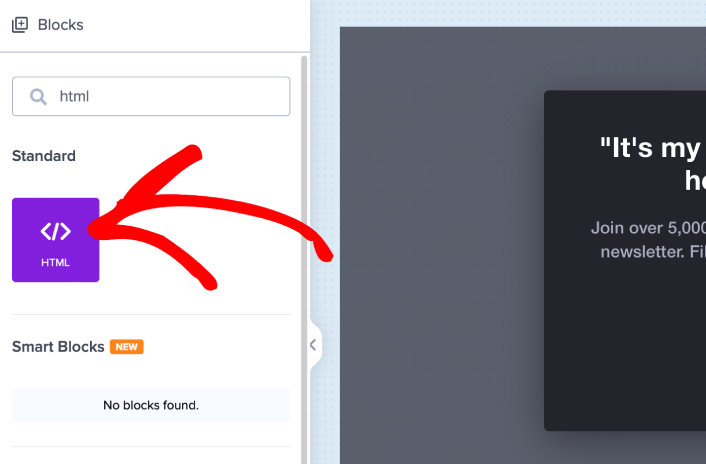
Step #2: Add an HTML Block to Your Popup
Tout d'abord, ajoutez un bloc HTML à votre fenêtre contextuelle depuis la barre latérale dans OptinMonster.
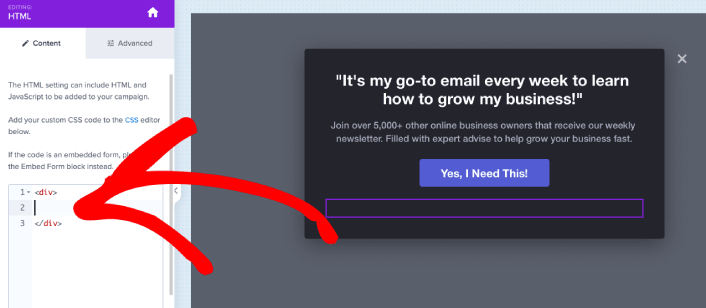
C'est ici que nous allons ajouter le code pour collecter les abonnés aux notifications push. Tout d'abord, collez le code suivant pour créer un bouton cliquable :
<button onclick="subscribeOnClickButton()" style="border: none; width: 100%; padding-left: 15%; padding-right:15%; text-align: center; display: inline-block; color: white;">Get Updates via Push Notifications Instead</button>Collez le code là où il est indiqué que vous pouvez ajouter du HTML :
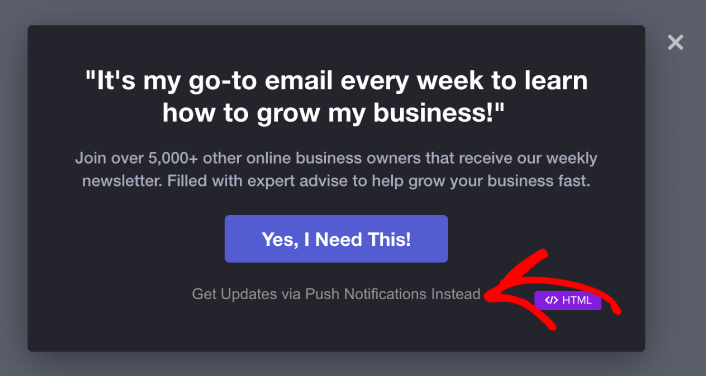
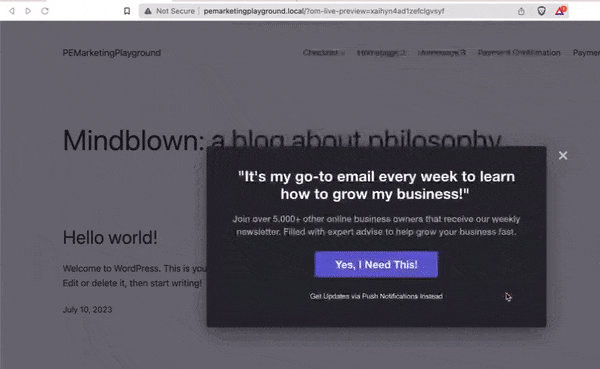
At this point, you should see a new button in your popup that says, “Get Updates via Push Notifications Instead” right below the email subscription button:
Bien sûr, vous pouvez jouer avec les styles pour le rendre plus attrayant. Ensuite, nous allons faire en sorte que le bouton collecte les abonnés aux notifications push lorsqu'il est cliqué.
Step #3: Get Subscription Code from PushEngage
Rendez-vous sur la page d'accueil de PushEngage et cliquez sur le bouton Commencer :

Ensuite, vous devrez sélectionner le plan gratuit pour essayer PushEngage ou choisir un plan payant si vous êtes sérieux au sujet de la croissance de votre entreprise. Les plans payants offrent plus d'options de campagne et la possibilité de créer des listes d'abonnés encore plus grandes.
Dans votre tableau de bord PushEngage, allez dans Paramètres du site » Détails du site et cliquez sur le bouton Cliquez ici pour les instructions de configuration. Sous N'importe quel site, vous obtiendrez votre code d'installation :

ATTENTION : Vous devez copier le code que vous obtenez de votre tableau de bord. Le code est unique pour chaque utilisateur de PushEngage. Vous ne pourrez pas copier le code de l'image et collecter les abonnés aux notifications push.
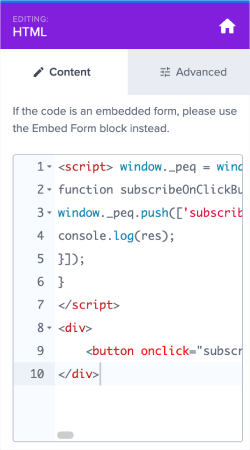
Une fois que vous avez le code dans votre tableau de bord PushEngage, prenez le deuxième script et ajoutez-lui du code supplémentaire. Votre code final devrait ressembler à ceci :
<script src="https://clientcdn.pushengage.com/core/02a6e92667ae2279fcba8932356c1d93.js" async></script>
<script> window._peq = window._peq || [];
function subscribeOnClickButton(){
window._peq.push(['subscribe',{}.pe,function(res){
console.log(res);
}]);
}
</script>
Step #4: Add Your Subscription Code to the HTML Block in Your Popup
Add this code to the HTML block in OptinMonster and you’re done!
When you’re done, just hit the Save and Publish buttons.
If you check out your website, you should now see the lightbox popup collecting both email and push notification subscribers:
And just like that, you’re collecting push subscribers from your popup. Push notifications come with their own popup modals. But they’re a bit difficult to customize. So, you can create beautiful popups using OptinMonster and then use them as your push notification popups.
What to do After You Create a Lightbox Popup
C'est tout pour cette fois, les amis !
Let us know if this article helped. Creating popups on your site can help you convert your traffic into email subscribers and genuine business leads. And we highly recommend that you start creating lightbox popups right away.
Et si vous recherchez un moyen abordable de développer votre trafic, nous vous recommandons d'utiliser les notifications push. Les notifications push peuvent vous aider à générer plus de trafic de retour et d'engagement sur le site. Vous pouvez également créer des campagnes de notifications push automatisées qui génèrent des ventes.
Pas convaincu ? Consultez ces ressources :
- 7 stratégies intelligentes pour stimuler l'engagement client
- Les notifications push sont-elles efficaces ? 7 statistiques + 3 conseils d'experts
- Comment configurer des notifications push pour paniers abandonnés (Tutoriel facile)
Nous vous recommandons d'utiliser PushEngage pour créer vos campagnes de notifications push. PushEngage est le logiciel de notifications push n°1 au monde. Donc, si ce n'est pas déjà fait, commencez avec PushEngage dès aujourd'hui !


