Looking for a guide to send retargeting push notifications?
Retargeting notifications are gaining a lot of popularity these days. For a long time, you could only send retargeting email drip campaigns. But now, you can recreate the same effective campaigns and use the targeting options in push notification software as well.
But how do you get started? Do you need experience with retargeting campaigns? Do you need any experience setting up push notification campaigns?
In this article, we’re going to help you create retargeting push notifications in less than 10 minutes. We’ll also answer all your questions about retargeting push notifications.
Ça vous dit ? Plongeons.
Why Use Retargeting Push Notifications?
With any business your run, you’ll see a group of subscribers who are extremely engaged. They buy anything you sell, happily offer testimonials and reviews, and refer new customers to you.
And then again, you’ll see subscribers who simply aren’t interested in anything about your business.
Retargeting push notifications help you focus on subscribers who want to be sold to. You can retarget them for cross-selling, upselling, renewals, or just give them enough incentive to buy from you using a welcome offer or coupon.
One methodology for sending retargeting push notifications is to use waterfall push campaigns.
Push notification campaigns come with detailed analytics. So, you can see both groups pretty clearly in your subscriber list. And the cool thing is that you can create Audience Groups in PushEngage to retarget both types of subscribers.
Then, you can create targeting options for your push notifications to retarget specific behavior on each notification you send. All retargeting push notifications have two core components:
- A set of push notifications with a common goal
- Audience groups to retarget different types of subscribers
Let’s get you started with creating your own retargeting push notifications next.
How to Send Retargeting Push Notifications
Now that we know what a retargeting push campaign is and why you should create them, let’s take a look at a real example with step-by-step instructions to create one.
Before you get started with sending retargeting notifications, you need to select a push notification service. We recommend using PushEngage.
Étape n°1 : Créez un compte PushEngage gratuit
Rendez-vous sur PushEngage et cliquez sur Commencez gratuitement dès maintenant :

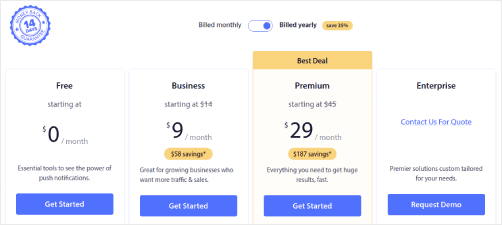
Vous pouvez commencer avec le plan gratuit. Mais si vous recherchez les notifications push les plus puissantes, vous devriez choisir un plan payant en fonction de vos besoins professionnels :
Une fois que vous savez quel plan vous voulez, cliquez sur Commencer pour créer votre compte PushEngage.
Étape n°2 : Inscrivez-vous sur PushEngage
Il est maintenant temps de créer votre compte PushEngage. Commencez par vous inscrire avec une adresse e-mail ou un identifiant Gmail :

Ensuite, remplissez les détails de votre compte :

Et ajoutez les informations de votre carte de crédit pour acheter votre plan :

Si vous avez choisi le compte gratuit, votre carte de crédit ne sera jamais débitée tant que vous n'aurez pas choisi de mettre à niveau votre plan. Et maintenant, vous êtes prêt à accéder à votre tableau de bord PushEngage. Cliquez simplement sur Terminer l'inscription et obtenir un accès instantané.
Étape n°3 : Installez le plugin WordPress pour les notifications web
Vous avez terminé la création de votre compte. Rendez-vous donc sur le tableau de bord PushEngage et suivez le guide :

Cliquez sur Paramètres du site » Détails du site et cliquez sur le bouton Cliquez ici pour les instructions de configuration :

Cliquez sur l'onglet WordPress et cliquez sur le bouton Installer le plugin WordPress PushEngage pour installer le plugin sur votre site web.

Le plus intéressant : Lorsque vous avez créé votre compte PushEngage, vous avez déjà synchronisé votre site web avec votre compte PushEngage. Cliquez donc sur le lien d'installation dans le tableau de bord PushEngage pour installer automatiquement le plugin WordPress PushEngage sur votre site web.
Étape n°4 : Connectez votre site WordPress à PushEngage
Une fois que vous avez terminé l'installation et l'activation du plugin WordPress PushEngage, vous verrez l'assistant de configuration PushEngage :

L'assistant est assez simple. Si vous êtes un nouvel utilisateur, cliquez sur Nouveau ? Réclamez votre compte gratuit. Et si vous vous êtes déjà inscrit, cliquez sur Connecter votre compte existant.
Ensuite, vous pouvez sélectionner votre site dans le menu déroulant Sélectionner un site sous Connecter un site enregistré si vous avez déjà enregistré un site lors de l'inscription :

Ou, vous pouvez cliquer sur Enregistrer un nouveau site pour ajouter un nouveau site si vous avez un plan tarifaire Premium ou supérieur. À l'étape suivante, l'assistant de configuration vous invitera à installer d'autres plugins WordPress indispensables.

Si vous avez suivi chaque étape correctement, vous verrez ce message de succès de l'assistant :

You are now ready to create campaigns.
Step #5: Create Retargeting Push Notifications
Finally, it’s time for our example. To show you a real use case for retargeting push notifications, we’re going to take the example of Black Friday promotions. Our objective is to maximize the conversions on our Black Friday offer.
To retarget our subscribers based on their behavior, we’re going to send a broadcast to all our subscribers. Then, based on their engagement levels, we’re going to create different Audience Groups for retargeting.
How to Send Your Notification to All Subscribers
We want the maximum reach for 3 notifications:
- Early Black Friday Announcement
- Black Friday Flash Sale
- Cyber Monday Sale
So, we’re sending those 3 notifications to everyone. In the Audience tab, select Send to All Subscribers:

How to Retarget Subscribers Who Didn’t Click the Broadcast to Everyone
If you’re not sending the notification to all subscribers, you’ll need to create an Audience Group. For instance, if you want to target the subscribers who didn’t click on the broadcast to everyone, you’ll need to create a new Audience Group.
In your WordPress dashboard, go to Audience » Audience Groups and click Create New Audience Group:

To target subscribers who didn’t click the last notification, you’ll need to filter by Last click date:
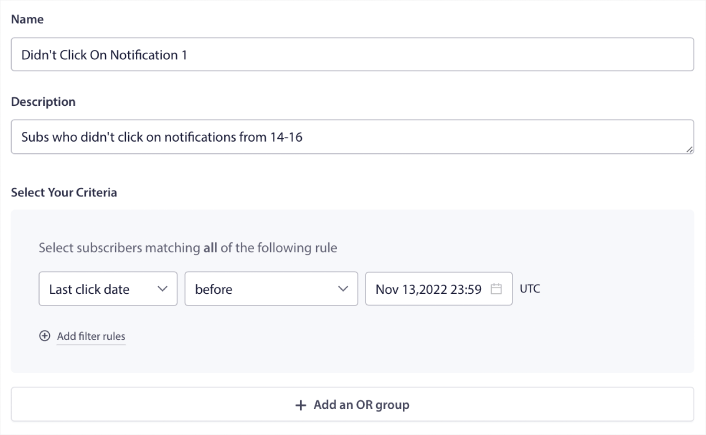
Filter by last click date before the date you sent your previous notification. So, if you sent the last push notification on 14th November, filter for subscribers who clicked on notifications only before 13th November at midnight.
NOTE: Unlike an email campaign, you can’t actually filter by click rate on the last notification. The closest approximation is to filter for clicks in a date range.
When you’re done, click on Save Notification.
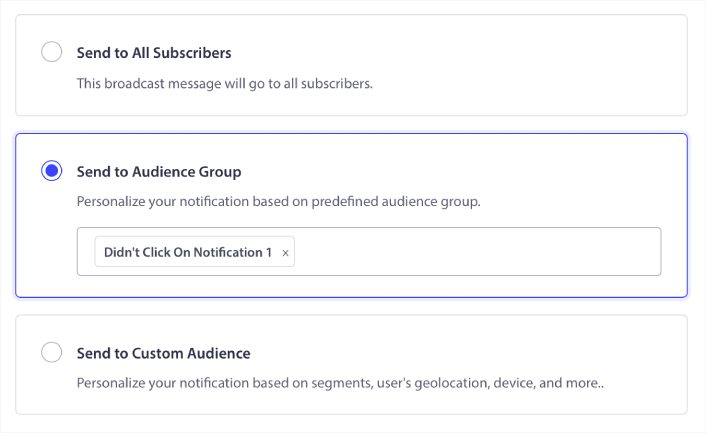
Then, head back to your push notification broadcast and select Send to Audience Group. From the dropdown, select your Group:
How to Retarget Subscribers Who Clicked the Broadcast to Everyone
Si vous souhaitez cibler les abonnés qui ont cliqué sur votre dernière notification, vous pouvez créer un autre Groupe d'audience.
Filter your subscribers by Last click date after the date you sent your previous notification AND before the date you want to send your next notification:
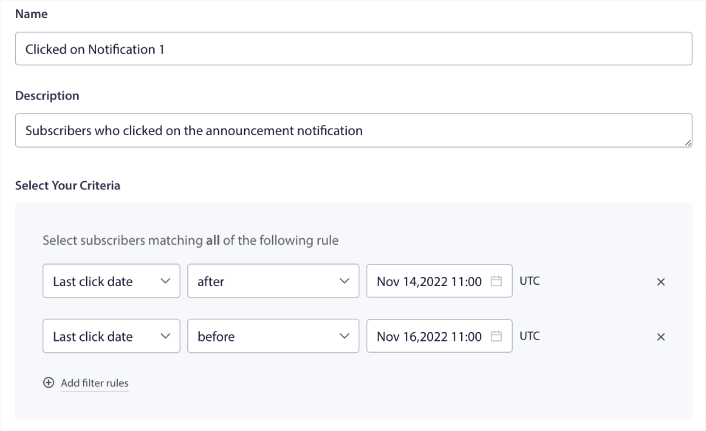
You can add AND criteria to your filter by clicking on Add filter rules. A filter like this is great for cross-selling push notifications.
The outcome of these Audience Groups is more granular targeting. So, each time, you can send different offers to improve your conversion rates.
What to do After You Create Retargeting Push Notifications
One of the most important things to remember about retargeting push notifications is that you can only use this methodology on broadcast push notifications. Drip campaigns in push notifications don’t have targeting options that granular yet.
So, make sure to A/B test your push notifications. We also suggest that you take some time to read our articles and learn how to supercharge your automated push notifications. Start with our article on push notification best practices.
Si vous êtes novice en matière de notifications push, vous devriez suivre un processus complet de test de notifications push avant de vous lancer. Cela vous aidera à résoudre les problèmes courants avant que vos visiteurs ne les voient et ne commencent à se plaindre d'une expérience utilisateur dégradée. Et vous devriez absolument configurer Google Analytics pour suivre les notifications push.
Retargeting des notifications push pour cibler les abonnés qui ont cliqué dessus ou non. Faites-nous savoir comment cela fonctionne pour vous. En attendant, consultez ces ressources :
- Comment augmenter les clics sur vos notifications push avec la curiosité
- Comment personnaliser chaque notification push
- Comment vous démarquer avec des médias riches dans vos notifications push
- Comment réactiver les abonnés push dormants
- Comment utiliser les notifications push pour tenir les clients informés
- Comment utiliser les emojis dans vos notifications push pour des taux de clics plus élevés
- Comment augmenter les conversions en créant un sentiment d'urgence
And if you haven’t already, get started with PushEngage.


