
Looking for a way to add push notifications to the AMP version of your site? Adding AMP push notifications can be a little technical. But we’re going to help you do it the easy way.
AMP or Accelerated Mobile Pages are essentially a mobile version of your site. So, if you’re not setting up web push on your AMP site, then you’re going to lose a bunch of subscribers because a huge part of your audience will use mobile devices to visit your site.
In this article, we’re going to use PushEngage to install AMP push notifications because it’s way easier than doing things manually.
Plongeons dans le vif du sujet.
How to Install AMP Push Notifications
Installing AMP push notifications is a really quick and easy process. Just follow these steps and by the end of this article, you should be able to send push campaigns from your site like this one:

Looks good, doesn’t it? Let’s dive in.
Étape n°1 : Configurer votre compte PushEngage
Rendez-vous sur la page d'accueil de PushEngage et cliquez sur le bouton Démarrer :

Vous pouvez sélectionner le plan gratuit pour essayer PushEngage, ou choisir un plan payant si vous êtes sérieux dans le développement de votre entreprise. Les plans payants offrent plus d'options de campagne et la possibilité de créer des listes d'abonnés encore plus grandes.
Une fois que vous avez créé votre compte PushEngage, rendez-vous sur votre tableau de bord PushEngage et allez dans Paramètres du site » Détails du site :

Vous pouvez y définir votre logo, le nom de votre site et l'URL de votre site. Il est très important de régler ces éléments dès maintenant afin de pouvoir tester toute votre configuration plus tard.
Step #2: Get the AMP Push Notifications Installation Code
To install web push on your AMP site, you’ll need to get an installation code. In your Site Settings screen, scroll down and click on the Click Here For Setup Instruction button:

Head over to the AMP tab to get installation settings.
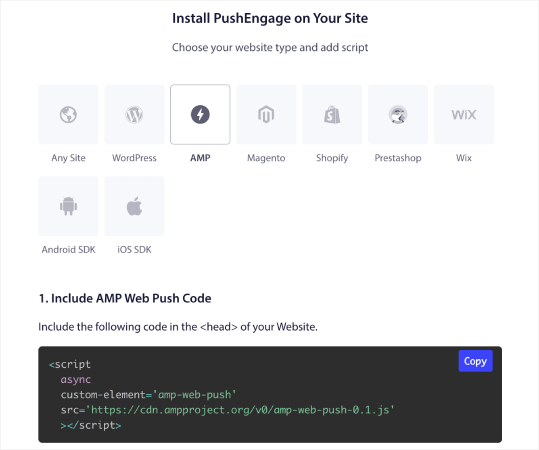
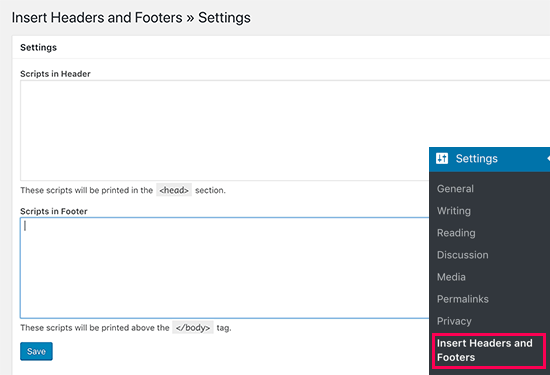
Copy this code. You’ll need to paste this code in the HTML <head> of your site. If you’re running a WordPress site with an AMP version, the simplest way to do this is to use the Insert Headers and Footers plugin. It’s a free plugin where you can paste in the AMP installation code without having to go into the actual HTML of your site:
Step #3: Install Service Worker on Your AMP Site
Next, download the package file that includes the service worker.

Cela inclut :
- service-worker.js
- amp-helper-frame.html
- amp-permission-dialog.html
Unzip the package and place these files in the root folder of your server. This part is super important. If you skip this step, your site won’t be able to collect push subscribers.
Pro Tip: If you’re not sure what the root folder is and how you can upload files there, you should check out this article on the WordPress File and Directory Structure. It’s a really simple guide for beginners and you get a lot of insight into how WordPress works.
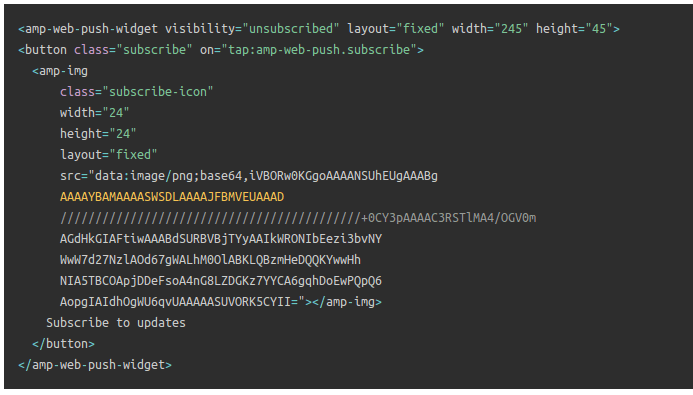
Step #4: Add the AMP Push HTML Code to Your Site
Next, add the HTML code to enable a subscribe on click button and a button to unsubscribe from push campaigns.
This code enables the service worker file you uploaded and allows your site to display subscribe and unsubscribe buttons. To collect subscribers, you need to give your visitors a simple way to subscribe to your push campaigns. The unsubscribe button will give your active subscribers a way to opt out if they’re not interested in your content. Both are pretty important.
Add the `Subscribe to updates’ button where you want it to show up on your site:
And add an ‘Unsubscribe from updates’ button:
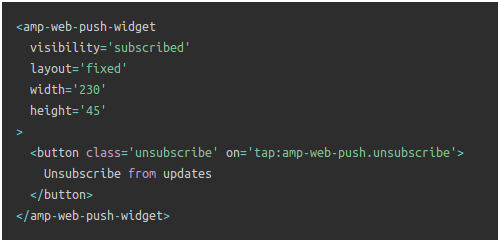
The Unsubscribe button is going to be a simple ‘tap to unsubscribe’ button. You get a lot more customization options for the non-AMP version of your site on both mobile and desktop devices. So, we recommend that you add AMP CSS to your <body> section.
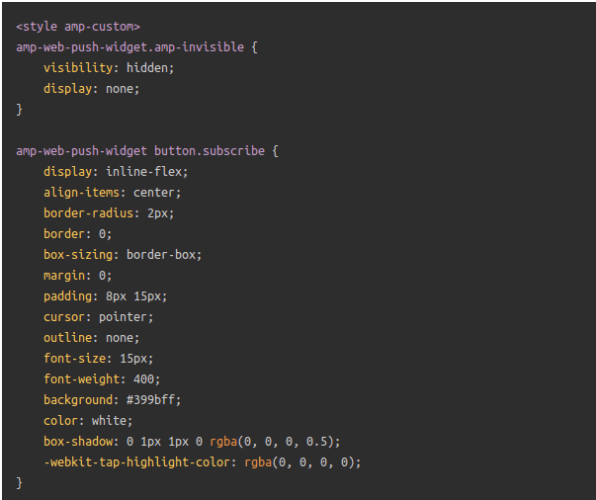
This code snippet is meant to customize the look and feel of both Subscribe and Unsubscribe buttons. If you’d like to play around with these styles, go for it. Just make sure that you don’t change the AMP HTML tags that the code is styling.
And that’s it. You’re done.
Step #5: Configuring the PushEngage Opt-In
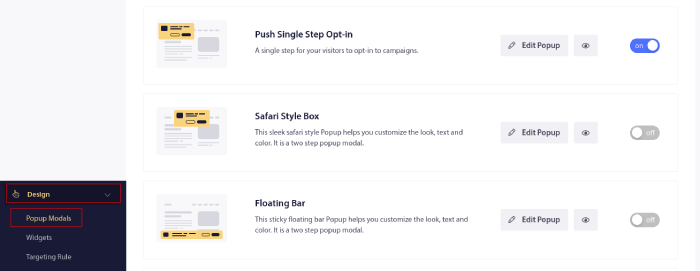
Maintenant, retournez à votre tableau de bord PushEngage. Allez dans Design » Modèles de popup et sélectionnez l'option de votre choix :
L'idée ici est de donner à vos visiteurs une bonne raison de s'abonner. Si vous avez besoin d'aide à ce sujet, consultez notre article sur comment créer un opt-in de notification push personnalisé.
Et si vous souhaitez des modèles pour commencer, vous devriez consulter cet article sur les opt-ins de notification push à haute conversion.
BONUS Step: Create a Welcome Campaign
Une fois que vous avez terminé la configuration de la popup d'inscription, votre site peut collecter des abonnés.
But how do you know if your push campaigns are working properly?
We recommend that you create a welcome push notification to test if your setup went smoothly. A welcome notification is a web push notification you send a new subscriber to confirm their subscription and welcome them on board.
Accédez à votre tableau de bord PushEngage et allez dans Campaign » Drip Autoresponders, puis cliquez sur Create New Drip Autoresponder :

Ensuite, nommez votre campagne (nous suggérons quelque chose comme Drip de bienvenue), et sous Contenu, sélectionnez l'option qui dit : « Envoyer la notification immédiatement après l'abonnement de l'utilisateur ») :

À ce stade, vous pouvez cliquer sur la flèche à côté de la notification pour modifier le contenu de votre notification. Si vous avez un plan Premium ou Entreprise avec PushEngage, vous pourrez ajouter plus d'une notification pour créer une séquence de messages de bienvenue automatisés. Cliquez simplement sur Ajouter une nouvelle notification et modifiez le contenu.
Une fois que vous avez terminé, cliquez sur Paramètres de drip et sélectionnez l'option pour envoyer votre campagne de bienvenue à tous les abonnés :

Then, scroll down to set your own UTM parameters to track the push campaigns:

Et une fois que vous avez terminé, faites défiler vers le haut et cliquez sur le bouton Activer l'autorépondeur :

Et c'est tout !
You have successfully set up AMP web push notifications on your website. It’s time to head back to your PushEngage dashboard and start creating your push campaigns.
What to do After You Add AMP Push Notifications to Your Site
C'est tout pour cette fois, les amis !
If you’re new to push campaigns, you should follow a full-blown push notification testing process before you go live. It’ll help you troubleshoot common issues before your visitors see them and start complaining about a broken user experience.
Vous devriez également consulter d'autres campagnes automatisées de notifications push telles que :
Nous vous recommandons de contacter nos responsables du succès client si vous êtes bloqué sur l'un de ces points. Nous serons ravis de vous aider avec n'importe quel problème.
Et si ce n'est pas déjà fait, essayez PushEngage. PushEngage est le service de notification push n° 1 au monde. Donc, si vous êtes sérieux au sujet de la croissance de votre entreprise, PushEngage est la bonne option pour vous.


Thanks for this tips & information. Its very easy to understand.
good explanation