Looking for a quick and easy way to sort push notifications and find your best performing campaigns?
Sorting your push campaigns by performance metrics helps you understand what works and what doesn’t. More importantly, you can use your best campaigns as a base for new campaigns.
The sorting feature isn’t standard for all push notification services. Even if you get the feature, you might not be able to use it without using their API service. Which means that you’ll need a developer to do it for you.
If you have an in-house developer, that’s fine. But if you don’t, we highly recommend shifting to PushEngage. PushEngage allows you to filter your campaigns in a few simple clicks.
In this article, we’re going to show you step by step how to sort push notifications and find your best campaigns.
Why Would You Want to Filter and Sort Push Notifications?
You can filter and sort push notifications to find the best performing campaigns or even your worst performing campaigns.
The epic thing about these filters is that you can see:
- Types of push notifications that you send the most
- How well specific types of notifications perform
- Identify seasonal trends in campaign performance
- What kinds of campaigns need to be optimized immediately
And you can do it in a few simple clicks!
You can also sort the push notifications by Latest Created or Oldest Created. This way, you can make it super easy to find specific campaigns even after your filter by a date range.
Does Your Push Notification Service Allow Campaign Sorting?
Not every push notification service allows you to filter and sort push notifications. At least, not directly. Sometimes, you can do it using their API service. But that’s difficult to do if you don’t have an in-house developer.
Хороший способ проверить — просто спросить у вашего поставщика услуг, есть ли у них опция очистки. Но велика вероятность, что у них не будет доступных опций.
Мы рекомендуем вам немедленно перейти на PushEngage.

PushEngage — лучший сервис push-уведомлений в мире. И мы говорим не только о бесплатной версии. Он позволяет вам связываться с посетителями после того, как они покинут ваш сайт, с помощью целевых push-сообщений.
PushEngage is our first choice for push notification services and tools because it’s:
- Очень прост в использовании
- Эффективен на HTTP и HTTPS сайтах
- Поставляется с визуальным конструктором, который требует минимального или нулевого кодирования для настройки
- Легко настраивайте полностью автоматизированные кампании push-уведомлений для любого типа сайта
- Имеет множество опций для отправки персонализированных push-уведомлений для более высоких показателей кликабельности
- Оснащен отслеживанием пользовательских целей, UTM-параметрами и расширенной аналитикой
И это лишь малая часть. Ознакомьтесь с полным списком функций PushEngage, прежде чем двигаться дальше.
Самое невероятное в PushEngage — это то, что у него есть бесплатный тариф, которым вы можете воспользоваться, прежде чем принимать решение о покупке.
Бесплатный план PushEngage достаточно хорош, чтобы довести ваш бизнес до точки, когда вы легко сможете позволить себе платные тарифы, начинающиеся с 9 долларов в месяц за 100 000 подписчиков.
Общая стоимость перехода довольно низкая. Поэтому мы настоятельно рекомендуем вам немедленно перейти на PushEngage. Функция очистки — это не единственная причина для покупки плана PushEngage. Вы получаете множество расширенных функций, которые другие инструменты push-уведомлений просто не предлагают.
How to Filter and Sort Notifications Quickly
Теперь, когда вы перешли на PushEngage, пришло время очистить список подписчиков push-уведомлений.
If you’re new to tracking push notification performance, we have some really great news for you. You can sort and filter your push broadcasts easily.
Head over to your PushEngage dashboard and go to Push Broadcasts:

Here, you’ll notice that there’s a filter option:
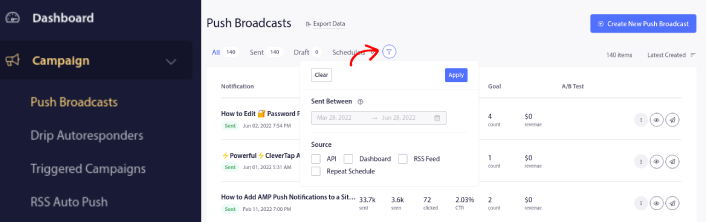
You can filter the push broadcasts you sent out by date and source:

Let’s say that you have a Black Friday push notification campaign spanning multiple days.
Now, you can get a clear picture of which notifications performed the best and which ones aren’t performing too well. And this information can help you optimize your current broadcasts and campaigns.
If you’re new to using push notifications, you should know that you can only A/B test push broadcasts. But you can use the sorting and filtering options to apply optimizations to even your automated campaigns. It’s a really neat way to set up push notification best practices for your industry and brand.
What to do After You Sort Push Notifications
After you sort your push notifications, you can look into detailed analytics and then get back to optimizing your push notification campaigns and growing your business.
Мы также рекомендуем вам уделить время чтению наших статей и узнать, как улучшить ваши автоматические push-уведомления. Начните с нашей статьи о лучших практиках push-уведомлений.
If you’re new to push notifications, you should follow a full-blown push notification testing process before you go live. It’ll help you troubleshoot common issues before your visitors see them and start complaining about a broken user experience. And most definitely you should set up Google Analytics to track push notifications.
Ретаргетинг push-уведомлений для таргетинга подписчиков, которые нажали на них или нет. Сообщите нам, как это работает для вас. А пока ознакомьтесь с этими ресурсами:
- Как увеличить количество кликов по вашим push-уведомлениям с помощью любопытства
- Как персонализировать каждое push-уведомление
- Как выделиться с помощью медиафайлов в ваших push-уведомлениях
- Как реактивировать неактивных подписчиков push-уведомлений
- Как использовать push-уведомления для информирования клиентов
- Как использовать эмодзи в ваших push-уведомлениях для увеличения количества кликов
- Как увеличить конверсию, создавая ощущение срочности
И если вы еще этого не сделали, начните работу с PushEngage.


