At PushEngage, you can choose from multiple Web Push Opt-in. You can even choose different opt-in for desktop and mobile. You can configure various options like color, position, delay, type of pop-up for configuring your subscription.
However, we need to understand each of the push opt-in templates are different. One type of opt-in may work for one website and other types would work for other sites. To understand which push opt-in is best for your site, you can check out the detailed Push Notification Opt-In Analytics report. Funnel analytics provides push notification statistics which helps in improving the Push Notification Opt-In rate.
With Push Opt-in Analytics, you will get the complete picture of how your opt-in is performing. You can then analyze the data and see which one works better. Many times users do not click on your notifications and want to unsubscribe. PushEngage offers a feature to enable an easy way to unsubscribe from Web Push Notification.
To gather this data, go into your settings and enable the gathering of this data under Settings > Subscription Settings > Opt-In Analytics.
Check the button to enable subscription opt-in analytics and click on update.

How To Understand The Push Notification Opt-In Analytics Report?
Push Notification Opt-In works like the marketing funnel. First, we need to see how many times your opt-in appears. This is the top funnel. Next is the second impression which is the intermediate page. Note, in HTTPS sites, you don’t need an intermediate page or pop-up, and can skip this step.
Once the user sees the opt-in, he has two options – Allow or Block. If he allows he will see the intermediate page. The third and last important thing is subscription. In the intermediate page, if the user “Allows” notification, he will be subscribed to the notification. Below image will give you a clearer idea:

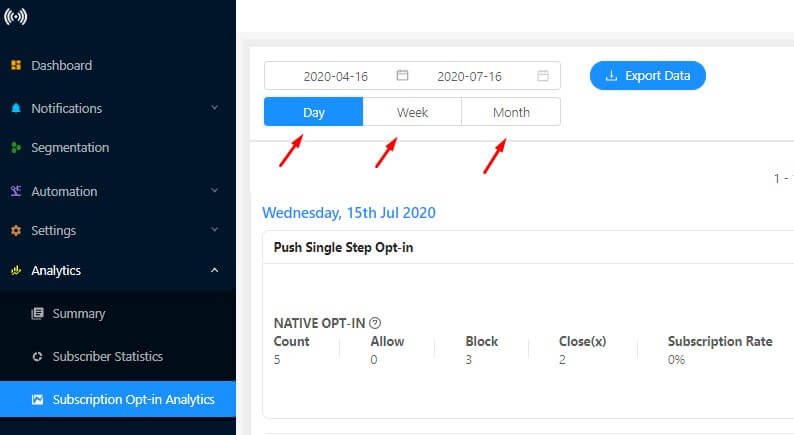
To view the analytics report, go to Analytics > Subscription Opt-in Analytics. To get a better understanding, check the below sample analytics report:

Meaning of each section of the report:
- Subscription Opt-in Type: At PushEngage, you can choose from 7 different types of opt-in depending on the site type. This column shows which type of push opt-in type you have chosen.
- Site Type: This shows the site type of your website. It could be either HTTP or HTTPS websites.
- First Impression: This shows the 1st impression of your push opt-in. When a user comes to your website, the push opt-in appears on the page. This is called the 1st impression of the opt-in.
- Second Impression: In two-step opt-in, you have an intermediate image after the user clicks on “Allow”. This is the second impression of your push opt-in. In the case of single-step opt-in, you don’t have the second impression
- Subscribers: This is the count of total subscribers who subscribed under this specific Subscription opt-in type.
- Тариф подписки: Это коэффициент выбора для типа подписки, который вы выбрали для своего веб-сайта.
Как использовать отчет по аналитике подписки на push-уведомления
Сначала вам нужно настроить тип подписки. Перейдите в «Настройки диалогового окна подписки» в разделе «Настройки». Выберите любой тип подписки и настройте push-подписку.
Далее посмотрите коэффициент подписки для этого типа подписки в вашем отчете. Вы можете выбрать просмотр отчета по дням/неделям/месяцам. Через пару дней или неделю измените тип подписки и посмотрите коэффициент подписки.
Таким образом, вы можете проверить, какой тип подписки дает вам более высокий коэффициент push-подписки. Используйте этот тип подписки для своего веб-сайта. Вы можете пойти дальше и изменить:
- Размещение формы подписки
- Содержимое формы подписки
- Название кнопки
- Цвет текста и кнопки
Посмотрите отчет по аналитике, чтобы узнать, что дает вам лучший результат.


