
Looking for a way to add push notifications to the AMP version of your site? Adding AMP push notifications can be a little technical. But we’re going to help you do it the easy way.
AMP or Accelerated Mobile Pages are essentially a mobile version of your site. So, if you’re not setting up web push on your AMP site, then you’re going to lose a bunch of subscribers because a huge part of your audience will use mobile devices to visit your site.
In this article, we’re going to use PushEngage to install AMP push notifications because it’s way easier than doing things manually.
Давайте начнем.
How to Install AMP Push Notifications
Installing AMP push notifications is a really quick and easy process. Just follow these steps and by the end of this article, you should be able to send push campaigns from your site like this one:

Looks good, doesn’t it? Let’s dive in.
Шаг № 1: Настройте свою учетную запись PushEngage
Перейдите на главную страницу PushEngage и нажмите кнопку Начать работу:

Вы можете выбрать бесплатный план, чтобы попробовать PushEngage, или выбрать платный план, если вы серьезно относитесь к развитию своего бизнеса. Платные планы предлагают больше опций для кампаний и возможность создавать еще большие списки подписчиков.
После регистрации в вашей учетной записи PushEngage перейдите в вашу панель управления PushEngage и выберите Настройки сайта » Сведения о сайте:

Здесь вы можете установить свой логотип, название сайта и URL сайта. Очень важно разобраться с этими настройками прямо сейчас, чтобы вы могли протестировать всю свою конфигурацию позже.
Step #2: Get the AMP Push Notifications Installation Code
To install web push on your AMP site, you’ll need to get an installation code. In your Site Settings screen, scroll down and click on the Click Here For Setup Instruction button:

Head over to the AMP tab to get installation settings.
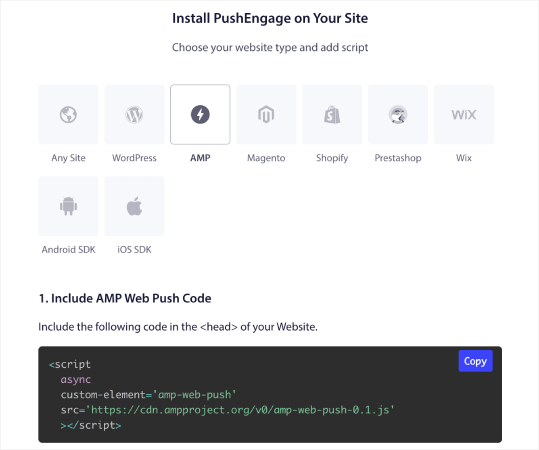
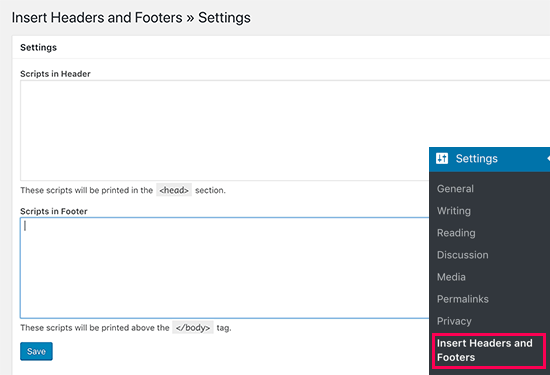
Copy this code. You’ll need to paste this code in the HTML <head> of your site. If you’re running a WordPress site with an AMP version, the simplest way to do this is to use the Insert Headers and Footers plugin. It’s a free plugin where you can paste in the AMP installation code without having to go into the actual HTML of your site:
Step #3: Install Service Worker on Your AMP Site
Next, download the package file that includes the service worker.

К ним относятся:
- service-worker.js
- amp-helper-frame.html
- amp-permission-dialog.html
Unzip the package and place these files in the root folder of your server. This part is super important. If you skip this step, your site won’t be able to collect push subscribers.
Pro Tip: If you’re not sure what the root folder is and how you can upload files there, you should check out this article on the WordPress File and Directory Structure. It’s a really simple guide for beginners and you get a lot of insight into how WordPress works.
Step #4: Add the AMP Push HTML Code to Your Site
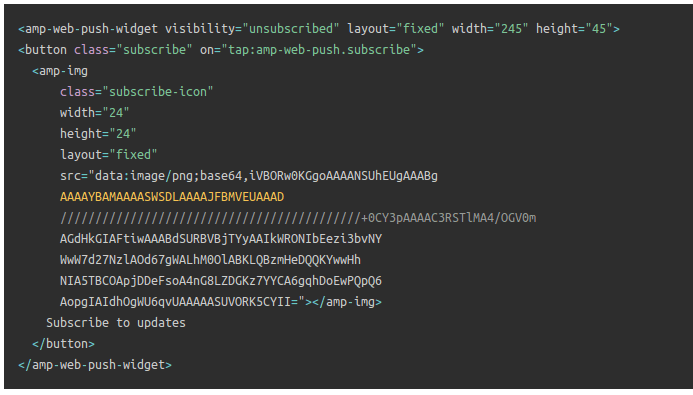
Next, add the HTML code to enable a subscribe on click button and a button to unsubscribe from push campaigns.
This code enables the service worker file you uploaded and allows your site to display subscribe and unsubscribe buttons. To collect subscribers, you need to give your visitors a simple way to subscribe to your push campaigns. The unsubscribe button will give your active subscribers a way to opt out if they’re not interested in your content. Both are pretty important.
Add the `Subscribe to updates’ button where you want it to show up on your site:
And add an ‘Unsubscribe from updates’ button:
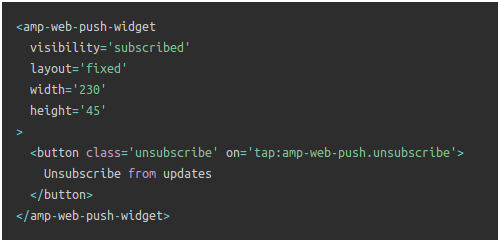
The Unsubscribe button is going to be a simple ‘tap to unsubscribe’ button. You get a lot more customization options for the non-AMP version of your site on both mobile and desktop devices. So, we recommend that you add AMP CSS to your <body> section.
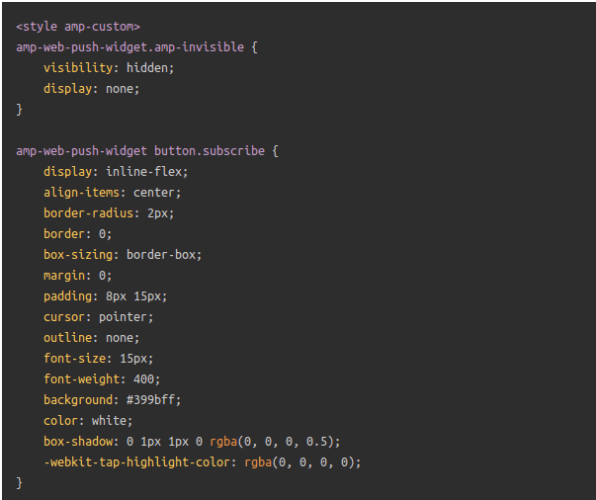
This code snippet is meant to customize the look and feel of both Subscribe and Unsubscribe buttons. If you’d like to play around with these styles, go for it. Just make sure that you don’t change the AMP HTML tags that the code is styling.
And that’s it. You’re done.
Step #5: Configuring the PushEngage Opt-In
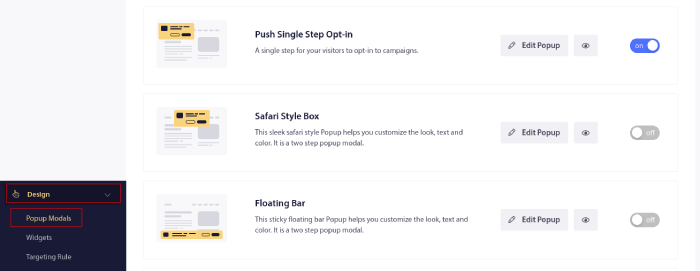
Теперь вернитесь в свою панель управления PushEngage. Перейдите в раздел Дизайн » Модальные окна всплывающих окон и выберите форму подписки по вашему выбору:
Идея здесь состоит в том, чтобы дать вашим посетителям вескую причину подписаться. Если вам нужна помощь с этим, ознакомьтесь с нашей статьей о том, как создать пользовательский запрос на подписку на push-уведомления.
А если вам нужны шаблоны для начала, ознакомьтесь с этой статьей о высококонверсионных формах подписки на push-уведомления.
BONUS Step: Create a Welcome Campaign
После завершения настройки формы подписки ваш сайт сможет собирать подписчиков.
But how do you know if your push campaigns are working properly?
We recommend that you create a welcome push notification to test if your setup went smoothly. A welcome notification is a web push notification you send a new subscriber to confirm their subscription and welcome them on board.
Перейдите в панель управления PushEngage и выберите Campaign » Drip Autoresponders, затем нажмите Create New Drip Autoresponder:

Затем назовите свою кампанию (мы предлагаем что-то вроде "Welcome Drip"), а в разделе Content выберите опцию "Send notification immediately after user subscribes“):

На этом этапе вы можете нажать на стрелку рядом с уведомлением, чтобы отредактировать его содержимое. Если у вас есть план Premium или Enterprise с PushEngage, вы сможете добавить более одного уведомления для создания последовательности автоматических приветственных сообщений. Просто нажмите Add New Notification и отредактируйте содержимое.
Когда закончите, нажмите Drip Settings и выберите опцию отправки вашей приветственной кампании всем подписчикам:

Then, scroll down to set your own UTM parameters to track the push campaigns:

И когда закончите, прокрутите обратно вверх и нажмите кнопку Activate Autoresponder:

И это все!
You have successfully set up AMP web push notifications on your website. It’s time to head back to your PushEngage dashboard and start creating your push campaigns.
What to do After You Add AMP Push Notifications to Your Site
На этом всё, друзья!
If you’re new to push campaigns, you should follow a full-blown push notification testing process before you go live. It’ll help you troubleshoot common issues before your visitors see them and start complaining about a broken user experience.
Вам также стоит ознакомиться с некоторыми автоматизированными кампаниями push-уведомлений, такими как:
Мы рекомендуем вам связаться с нашими менеджерами по работе с клиентами, если вы застряли с чем-либо из этого. Мы будем рады помочь вам с любой проблемой.
И если вы еще этого не сделали, попробуйте PushEngage. PushEngage — это сервис push-уведомлений №1 в мире. Так что, если вы серьезно относитесь к развитию своего бизнеса, PushEngage — правильный выбор для вас.


Thanks for this tips & information. Its very easy to understand.
good explanation