
Looking for a way to add Wix push notifications to your site?
Push notifications can help you quickly grow your repeat traffic, engagement, and sales. But what service should you use to send push notifications? Will it be worth your time? Can you afford web notifications as a marketing channel?
And most importantly, do you need a development team to launch your marketing campaigns?
In this article, we’re going to show you how to set up push notifications to a Wix site step by step with no coding in ten minutes or less. Wix is a great platform to create your very first website. So, once you’re done setting up your Wix website, it’s time to dive into this tutorial.
Давайте начнем.
How to Install Wix Push Notifications
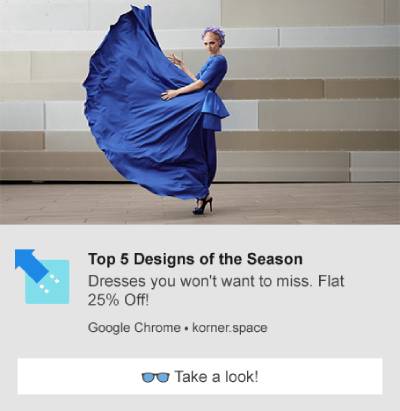
Installing Wix push notifications isn’t really difficult. Just follow these simple steps and by the end of this article, you should see a welcome push notification on your site like this one:
Truth be told, we don’t really prefer using Wix as a website builder. In our honest opinion, WordPress or even Shopify gives you way better features and functionality. So, if you can shift to WordPress or Shopify, now might be the best time to do it.
But if you’re sticking to Wix, don’t worry. It’s still easy to install push notifications to your site.
Давайте начнем.
Шаг № 1: Настройте свою учетную запись PushEngage
Перейдите на главную страницу PushEngage и нажмите кнопку Начать работу:

You can select the free plan to try out PushEngage, or choose a paid plan if you’re serious about growing your business. The paid plans come with more campaign options and the ability to build even bigger subscriber lists. Push notifications cost very little to get started and you can use your credit card to buy a plan.
If you’re running an eCommerce site, we highly recommend getting a paid plan so that you can set up eCommerce push notifications. Push notifications are great for launching new products from your online store.
Check out the pricing plans and select a plan to get started. Once you’ve signed up for an account, head over to the PushEngage dashboard and go to Site Settings » Installation Settings:

This is where you configure your site details and branding. Go ahead and set a logo and website URL for your push notifications. You should do this right now so that you can test your push notifications properly.
Шаг № 2: Получите установочный код из PushEngage
Next, you’ll need to head over to the PushEngage dashboard and get the installation code. Inside Installation Settings:

Depending on whether your site has an SSL certificate installed, go to either the HTTP tab or the HTTPS tab to get your installation code. For WordPress sites, there’s no need for this installation code. The plugin takes care of everything. This applies to WooCommerce sites as well.
You can use a Wix app to install push notifications on your Wix site. But for now, just copy this code. Using Wix app automations can cause more problems than it solves.
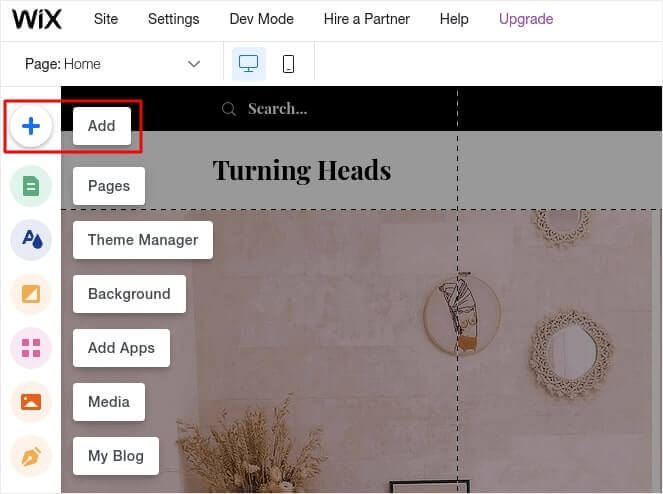
Step #3: Place the Wix Push Notifications Installation Code in Your Site
Log in to your Wix account and head over to Edit » Add:
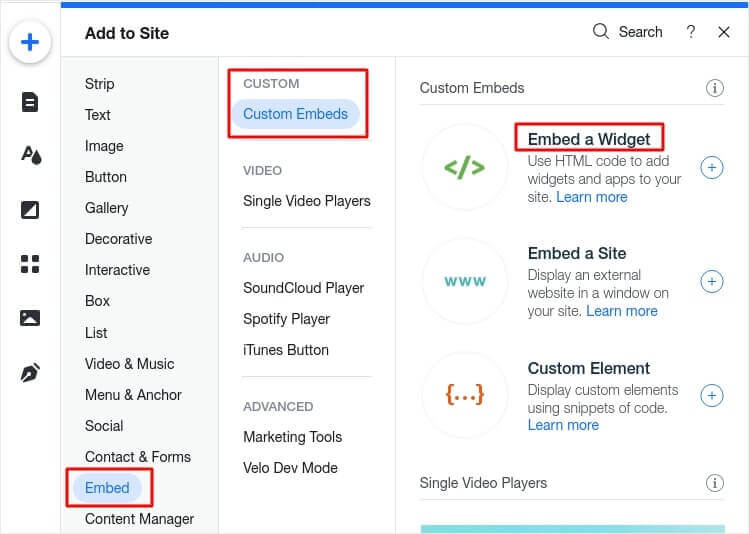
Go to Embed » Custom Embeds » Embed a Widget:
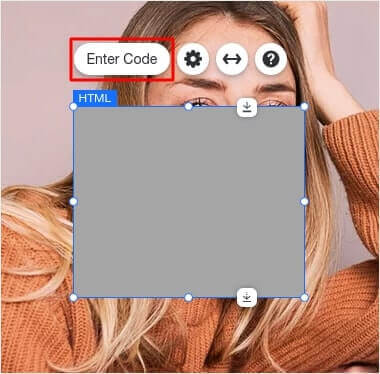
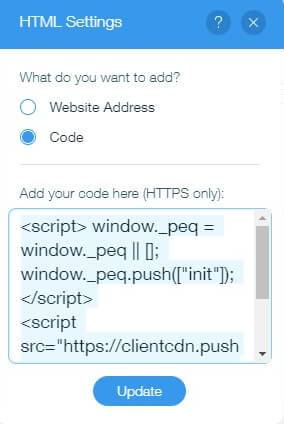
This is where you install your code snippet from the PushEngage dashboard. Click on Enter Code:
And now, paste in your code and click on Update:
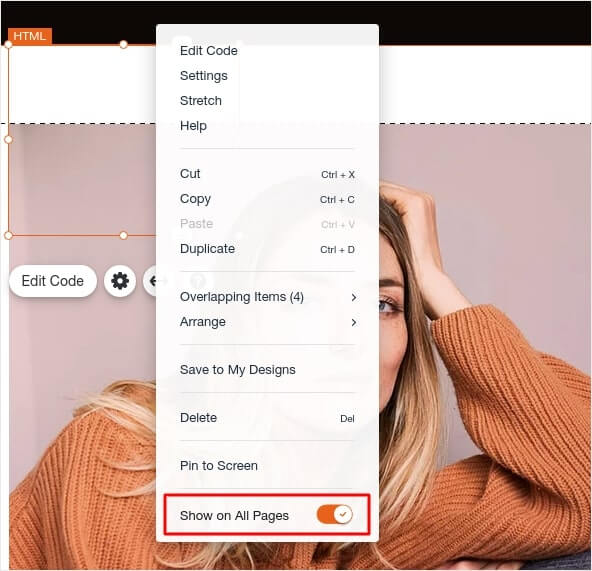
Now, right-click on the iframe and enable Show on All Pages:
Once you hit Publish, you should see the opt-in popup on your Wix website.
Pro-Tip: You can reposition this element anywhere on your screen by dragging it around. We recommend positioning it right below your navigation bar so that your visitors get the standard push notification opt-in experience.
Step #4: Configuring the Wix Push Notifications Opt-In
Наконец, в вашей панели PushEngage перейдите в раздел Дизайн » Модальные окна:
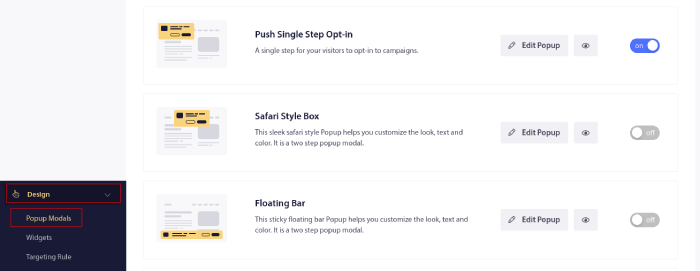
Отсюда вы можете настроить форму подписки на push-уведомления. Если вам нужна помощь с этим, ознакомьтесь с этой статьей о том, как создать пользовательскую форму подписки на push-уведомления.
Если вам нужно вдохновение, вы можете ознакомиться с этой статьей о высококонверсионных формах подписки на push-уведомления.
Step #5: Create Welcome Web Push Notifications
Независимо от того, есть ли у вас новый магазин или уже существующий, приветственные сообщения на веб-сайте абсолютно необходимы. Приветственные push-уведомления отлично подходят для:
- Подтверждение: Вы хотите подтвердить, что ваш новый подписчик действительно подписан на ваши веб-push-уведомления.
- Повторное вовлечение: Приветственные кампании — отличный способ вернуть ваших подписчиков на ваш сайт.
- Продажи: Вы можете предложить новым подписчикам приветственное предложение со скидками, подарками и купонами.
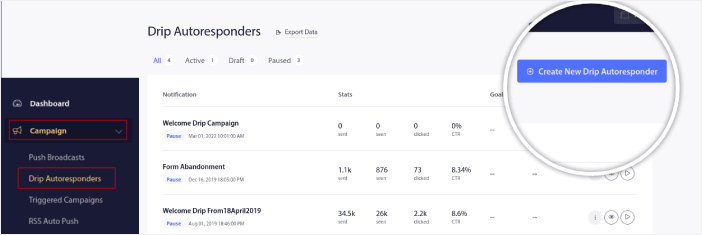
Давайте создадим кампанию приветственных push-уведомлений. Перейдите в свою панель PushEngage и выберите Campaign » Drip Autoresponders » Create New Drip Autoresponder:
Дайте вашей капельной кампании легко запоминающееся имя. Затем установите первое push-уведомление, которое будет отправлено сразу после того, как посетитель подпишется на ваши push-уведомления.

Вы можете отредактировать уведомление, чтобы создать пользовательский контент для вашего приветственного сообщения. Когда закончите, нажмите кнопку Add New Notification, чтобы добавить больше уведомлений в последовательность. Вы можете редактировать новые уведомления и устанавливать пользовательскую задержку между каждым уведомлением.
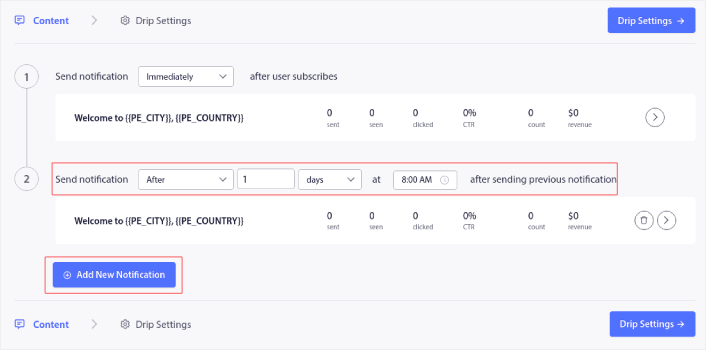
Вы можете добавить столько уведомлений, сколько захотите, но мы рекомендуем создать приветственную капельную кампанию из 5-7 уведомлений.
После этого выберите свою аудиторию в Drip Settings:
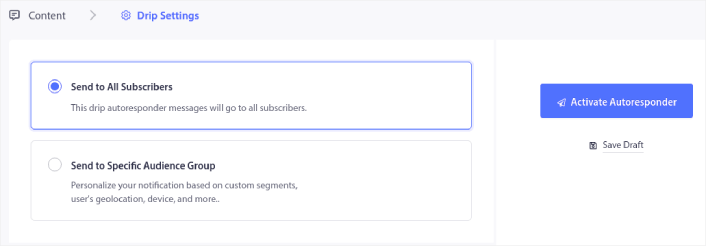
Вы можете отправлять разные приветственные капельные кампании для разных сегментов, используя опцию Send to Specific Audience Group. Это особенно полезно, когда вы сегментируете посетителей при их согласии на push-уведомления. Когда вы будете довольны своим таргетингом, нажмите кнопку Activate Autoresponder. И готово!
NOTE: You can schedule real-time notifications as well. So, if you want to send notifications from a mobile app on Android or iOS, PushEngage is a great choice for you.
You have successfully set up Wix push notifications on your site. It’s time to head back to your PushEngage dashboard and start creating your push notification campaigns.
What to do After You Add Wix Push Notifications
На этом всё, друзья!
If you’re new to push notifications, you should follow a full-blown push notification testing process before you go live. It’ll help you troubleshoot common issues with the functionality before your visitors see them and start complaining about a broken user experience.
You should check out some of these incredible resources to understand how push notifications can help grow your business before you invest in an extension:
- Как повысить коэффициент согласия на получение push-уведомлений (7 способов)
- Как использовать отслеживание отказа от формы для восстановления потерянных лидов
- 11 автоматических push-уведомлений, которые продают, даже когда вы спите
One of the best things about push notifications is that you can create templates for your campaigns very easily. If you need inspiration for your campaign templates, check out these epic push notification examples.
И если вы еще этого не сделали, попробуйте PushEngage. PushEngage — это сервис push-уведомлений №1 в мире. Так что, если вы серьезно относитесь к развитию своего бизнеса, вам следует инвестировать в PushEngage.


