Looking for a guide to creating drip campaigns to boost your sales?
Marketing is incomplete today without automation. Sure, you can collect subscribers and send out push notifications and emails. What then? Keep selling them on your business with every newsletter and hope that your subscribers convert?
There’s no way to:
- Personalize your campaigns
- Get new customers on autopilot
- Retain existing customers with your content
- Upsell or cross-sell products
- Recover lost sales
Unless… you use drip campaigns that convert.
In this article, we’ll show you how to set up drip campaigns and make the most of them. The best part? You don’t need any previous experience.
Звучит неплохо? Давайте погрузимся.
What Are Drip Campaigns?
Think of drip campaigns like setting up a bunch of emails or even push notifications to be sent out automatically, sort of like a sprinkler system for your garden. Instead of watering plants, you’re sending out messages to people who are interested in what you’ve got to say or sell.
Вот как это работает:
- It’s not magic, it’s automated: Once you set it up, these messages keep going out on their own. You don’t have to keep sending them manually.
- You can talk to the right people: You can send different messages to different groups of people. For example, someone who just signed up might get a friendly “hello” message, while someone else who’s been around for a while might get special deals or updates.
- It’s personal: These messages can use the person’s name or talk about things they’ve shown interest in. It makes them feel like you’re really talking to them, not just sending the same thing to everyone.
- Timing is everything: The messages are sent at times that make the most sense – like right after someone signs up or looks at something on your site.
- Each message has a job: Every email or notification is meant to do something specific, like help people get to know your product better or remind them about something they looked at but didn’t buy.
- You can see how it’s doing: You can check out things like how many people open the messages or click on links inside them. This helps you know if your messages are working well.
Drip campaigns aren’t just for emails – they work app push notifications and web push notifications as well. They’re great for keeping in touch with people who are interested in your stuff, without overwhelming them. It’s a smart way to keep people engaged and interested in what you’re doing.
Types of Drip Campaigns
Let’s dive into the different types of drip campaigns. Just like ice cream comes in all sorts of varieties, drip campaigns have different types too. Each kind is tailored for a specific purpose or audience. Here are some of the most common ones:
- Welcome Series: This is like saying “Hi!” to someone new. When someone signs up for your emails or notifications, you send them a few friendly messages to introduce them to your brand or service. It’s like rolling out the red carpet for your new guests.
- Onboarding Campaigns: Think of this as a helpful guide. When someone buys a product or signs up for a service, these messages walk them through how to use it, offer helpful tips, or show them things they might not know about. It’s like giving a tour to someone new in town.
- Abandoned Cart Reminders: Ever put something in your online shopping cart and then forget about it? These campaigns are little nudges to remind people about stuff they were interested in but didn’t buy. It’s like a gentle tap on the shoulder saying, “Hey, did you forget about this?”
- Re-engagement Campaigns: These are for reaching out to people who used to interact with your brand but haven’t in a while. It’s like calling up an old friend and saying, “Hey, let’s catch up!” You might offer them a special deal or just remind them about your brand.
- Educational Content: Here, the goal is to teach your audience something valuable related to your product or industry. It’s like a mini-course, delivered in small, digestible messages. Think of it as a series of fun and informative lessons.
- Product Updates: Got something new or improved? This type of campaign keeps your audience in the loop about new features, products, or services. It’s like showing off your latest gadget to friends.
- Event Invites: Hosting a webinar, workshop, or another event? These campaigns are all about getting people excited and signed up for your events. It’s like sending out cool invitations to a party.
- Seasonal Campaigns: These are tied to specific times of the year, like holidays, seasons, or special events. It’s like decorating your store for Christmas or having a summer sale.
Each type of drip campaign has its own charm and purpose. By matching the right type of campaign with your audience and goals, you can create meaningful connections and keep your audience engaged in a way that feels natural and not too sales-y.
How to Create Push Notification Drip Campaigns
Установка push-уведомлений на веб-сайт несложна. Но это требует нескольких шагов, и вам нужно будет следовать этому руководству шаг за шагом.
Не торопитесь, и все будет хорошо.
Before you create a welcome push notification campaign, you need to select a push notification service. A push notification service is a software that allows you to create push campaigns without any coding.
We recommend using PushEngage.

PushEngage — это плагин для push-уведомлений № 1 в мире.
Push-уведомления помогают вам автоматически увеличивать трафик вашего сайта и вовлеченность. И если вы управляете интернет-магазином, PushEngage также помогает вам увеличить продажи, помогая создавать автоматические push-уведомления для электронной коммерции.
Вы можете начать бесплатно, но если вы серьезно относитесь к развитию своего бизнеса, вам следует приобрести платный план. Кроме того, прежде чем покупать какую-либо службу push-уведомлений, ознакомьтесь с этим руководством по стоимости push-уведомлений.
Вот краткий обзор того, что вы получаете с PushEngage:
- Высококонверсионные автоматизированные кампании
- Множеством вариантов таргетинга и планирования кампаний
- Отслеживанием целей и расширенной аналитикой
- Интеллектуальным A/B-тестированием
- Выделенный менеджер по успеху
Вы увидите, что PushEngage — это, без сомнения, лучший выбор, если вы хотите увеличить трафик, вовлеченность и продажи для своего бизнеса. И если у вас ограничен бюджет, вы всегда можете немного проявить креативность с вашими push-уведомлениями.
ПРИМЕЧАНИЕ: Если у вас сайт на WordPress, вам следует установить и активировать плагин PushEngage для WordPress.
Поехали!
Шаг № 1: Создайте бесплатную учетную запись PushEngage
Перейдите на PushEngage и нажмите Начать бесплатно прямо сейчас:
Вы можете начать с бесплатного плана. Но если вы хотите отправлять целевые push-уведомления, вам следует выбрать План Роста. Как только вы определитесь с нужным планом, нажмите «Начать», чтобы создать свою учетную запись PushEngage.
Шаг № 2: Зарегистрируйтесь в PushEngage
Теперь пришло время создать вашу учетную запись PushEngage. Начните с регистрации по адресу электронной почты или идентификатору Gmail:

Затем заполните данные вашей учетной записи:

И добавьте информацию о вашей кредитной карте, чтобы купить ваш план:

Если вы выбрали бесплатную учетную запись, с вашей кредитной карты никогда не будет взиматься плата, пока вы не решите обновить свой план. И теперь вы готовы получить доступ к вашей панели управления PushEngage. Просто нажмите Завершить регистрацию и получить мгновенный доступ.
Если вы раньше использовали OneSignal или PushAlert, вы увидите, что PushEngage предоставляет вам гораздо более удобный интерфейс панели управления. Панель управления OneSignal не предназначена для расширенных кампаний. Для этого вам понадобится API больше, чем плагин OneSignal.
Шаг № 3: Установите плагин WordPress для веб-уведомлений
NOTE: If you’re not running a WordPress site, you should check out our installation guides to get started.
Вы закончили создание учетной записи. Теперь перейдите в панель управления PushEngage и следуйте инструкциям:

Нажмите на Настройки сайта » Детали сайта и нажмите кнопку Нажмите здесь для инструкций по настройке:

Нажмите на вкладку WordPress и нажмите кнопку Установить плагин PushEngage для WordPress , чтобы установить плагин на ваш веб-сайт.

Вот что самое интересное: При создании учетной записи PushEngage вы уже синхронизировали свой веб-сайт с учетной записью PushEngage. Поэтому нажмите на ссылку установки на панели управления PushEngage, чтобы автоматически установить плагин PushEngage для WordPress на ваш веб-сайт.
Шаг № 4: Подключите ваш веб-сайт WordPress к PushEngage
Когда вы закончите установку и активацию плагина WordPress PushEngage, вы увидите мастер начальной настройки PushEngage:

Мастер настройки довольно прост. Если вы новый пользователь, нажмите Новый? Получите бесплатную учетную запись. А если вы уже зарегистрировались, нажмите Подключить существующую учетную запись.
Далее вы можете выбрать свой сайт из выпадающего списка Выберите сайт в разделе Подключить зарегистрированный сайт, если вы уже регистрировали сайт во время регистрации:

Или вы можете нажать Зарегистрировать новый сайт, чтобы добавить новый сайт, если у вас есть премиум-тарифный план или выше. На следующем шаге мастер онбординга предложит вам установить другие обязательные плагины WordPress.

Если вы выполнили каждый шаг правильно, вы увидите это сообщение об успехе от мастера:

Теперь вы готовы создавать кампании и всплывающие окна для push-уведомлений.
Step #4: Send Personalized Drip Campaigns
Before you create a campaign, you should set up segments and audience groups to send personalized push messages.
Ничто не сравнится с уровнем персонализации, которого вы можете достичь, создавая сегменты и группы аудиторий для подписчиков ваших push-уведомлений. Перейдите в раздел PushEngage » Аудитория и немедленно начните создавать сегменты и группы аудиторий.
На вкладке Сегменты вы можете создавать новые сегменты или редактировать существующие:

А если вам нужна еще более глубокая персонализация, создайте группу аудиторий на вкладке Группы аудиторий:

Если вы новичок в сегментах push-уведомлений и персонализированных push-уведомлениях, вам следует ознакомиться с нашей статьей о создании сегментов и нашим анонсом расширенного группирования аудиторий.
Step #5: Create Your Drip Push Notifications Campaign
Go to PushEngage dashboard and head over to Campaign » Drip Autoresponders and click on Create New Drip Autoresponder:

Then, name your campaign (we suggest something like Welcome Drip), and under Content, select the option that says, “Send notification immediately after user subscribes“):

На этом этапе вы можете нажать на стрелку рядом с уведомлением, чтобы отредактировать его содержимое.
If you have a Premium or Enterprise plan with PushEngage, you’ll be able to add more than one notification to create a sequence of automated welcome messages. Just click on Add New Notification and edit the content.
Once you’re done, click on Drip Settings and select the option to send your welcome campaign to all subscribers:

Then, scroll down to set your own UTM parameters to track the push notifications:

And when you’re done, scroll back up and click the Activate Autoresponder button:

И вы закончили!
How to Create Email Drip Campaigns
Setting up those nifty automated drip campaigns in WordPress? You can do that easily with an email marketing tool. Follow along with the rest of this guide and you’re all set!
Step #1: Select an Email Drip Service
We suggest giving Constant Contact a whirl. It’s like the superstar of email marketing services. Super user-friendly and it comes with a cool drag-and-drop feature for crafting emails.

Constant Contact — лучшая служба email-маркетинга для настройки автоответчиков для вашего бизнеса. Она очень проста в использовании и предлагает множество функций автоматизации для улучшения ваших email-кампаний.
Вот что делает Constant Contact таким отличным выбором для настройки кампаний email-маркетинга:
- Простой конструктор drag-and-drop для создания писем
- Сотни готовых шаблонов писем
- Приветственные сообщения, предложения на день рождения и автоответчики для брошенных корзин
- Инструменты для создания списков и формы подписки для роста вашей аудитории
- Сплит-тестирование для целевых писем
- Интеграция с CRM и сторонними сервисами
- Отличная поддержка через чат и телефон
Не говоря уже о том, что Constant Contact имеет плагин форм для WordPress, который вы можете использовать для генерации лидов. Вы также можете развивать и закрывать свои лиды с помощью автоответчиков.
But hey, this isn’t the only game in town. Most of the big email marketing services, like Brevo (you might know it as Sendinblue), HubSpot, and others, they’ve got this drip email magic too.
With a few clicks, you can get those automated emails rolling out to your subscribers. Plus, Constant Contact plays nice with WordPress plugins like WPForms and OptinMonster. And if you’re into eCommerce, using WooCommerce or Shopify, it’s got you covered for reaching out to new customers or reminding folks about those items they left in their carts.
Ready to give it a go? Pop over to the Constant Contact website, sign up, and guess what? You get to try it out with a 60-day free trial. It’s like test driving a car but for email marketing. This way, you can see if it’s the right fit before you decide to go for a paid plan.
Step #2: Create an Email List
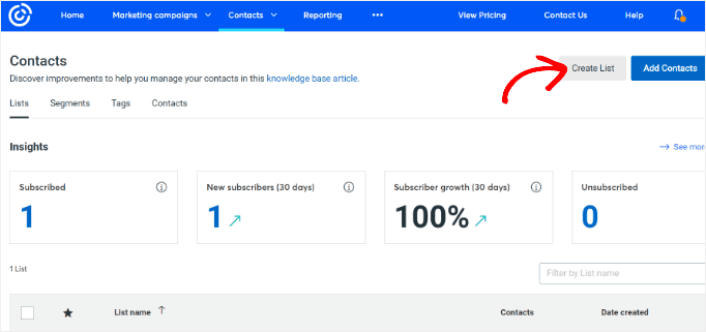
After creating an account, you can visit the Constant Contact dashboard to create a contact list.
Constant Contact will have already created a default list for you. However, you can create your own list by going to the Contacts tab in the top menu and then clicking the Create List button.
You can connect your WordPress newsletter form with Constant Contact and start building an email list. You should also check out our blog post on how to add a WordPress blog subscription widget.
Step #3: Create Marketing Drip Campaigns
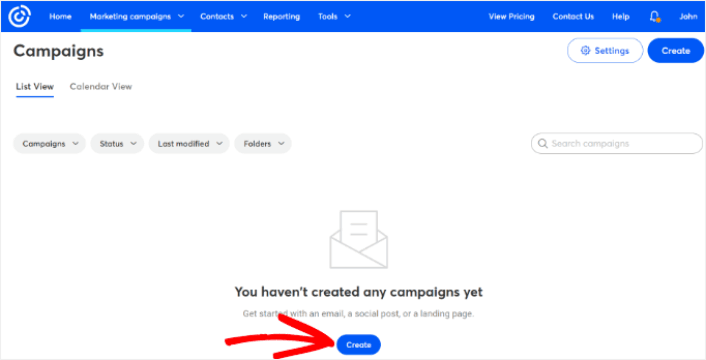
Now that you’ve added subscribers to your Constant Contact list, the next step is to create an automated drip campaign. Head over to the Marketing Campaigns tab and then click the Create button.
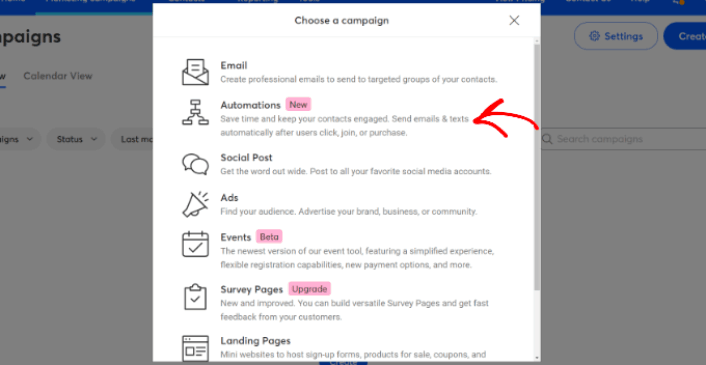
Constant Contact will show you multiple options for creating a campaign. Go ahead and select the Automations campaign.
From here, you can choose from several pre-built campaign templates to set up a drip campaign. You can create a Custom Automation to start from scratch, or you can quickly get started using any of the campaign templates.
For this tutorial, we will select the Create custom path template to get started. Select the Subscribes for email option and then click the Next button.
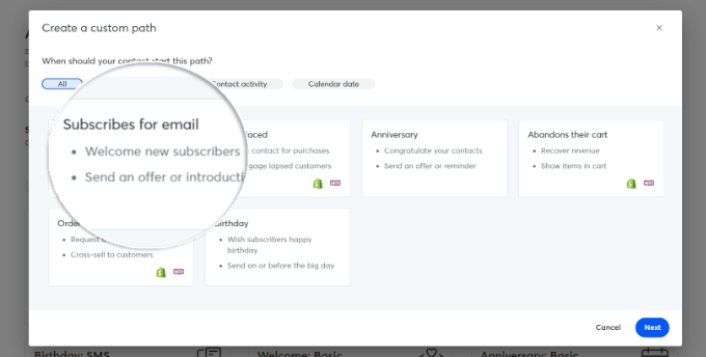
Give your custom path a name and you’re done! This template will trigger a drip campaign any time someone new subscribes to your email list. So, it’s perfect for a welcome campaign. If you’re looking to create an onboarding campaign, you can use tags to put them on a separate drip campaign.
Step #4: Create a Campaign Flow
However, you can simply drag actions and rules from the menu on the left onto the path. For instance, you add different actions like sending an email or sending an SMS to your workflow.
There are also different rules that help you customize your automation. You can add a time delay and specify when the next email should be sent. Similarly, there is a conditional split option that lets you set up Yes and No conditions and split the path.
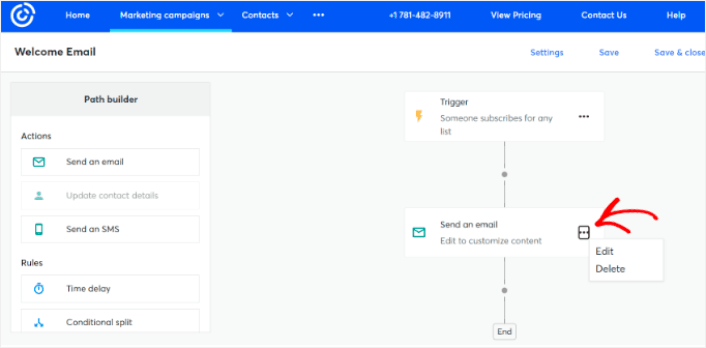
Tweaking your automated workflow is a breeze too. Just spot the three dots icon and give it a click. Choose Edit to make changes. Say you want to change up the Send an email action.
Once you do that, a popup window shows up. Here’s where you can either whip up a brand new email or use one you’ve already made.
Since it’s your first time setting up this workflow, go ahead and pick Create a new email. Put in a cool name for your email, then hit Continue. And just like that, you’re on your way to customizing your email workflow!
Step #5: Creating Your Email Campaign
You can search for a template based on the occasion or use a blank template to create an email from scratch.
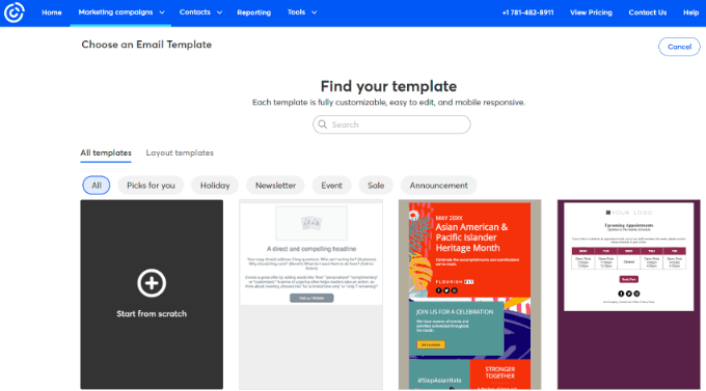
Once you select a template, the email editor will launch.
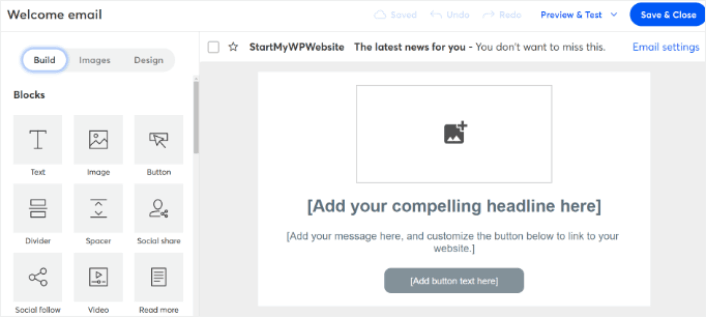
When you are done, hit the Save & Close button at the top. This will take you back to the Path Builder in Constant Contact. Go ahead and finish your automation path by adding as many actions and rules to your path and editing each one of them.
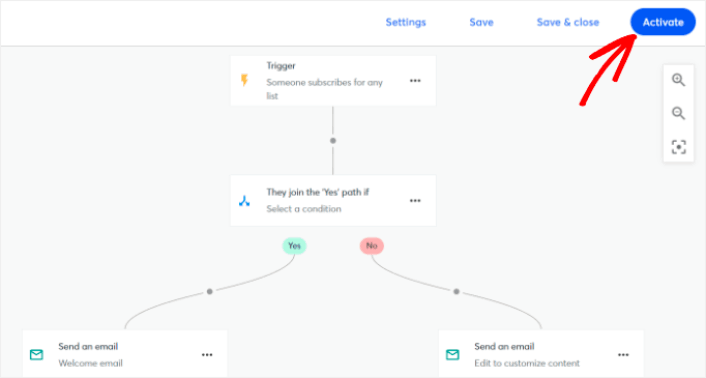
After creating an automated workflow, you can simply click the Activate button at the top. And you’re done!
What to do After You Create a Drip Campaign
На этом всё, друзья!
Если эта статья оказалась полезной, обязательно оставьте комментарий ниже.
Getting started with drip campaigns can seem intimidating. But if you keep an eye on goal tracking and analytics, you should be fine. More importantly, you’ll make a lot more profit with the help of push notification campaigns. Here are a few cool resources to get you started:
- Как использовать ретаргетинговые push-уведомления для увеличения дохода в 2 раза
- Как сортировать push-уведомления и находить выигрышные кампании
- Как очистить списки подписчиков push-уведомлений (легко)
- Как автоматически отправлять RSS-push-уведомления
- Как использовать push-уведомления для продвижения новостного сайта
- Как использовать push-уведомления для перекрестных продаж, чтобы удвоить продажи
- Как использовать push-уведомления об отказе от просмотра (4 шага)
Если вы новичок в push-уведомлениях, вам стоит попробовать PushEngage. PushEngage — это программное обеспечение для push-уведомлений № 1 на рынке. И ваши кампании будут в надежных руках.
Так что, если вы еще этого не сделали, начните использовать PushEngage сегодня!


