Are you looking for a detailed, step-by-step guide to creating Black Friday push notifications that convert?
Sure, you can send out a simple push notification broadcast. But will that work? We’ve figured out a rock solid process to help you get more sales from holiday season. And we’ve tested it out multiple times with multiple brands.
In this article, we’re covering how we create push notifications for PushEngage’s Black Friday Sale. And how you can do the same thing as well. We’re going to check out what you need to get started, how you would create the campaigns, and what an ideal schedule would look like.
Звучит неплохо? Давайте погрузимся.
Before You Get Started with Black Friday Push Notifications
Push notifications are a marketing tool that helps you to connect with web visitors even after they leave your website. You can send targeted notifications to your push subscribers and even personalize your notifications for difference customer segments. But which push notification service should you choose?
We recommend using PushEngage to send push notification campaigns.

PushEngage — лучший сервис push-уведомлений в мире. И мы говорим не только о бесплатной версии. Он позволяет вам связываться с посетителями после того, как они покинут ваш сайт, с помощью целевых push-сообщений.
PushEngage — наш первый выбор среди сервисов и инструментов для push-уведомлений, потому что он:
- Очень прост в использовании
- Эффективен на HTTP и HTTPS сайтах
- Поставляется с визуальным конструктором, который требует минимального или нулевого кодирования для настройки
- Легко настраивайте полностью автоматизированные кампании push-уведомлений для любого типа сайта
- Имеет множество опций для отправки персонализированных push-уведомлений для более высоких показателей кликабельности
- Оснащен отслеживанием пользовательских целей, UTM-параметрами и расширенной аналитикой
И это только верхушка айсберга. Ознакомьтесь с полным списком функций PushEngage, прежде чем двигаться дальше. Самое невероятное в PushEngage — это то, что у него есть бесплатный тариф, который вы можете попробовать, прежде чем принимать решение о покупке.
Pro Tip: Check out our article on push notification cost analysis before you buy any service.
После создания учетной записи перейдите на панель управления PushEngage и следуйте инструкциям:

Нажмите Настройки сайта » Детали сайта и нажмите кнопку Нажмите здесь для инструкций по настройке:

Нажмите на вкладку WordPress и нажмите кнопку Установить плагин WordPress PushEngage, чтобы установить плагин на ваш веб-сайт.

Вот что здорово: Когда вы создали свою учетную запись PushEngage, вы уже синхронизировали свой веб-сайт с учетной записью PushEngage. Итак, нажмите на ссылку установки в панели управления PushEngage, чтобы автоматически установить плагин PushEngage WordPress на ваш веб-сайт.
And you’re done! You have successfully set up a web notifications WordPress plugin on your website. website. You don’t have to login to your WordPress admin panel at all. For a more detailed guide, check out our article on how to install web notifications on WordPress.
Before you start creating Black Friday push notifications, you should also check out these resources to help you get started.
- Как добавить плагин WordPress для веб-уведомлений на ваш сайт
- Как добавить значок push-уведомления (простой способ)
- 7 лучших практик push-уведомлений для мгновенного трафика
- Как включить одношаговый сбор подписок для push-уведомлений
- [Объявление] В PushEngage теперь есть расширенная группировка аудитории
I highly recommend using these resources to get started with PushEngage quickly.
How to Create Your Push Notification Campaign
Now that we have a basic understanding of how PushEngage works, let’s create our campaign. Currently, PushEngage only offers the Audience Group feature for Push Broadcasts.
So, in your PushEngage dashboard, go to Campaign » Push Broadcasts to create your push notifications.

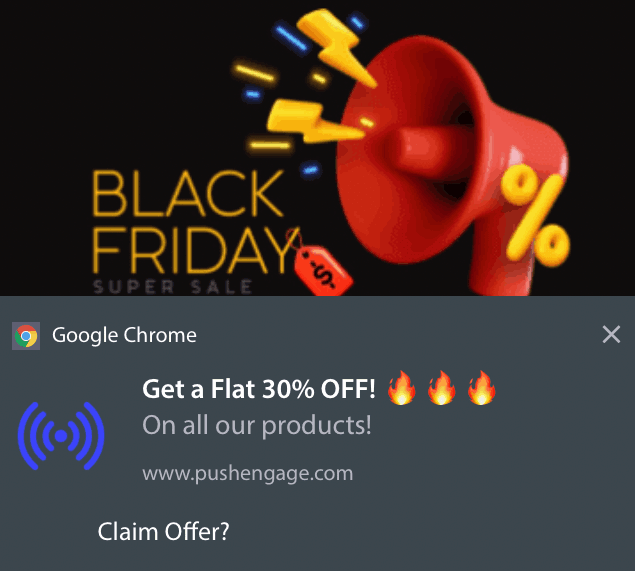
Next, follow our step-by-step process to create a powerful Black Friday Sale. If you follow every step, you should have powerful push notifications like this one:
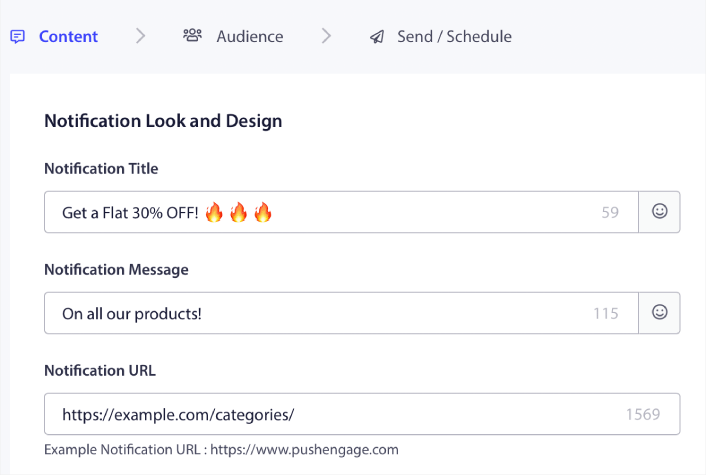
Step #1: Draft Your Push Notification Content
Your push notification content will include:
- A Notification Title
- A Notification Message
- A URL to redirect to
- A Large Image for the Notification
- Call-to-Action Buttons
- A notification expiration limit
Start with the basic content of your notification first:
Notice the use of emojis in the Notification Title. We recommend using emojis in the title and the message for all your push notifications for higher open rates. You can A/B test your notifications as well for better performance.
Step #2: Add a Large Image to Your Notification
It’s difficult to stand apart from a bunch of notifications in the Notification Tray. That’s why you need a Large Image to make your notifications pop:
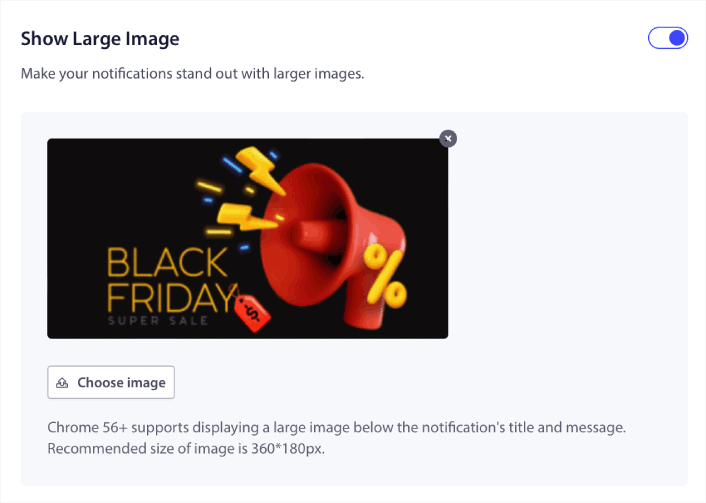
You can use PNG and JPEG formats for images.
Step #3: Add CTAs for Higher Click Rates
We’ve seen that using custom call-to-action buttons increase the click rates on your notifications. So, we highly recommend using the Multi Action Notification option to create a custom CTA:
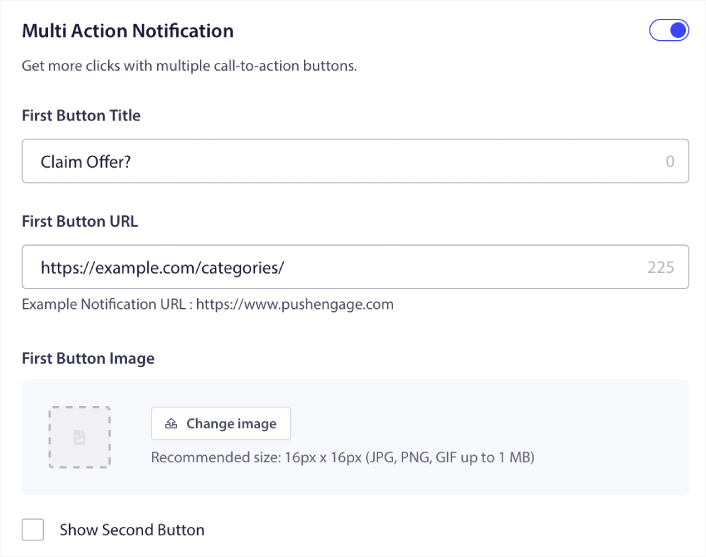
You can add at most two CTAs. If you want, you can create a split test with one CTA or two. In our experience, it’s usually best to use multiple CTAs unless you are super focused on ONLY one action.
One thing you want to be careful about is push notification character limits. Everything in push notifications has a character limit based on your subscriber’s browser and device. If your notifications are too wordy, they simply won’t show up the right way.
Step #4: Set Notification Duration
The Notification Duration is a time limit after which your push notification expires. After expiry, your subscriber won’t be able to see the notification even if it was delivered to them.
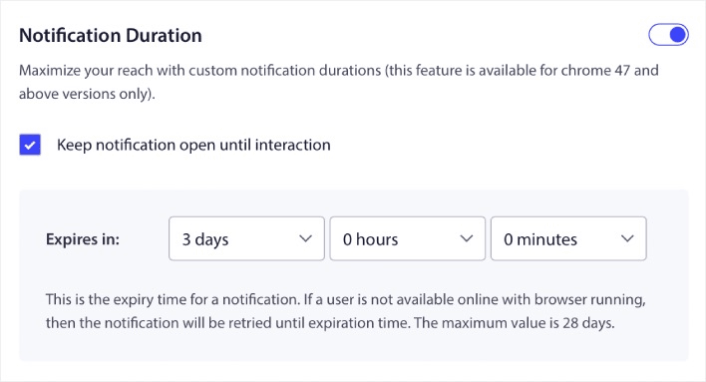
Setting a Notification Duration is a great practice for all sales. This way, your subscribers won’t get flooded with a bunch of notifications.
Pro Tip: Make sure to set the right duration for a Flash Sale. If your subscribers click through to an offer that’s already expired, they will be very unhappy.
Step #5: Select Your Audience Group
Now that you have your content in place, it’s time to find the right audience for your notifications.
Как отправить уведомление всем подписчикам
Мы хотим максимального охвата для 3 уведомлений:
- Раннее объявление о Черной пятнице
- Распродажа в Черную пятницу
- Киберпонедельник
Итак, мы отправляем эти 3 уведомления всем. На вкладке Аудитория выберите Отправить всем подписчикам:

Как перенацелить подписчиков, которые не нажали на широковещательное сообщение для всех
If you’re not sending the notification to all subscribers, you’ll need to create an Audience Group.
Go to Audience » Audience Groups and click Create New Audience Group:

Чтобы нацелиться на подписчиков, которые не нажали на последнее уведомление, вам нужно будет отфильтровать по Дате последнего клика:
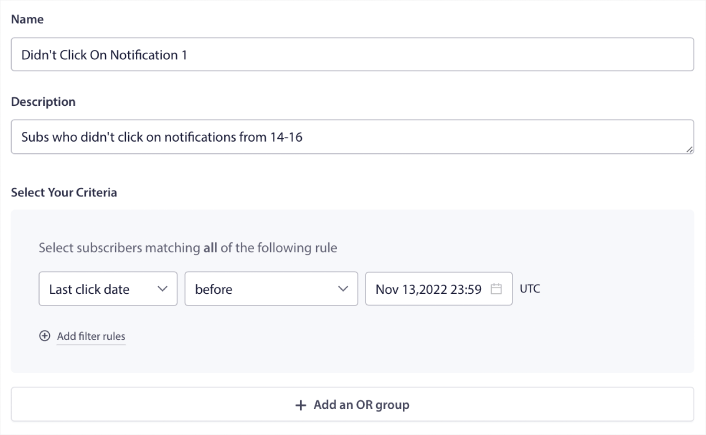
Фильтруйте по дате последнего клика до даты отправки предыдущего уведомления. Итак, если вы отправили последнее push-уведомление 14 ноября, фильтруйте подписчиков, которые кликнули на уведомления только до полуночи 13 ноября.
ПРИМЕЧАНИЕ: В отличие от кампании по электронной почте, вы не можете фактически фильтровать по коэффициенту кликов последнего уведомления. Наиболее близкое приближение — это фильтрация по кликам в диапазоне дат.
Когда закончите, нажмите Сохранить уведомление.
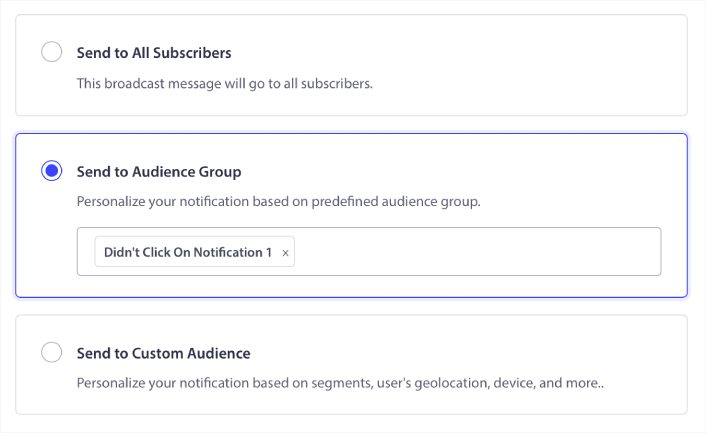
Затем вернитесь к широковещательному уведомлению и выберите Отправить группе аудитории. Из выпадающего списка выберите вашу Группу:
Как перенацелить подписчиков, которые нажали на широковещательное сообщение для всех
If you want to target subscribers who did click on your last notification, you can create another Audience Group.
Отфильтруйте подписчиков по Дате последнего клика после даты отправки предыдущего уведомления И до даты отправки следующего уведомления:
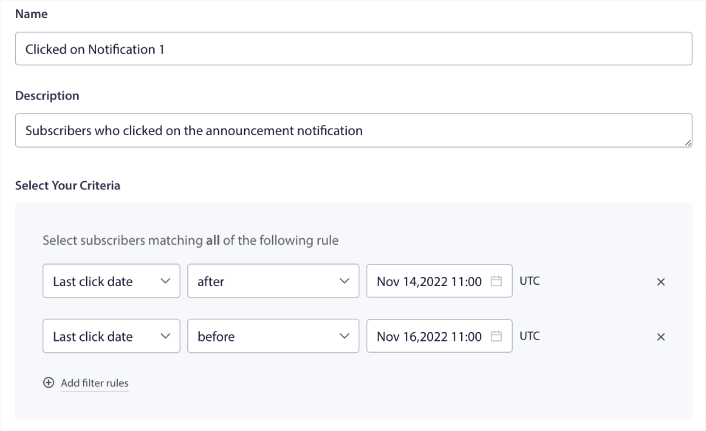
Вы можете добавить критерии И к вашему фильтру, нажав Добавить правила фильтра. Такой фильтр отлично подходит для перекрестных продаж push-уведомлений.
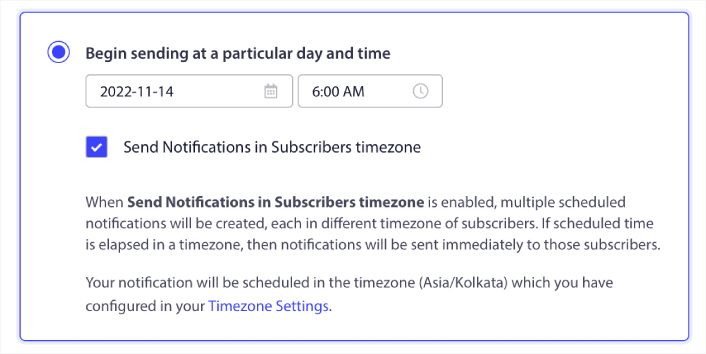
Step #6: Schedule Your Push Notification
In the Schedule tab, select the Begin sending at particular day and time for granular scheduling options.
We’re sending the notification at 11:00 AM. Since browser push notifications get shown no matter when you actually sent the notification, you can send it even earlier if you want.
Since my default Timezone Setting is not in EST, I’m using the Send Notifications in Subscribers timezone option:
Don’t forget to test your notifications by clicking the Test Notification button. When you’re done, click Schedule Notification.
What’s the Ideal Black Friday Push Notifications Schedule
There’s no one right or wrong schedule with holiday campaigns. But we follow a very strict schedule and it works:
- 3 notifications for an early Black Friday sale
- 1 notification for Black Friday
- 1 notification for Small Business Saturday
- 1 notification for Cyber Monday
- 1 notification for Cyber Monday Extended sale
And retargeting push notifications to target the subscribers who clicked on them or didn’t. Let us know how that works for you. In the meantime, check out these resources:
- Как увеличить количество кликов по вашим push-уведомлениям с помощью любопытства
- Как персонализировать каждое push-уведомление
- Как выделиться с помощью медиафайлов в ваших push-уведомлениях
- Как реактивировать неактивных подписчиков push-уведомлений
- Как использовать push-уведомления для информирования клиентов
- Как использовать эмодзи в ваших push-уведомлениях для увеличения количества кликов
- Как увеличить конверсию, создавая ощущение срочности
И если вы еще этого не сделали, начните работу с PushEngage сегодня.


