Looking for a resource on how to track push notifications with Google Analytics?
Push notification analytics can be a bit overwhelming. First, you have to make sure that you can track them properly on Google Analytics so that you can report them better. Then, you have to understand what the numbers actually mean and whether you’re on the right track.
There are too many questions and the internet is full of mediocre resources with no real answers.
Don’t worry. In this article, we’re going to show you how to look at push notification analytics the right way. You’re about to get answers to all these questions and more.
始めましょう。
Types of Push Notification Analytics Data
Push notification analytics can be pretty confusing when you see them for the first time. So, before we get into advanced topics such as goal tracking and revenue mapping, let’s understand the different types of push notification analytics data and how to interpret them.
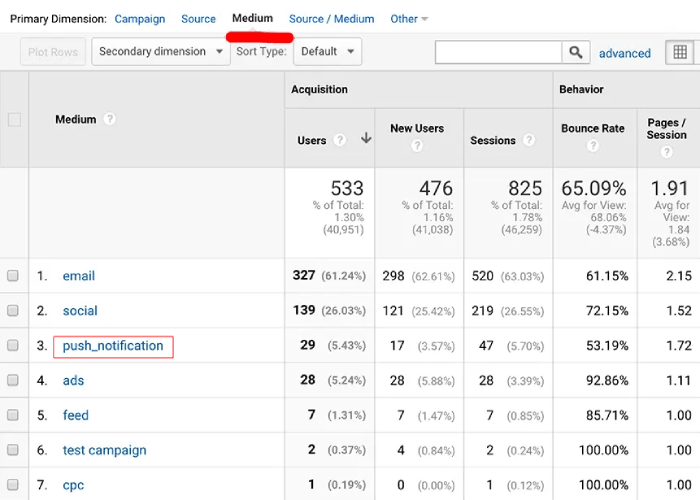
Push Notification Analytics for Campaigns
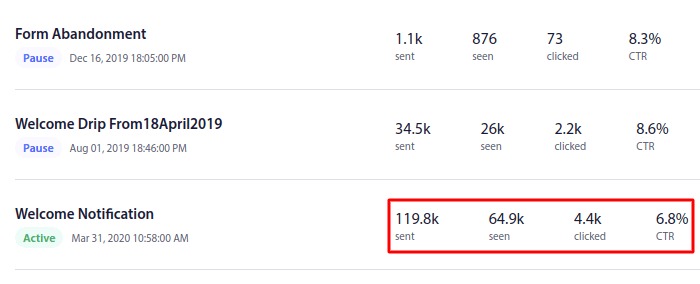
すべてのプッシュ通知キャンペーンまたは単一のブロードキャストには、独自の分析データがあります。確認すべきことは次のとおりです。
- Click through rate (CTR): The CTR is the percentage of people who saw your push notification and then clicked on it.
- Goal count: Your goal count is the number of people who took the action you wanted after clicking on your notification.
- Revenue: We highly recommend having a revenue goal for your push campaigns, especially is you’re running an eCommerce store.
確認できるその他の指標がいくつかあります。
But if you’re just focusing on your CTR, your goal counts, and your revenue, that’s good enough. We’ll talk more about creating goals soon. Keep reading.
Push Notification Opt-In Analytics
プッシュ通知のオプトインにも非常に具体的な分析があります。
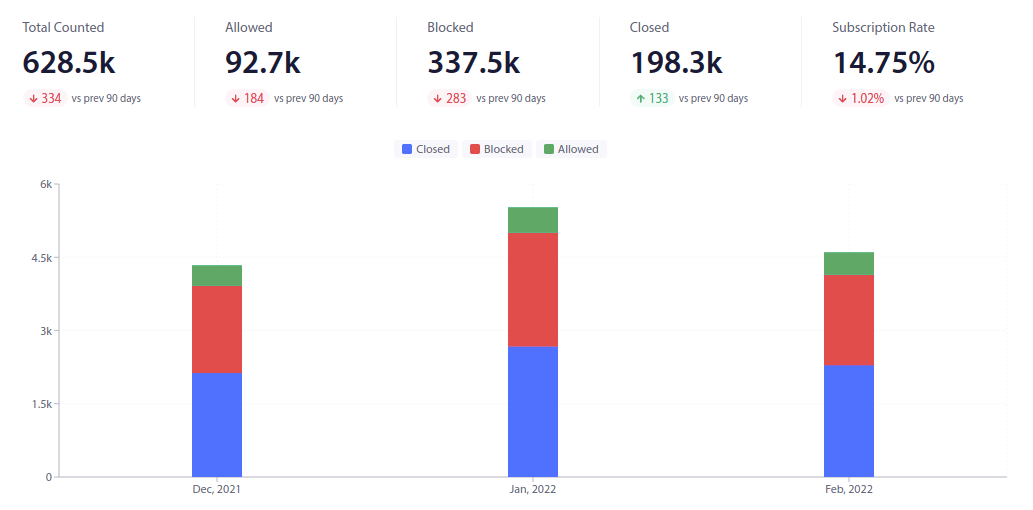
What you want to focus on is your subscription rate. The rest of the numbers can be a distraction if you’re a complete startup.
But once you start to grow, you also want to have a clear picture of how many times people saw your opt-in, how many times your web visitors allowed the opt-in to show up, and how many times the popup got blocked. Knowing these numbers will help you get a clear picture of how effective your spending on push notifications really is.
Goal Tracking for Push Notifications
Goal tracking is one of the most powerful features any push notification service can offer you. Goal tracking enables you to create a goal for your campaigns. Every time your subscribers take the action you want them to, the goal counter automatically attributes success for easy reporting.
Let’s break this down in simpler terms.
目標追跡を使用すると、キャンペーンのROIを追跡できます。たとえば、サイトでの購入に対して収益目標を設定した場合、プッシュ通知による目標追跡は次のことを追跡できます。
- コンバージョンの数
- およびドル価値
プッシュ通知キャンペーンからのすべての販売に対して!
このレポートに基づいて、キャンペーンの投資収益率(ROI)を計算できます。
Similarly, if your goal is to increase leads on your site, goal-tracking a form abandonment notification campaign will assign a value per lead to identify how many leads you’ve generated from push notifications and how much they’re worth.
If you’re running several triggered campaigns at a time and you want to test which of them is working best, Goal Tracking will help you get a clear picture.
たとえば、ある「カート放棄」キャンペーンで追加割引のクーポンを、別のキャンペーンで送料無料のクーポンコードを持っているとします。両方のキャンペーンの収益メトリクスを確認することで、どちらがより効果的かがわかります。
これにより、どのキャンペーンがウェブサイトにとって最も効果的であるかが明確になります。
UTMパラメータを使用してプッシュ通知を追跡する方法
これまでに、プッシュ通知キャンペーン全体の一部のメトリクスを確認する方法を理解したことでしょう。しかし、それを効果的に報告するにはどうすればよいでしょうか?プッシュ通知ダッシュボードで目標追跡レポートを確認するのは素晴らしいことです。しかし、プッシュ通知のパフォーマンスを他のマーケティングチャネルと比較する必要があります。
ここでは、UTMパラメータを使用してGoogleアナリティクスでプッシュ通知を追跡する方法を説明します。そして、それをPushEngageで行います。PushEngageは世界No.1のプッシュ通知ソフトウェアです。PushEngageではプッシュ通知キャンペーンのパフォーマンスを追跡するのが非常に簡単で、UTMパラメータも使用できます。
ステップ1:PushEngageを使い始める
まだの場合は、PushEngageをサイトにインストールしてください。

ステップ2:プッシュブロードキャストを作成する
サインアップが完了したら、PushEngageダッシュボードに移動し、Campaign » Push Broadcastsにアクセスします。次に、Create New Push Broadcastをクリックします。

次の画面で、プッシュ通知を作成できるようになります。
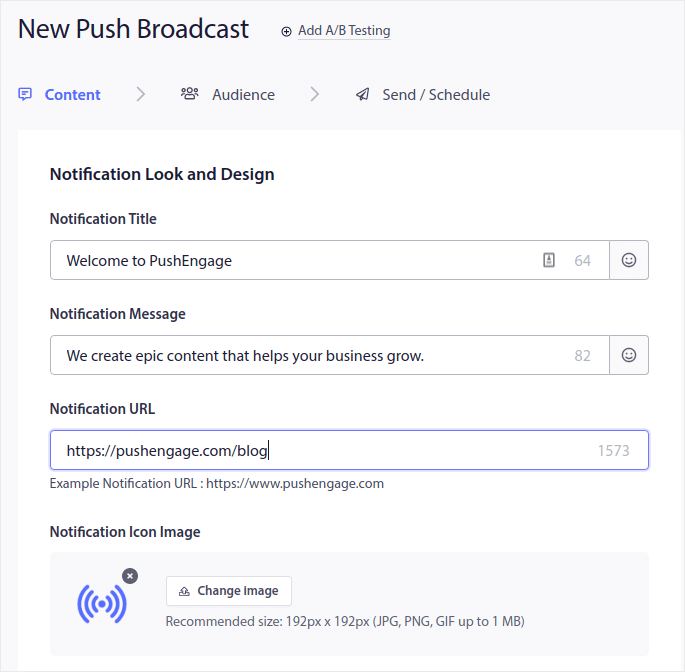
ステップ3:UTMパラメータを追加する
Contentタブの下にあるUTM Parametersというセクションまでスクロールダウンし、有効にします。

UTMパラメータのデフォルト値を使用することも、必要に応じて変更することもできます。たとえば、UTM CampaignおよびUTM Contentパラメータには、より説明的なタグを設定するでしょう。
これらのパラメータが何であるかわからない場合は、簡単な説明を以下に示します。
- UTM Source:トラフィックを送信したサイトを特定するのに役立ちます
- UTM Medium:使用されたリンクの種類を特定します
- UTM Campaign:特定の製品またはキャンペーンプロモーションを指定します
- UTM Terms:コンテンツの検索語を特定するのに役立ちます
- UTM Content:ユーザーがクリックしてサイトにリダイレクトされたものを追跡するのに役立ちます
UTMパラメータが詳細であるほど、プッシュ通知をより多く追跡できます。
Googleアナリティクスでプッシュ通知のパフォーマンスを確認したい場合は、このUTM追跡の初心者ガイドを参照してください。
プロのヒント:UTMパラメータはプッシュブロードキャスト専用ではありません。自動プッシュ通知キャンペーンに移動して、自動キャンペーンの各通知にUTMパラメータを設定することもできます。
プッシュ通知のコンバージョン目標を設定する方法
プッシュ通知の目標追跡を設定することが非常に重要である理由についてはすでに説明しましたが、実際にどのように行うのでしょうか?
ステップ1:目標追跡設定を構成する
PushEngageダッシュボードに移動し、Analytics » Goal Trackingにアクセスしてください。
まずEnable Goal Trackingをクリックします。必要であれば、Tracking Methodを変更することもできます。ここでは2種類の帰属を使用できます。
- Last View:通知が受信した表示回数をカウントします。認知度向上やエンゲージメント向上キャンペーンに最適です。
- Last Click:プッシュ通知のクリック数と、サイトでのクリック数をカウントします。コンバージョンキャンペーンに最適です。
次に、必要であれば、目標をカウントするためのクッキーのカスタム追跡時間を設定できます。ただし、デフォルト値のままにしておくことをお勧めします。
PushEngageが提供するデフォルトの目標は収益目標です。通貨を変更したい場合は、好きな通貨に変更できます。デフォルトの通貨はUSDですが、ドロップダウンからお住まいの地域の通貨に変更できます。
目標追跡設定のカスタマイズが完了したら、Updateをクリックします。
ステップ#2: トラッキングコードの追加
次に、右側にあるトラッキングコードをコピーし、コンバージョンを追跡しているページのHTML <body>に貼り付けます。通常、これはサイトのチェックアウトページになります。やり方がわからない場合でも心配いりません。同じ画面で詳細な手順が表示されます。
サイトの運営に使用しているCMSを選択し、See detailed instructionsをクリックしてください。
これで完了です!
次は何をしますか?
今回は以上です、皆さん!
プッシュ通知が初めての場合は、公開前に完全なプッシュ通知テストプロセスに従うべきです。これにより、訪問者が見て、壊れたユーザーエクスペリエンスについて不平を言う前に、一般的な問題をトラブルシューティングできます。
または、これらの素晴らしいリソースのいずれかをチェックして、プッシュ通知キャンペーンからさらに多くの価値を引き出すことができます。
まだの方は、ぜひPushEngageをお試しください。PushEngageは世界No.1のプッシュ通知サービスです。ビジネスの成長に真剣に取り組んでいるなら、PushEngageに投資すべきです。


