Looking for a way to send personalized push notifications on autopilot?
The simplest way to do it is to use automated drip campaigns with attributes. Attributes are custom variables that you can use to dynamically send personalized push notifications.
Don’t worry if that seemed a little bit complicated.
We’ll explain everything in this article and how you can easily set up personalized push notification drip campaigns using attributes.
よさそうですね?さあ、始めましょう。
What Are Push Notification Attributes?
Push notification attributes are variables that automatically fetch subscriber details and personalize your notification messages. You can customize your drip campaign by adding data such as:
- The first name of the user
- Their hobbies
- Their location
And more, depending on the type of campaign you’re running.
We recommend that you use PushEngage to send your push notification campaigns. PushEngage is the #1 push notification software in the world. So, your campaigns will be in safe hands.
Even without using push notification attributes, PushEngage allows you to send personalized web push notifications using the County and the City name of your subscribers. If you want, you can send a drip push notification sequence to all your subscribers or a custom segment. You can even run drip campaigns with geo segmentation in PushEngage.
But if you want to take it one step further, you can offer a whole different level of personalization using the PushEngage Attributes API.
How to Send Personalize Drip Push Notifications
A Drip Campaign is a series of push notifications that are sent out automatically. Typically, a drip sequence gets triggered in one of two conditions:
- When someone subscribes for the first time
- When a subscriber is added to a segment
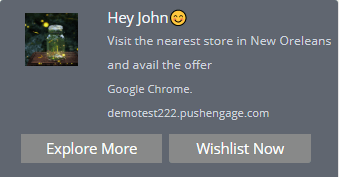
You can trigger the drip notification based on the subscriber’s action. Now that you understand what a drip campaign is and how you can turn the trigger on, let’s check out how you can use the Attribute API to send personalized drip notifications like this one:
Case #1: Send to All Subscribers
If you send your drip campaign to all subscribers, everyone subscribed to your push notifications will get personalized drip notifications. The cool part is that you can create your entire sequence along with a delivery schedule.
In this condition as soon as the user subscribes, you can pass the values or set the attributes against the subscriber hash. This can be done using the response of the hash.
Case #2: Send to Custom Segments
You can also send a drip campaign to custom segments. If you’re not sure what that is, check out our article on how to create custom segments. For this trigger condition, you can pass the values or set the attributes against the response of the segment as soon as the subscriber enters a segment.
Case #3: Attributes and Geo-Location
PushEngageを使用すると、通知のタイトルとメッセージでユーザーの国名と都市名の属性を使用することにより、カスタムドリップ通知をユーザーに送信できます。これらは、コーディングなしで、すべてのサブスクライバーに対して使用できる事前定義された属性です。同様に、通知フィールドにユーザーの名前やその他の詳細を追加することもできます。
ジオロケーション属性の場合、サブスクライバーがサブスクライブされた直後に、サブスクライバーハッシュに対して属性を設定する必要があります。
使用できるサンプルコードを簡単に見てみましょう。
 var newAttributes = {
 'name': 'Jon smith',
 'isAdmin': true,
 'lastActive': "2019-09-19T05:41:53.150Z",
};
このコードスニペットは、ユーザーの3つの新しい属性を作成することを目的としています。簡単に言うと、コードは名前、管理権限ラベル、および最後ののアクティブタイムスタンプを割り当てようとしています。これらはすべて、パーソナライズされたプッシュ通知を作成するために使用できるデータポイントです。
window._peq.push(['init', false, function(res) {
   if(res.statuscode==1) {
     //Get your subscriber hash in response
     console.log(res.subscriber_hash);
     window._peq.push(['set-attributes', newAttributes, function(res) {
       if(res.statuscode == 1) {
         // handle response
         console.log(res);
       }
     }]);
   }
}]);
ここでは、前のコードブロックで定義された新しい属性を新しいサブスクライバーに対して取得し、PushEngageサーバーに送信しようとしています。サブスクライバーがウェブサイトにユーザーとしてログインしたときに属性を取得することもできます。これらの属性が送信されると、PushEngageキャンペーンで属性を使用できます。
属性の詳細については、PushEngage Attributes APIドキュメントをご覧ください。
属性を使用したドリップ自動応答の設定方法
使用できるドリップキャンペーン属性の種類について少し理解したところで、PushEngageを使用して設定を進めましょう。まだPushEngageを使用していない場合は、今すぐ始めましょう。
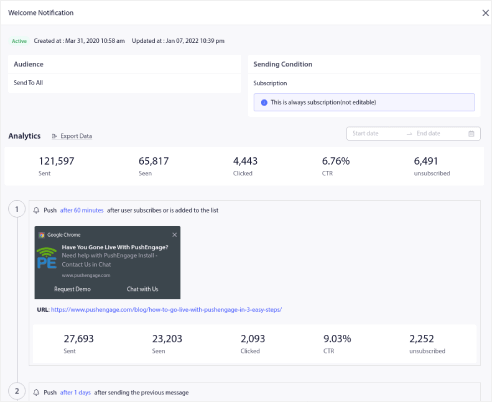
PushEngageダッシュボードにログインし、Campaign » Drip Autorespondersに移動して、Create Drip Autoresponderをクリックします。

キャンペーンに名前を付けて、ドリップに通知を追加して作成を開始します。
次に、属性の使用を開始します。たとえば、通知にサブスクライバーの名前を追加したいとします。タグ {{name||there}}を使用できます。
属性タグは、ここで非常に単純なことを行います。各サブスクライバーについて、PushEngageは属性 nameとして保存されている名前を確認します。いずれかのサブスクライバーに対して有効な nameデータが見つからない場合、PushEngageはフォールバックオプション thereを使用します。
ご覧のとおり、例では通知メッセージフィールドに属性 {{PE_CITY}}を使用して、サブスクライバーの場所によって通知をパーソナライズしています。ジオロケーション属性を作成する必要はありません。PushEngageは各サブスクライバーの位置をハッシュに対して保存するためです。したがって、{{PE_COUNTRY}}と{{PE_CITY}}はデフォルトの属性です。
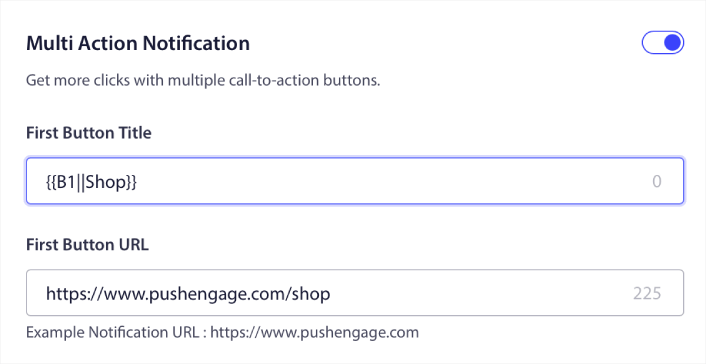
ドリップキャンペーンのマルチアクションボタンでも属性を使用できます。
注意:属性値が欠落している場合に備えて、必ずデフォルト値を渡してください。
私たちの例で属性を使用したパーソナライズされたプッシュ通知は次のようになります。
このようなパーソナライズされたターゲット通知を送信すると、プッシュブロードキャスト通知やドリップキャンペーンと比較してCTRが高くなることに気づくでしょう。
次は何をしますか?
今回は以上です、皆さん!
作成した属性は、購読者をセグメント化する方法としても機能します。または、GTMを介して動的にセグメントを作成することもできます。次にそれを確認しますか?
プッシュ通知が初めての場合は、公開前に完全なプッシュ通知テストプロセスに従うべきです。これにより、訪問者が見て、壊れたユーザーエクスペリエンスについて不平を言う前に、一般的な問題をトラブルシューティングできます。
まだの方は、ぜひPushEngageをお試しください。PushEngageは世界No.1のプッシュ通知サービスです。ビジネスの成長に真剣に取り組んでいるなら、PushEngageに投資すべきです。


