
Looking for a quick tutorial on how to create a website?
Creating a website usually involves a LOT of coding. You’ll need to know a bunch of different languages such as HTML, CSS, Javascript, PHP, and more to create a fully functional website. But should you really create a website from scratch using code?
Short answer: No. There are simple ways to create a website that is powerful, fast, and packed with features. And you don’t have to know a single line of code to do it!
So, if you’re wondering how to create a business website in hours with little to no work involved, this is the right article for you. We’re going to show you how to create a WordPress website even if you have no idea what WordPress is and why you should care.
Let’s take it step-by-step.
Why You Should Create Your Own Website
One of the best ways to establish yourself online is by creating your own website.
Creating your own website is super easy, and brings many benefits with. Your website is an essential tool whether you’re running businesses, selling art, and building a personal brand. Here’s a quick look at the benefits of having your own website:
- Build an online presence: With a website, you can establish yourself as an expert in your field and build credibility with potential clients or customers.
- Control your brand image: You can design your website to reflect your unique style, values, and messaging in a consistent way.
- Get more views: A website can get your brand seen by way more people than the biggest sales convention in the world.
- Sell products and services: You can set up an online store and offer your products to customers worldwide and round the clock.
- Gain business insights: Websites allow you to track and monitor your traffic and their behavior so that you can optimize your site for conversions.
So, if you’re looking to grow your business, showcase your work, or simply establish yourself online, creating your own website is the way to go.
How to Create a Website With No Coding
Now that we’ve gone over why you should create a website, let’s go over how to create a website. We’re going to take through the entire process of building a website without any coding. So, let’s get started.
Step #1: How to Set Up Your Hosting Server
Before you create a website, you need to get:
- A domain name
- Web hosting
- An SSL certificate
You might run into videos and articles online that talk about building a free website. Believe us when we say it, there’s no such thing as a truly free website. Most free hosting sites offer extremely bad hosting, no technical support, and slap their branding on your website.
If you’re testing themes for web development or looking to experiment with a web page and its design, that’s fine. But for any self-respecting business owner, “free websites” are a horrible way to go.
Select a Hosting Service
Most modern hosting services will offer a custom domain name, web hosting, and an SSL certificate. But we recommend using one of these three hosting providers to start building:
All three hosting services are completely optimized for WordPress. And you get a free domain name and SSL certificate when you buy website hosting. For this article, we will show you how to get started using Bluehost. But it’s a somewhat similar process for our other recommended hosting services.
NOTE: These are all paid hosting services. You can create a website for free using free hosting. But if you’re serious about building a business, we recommend using hosting services that take your business seriously.
Sign Up for WordPress Hosting
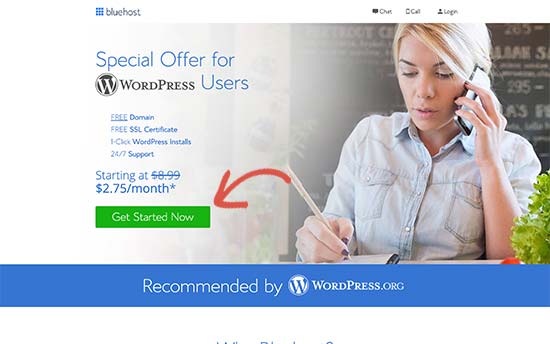
Head over to Bluehost and click on Get Started:
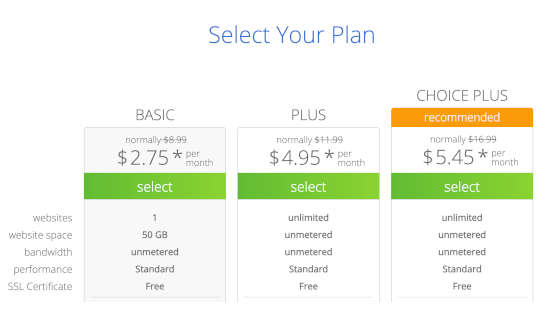
Then, choose your hosting plan on the next screen. We recommend getting the Plus plan if you’re looking to scale the business. But if you’re just looking to get started, even the Basic plan should be fine for you.
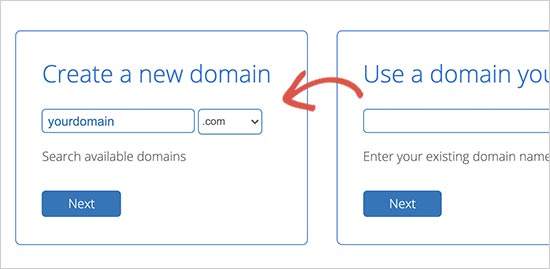
After that, you’ll choose the domain name for your website.
Finally, Bluehost will confirm your order and try to upsell you some added services such as Domain Privacy Protection. It’s entirely up to you whether you want to get this extra stuff. We don’t recommend it for small businesses, but if you think that the upsells are worth it, go ahead and add them to your cart.

After that, you complete the checkout process.
Step #2: How to Install WordPress on Your Server
Once you’re done with the checkout, Bluehost will send you an email to log in to your cPanel account. The cPanel is your web hosting control panel. From there, you can manage your email inboxes and FTP accounts, get support from Bluehost, and more.
When you log in to cPanel, you’ll see that Bluehost has already installed WordPress for you. WordPress is a website builder and content management system (CMS) to create and publish content on your website. It’s open-source software that anyone can use to make any kind of website imaginable.
Why Choose WordPress?
It started out as a blogging platform in 2003 but soon transformed into a CMS and later a full-fledged website building platform. Today it powers more than 38% of all websites on the internet.
If you want to build an eCommerce website, then you have a choice between Wix, Shopify, Squarespace and WooCommerce. These are the most popular apps to create a new website for an online store.
We recommend using WooCommerce over other platforms as it’s the leading eCommerce website software in the world and unlike most other services, it’s free. The cool part is that WooCommerce acts like a WordPress plugin and is based on WordPress. So, even if you want to build an eCommerce store, we recommend getting started with WordPress.
Log In to Your WordPress Site
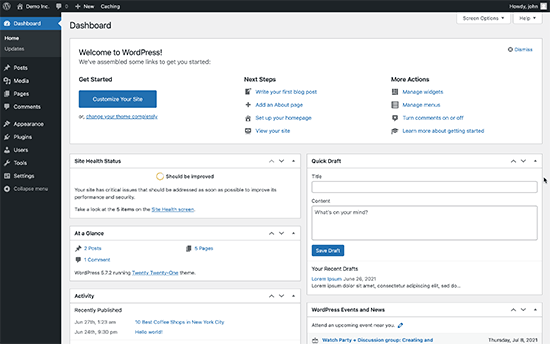
To get into your WordPress dashboard, all you have to do is click on the Log in to WordPress button:

Your WordPress dashboard will look something like this:
NOTE: The WordPress installation process is different for different hosting services. You may have to manually install WordPress if you’re not using Bluehost, depending on your hosting service. Mostly, you’ll need to locate a software installer inside your cPanel called Softaculous. Softaculous is a setup wizard that will help you install WordPress on your server.
Configure Your WordPress Settings
When you first log in to your WordPress dashboard, you’ll want to take care of a few small details before launching your product.
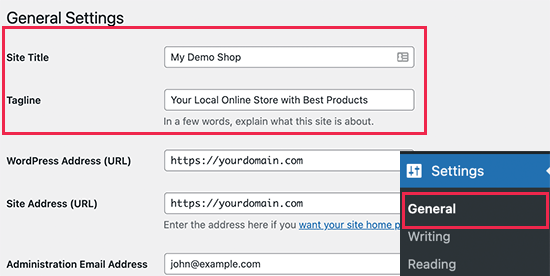
Head over to Settings » General to set the website title and description tags:
Then, change your WordPress Address and Site Address to their HTTPS versions to use SSL on your site:
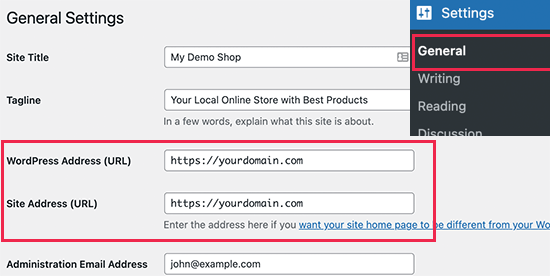
When you’re done, hit the Save Changes button at the bottom.
Step #3: How to Create a Website Theme
Before you can dive into building a lead generating machine, you need to design your website. The traditional way is to hire a designer to design a website with an amazing user experience for you.
But you can skip this step altogether and use a WordPress theme instead. Most WordPress themes come with design templates that you can use straight away and customize according to your need.
What is a Theme?
A WordPress theme allows you to create pages and posts on your site with zero coding. WordPress themes are template files written in PHP, HTML, CSS, and JavaScript. Each file works together to create the design and functionality of your WordPress site.
A typical WordPress theme will include some, if not all, of the following theme files:
- footer.php
- header.php
- index.php
- page.php
- sidebar.php
- archive.php
WordPress themes also include a functions.php file and style.css file.
If you’re not sure what any of this means, don’t worry. You don’t need to be a coding expert to install and use a WordPress theme.
Selecting a WordPress Theme
There are tons of free and paid WordPress themes that can help you create a website easily. We recommend using a theme builder such as SeedProd.

SeedProd is the #1 drag-and-drop WordPress website builder.
You get a drag-and-drop landing page builder that’s packed with options to build product sites and landing pages. Unlike WordPress website builders, you can customize every inch of your landing page including navigation menus, footers, fonts, and styles. SeedProd also works with any WordPress theme and creates mobile-friendly landing pages.
With SeedProd, you get pre-built website templates for high-converting landing pages that you can publish instantly. This includes templates for:
- Pages de vente
- Pages "Bientôt disponible"
- Pages 404
- Pages FAQ
- Pages de maintenance
- Pages de destination d'applications
- Pages de connexion
- Pages de remerciement
- Pages de webinaires
- Pages vidéo
And lots more! You can even create your own theme using the SeedProd Theme Builder. The best part is that any website you build with SeedProd looks just as good on a mobile device. Check out the full list of features in our SeedProd review.
Install and Activate SeedProd
Go ahead and install and activate the SeedProd plugin.

If you’re not sure how to do that, check out this article on how to install a WordPress plugin.
Create a WordPress Theme Without Coding
Then, in your WordPress dashboard, head over to SeedProd » Theme Builder:
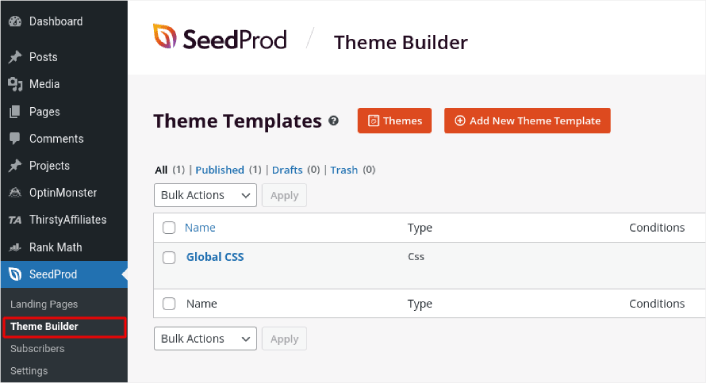
This is where you can create all the individual parts that make up your theme, including:
- Header
- Pied de page
- Single Post
- Single Page
- Archive (Blog Page)
- Home Page
- Sidebar
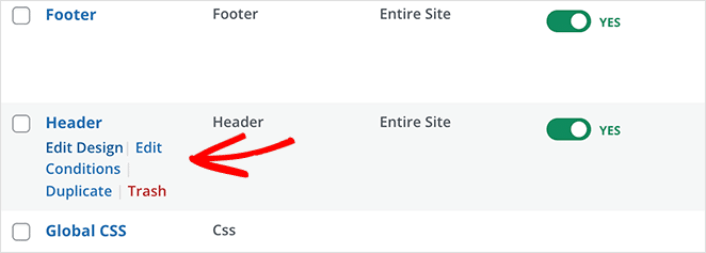
You can create each of these theme parts individually by clicking the Add New Theme Template button. And then, you can edit each of these elements using a drag-and-drop visual builder.
Or, you can use one of the many fully designed themes in SeedProd by clicking on the Themes button. Just choose any theme that matches your business closely to get started:
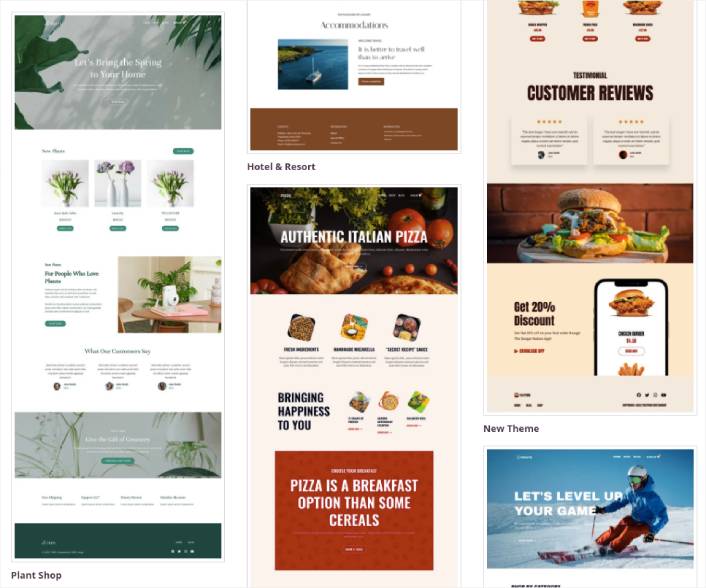
It doesn’t have to be an exact match. You can even select one based on the design. You can edit everything about these themes including fonts, the web design, and the overall user experience.
Step #4: How to Customize Your Website
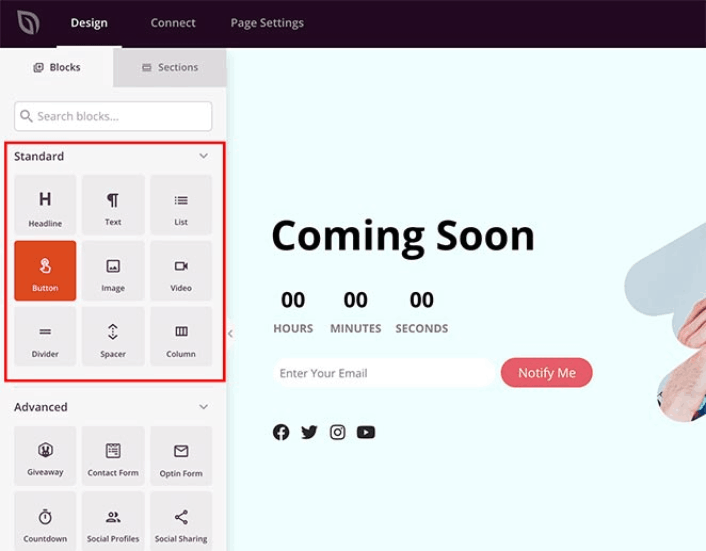
Now that you have a theme to get you started, you’ll want to edit that theme to suit your business. This is super easy to do.
SeedProd’s page builder comes with various content blocks in a drag and drop editor. Even if you’re never used a page builder before, you’re going to find it super easy to use. Just drag and drop different design elements from the sidebar:
Vous pouvez utiliser ces blocs pour créer des pages de destination super interactives avec :
- Concours RafflePress pour susciter l'engagement sur votre site avant le lancement
- Formulaires de contact pour collecter des prospects sur votre site
- Compteurs de compte à rebours pour augmenter la peur de manquer quelque chose (FOMO) et le battage médiatique autour de votre lancement
- Boutons sociaux pour obtenir des partages sur les réseaux sociaux
- FAQ blocks for better Search Engine Optimization
Et bien plus encore !
You can edit any of the content blocks on the page by simply clicking on them. This includes the navigation menu or the blog posts on your site. Once you lock down your website’s design, you can build your website any way you want it.
Step #5: How to Integrate Your Email Marketing Service with Your Site
Une fois que vous avez terminé de concevoir votre page en cours de construction, cliquez sur l'onglet Connecter en haut de votre constructeur de pages, et sélectionnez votre fournisseur de marketing par e-mail pour collecter des prospects sur votre site.

Marketing tools and integrations can help build your online presence. So, we highly recommend setting up an email list.
We recommend using Constant Contact as your email marketing service. It’s a robust service that allows you to create powerful email marketing campaigns easily.
When you’re done configuring your email marketing service, click the Page Settings tab at the top of your screen as an added bonus.

Ici, vous pouvez ajouter un plugin SEO et un plugin Google Analytics à votre page de destination. Vous pouvez même configurer des codes de suivi personnalisés tels qu'un pixel Facebook ou un pixel Pinterest pour suivre les performances des publicités.
Pro Tip: You should also set a blog subscription widget on your site. It doesn’t matter if you’re running a personal blog or a business website.
Step #6: Add a Click to Subscribe Button to Your Landing Page
You can also add a click to subscribe button to collect push notification subscribers. Push notifications are a great way to increase your repeat traffic, get more engagement and even sell official merch if you have some.
In SeedProd, just drag and drop the Custom HTML module from the sidebar.
We’ve put the subscribe button directly underneath the email signup form in the first fold.

But you can insert the button anywhere you like.
For this part, you need some experience with HTML and CSS. Or, you can copy this code and paste it into your Custom HTML block:
<button onclick="subscribeOnClickButton()" style="border: none; padding-left: 5%; padding-right:5%; text-align: center; display: inline-block; color: blue;">Get Updates via Push Notifications</button>That’s a standard button in HTML with very little styling. The only fancy bit is the onclick function in the code. It basically means that your visitors can click on the button to subscribe to something. Now, we need to give the button some extra code to allow your visitors to subscribe to push notifications.
Rendez-vous sur la page d'accueil de PushEngage et cliquez sur le bouton Commencer :

Ensuite, vous devrez sélectionner le plan gratuit pour essayer PushEngage ou choisir un plan payant si vous êtes sérieux au sujet de la croissance de votre entreprise. Les plans payants offrent plus d'options de campagne et la possibilité de créer des listes d'abonnés encore plus grandes.
Dans votre tableau de bord PushEngage, allez dans Paramètres du site » Détails du site et cliquez sur le bouton Cliquez ici pour les instructions de configuration. Sous N'importe quel site, vous obtiendrez votre code d'installation :

ATTENTION : Vous devez copier le code que vous obtenez de votre tableau de bord. Le code est unique pour chaque utilisateur de PushEngage. Vous ne pourrez pas copier le code de l'image et collecter les abonnés aux notifications push.
Une fois que vous avez le code dans votre tableau de bord PushEngage, ajoutez cet extrait de code à votre code :
<script> window._peq = window._peq || [];</script> <script>
function subscribeOnClickButton(){
window._peq.push(['subscribe',{}.pe,function(res){
if(res.statuscode==1)
{
// Code to return response
console.log(res);
}
}]);
}
</script>
Votre code final devrait ressembler à ceci :
<script src="https://clientcdn.pushengage.com/core/02a6e92667ae2279fcba8932356c1d93.js" async></script>
<script> window._peq = window._peq || [];</script> <script>
function subscribeOnClickButton(){
window._peq.push(['subscribe',{}.pe,function(res){
if(res.statuscode==1)
{
// Code to return response
console.log(res);
}
}]);
}
</script>
You’ll want to add this code to the HTML block in your landing page after the code for the button. It should look something like this:

Feel free to customize the styles for the button any way you please. When you’re done customizing your webinar landing page, go ahead and hit the Save button.
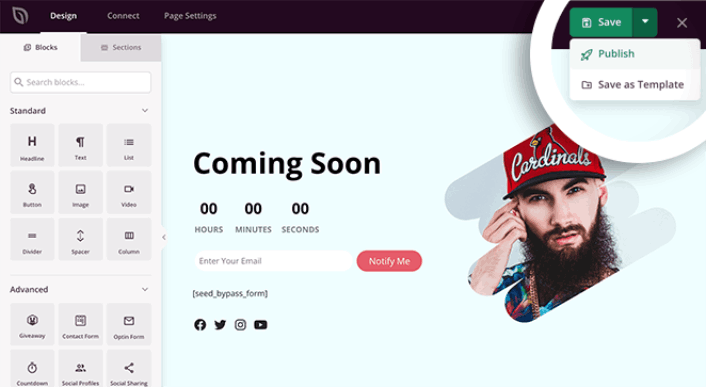
Step #7: How to Publish Your Site
When you’re done editing your WordPress site, go ahead and publish it by clicking on Save » Publish:
Then, go back to your Theme Builder and click on Enable SeedProd Theme:
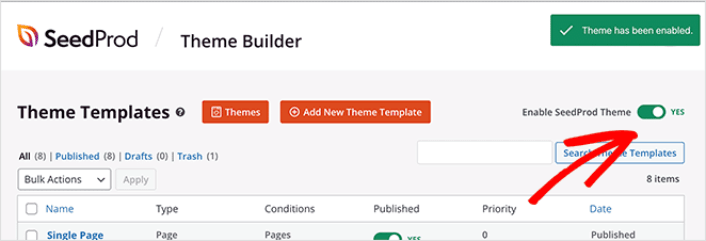
Et voilà !
Bonus Step: How to Create a Website That’s Popular
Once your store is live, you’ll want to extend your functionality to get better conversion rates on your site. Here’s a quick list of essential plugins and marketing tools you can use to boost your growth instantly:
N° 1. PushEngage

PushEngage est le plugin de notifications push n°1 au monde.
Push notifications help you grow your website traffic and engagement on autopilot. And if you’re running an online store, PushEngage also enables you to increase your sales by helping you create automated eCommerce push notifications.
You can get started for free, but you should buy a paid plan if you’re serious about growing your business.
Here’s a glance at what you get with PushEngage:
- Campagnes automatisées à forte conversion
- Options multiples de ciblage et de planification de campagnes
- Suivi des objectifs et analyses avancées
- Tests A/B intelligents
- Un responsable du succès dédié
You’ll see that PushEngage is hands down the best bet if you want to build traffic, engagement, and sales for your business. And if you’re on a budget, you can always get a little creative with your push notifications.
#2. OptinMonster
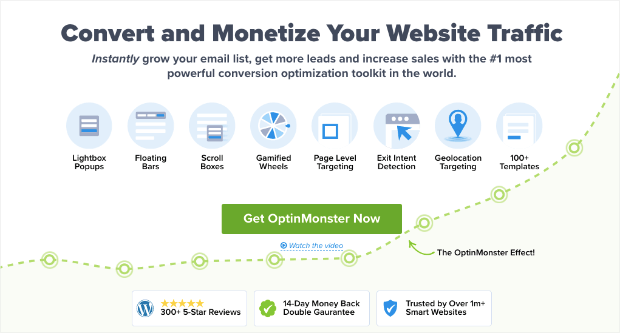
OptinMonster is the world’s most powerful conversion toolkit. This plugin has everything you need to start, grow, and scale your email lead generation process. You can create some incredibly high-converting campaigns such as:
- Lightbox popups
- Sticky headers and footers
- Video popups
- Compteurs
- Spin to win welcome mats
- Popup contact forms
Et plus !
Check out our review of OptinMonster to get a closer look at what it can do to grow your business.
#3. AffiliateWP
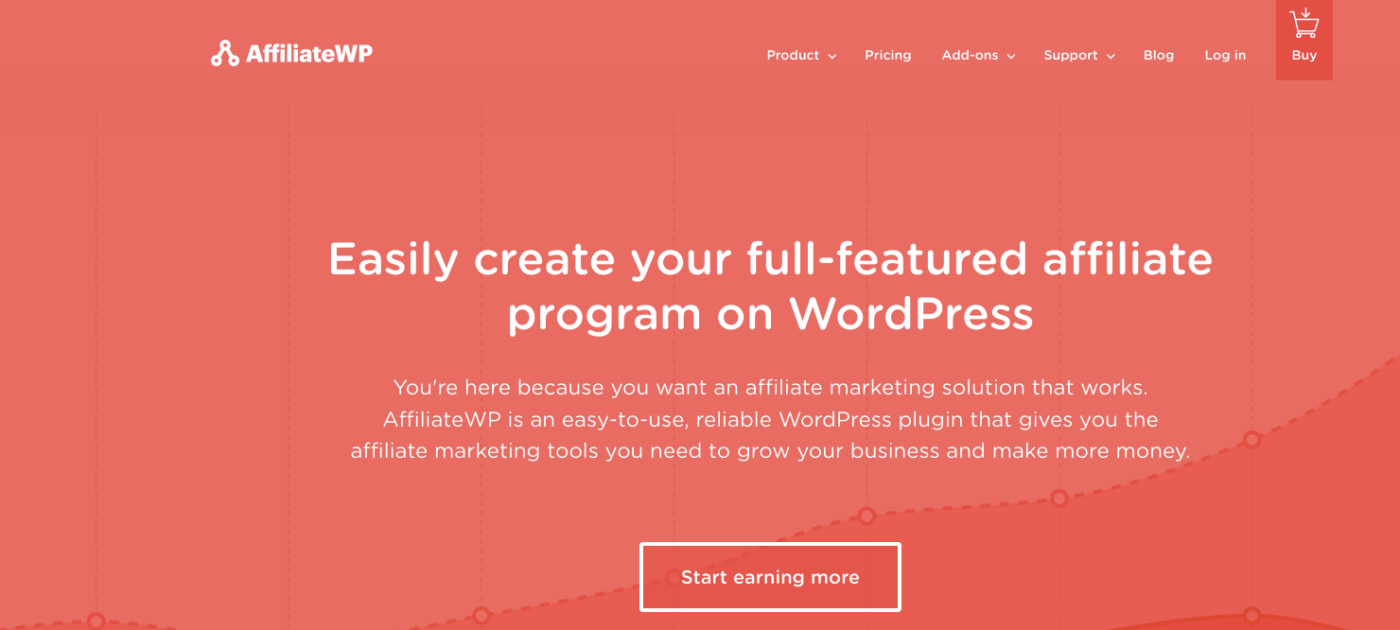
AffiliateWP est un plugin WordPress qui vous permet de créer un programme d'affiliation pour vos produits et services. Il est facile à utiliser, très fiable et ne nécessite aucune connaissance en codage pour être configuré.
Le meilleur ? AffiliateWP vous permet de développer votre réseau d'affiliés grâce à des outils entièrement automatisés.
AffiliateWP has a whole host of great features, including:
- Suivi et gestion des affiliés
- Rapports en temps réel
- Intégration des affiliés conviviale
- Paiements automatiques aux affiliés
- Notifications par e-mail personnalisables
- Intégrations avec des plugins et services populaires
- Import/export de données d'affiliation en un clic
- Addons gratuits et Pro
It’s super easy to use AffiliateWP, which separates the plugin from its alternatives. Get started right now and start growing your affiliate network. If you’re not 100% convinced, you can check out our review of AffiliateWP first.
#4. All in One SEO

All In One SEO is the best WordPress SEO plugin in the world.
Non seulement AIOSEO est suffisamment puissant pour mettre en œuvre les meilleures pratiques SEO actuelles, mais vous bénéficiez également d'options avancées pour résoudre des problèmes SEO spécifiques dès le départ. Cela comprend :
- Modules SEO locaux pour les petites entreprises ayant une audience locale
- SEO WooCommerce pour les boutiques en ligne
- Un optimiseur SEO à l'intérieur de votre éditeur WordPress
- Smart Sitemaps pour un indexation instantanée sur les moteurs de recherche
- Un plugin Schema pour que votre contenu se classe dans les Rich Snippets
And a lot more! You can learn more about the features in our review of AIOSEO.
#5. MonsterInsights

MonsterInsights is a WordPress plugin that makes it easy to use Google Analytics. Google Analytics is too complicated to use for a beginner. But even worse, it’s easy to get lost in a sea of data without getting any actionable insights on growing your business.
MonsterInsights focuses on insights over volumes of data. You don’t need a single line of code to install Google Analytics on WordPress.
Voici un aperçu rapide de ce que MonsterInsights peut faire pour vous :
- Suivi Google Analytics sans code
- Compatible avec toutes les versions de Google Analytics
- Rapports pour trouver le contenu le plus performant
- Insights détaillés sur l'audience
- Analyses e-commerce
- Analyses des inscriptions aux formulaires
- Insights supplémentaires à partir de dimensions personnalisées
- Suivi des clics sur les liens d'affiliation
- Conformité RGPD
- Intégrations Premium
If you need to look at the features, check out our review of MonsterInsights.
What to do Once You Know How to Create a Website
Now that you know how to create a website, you need to bring people or traffic to your site. Creating a website is actually the easiest part of building an online business. The tricky part is to generate traffic on your site and get people to buy from you consistently.
Notre recommandation est de commencer par les notifications push. Les notifications push sont d'excellents outils pour augmenter votre engagement et vos conversions. Pas convaincu ? Consultez ces ressources étonnantes sur les campagnes de notifications push :
- Comment convertir les abonnés en acheteurs à l'aide des notifications push web
- Comment notifier les abonnés des nouveaux articles WordPress
- Comment envoyer des notifications de réapprovisionnement pour augmenter vos ventes
PushEngage est le logiciel de notification push n°1 au monde. Donc, si ce n'est pas déjà fait, commencez dès aujourd'hui avec PushEngage !


