
Looking for a simple guide to iOS push alert campaigns? iOS push alerts, those handy little messages that pop up on your screen, can be a real game-changer for your business if used properly.
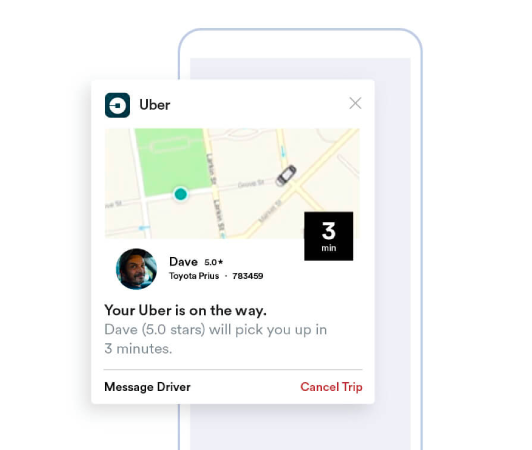
Now picture this: You’re a business owner and you’ve just launched a flash sale on your website and app. How do you get customers to immediately flock to your site? Simple, by sending out an iOS push alert. Just like that, shoppers receive a timely notification about the sale, and your website and app traffic shoots through the roof.
But what is an iOS push alert exactly? Think of it as your personal, pocket-sized billboard. It’s a brief message or notification pushed to iOS devices (iPhones, iPads) from apps installed on the device.
The best part is that you can get all this set up super fast! Sounds interesting, right? Let’s dive in.
What is an iOS Push Alert?
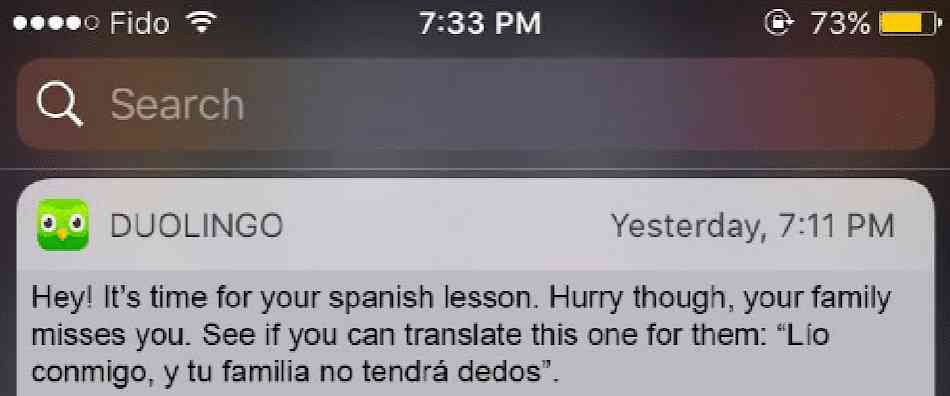
An iOS push alert is akin to a small digital memo that shows up on your Apple mobile devices. It could be from your favorite social media platforms, news distributors, or online shopping apps – all aiming to keep you in the loop, engaged, and connected.
Think of these mini-messages as gentle taps on your iOS device’s shoulder sent via the Apple Push Notification service (APNs). It’s almost as if the app is whispering to your device, requesting for your attention. The remarkable aspect of iOS push alerts is that you don’t even need to have the app active, or be using it. As if by a stroke of wizardry, notifications pop-up even on your locked screen, assuring you never bypass essential updates or prompts.
iOS push alerts offer a wealth of benefits. First and foremost, they are an exceptional tool for keeping you informed with up-to-the-minute information. Picture an alert from an online shopping app informing you about a current sale.

Additionally, they can save you precious time. Imagine your banking app sending an alert confirming a successful transaction, negating the need to login and check manually. On top of these pragmatic benefits, iOS push alerts enhance your overall app experience by making it more lively and interactive.
Navigating these notifications is made user-friendly by platforms such as PushEngage. Empowered with sophisticated features, PushEngage ensures these bite-sized information pieces serving your interests, reach you timely and are streamlined according to your preferences. Whether it’s notification frequency or the type of alerts; PushEngage places the control in your hands.
Armed with a basic understanding of what iOS push alerts are and their mechanics, let’s delve deeper into the variety of notifications and unravel how apps harness them to engage and convert their users.
Types of iOS Push Alert Campaigns You Can Use
There are many types of iOS push alerts that can be used to increase interaction with your audience. By understanding these different types, you can improve their effectiveness and create a more personalized and interactive user experience.
- In-App Alerts: These alerts can be sent when a user is actively using your app. For example, an e-commerce app can send an alert about a special discount on an item that the user is interested in. With PushEngage, businesses can easily send these relevant and timely messages to increase user engagement.
- Location-Based Notifications: These alerts are sent based on the user’s geographical location. They are great for businesses like retail outlets or events that want to inform nearby users about exclusive offers. PushEngage makes geo-targeting simple, ensuring businesses can effectively reach their target audience no matter where they are.
- Behavior-Based Alerts: These notifications are sent in response to specific actions taken (or not taken) by the user in the app. For example, if a user adds an item to their cart but doesn’t buy it, a behavior-based alert could remind them. With PushEngage, businesses can precisely manage these types of notifications.
- Timed Notifications: These push alerts are set to be sent at predetermined times and can be used for recurring events or notifications. With PushEngage, these notifications can be scheduled ahead of time, ensuring users stay informed about important updates or events.
A successful push alert campaign needs the right type of notification for its goals. So, if you’re looking to boost your business using iOS push alert campaigns, you need an iOS push notification service with many choices available to optimize your strategy for maximum engagement.
How Does an iOS Push Alert Work?
An iOS push alert is generated when the specific app on your iOS device communicates with the APNs. Once the notification is crafted and sent, APNs routes it to the intended device – all within the space of a few microseconds.
Now let’s dive deeper into the world of iOS push alerts. Consider checking your phone and you immediately see a notification from your favorite news app telling you about breaking news, or your go-to shopping app alerting you about a flash sale. These are the moments when iOS push alerts come into play. These notifications are small messages that apps send to appear on the device’s home or lock screen, even when the app is not currently in use.
iOS push alerts are vital parts of our day-to-day digital interaction. They are powered by Apple’s push notification service, known as APNs. This service coordinates the delivery of notifications from the servers of your apps to your Apple devices. This process ensures that you’re always in the loop, receiving real-time updates from your apps without having to check them manually.
These alerts not only provide information, but also save you time and keep you connected. Using our partner, PushEngage, businesses can send targeted iOS push alerts that enhance user dopamine and engagement levels. For instance, PushEngage-driven notifications can intelligently remind you about the items left in your e-commerce cart or alert you about the arrival of a much-awaited product. In this sense, they enrich the overall user experience by providing optimized and personalized notifications.
Think of it this way: iOS push notifications are like friendly gatekeepers, providing helpful updates right at the doorsteps of your device. And what’s more, their roles are becoming increasingly diverse and exciting with passing time. So, by using a powerful tool like PushEngage, both businesses and users can derive significant benefits from these sophisticated alert systems.
How to Add iOS Push Alerts to Your App
There are fundamentally two types of iOS push alert campaigns:
- An iOS web push alert
- An iOS app push alert
Based on your business, you might be able to send both web and app push notifications. And we highly recommend sending both types of push alerts. But before you create an iOS push alert, you need to select a push notification service. A push notification service is a software that allows you to create push campaigns without any coding.
PushEngageの使用をお勧めします。

PushEngage は世界No.1のプッシュ通知プラグインです。
プッシュ通知は、ウェブサイトのトラフィックとエンゲージメントを自動で増やすのに役立ちます。オンラインストアを運営している場合は、PushEngageが自動eコマースプッシュ通知の作成を支援することで、売上を伸ばすのにも役立ちます。
無料で開始できますが、ビジネスの成長に真剣に取り組んでいる場合は、有料プランを購入する必要があります。また、プッシュ通知サービスを購入する前に、プッシュ通知のコストに関するこのガイドを確認してください。
PushEngageで得られるものを簡単に見てみましょう。
- コンバージョン率の高い自動キャンペーン
- 複数のターゲティングおよびキャンペーンスケジュールオプション
- 目標追跡と高度な分析
- インテリジェントA/Bテスト
- より多くのトラフィックとコンバージョンを獲得するための、実績のあるプッシュ通知テンプレート
- 専任のサクセスマネージャー
ビジネスのトラフィック、エンゲージメント、売上を伸ばしたいのであれば、PushEngageが断然最良の選択肢であることがわかるでしょう。予算が限られている場合は、プッシュ通知で少しクリエイティブになることもできます。
How to Create a Free PushEngage Account
PushEngageにアクセスし、今すぐ無料で始める:をクリックしてください。
無料プランで始めることができます。しかし、最も強力なブラウザ通知を探している場合は、ビジネスニーズに基づいて有料プランを選択する必要があります。必要なプランがわかったら、「開始する」をクリックしてPushEngageアカウントを作成してください。
Sign Up for PushEngage
次に、PushEngageアカウントを作成します。メールアドレスまたはGmail IDでサインアップすることから始めます。

次に、アカウントの詳細を入力します。

そして、プランを購入するためにクレジットカード情報を追加します。

無料アカウントを選択した場合、プランをアップグレードすることを選択するまで、クレジットカードに請求されることはありません。これで、PushEngageダッシュボードにアクセスする準備が整いました。 登録を完了してすぐにアクセスをクリックするだけです。
以前にOneSignalやPushAlertを使用したことがある場合、PushEngageはダッシュボードからよりクリーンなエクスペリエンスを提供することがわかります。OneSignalダッシュボードは高度なキャンペーン向けではありません。そのためには、OneSignalプラグインよりもAPIが必要になります。
How to Add Web App iOS Push Alert Campaigns to Your Website
Let’s start by setting up iOS push alerts from your website. The idea behind this is simple. We turn your website into a simple web app that can send iOS and iPadOS push notifications. This approach is ideal for sending web app push notifications.
Step #1: Add a Web App Manifest to Your Website to Send Web Push Notifications
ウェブアプリマニフェストとは、誰かの携帯電話やコンピューターにインストールされたときに、ウェブサイトのガイドブックのように機能する特別なファイルだと考えてください。JSONという言語で書かれていますが、その部分は心配する必要はありません。
The manifest file contains important information about your Progressive Web App (PWA), like its name, description, icons, and colors. So, when someone adds your website to their home screen or installs it on their device, the browser uses this manifest to know how your app should look and behave. This allows you to send PWA push notifications.
たとえば、マニフェストは、ホーム画面やアプリドロワーでアプリに使用するアイコンをブラウザに指示するため、見栄えが良く認識しやすくなります。また、アプリの色とテーマを指定して、一貫性があり魅力的な外観を提供します。
さらに、マニフェストには、誰かがアプリを起動したときに開かれるURLが含まれています。このようにして、ブラウザはウェブサイトのどのページまたはセクションを最初に表示するかを知ることができます。
マニフェストファイルの作成は、面倒な作業を代行してくれるオンラインツールで迅速に行うことができます。この無料アプリマニフェストジェネレーターを使用して、数回のクリックとコーディングなしでウェブアプリマニフェストを構築することをお勧めします。
マニフェストが準備できたら、通常は「manifest.json」という名前を付けて、ウェブサイトのルートフォルダーにアップロードします。
要するに、ウェブアプリマニフェストは、人々がデバイスでウェブアプリを使用するときに、見た目と感触をちょうど良くするためのマニュアルのようなものです。ウェブサイト訪問者にとって優れたユーザーエクスペリエンスを作成するための不可欠な部分です。
典型的なマニフェストは、次のようなものになります。
{
	"name": "PushEngage",
	"short_name": "PushEngage",
	"start_url": "/",
	"display": "standalone",
	"theme_color": "#3b43ff",
	"background_color": "#ffffff",
	"icons": [
		{
			"src": "icon/icon-128x128.png",
				"sizes": "128x128",
				"type": "image/png"
		},
		{
			"src": "img/icon-192x192.png",
			"sizes": "192x192",
			"type": "image/png"
		},
		{
			"src": "img/icon-512x512.png",
			"sizes": "512x512",
			"type": "image/png"
		}
 	]
}
マニフェストファイルをウェブサイトサーバーのルートフォルダーに追加したら、ウェブサイトのHTMLヘッドにコードスニペットを追加する必要があります。スニペットは次のようになります。
<link rel="manifest" href="/manifest.json">WordPress を使用していて、このコード スニペットをサイトのヘッダーに追加する方法がわからない場合は、WPCode を使用してマニフェスト ファイルをアップロードできます。これは、WordPress の 最高のコード スニペット プラグインの 1 つです。
Step #2: Install PushEngage to Your WordPress Site
You’re done creating your account. So, head over to the PushEngage dashboard and follow along.
NOTE: If you’re not running a WordPress site, you should check out our other installation guides.

サイト設定 » サイト詳細をクリックし、セットアップ手順はこちらをクリックボタンをクリックしてください:

WordPressタブをクリックし、PushEngage WordPressプラグインをインストールボタンをクリックして、ウェブサイトにプラグインをインストールしてください。

クールな点: PushEngage アカウントを作成したときに、すでにウェブサイトを PushEngage アカウントと同期しています。そのため、PushEngage ダッシュボードのインストールリンクをクリックして、PushEngage WordPress プラグインをウェブサイトに自動的にインストールしてください。
ステップ3:WordPressウェブサイトとPushEngageの接続
PushEngage WordPress プラグインのインストールと有効化が完了すると、PushEngage のオンボーディング ウィザードが表示されます。

ウィザードは非常にわかりやすいです。新規ユーザーの場合は、新規?無料アカウントを請求をクリックしてください。すでにサインアップ済みの場合、既存のアカウントを接続をクリックしてください。
次に、サインアップ中にサイトを登録した場合、登録済みサイトを接続の下にあるサイトを選択ドロップダウンからサイトを選択できます:

または、 プレミアムプラン以上をお持ちの場合は、新規サイトを登録をクリックして新しいサイトを追加できます。次のステップでは、オンボーディングウィザードが他の 必須のWordPressプラグインをインストールするように促します。

各ステップを正しく実行すると、ウィザードからこの成功メッセージが表示されます。

これで、キャンペーンやプッシュ通知ポップアップモーダルを作成する準備が整いました。
Step #4: Test Your Website Manifest
それでは、ウェブアプリをテストし、すべてがスムーズに動作していることを確認する手順を説明します。
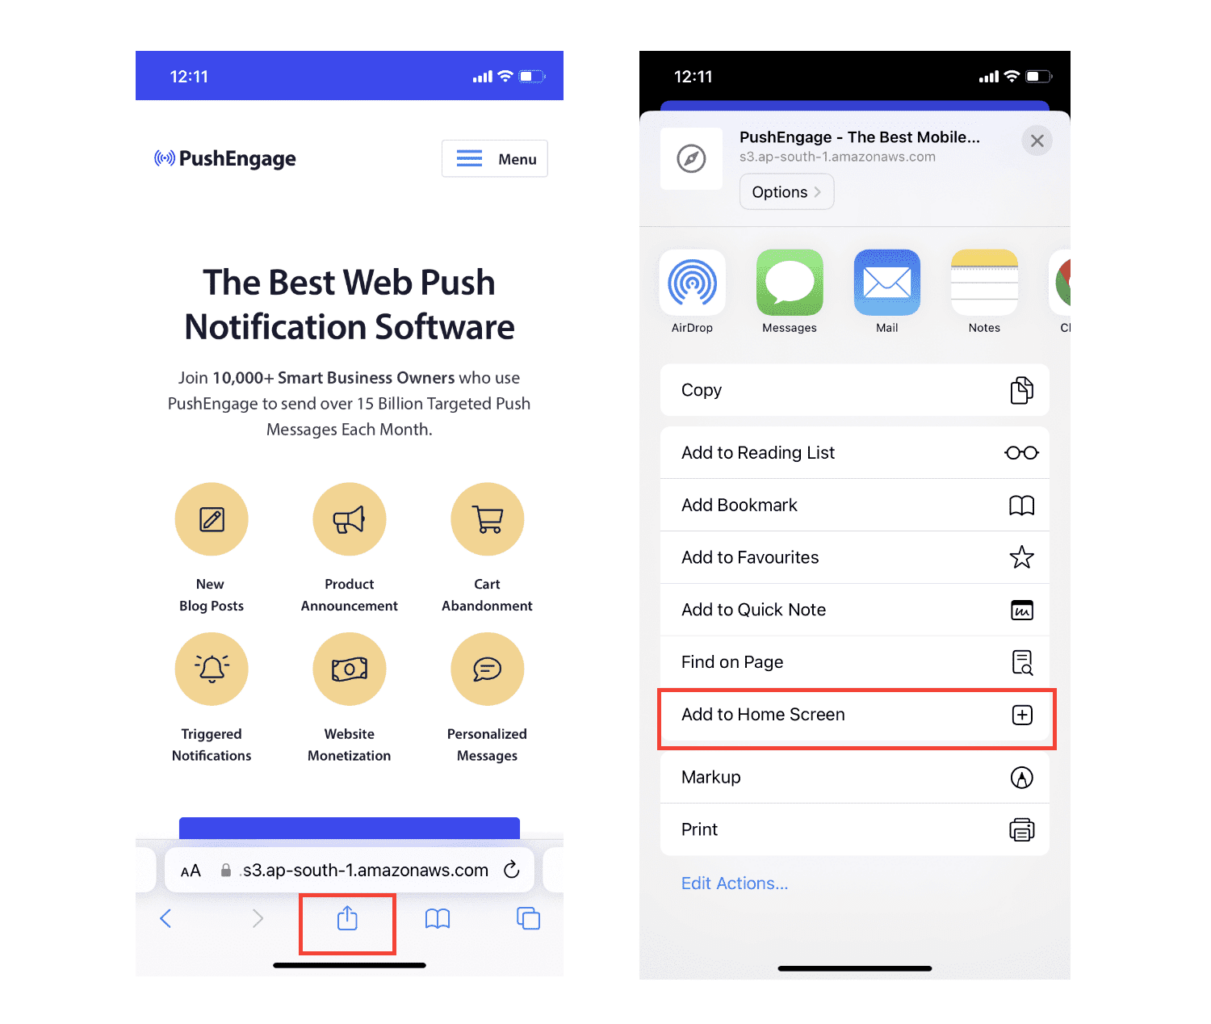
まず、iPhone または iPad の Safari ブラウザを使用してウェブサイトを開きます。デバイスで iOS 16.4 以降を実行していることを確認してください。ウェブサイトが読み込まれると、上向きの矢印が付いた四角形の 共有 ボタンが表示されます。そのボタンをタップして共有メニューを開きます。
共有メニューで、ホーム画面に追加 というオプションを見つけるはずです。そのオプションをクリックしてください。
これで、App Store からダウンロードした他のアプリと同様に、ウェブアプリがデバイスの ホーム画面 に保存されます。
すべてが正しく設定されていれば、ホーム画面からアプリを開いても、Safari ブラウザでは開かなくなります。代わりに、iPhone または iPad で通常のアプリを使用しているような感覚になります。
ユーザーがアプリからウェブプッシュ通知を受信できることを知らせるには、画面にバナーを表示できます。このバナーは、アプリを ホーム画面 に追加してウェブプッシュ通知を購読するように促します。これは、ユーザーをアプリに引き付け、重要な更新情報を受け取るための便利な方法です。
したがって、これらの手順に従えば、iOS デバイスのユーザーにスムーズでアプリのようなエクスペリエンスを提供する準備が整います。プッシュ通知のテストに関する完全なチュートリアルについては、iOS ウェブプッシュ通知に関するドキュメントを確認してください。
How to Add Mobile App iOS Push Alert Campaigns to Your App
The easiest way to send mobile iOS mobile app push alerts from your native iOS app is to use the PushEngage iOS SDK. Right till now, you had to use skeleton SDKs to send app push notifications. The problem with using those SDKs is that they are pretty bare bones.
理論的には、それらを使用してあらゆる種類のモバイルアプリプッシュキャンペーンを送信できます。しかし、それには以下を構築する必要があります。
- キャンペーンを管理するためのインターフェース
- キャンペーンパフォーマンスを追跡するための分析スイート
- リッチメディアおよびアプリ内リダイレクトリンク(またはディープリンク)のより良いサポート
- マーケティングチームと開発チームの両方を連携させるプロセス
すべては、単一の成長チャネルを導入するためです。古いツールを使用してモバイルアプリのプッシュ通知を送信することは、面倒で、高価で、リソースを大量に消費し、時間がかかります。そしてもちろん、構築したすべてを開発および管理するには、チームに深いコーディングスキルが必要です。
PushEngageのAndroidおよびiOS SDKを使用すると、同じ信頼性の高いソフトウェアを使用してモバイルアプリプッシュを送信し、優れた配信率を実現できます。しかし、アプリとのカスタム統合を非常に簡単に構築できる、いくつかのレイヤーをその上に構築しました。そして、PushEngageはSDK全体を管理します。そのため、統合の管理に多大な時間とお金を費やす必要さえありません。
あなたがする必要があるのは、構築することだけです!
PushEngageのSDKを使用してモバイルアプリプッシュ通知を送信するようにアプリを設定すると、PushEngageダッシュボードから直接ブロードキャスト通知を送信できます。はい、アプリにコードを追加し、アプリとPushEngage API間のコネクタを開発する必要があります。しかし、それが完了すれば、次のような、あらかじめ構築されたソフトウェアインターフェイスからモバイルアプリプッシュキャンペーンを簡単に作成できます。
- エンゲージメントの高いプッシュキャンペーンタイプ
- コンバージョン率の高い実績のあるキャンペーンテンプレート
- 公開するたびにコンテンツを宣伝するための自動キャンペーン
- 複数のターゲティングおよびキャンペーンスケジュールオプション
- 補完的な成長チャネルとしてのWebプッシュキャンペーン
- データに基づいたパーソナライゼーションを使用したオーディエンス維持率の向上
- 目標追跡と高度な分析
- スマートA/Bテスト
- 専任のサクセスマネージャー
And so much more. PushEngage takes the pain out of developing Android and iOS mobile push campaigns for your app.
We created a detailed step-by-step guide to setting up iOS app push notifications for PushEngage. Go check that out to start sending iOS app push alerts right away.
キャンペーンをパーソナライズする方法
キャンペーンを作成する前に、セグメントとオーディエンス グループを設定して、パーソナライズされた プッシュ メッセージを送信する必要があります。
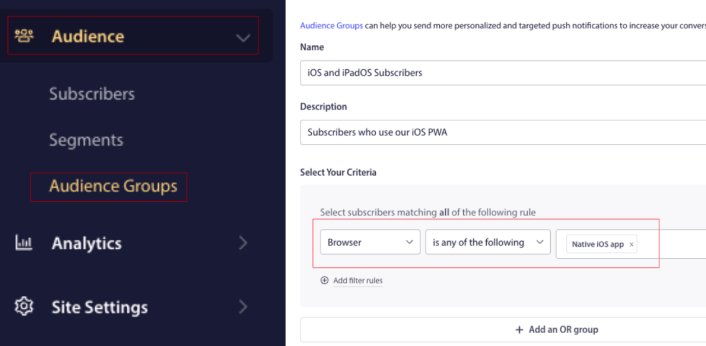
プッシュ通知購読者向けのセグメントとオーディエンスグループを作成することで得られるパーソナライゼーションのレベルを超えるものはありません。 PushEngage » オーディエンスにアクセスし、すぐにセグメントとオーディエンスグループの作成を開始してください。
セグメントタブの下で、新しいセグメントを作成したり、既存のセグメントを編集したりできます:

さらに深いパーソナライゼーションが必要な場合は、オーディエンスグループタブでオーディエンスグループを作成してください:

プッシュ通知セグメントとパーソナライズされたプッシュ通知が初めての方は、セグメントの作成方法に関する記事と、高度なオーディエンスグルーピングに関する発表をご覧ください。
最もクールな点は、iOS および iPadOS ユーザーのみの オーディエンス グループを作成することで、ターゲットを絞ったプッシュ キャンペーンを作成できることです。
そして、このオーディエンス グループをドリップ キャンペーンやブロードキャストに使用できます。
プッシュ通知ドリップ キャンペーンの作成方法
PushEngage ダッシュボードに移動し、キャンペーン » ドリップ自動応答 に進み、新しいドリップ自動応答を作成 をクリックします。

次に、キャンペーンに名前を付け(「ウェルカムドリップ」のような名前をお勧めします)、コンテンツの下で、「ユーザー登録直後に通知を送信」というオプションを選択します。

この時点で、通知の横にある矢印をクリックして、通知の内容を編集できます。
PushEngageのプレミアムまたはエンタープライズプランをご利用の場合、複数の通知を追加して一連の自動ウェルカムメッセージを作成できます。新しい通知を追加をクリックしてコンテンツを編集するだけです。
完了したら、ドリップ設定をクリックし、ウェルカムキャンペーンをすべての購読者に送信するオプションを選択します。

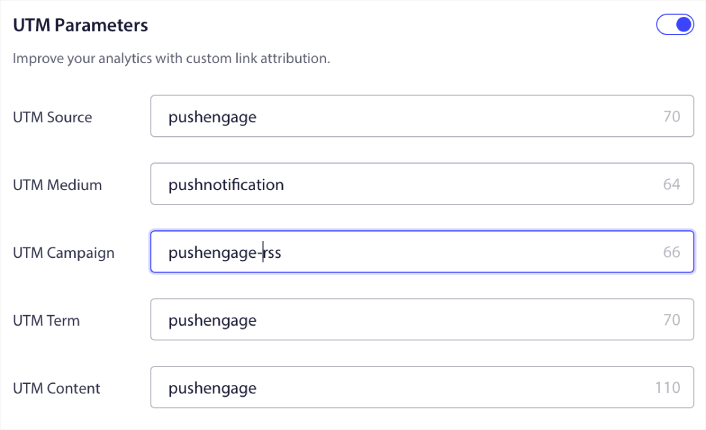
次に、下にスクロールして独自のUTMパラメータを設定し、プッシュ通知を追跡します。
完了したら、上にスクロールして戻り、自動応答を有効にするボタンをクリックします。

これで完了です!
iOSウェブプッシュブロードキャストの送信方法
「PushEngageダッシュボード」にアクセスし、「Campaign » Push Broadcasts」に移動して、「Create a New Push Broadcast」ボタンをクリックします。

「Content」タブで、プッシュ通知のコンテンツを追加します。

また、クリック率を向上させるためにA/Bテストを設定したり、より多くの表示回数を獲得するためにプッシュブロードキャストをスケジュールしたりすることもできます。いずれの場合も、最良の結果を得るために、プッシュ通知のベストプラクティスを確認してください。
iOSプッシュ通知ポップアップモーダルの作成方法
プッシュ通知ポップアップモーダルとは、ウェブサイト訪問者にメッセージや通知を表示するために、ウェブサイトまたはモバイルアプリのインターフェイスの上に表示される小さなウィンドウのことです。
ポップアップモーダルは、さまざまなイベントによってトリガーされる可能性があります。ページ訪問時、スクロール深度時、さらにはボタンクリックのようなカスタムアクション時にトリガーされるようにポップアップを設定できます。
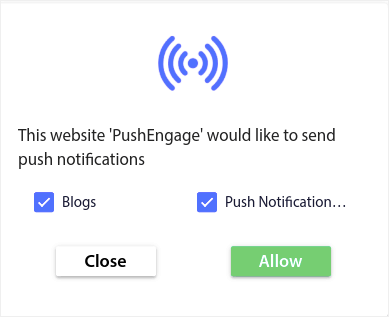
通常、ポップアップモーダルには、「購読」や「許可」などの行動喚起が表示され、訪問者からプッシュ通知を送信することへの同意を得ます。このチュートリアルに従えば、次のようなポップアップを作成できます。
登録者を直接セグメント化できるポップアップモーダルを作成したり、ジオロケーションやブラウザなどのデフォルト属性で登録者を収集するだけの通常のポップアップを作成したりできます。
WordPressダッシュボードに戻ります。PushEngage » デザインに移動します。
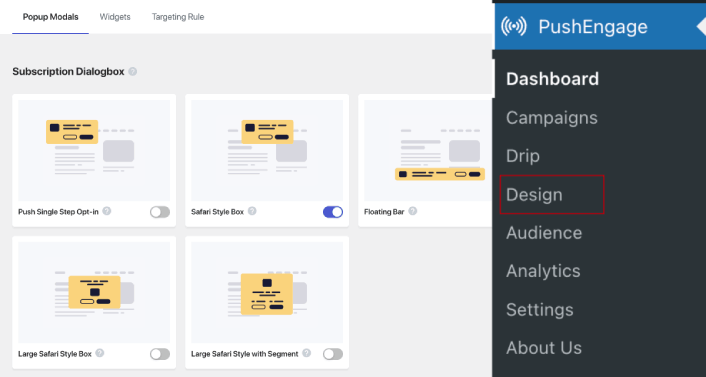
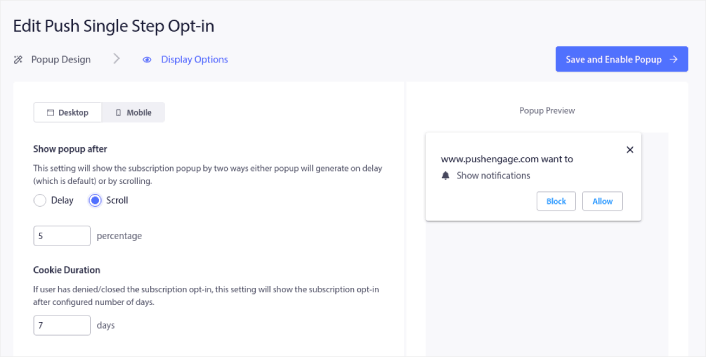
そして、好きなだけ多くのポップアップモーダルを作成できます。もちろん、各ポップアップモーダルの表示オプションの下で、異なる時間にトリガーされるようにすることができます。
ここでのアイデアは、訪問者に購読する確かな理由を与えることです。そのためのヘルプが必要な場合は、カスタムプッシュ通知オプトインを作成する方法 に関する記事を確認してください。
よりターゲットを絞ったポップアップモーダルを作成したい場合は、ターゲティングルールタブの下にあるターゲティングルールを使用できます。
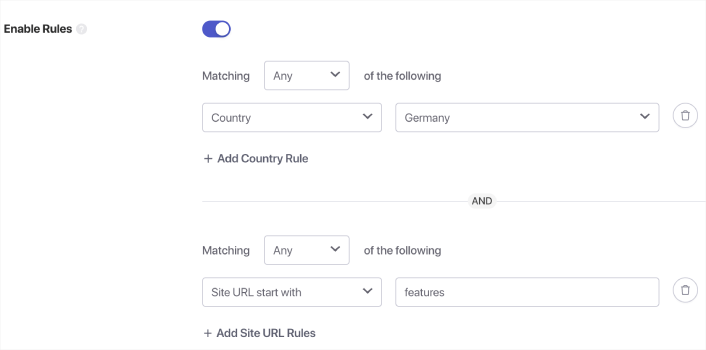
これらはグローバルなターゲティングルールであり、個々のポップアップモーダルのターゲティングルールよりも優先されます。ただし、必要に応じて、それらを編集することで、各モーダルに堅牢なターゲティングルールを作成できます。
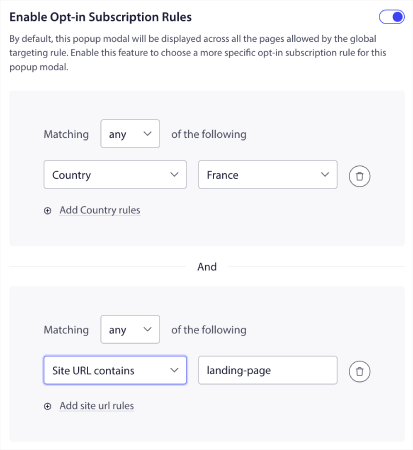
たとえば、さまざまな国の訪問者をターゲットにするために、さまざまな言語でポップアップモーダルを作成できます。
開始するためにクリック率の高いテンプレートが必要な場合は、コンバージョン率の高いプッシュ通知オプトイン に関するこの記事を確認してください。
What to Do Before You Send iOS Push Alerts
ほぼ完了です。
Before you start sending web push notifications for iOS and iPadOS, you’ll need to set up a subscription opt-in for your website. Your opt-in will convert web visitors into push notification subscribers. So, this is a critical element.
インスピレーションが必要な場合は、コンバージョン率の高いプッシュ通知オプトインに関するこの記事を確認できます。オプトインの設定が完了したら、サイトは登録者情報を収集できます。しかし、オプトインが正常に機能していることをどのように確認しますか?
したがって、賢明なのは、ウェルカムプッシュ通知を設定することです。
ヒント: 本格的なプッシュ通知のテストに時間をかけるべきです。これにより、最も一般的な問題がトラブルシューティングされ、後で問題を解決しようと時間を無駄にすることはありません。
What to Do After You Send iOS Push Alerts
今回は以上です、皆さん!
この記事がお役に立った場合は、ぜひ下記のコメント欄にご記入ください。
プッシュ通知の開始は intimidating に見えるかもしれません。しかし、目標追跡と分析に注意を払っていれば、大丈夫なはずです。さらに重要なのは、プッシュ通知キャンペーンの助けを借りて、より多くの利益を得られることです。開始に役立つクールなリソースをいくつか紹介します。
- リターゲティングプッシュ通知を使用して収益を2倍にする方法
- プッシュ通知の並べ替え方法と、成果の出るキャンペーンの見つけ方
- プッシュ通知購読者リストをクリーンアップする方法(簡単)
- RSSプッシュ通知を自動送信する方法
- プッシュ通知を使用してニュースサイトを宣伝する方法
- クロスセルプッシュ通知を使用して売上を2倍にする方法
- 閲覧放棄プッシュ通知の使用方法(4つのステップ)
プッシュ通知が初めての場合は、PushEngageを試してみてください。PushEngageは市場でNo.1のプッシュ通知ソフトウェアです。あなたのキャンペーンは安全な手に委ねられます。
ですので、まだの場合は、今すぐPushEngageを使い始めましょう!


