Looking for a guide on how to send Safari push notifications that can actually grow your business?
Automated notifications are single push notifications or a series of push notifications that keep working in the background. Unlike push notification broadcasts, they work without any manual action on your part. You can simply set them up once and they’ll keep working forever.
しかし、どのような通知を送信すべきでしょうか?ビジネスに効果があるかどうかをどのように判断しますか?そして、どのように始めればよいのでしょうか?
In this article, we’ll show you how to use simple, actionable tricks to bring in traffic and sales on autopilot using Safari push notifications.
よろしいですか?早速始めましょう。
A Breakdown of Safari Push Notifications
In the broadest sense, there are 3 types of Safari push notifications:
- Broadcast notifications
- Drip push notification campaigns
- Triggered push notification campaigns
Broadcasts are push notifications that you send out as a single notification. You can schedule them, but they will only fire off once. Triggered campaigns involve setting up a push notification, defining a trigger to set it off, and a workflow to control its scheduling. Automated drip notifications are a series of notifications that set off automatically at specific or when specific conditions are met.
For all intents and purposes, triggered campaigns and automated drip campaigns look the same from the outside. The critical difference is that trigger campaigns are way more flexible and customizable. If you consider that push notifications cost way less than most other channels, it makes perfect sense to use a combination of all three to grow your business.
If you’re new to push notifications, we strongly recommend starting your journey using proven templates.
NOTE: Most triggered campaigns need some experience with development. You’d need to use an API to make the best use of triggered notifications. However, there are some triggered notifications that you can send straight off the rack. If you’re curious, check our article on eCommerce push notifications for a better idea.
The Best Service to Send Safari Push Notifications
まず、多くの「無料プッシュ通知サービス」は実際には無料トライアルであることをお伝えします。ここにリストされているプロバイダーのいくつかはトライアルソフトウェアですが、他のいくつかは永久無料プランを提供しています。
Firebase Cloud Messaging (FCM) のようなフリーミアムオプションもありますが、それは実際には良い選択肢ではありません。なぜFCMがPushEngageのようなサービスプロバイダーに勝てないのかについては、こちらで詳しく読むことができます。しかし、今は私たちの言葉を信じて、より良い選択肢に進んでください。
PushEngageの使用をお勧めします。

PushEngage は世界No.1のプッシュ通知プラグインです。
プッシュ通知は、ウェブサイトのトラフィックとエンゲージメントを自動で増やすのに役立ちます。オンラインストアを運営している場合は、PushEngageが自動eコマースプッシュ通知の作成を支援することで、売上を伸ばすのにも役立ちます。
無料で開始できますが、ビジネスの成長に真剣に取り組んでいる場合は、有料プランを購入する必要があります。また、プッシュ通知サービスを購入する前に、プッシュ通知のコストに関するこのガイドを確認してください。
PushEngageで得られるものを簡単に見てみましょう。
- コンバージョン率の高い自動キャンペーン
- 複数のターゲティングおよびキャンペーンスケジュールオプション
- 目標追跡と高度な分析
- スマートA/Bテスト
- プッシュキャンペーンテンプレート
- 強力なセグメンテーションオプション
- 専任のサクセスマネージャー
そして、これはほんの一部です。さらに進む前に、PushEngageの全機能リストを確認してください。
しかし、PushEngageの最も魅力的な点は、永久無料プランで始めることができることです。そして、複数のカスタマイズオプションを使用して、実際にビジネスを成長させるためにそれを使用できます。
ビジネスのトラフィック、エンゲージメント、売上を伸ばしたいのであれば、PushEngageが断然最良の選択肢であることがわかるでしょう。予算が限られている場合は、プッシュ通知で少しクリエイティブになることもできます。
注意: WordPressサイトを実行している場合は、 PushEngage WordPressプラグインをインストールして有効化する必要があります。
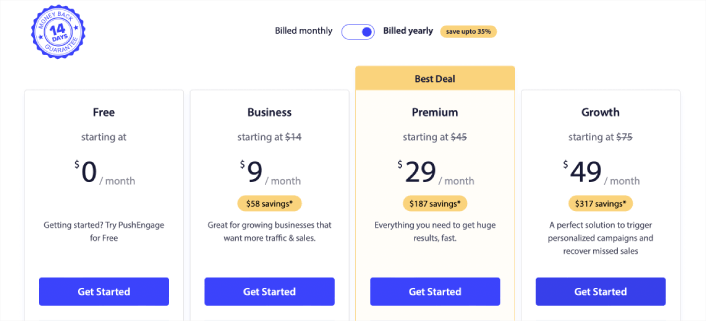
The free version allows up to 200 subscribers and 30 lifetime notifications. That’s good enough to get your business to a point where you can easily afford the paid plans that start at $9/month for 100,000 subscribers.
And don’t worry if you know absolutely nothing about coding. You can install PushEngage using one of the many installation guides for any website and CMS.
How to Send Safari Push Notifications
Now that you know what Safari push notifications are and what service you need to send them, it’s time to check out how to send different notifications. For practical purposes, we aren’t talking about custom triggered campaigns you can create using an API service here. If you’re more interested in custom notifications, you should check out our documentation.
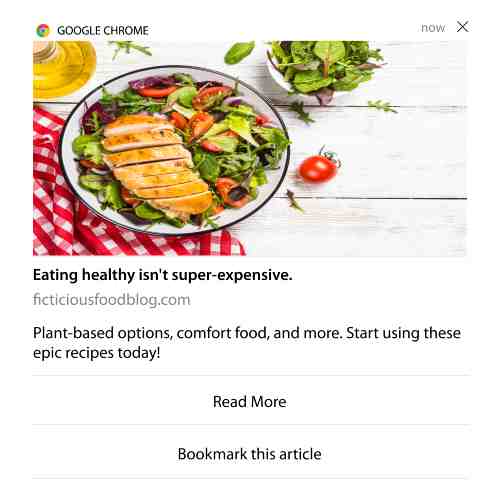
#1. Safari Push Notifications for Welcome Campaigns
A welcome push notification campaign is a simple push notification meant to appreciate any new subscriber.
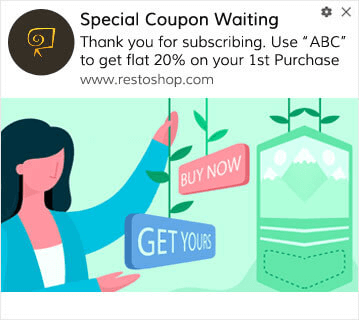
You can also an offer or gift for subscribing to your push notifications. This is pretty common with a lot of our customers. You can use your welcome push notifications to:
- ウェルカムクーポンを共有する
- プレミアム機能を提供する
- 送料無料を提供する
- 無料ギフトを提供する
- ウォークスルーで購読者をオンボーディングする
それでは、PushEngageを使用して最初のウェルカムプッシュ通知を設定しましょう。
PushEngageでウェルカム通知を有効にする方法は次のとおりです。PushEngageダッシュボードに移動し、Campaign » Drip Autorespondersに移動して、Create New Drip Autoresponderをクリックします。

次に、キャンペーンに名前を付け(「ウェルカムドリップ」のような名前をお勧めします)、コンテンツの下で、「ユーザー登録直後に通知を送信」というオプションを選択します。

この時点で、通知の横にある矢印をクリックして、通知のコンテンツを編集できます。PushEngageのPremiumまたはEnterpriseプランをお持ちの場合は、複数の通知を追加して自動ウェルカムメッセージのシーケンスを作成できます。Add New Notificationをクリックして、コンテンツを編集するだけです。
完了したら、ドリップ設定をクリックし、ウェルカムキャンペーンをすべての購読者に送信するオプションを選択します。

次に、下にスクロールして独自のUTMパラメータを設定し、プッシュ通知を追跡します。

完了したら、上にスクロールして戻り、自動応答を有効にするボタンをクリックします。

Now you know why welcome push notification is important. You also know how to set it up. Go ahead and activate welcome push notifications to re-engage new subscribers or check out this article on website welcome messages for inspiration.
#2. Abandoned Cart Safari Push Notifications
ショッピングカート放棄とは、潜在顧客が商品をショッピングカートに追加しても、チェックアウトプロセスを完了しないことです。
あなたの仕事は、カート放棄を可能な限り減らすことです。
One way to recover your lost sales is to use a cart abandonment Safari push notifications. Cart abandonment recovery campaigns target subscribers with an abandoned cart and send them follow-ups, reminders, offers, coupons, and discounts.

シンプルなアイデアです:できるだけ多くの人に何かを購入してもらうこと。
カート放棄プッシュ通知は、あなたの収益に非常に現実的な影響を与えます。例えば、WickedWeasel は、カート放棄プッシュキャンペーンから毎週 $2,000 ~ $4,000 の追加売上を得ています。
それでは、最初のカート放棄キャンペーンを PushEngage で設定しましょう。
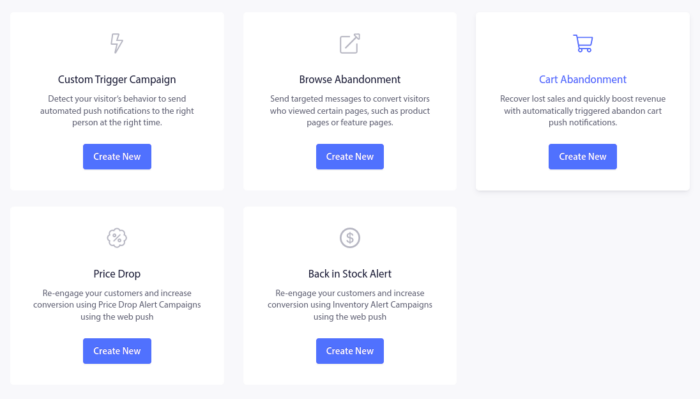
PushEngageダッシュボードにアクセスし、「キャンペーン」→「トリガーキャンペーン」に移動して、「新しいトリガーキャンペーンを作成」をクリックします。

次に、「カート放棄」テンプレートを選択し、「新規作成」をクリックします。
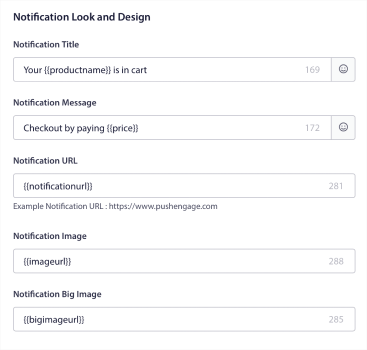
And you can start drafting an abandoned cart autoresponder. Under the Content tab, you can create a series of push notifications:
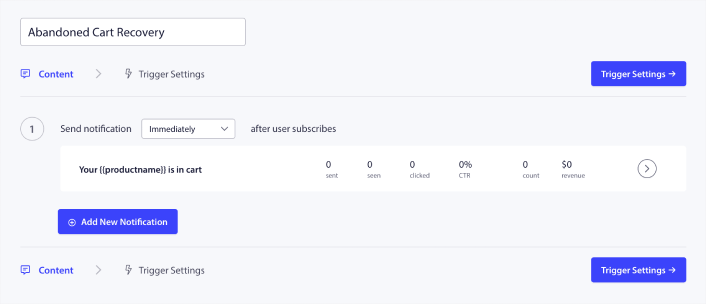
通知を編集するには、横にある矢印をクリックするだけで、プッシュ通知をカスタマイズできます。
For a more tutorial, check out this article on how to set up abandoned cart push notifications.
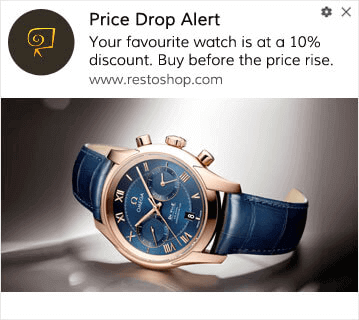
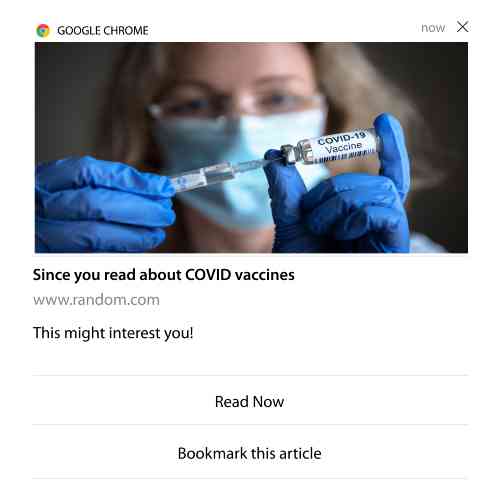
#3. Browse Abandonment Safari Push Notifications
閲覧放棄は、まさにその名の通りです。ウェブサイトの訪問者があなたのウェブサイトを閲覧していて、突然離れることを決定した場合です。これらのインシデントは、他のベンダーからはファネル放棄とも呼ばれます。
閲覧放棄は、ほぼすべての業界で非常に一般的な発生状況です。
そして、ランダムなユーザーにウェブサイトに滞在してもらうためのインセンティブを与える方法がないため、これを削減または制御することは非常に困難です。ここで閲覧放棄キャンペーンが非常に強力になります。
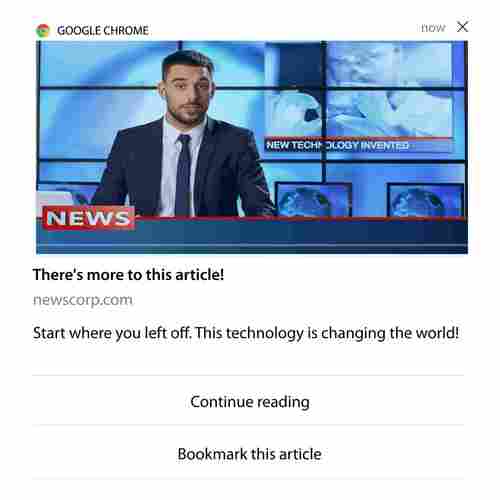
これは、パブリッシャー向けの閲覧放棄プッシュ通知の例です。
PushEngage の素晴らしい点は、ほぼすべての業界でキャンペーンを設定できることです。したがって、SaaS および旅行ウェブサイト向けの閲覧放棄プッシュ通知を送信することもできます。
では、閲覧放棄キャンペーンをどのように設定するのでしょうか?
カート放棄では、プッシュ通知をトリガーするための非常に明確なパラメータがあります。閲覧放棄の場合、次のようなパラメータを検討するとよいでしょう。
- ウィッシュリストに商品を追加した
- 同じ商品を X 回以上見た
- 同じカテゴリで X 個以上の商品を見た
- サイトで特定の商品を検索した
- 離脱する前に少なくとも X 分間サイトに滞在した
eコマースサイト向けのこのキャンペーンの背後にある考え方は、購読者に商品をカートに追加してもらうことです。パブリッシャーの場合は、閲覧していた記事のクリックまたはダウンロードになる可能性があります。
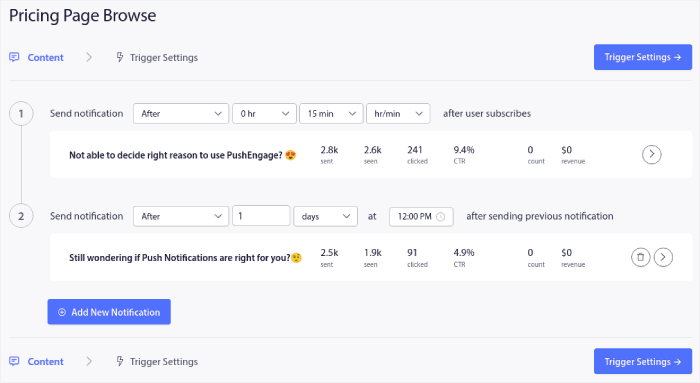
Head over to the PushEngage dashboard again and go to Campaign » Triggered Campaigns to create a new triggered campaign:

Then, create a new Browse Abandonment campaign by click on the Create New button:

Next, you’ll be able to set up your entire sequence of push notifications along with a delay in between each notification:
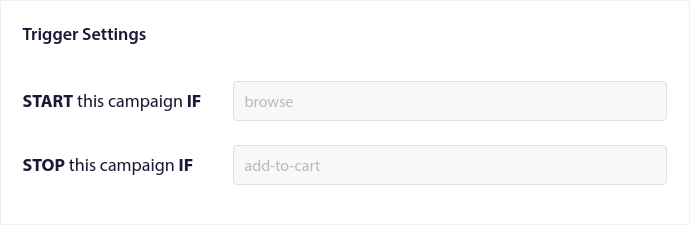
If you’re new to push notifications, you should check out our article on push notification best practices. When you’re happy with your push notification content, click on Trigger Settings. You’ll see that the conditions for a browse abandonment campaign have been pre-configured into the sequence.
Click on the Integration Code button to get the code snippet you need to embed the browse abandonment campaign on your site.
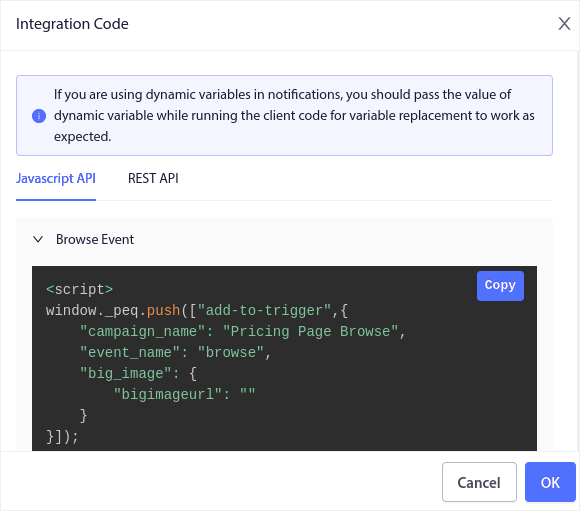
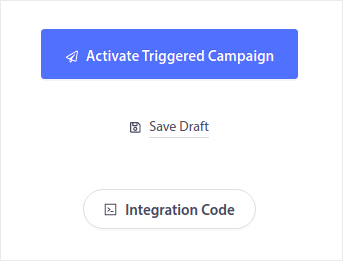
Then, copy the code and paste it into your site. You want to paste that code into the HTML <head> section of the page that you want to track. Finally, click on the Activate Triggered Campaign button:
これで完了です!
#4. RSS Feed Push Campaigns
RSS Auto Push を使用すると、RSS を介して通知を自動化できます。
PushEngage は 10 分ごとに RSS フィードに追加された新しい投稿をチェックします。新しい投稿が見つかった場合、PushEngage はそれをプッシュ通知に変換し、すべての購読者に送信します。最も良い点は、それが完全に自動で行われることです。
RSS フィードキャンペーンは、パブリッシャーやニュースサイトに最適です。
あなたが大手パブリッシャーで、30分に1回以上の投稿を行う場合、PushEngageは2つの投稿通知の間に5分間の遅延を維持します。
さらに進む前に、より多くの素晴らしいヒントやコツについては、RSSフィードの使用方法に関するこの記事をご覧ください。
Now, let’s go set up RSS push notifications on PushEngage.
Head over to Campaign » RSS Auto Push and just turn it on:
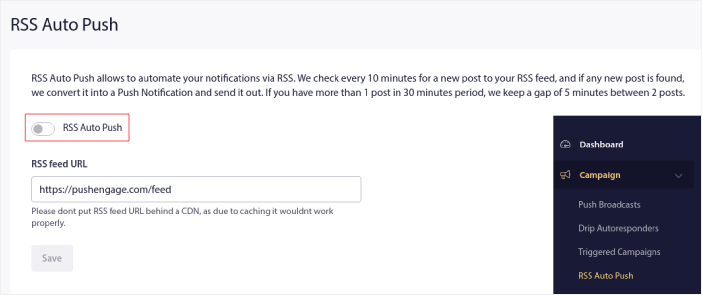
RSSフィードのURLを貼り付ける必要があります。WordPressサイトの場合、通常は次の形式になります。
Then, click on Verify RSS. And finally, click on Save.
これで完了です。設定はすべて完了しました。新しい投稿を公開するたびに、すべての購読者に自動的に送信されます。
#5. Automated Re-engagement Notifications
しばらくの間、コンテンツにエンゲージしていない購読者に対して、自動再エンゲージメントキャンペーンを設定できます。
しかし、そもそもなぜそれを行うのでしょうか?
例えば、どうでしょうか?
- 新規顧客獲得コストは、既存顧客維持コストの5倍です。
- 個人の好みをすでに理解している既知のオーディエンスをターゲットにし、リマーケティングするのは簡単です。
- 長期的には、エンゲージした顧客は、ブランドとほとんど接続しない人よりも会社により多くのビジネスをもたらします。
Ofertiaは、パーソナライズされた取引を提供するプッシュ通知を使用して、リピートユーザーを39%増加させることに成功しました。彼らだけではありません。これをeコマースウェブサイトに効果的に使用できます。
購読者を再エンゲージさせるための方法はたくさんあります。
But one of the most effective ways is to use Segmentation. Using dynamic segments, you can figure out a lot about your subscribers and send them personalized content that they’ll love.
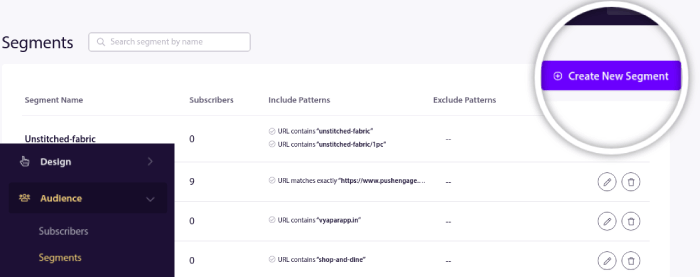
PushEngageダッシュボードで、Segmentationに移動し、新しいセグメントを作成します。
これにより、行動や閲覧パターンに基づいたセグメントを作成できます。特定のセグメントが自動プッシュ通知を受信するタイミングを決定するAND/OR操作のシーケンスを設定することも可能です。
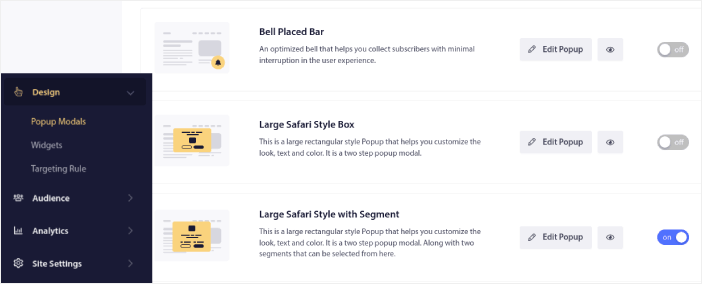
プッシュ通知を購読する際にユーザーをセグメント化することもできます。Design » Popup Modalsに移動し、Large Safari Style with Segmentを選択してください。
ユーザーをセグメント化するさらに多くの方法が必要な場合は、PushEngage Javascript APIを使用して、ユーザーのアクションに基づいてカスタムセグメントを作成できます。
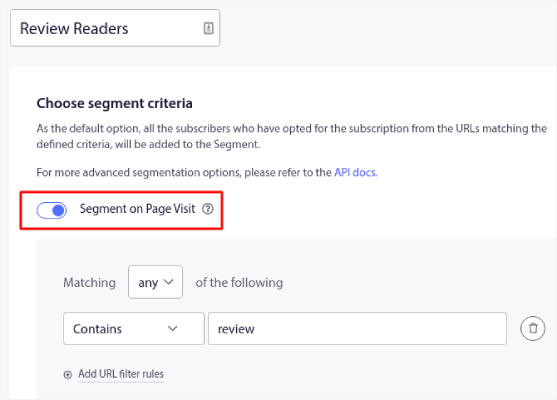
#6. ページ訪問トリガーキャンペーン
ページ訪問トリガーは、プッシュ通知セグメントの拡張機能です。ウェブ訪問者が特定のフレーズまたはパターンを含むURLを閲覧したときにセグメントを作成するだけです。
次に、Audience » Segmentsに移動し、オーディエンスを特定のセグメントに設定するだけです。
これにより、非常にパーソナライズされた自動プッシュ通知を作成できます。
そして、最も良い点は、PushEngageでカスタムセグメントを数分で作成できることです。
#7. クリックからの自動プッシュ通知
PushEngageでは、配信された通知をクリックしたときにトリガーされるプッシュ通知を作成することはできません。
しかし、非常に巧妙な回避策があります。
特定の通知が誘導するURLに基づいてセグメントを作成できます。誰かがこのURLにアクセスするたびに、その人はセグメントに追加され、このセグメントを使用してターゲット通知を送信できます。
プッシュ通知クリックキャンペーンは、基本的にドリップキャンペーンの標準オーディエンスセグメンテーションの拡張機能です。
クリックして購読するボタンの作成方法に関するチュートリアルをご覧ください。
#8. 反復自動プッシュ通知
たとえば、次のようなものがあると想像してください…
- フリーマーケットの週次セール、
- または週末セール;
- または在庫一掃セール;
- または月次フラッシュセール。
すべてのイベントに対して手動でプッシュ通知を作成するのは、どれほど不便でしょうか?
幸いなことに、PushEngageで繰り返し通知を設定できます。
繰り返し通知は、定期的なイベントのためのスケジュールされた自動プッシュ通知です。一度設定し、スケジュールを指定すれば完了です。
これは、MyDealがプッシュ通知を使用している方法の1つにすぎません。ぜひケーススタディ全体をお読みください!
Campaignに移動し、PushEngageダッシュボードに自動通知を追加します。次に、スケジューリングセクションまでスクロールダウンし、Send/Scheduleタブに移動します。
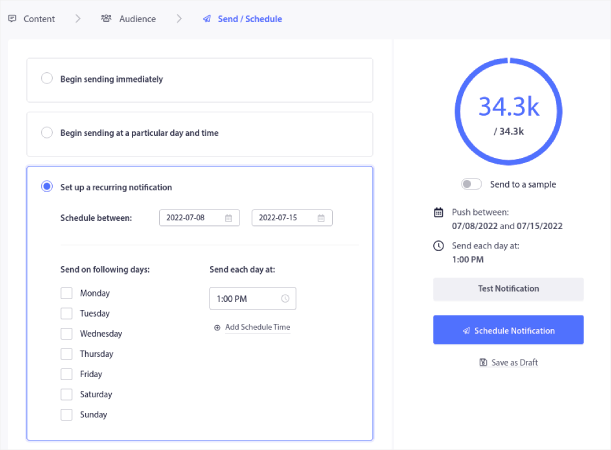
タイミングを設定するだけで完了です!
#9. 購読者タイムゾーン通知
購読者タイムゾーン通知は、その名の通りのものです。購読者のタイムゾーンに自動プッシュ通知を送信します。
なぜこれがそれほど重要なのでしょうか?
Subscriber timezone notifications have higher open rates. Typically, any push notification gets delivered even if your subscriber is offline. These notifications then pile up and get ignored when your subscriber finally comes online.
On the other hand, subscriber timezone Safari push notifications will get delivered when you KNOW your subscriber is most likely online.
プロのヒント: A/Bテストを使用して、購読者にプッシュ通知を送信するのに最適な時間を見つけてください。
購読者タイムゾーン通知は、はるかにパーソナライズされたように感じられます。そして、賢く行えば、ジオロケーションデータと組み合わせて通知をさらにパーソナライズできます。これはまさにPhootoがローカル言語を使用したときに開封率を急上昇させた方法です。
では、PushEngageで購読者タイムゾーン通知を設定しましょう。
新しい通知を作成する際に、スケジューリングオプションに移動し、Send Notifications in Subscriber Timezoneというチェックボックスをクリックします。
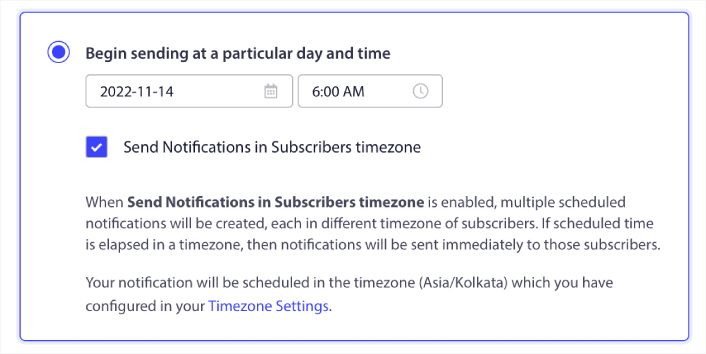
以上です!ドリップキャンペーンについても同様に行う必要がありますが、結果は各キャンペーンのボタンを1回クリックする労力に見合う価値があります。
Pro-Tip: The last two tactics were all about scheduling push notifications. But these two aren’t the only ways to schedule automated push notifications. Check out our article on how to schedule push notifications for more epic tricks. Also, check out the best times to send Safari push notifications.
#10. Eメールオプトイン通知
Eメールマーケティングは、リードを生成し育成するための最良の方法として長い間考えられてきました。自動プッシュ通知の最も良い点は、それらを使用してより多くのメール購読者を生成できることです。
It’s really simple to set up and using a combination of email and Safari push notifications is way more effective than using one or the other.
ユーザーにメール通知をオプトインするように求めるトリガー通知を送信するだけです。
カスタムCTA(コールトゥアクション)ボタンを作成し、ボタンのURLとして購読リンクを挿入するだけです。本当に必要なのはそれだけです。購読ボタンの取得方法がわからない場合は、そのまま続けてください。
どの通知でも、下にスクロールしてマルチアクションボタンをオンにすることができます。
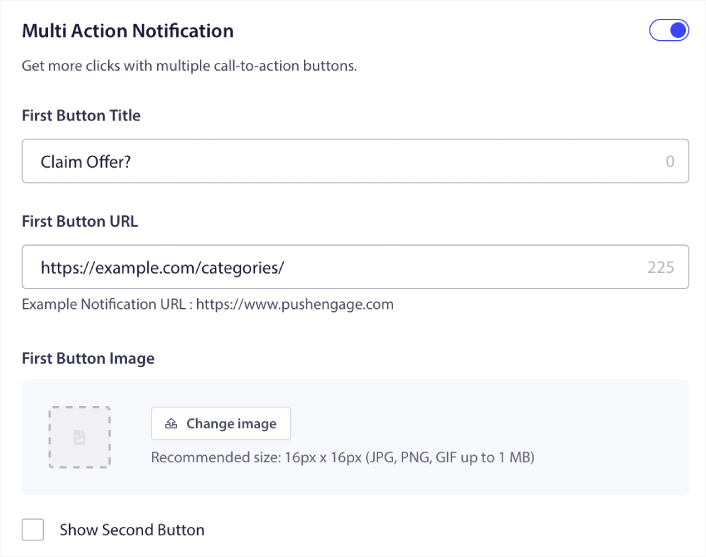
URLは、メールサインアップフォームへのリンクである必要があります。Dripのようなほとんどのメールサービスプロバイダーを使用して作成できます。サインアップフォームの共有オプションをクリックして、そのURLをコピーするだけです。次に、プッシュ通知のボタンURLに貼り付けます。
詳細については、マルチアクションボタンのチュートリアルをご覧ください。Eメールアイコンをボタンに追加して、Eメール通知の購読を求めていることを非常に明確にすることもできます。
プロのヒント: 同じアイデアを使用して、YouTubeチャンネルを成長させることもできます。チャンネルURLの末尾に「?sub_confirmation=1」を追加し、プッシュ通知ボタンのURLに貼り付けるだけです。
プッシュ通知の購読ボタンをクリックするたびに、YouTubeチャンネルにリダイレクトされ、購読するように求められます。
What to do After You Set Up Safari Push Notifications
Safari push notifications don’t guarantee success for your business. As with any marketing tool, you need to test and improve your messaging and your segments. Unfortunately, you can’t A/B test automated notifications directly. But these resources will help you get on the fast track:
- Web通知WordPressプラグインをサイトにインストールする方法
- プッシュ通知のA/Bテストの実施方法(ベストプラクティス)
- 即時トラフィックを獲得するための7つのプッシュ通知のベストプラクティス
- 2022年の最高のeコマースWordPressプラグイン21選(無料および有料)
- 2022年の最高のWordPressニュースプラグイン7選(比較)
また、PushEngageには、かなりの数のインテグレーションが用意されています。Zapierを使用してカスタムトリガーを設定することもできます。これらはかなり高度なキャンペーンであり、組み込みの自動化に慣れてから設定することをお勧めします。
また、PushEngage Javascript APIは非常に柔軟であり、ウェブサイト上のほぼすべての操作に対してカスタムトリガーを設定できることも知っておくべきです。
これらのすべてのリソースを確認すると、PushEngageが市場でナンバーワンのプッシュ通知ソフトウェアであることがわかるでしょう。
まだお済みでない場合は、今日からPushEngageを始めましょう!


