ECサイトの在庫切れ通知を簡単に送信する方法をお探しですか?
ウェブサイトの訪問者があなたの製品を気に入って購入しようとしたが、在庫切れだったとしましょう。在庫が補充されたらすぐに、そのウェブサイトの訪問者に通知を送信する必要があります。これは、在庫切れ通知または在庫アラートとして知られています。
なぜか?簡単です。それは簡単なセールスです。その訪問者はすでにあなたの製品を気に入って購入しようとしました。したがって、彼らが間違いなく興味を持っていることはわかっています。簡単なプッシュ通知は、多くの追加の売上を生み出し、自動操縦でビジネスの収益を増やすことができます。
どのウェブサイトでも在庫切れ通知を簡単に設定できます。しかし、初めて行う場合はかなり混乱する可能性があります。
この記事では、10分以内に在庫切れ通知を設定する方法を説明します。
よろしいですか?
早速始めましょう!
PushEngageを使用して在庫切れ通知を作成する方法
在庫切れ通知の作成に飛び込む前に、知っておくべきことがあります。在庫アラートはかなり高度です。自分でキャンペーンを作成することはできますが、開発者にインストールしてもらう必要があるかもしれません。または、使い慣れている場合は、Googleタグマネージャーを使用してコードスニペットをトリガーできます。
ここでは、PushEngageを使用してサイトの在庫切れ通知を設定します。PushEngageは、世界で最高のプッシュ通知サービスです。
基本的な在庫アラートWebプッシュキャンペーンを作成する方法
PushEngageを使用して、基本的な在庫切れプッシュ通知キャンペーンから始めましょう。後で確認する高度な機能がいくつかあります。今のところ、在庫アラートがどのように機能するかという基本的なことを理解しましょう。
ステップ1:新しい在庫切れアラートを作成する
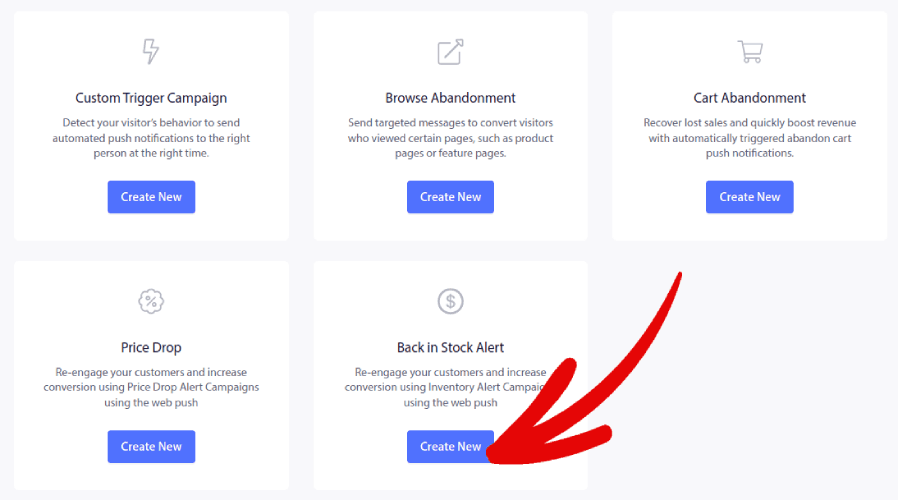
PushEngageダッシュボードに移動し、Campaign » Triggered Campaignsに移動して、Create New Triggered Campaignをクリックします。

次に、Back In Stock Alertsのテンプレートを選択し、Create Newをクリックします。
すると、次のようなキャンペーンを作成するための新しい画面が表示されます。
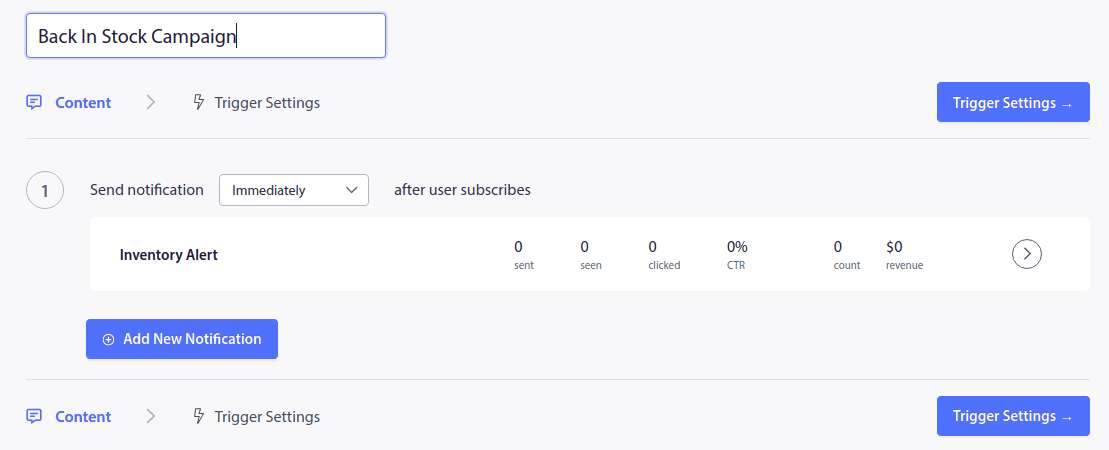
ステップ2:通知を作成する
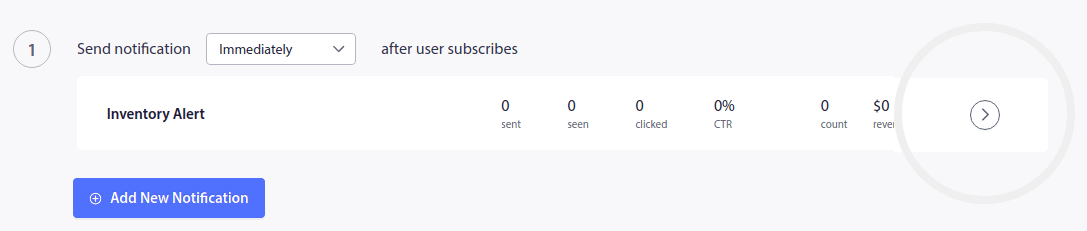
次に、最初の通知を作成するには、通知の横にある矢印をクリックします。
次に、Notification Look and Designの下でプッシュ通知のコピーを編集します。
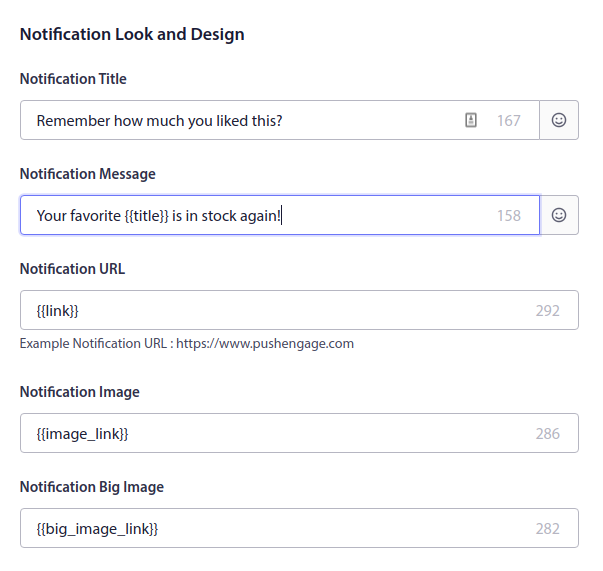
ご覧のとおり、プッシュ通知には{{title}}や{{link}}などのカスタムタグが多数あります。これらのタグは属性と呼ばれます。PushEngage属性については、属性を使用してパーソナライズされたプッシュ通知を送信する方法に関する記事で詳しく説明しています。
簡単に言うと、属性は在庫切れアラートを自動的にパーソナライズするのに役立ちます。これらは、顧客が保存した個人情報や、製品画像、製品名、製品URLなどの製品情報を動的に取得するために使用されます。
これにより、カスタムプッシュ通知を非常に簡単に送信できます。属性の設定については、すぐに詳しく説明します。まず、コールトゥアクションボタンを追加して、最初の通知を完成させましょう。
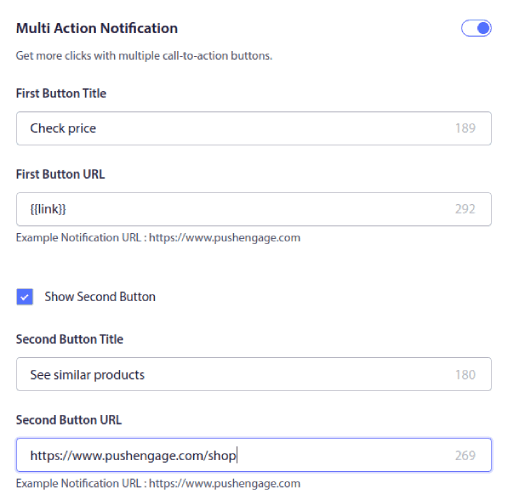
With PushEngage, it’s super easy to create multiple call-to-action (CTA) buttons with different URLs. All you have to do is enable the second push notification CTA by checking Show Second Button.
You can also set a custom Notification Duration:
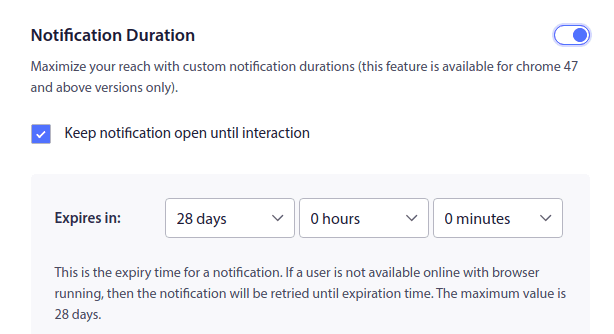
Setting a notification duration allows you to terminate notifications when an offer expires. If you don’t set an expiration date to your notifications, they just keep stacking up in your subscriber’s notification center until they see it. At first glance, this can look super spammy and that’s a great way to lose a lot of subscribers very quickly.
When you’re done, click on Trigger Settings and set Trigger Limits for your campaign:
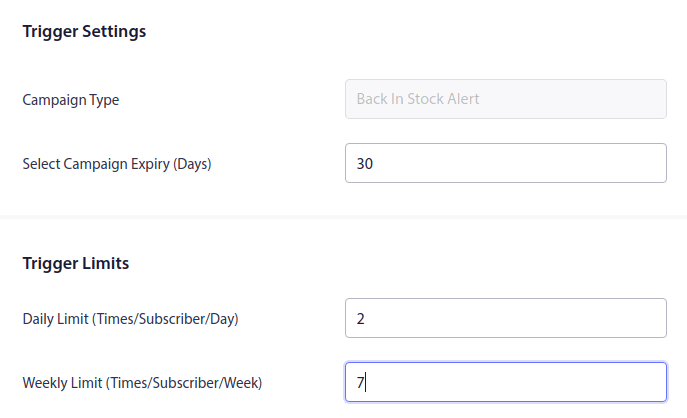
Trigger limits make sure that you don’t spam your subscribers. If you set a daily limit of 2, your subscribers will get two push notifications from you in a day at most in a day.
You can also set up UTM parameters to track push notifications more effectively:

Step #3: Copy the Back-In-Stock Notifications Integration Code
You’re mostly done.
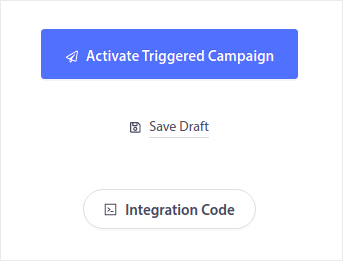
Now, you’ll need to copy the generated code snippet. Click on the ‘Integration Code’ button at the bottom right corner.
Then, just copy the code:
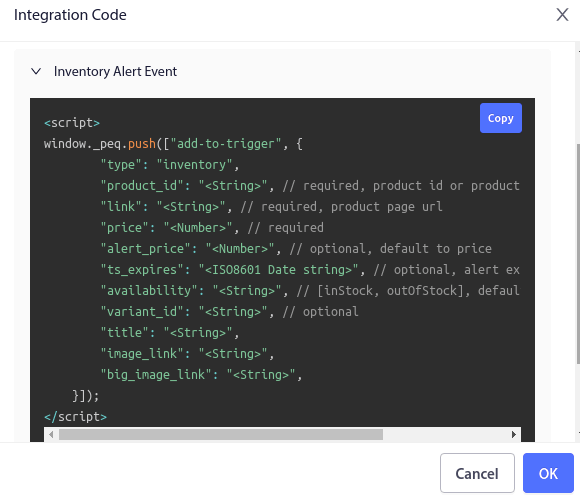
And edit it as required.
You will need to pass the variables from your end for the following as mentioned on your website:
- Product ID: This is your product’s unique identity such as the SKU.
- Link/URL: You’ll need to use the product URL as listed on your website.
- Price: This is the current product price (inclusive of all discounts).
- Title: The title is essentially the name of the product.
- Image Link: You’ll need to send the URL for any image you want to display as the brand’s identity. It’s typically the logo or favicon for your website.
- Alert Price (Optional): The alert price is the reduced price that will trigger your back-in-stock notifications.
- ts_expires/ Alert Expiry Date (In ISO Format): You can also set an expiry date for your notifications. This value is set to 28 days by default.
- Availability: This is an optional property and takes “Out Of Stock” as default value in Inventory Alert.
- Variant ID: Again, this is optional. But you can set the exact variant ID in case there are multiple variants to the same product.
- Big Image Link: You’ll need to send the URL for any image you want to display as the product image.
NOTE: You can leave the option to leave a field unchanged because they all have default values. But you’ll need to replace the values for the required fields. For instance, you will need to replace the <String> field for the link property in this code with the actual product URL. The same goes for other fields such as price and product_id.
ステップ 4: サイトにインテグレーションコードを追加する
インテグレーションコードについて理解したら、いよいよウェブサイトにインテグレーションコードを追加する段階です。ほとんどの場合、サイトには「在庫切れの場合通知する」というボタンがあります。購読者がそのようなボタンをクリックすると、自動在庫アラートの購読が完了します。

したがって、誰かがあなたの購読ボタンをクリックしたときに、そのコードスニペットを実行したいと思うでしょう。
ステップ 5: トリガーキャンペーンを有効にする
あとは、「トリガーキャンペーンを有効にする」ボタンを押すだけです。
これで完了です!サイトは自動的に在庫切れ通知を送信するようになります。
次は何をしますか?
マーケティングキャンペーンにおける最大の課題の1つは、プロセスの自動化がいかに複雑になるかということです。通常、学習曲線が非常に急で、設定途中で途中で諦めてしまう可能性が高いでしょう。
幸いなことに、プッシュ通知の設定はそれほど複雑ではありません。また、インスピレーションを得るために、実際に機能する自動キャンペーンに関するこの記事をいつでも確認できます。または、次のような他のeコマースプッシュ通知で始めることもできます。
プッシュ通知の旅を始めるには、PushEngageの使用をお勧めします。PushEngageは市場でNo.1のプッシュ通知ソフトウェアであり、PushEngageを使用して強力な自動通知を簡単に作成できます。
まだの場合は、今すぐPushEngageを始めましょう。


