
Looking for a way to add push notifications to the AMP version of your site? Adding AMP push notifications can be a little technical. But we’re going to help you do it the easy way.
AMP or Accelerated Mobile Pages are essentially a mobile version of your site. So, if you’re not setting up web push on your AMP site, then you’re going to lose a bunch of subscribers because a huge part of your audience will use mobile devices to visit your site.
In this article, we’re going to use PushEngage to install AMP push notifications because it’s way easier than doing things manually.
さあ、始めましょう。
How to Install AMP Push Notifications
Installing AMP push notifications is a really quick and easy process. Just follow these steps and by the end of this article, you should be able to send push campaigns from your site like this one:

Looks good, doesn’t it? Let’s dive in.
ステップ1:PushEngageアカウントの設定
PushEngage のホームページにアクセスし、開始ボタンをクリックします。

PushEngageを試すために無料プランを選択するか、ビジネスの成長に真剣に取り組んでいる場合は有料プランを選択できます。有料プランには、より多くのキャンペーンオプションと、さらに大きな購読者リストを構築する機能が付属しています。
PushEngageアカウントにサインアップしたら、PushEngageダッシュボードにアクセスし、サイト設定 » サイト詳細に移動してください。

ここでロゴ、サイト名、サイトURLを設定できます。後で全体のセットアップをテストできるように、これらの項目を今すぐ整理することが非常に重要です。
Step #2: Get the AMP Push Notifications Installation Code
To install web push on your AMP site, you’ll need to get an installation code. In your Site Settings screen, scroll down and click on the Click Here For Setup Instruction button:

Head over to the AMP tab to get installation settings.
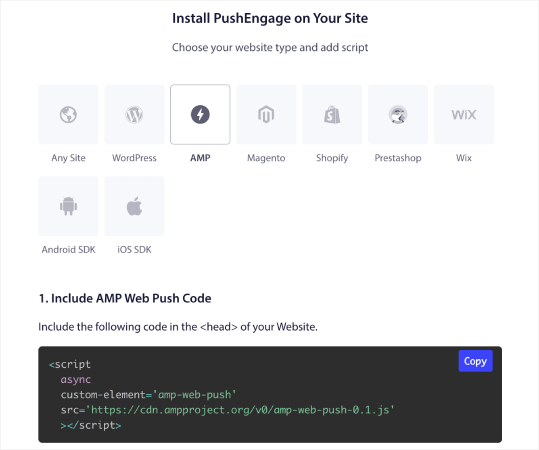
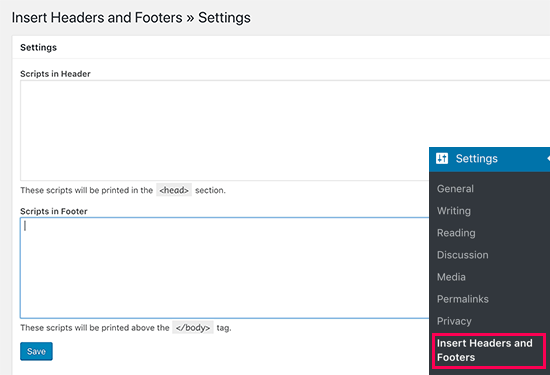
Copy this code. You’ll need to paste this code in the HTML <head> of your site. If you’re running a WordPress site with an AMP version, the simplest way to do this is to use the Insert Headers and Footers plugin. It’s a free plugin where you can paste in the AMP installation code without having to go into the actual HTML of your site:
Step #3: Install Service Worker on Your AMP Site
Next, download the package file that includes the service worker.

これには以下が含まれます:
- service-worker.js
- amp-helper-frame.html
- amp-permission-dialog.html
Unzip the package and place these files in the root folder of your server. This part is super important. If you skip this step, your site won’t be able to collect push subscribers.
Pro Tip: If you’re not sure what the root folder is and how you can upload files there, you should check out this article on the WordPress File and Directory Structure. It’s a really simple guide for beginners and you get a lot of insight into how WordPress works.
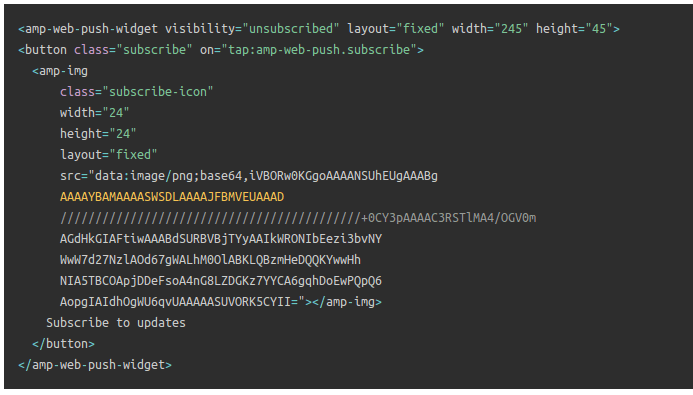
Step #4: Add the AMP Push HTML Code to Your Site
Next, add the HTML code to enable a subscribe on click button and a button to unsubscribe from push campaigns.
This code enables the service worker file you uploaded and allows your site to display subscribe and unsubscribe buttons. To collect subscribers, you need to give your visitors a simple way to subscribe to your push campaigns. The unsubscribe button will give your active subscribers a way to opt out if they’re not interested in your content. Both are pretty important.
Add the `Subscribe to updates’ button where you want it to show up on your site:
And add an ‘Unsubscribe from updates’ button:
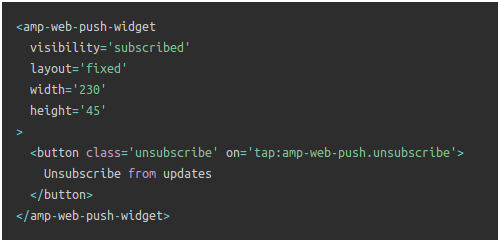
The Unsubscribe button is going to be a simple ‘tap to unsubscribe’ button. You get a lot more customization options for the non-AMP version of your site on both mobile and desktop devices. So, we recommend that you add AMP CSS to your <body> section.
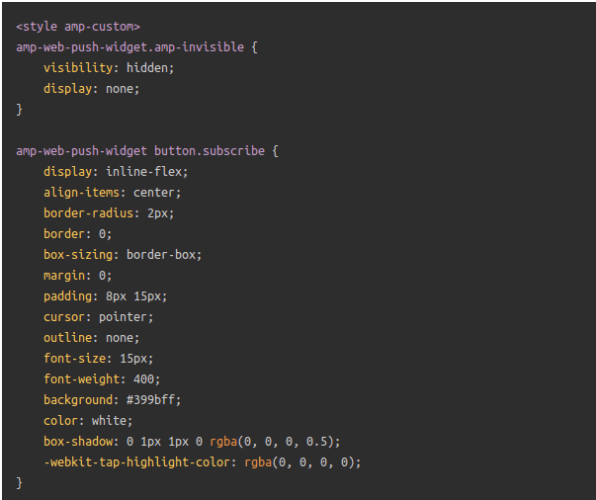
This code snippet is meant to customize the look and feel of both Subscribe and Unsubscribe buttons. If you’d like to play around with these styles, go for it. Just make sure that you don’t change the AMP HTML tags that the code is styling.
And that’s it. You’re done.
Step #5: Configuring the PushEngage Opt-In
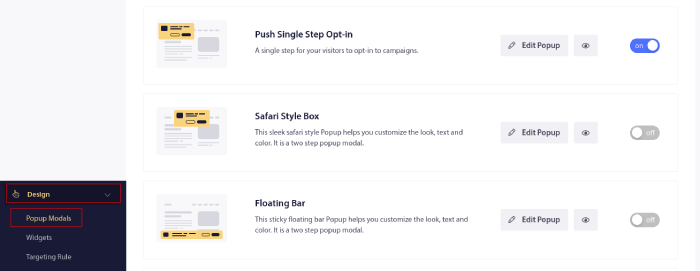
次に、PushEngageダッシュボードに戻ります。Design » Popup Modalsに移動し、希望するオプトインを選択します。
ここでのアイデアは、訪問者に購読する確かな理由を与えることです。そのためのヘルプが必要な場合は、カスタムプッシュ通知オプトインを作成する方法 に関する記事を確認してください。
そして、開始するためのテンプレートが必要な場合は、コンバージョン率の高いプッシュ通知オプトインに関するこの記事を確認してください。
BONUS Step: Create a Welcome Campaign
オプトインの設定が完了すると、サイトは購読者を取得できるようになります。
But how do you know if your push campaigns are working properly?
We recommend that you create a welcome push notification to test if your setup went smoothly. A welcome notification is a web push notification you send a new subscriber to confirm their subscription and welcome them on board.
PushEngage ダッシュボードに移動し、キャンペーン » ドリップ自動応答 に進み、新しいドリップ自動応答を作成 をクリックします。

次に、キャンペーンに名前を付け(「ウェルカムドリップ」のような名前をお勧めします)、コンテンツの下で、「ユーザー登録直後に通知を送信」というオプションを選択します。

この時点で、通知の横にある矢印をクリックして、通知のコンテンツを編集できます。PushEngageのPremiumまたはEnterpriseプランをお持ちの場合は、複数の通知を追加して自動ウェルカムメッセージのシーケンスを作成できます。Add New Notificationをクリックして、コンテンツを編集するだけです。
完了したら、ドリップ設定をクリックし、ウェルカムキャンペーンをすべての購読者に送信するオプションを選択します。

Then, scroll down to set your own UTM parameters to track the push campaigns:

完了したら、上にスクロールして戻り、自動応答を有効にするボタンをクリックします。

これで完了です!
You have successfully set up AMP web push notifications on your website. It’s time to head back to your PushEngage dashboard and start creating your push campaigns.
What to do After You Add AMP Push Notifications to Your Site
今回は以上です、皆さん!
If you’re new to push campaigns, you should follow a full-blown push notification testing process before you go live. It’ll help you troubleshoot common issues before your visitors see them and start complaining about a broken user experience.
また、以下のような自動プッシュ通知キャンペーンもいくつか確認してください。
このいずれかで困った場合は、カスタマーサクセスマネージャーにご連絡いただくことをお勧めします。どのような問題でも喜んでお手伝いさせていただきます。
まだの場合は、PushEngageを試してみてください。PushEngageは世界No.1のプッシュ通知サービスです。したがって、ビジネスの成長を真剣に考えているなら、PushEngageが最適な選択肢です。


Thanks for this tips & information. Its very easy to understand.
good explanation