Looking for a quick way to add and edit your push notification icon?
It’s actually super easy. The notification icon tells your subscribers who you are. It’s a brand mark on each push notification you send. And that can be priceless because it helps your audience remember your brand.
The cost of making sure that each push notification you send helps you become more memorable? Less than 5 minutes.
In this article, we’re going to show you how to add and edit your push notification icon. And like we said, it’s super easy.
さあ、始めましょう。
Why Add a Push Notification Icon?
A push notification icon is a small, distinctive image that represents an app on a user’s device. It appears alongside push notifications to visually identify the source app of the message or alert.
This icon helps users quickly recognize which app or website is communicating with them without having to read the notification’s text.
Adding a push notification icon is a smart move for a few reasons:
- Recognition: Just like seeing a familiar face in a crowd, we instantly recognize icons. When your app sends a notification, the icon acts like a little wave, saying, “Hey, it’s me!” This helps users quickly identify which app is calling for their attention.
- Branding: Your icon is like a tiny billboard for your app. It’s a part of your brand identity. Each time users see it, they’re reminded of your app. This can help keep your app top-of-mind.
- User Experience: Users often have many apps installed, and it can be a real jumble. A unique icon helps them manage their notifications more efficiently. They can see at a glance which notifications they want to check out first.
- Professionalism: An app with its own notification icon looks more polished and professional. It shows that you’ve put thought into even the small details, which can improve overall user satisfaction.
- Functionality: Sometimes, the icon can also convey additional information. For example, a messaging app might show different icons for a new message vs. a missed call. This adds an extra layer of functionality and user convenience.
So, a push notification icon might be small, but it plays a big role in how users interact with your app and perceive it!
How to Add a Push Notification Icon
Now that we understand what a push notification icon is and why you should add it, let’s check out how you can add it easily without any coding at all.
ステップ #1:プッシュ通知サービスを選択する
Push notifications are a marketing tool that helps you to connect with web visitors even after they leave your website. You can send targeted notifications to your push subscribers and even personalize your notifications for difference customer segments. But which push notification service should you choose?
We recommend using PushEngage to send push notification campaigns.

PushEngage は世界最高のプッシュ通知サービスです。無料版だけでなく、ターゲットを絞ったプッシュメッセージでサイトを離れた訪問者とつながることができます。
PushEngageがプッシュ通知サービスおよびツールとして第一選択肢である理由は次のとおりです。
- 使い方が非常に簡単
- HTTPおよびHTTPSサイトで効果的
- 設定にほとんどまたはまったくコーディングを必要としないビジュアルビルダーが付属しています
- あらゆる種類のサイト向けに、完全に 自動化されたプッシュ通知キャンペーン を簡単に設定できます
- クリック率を高めるためのパーソナライズされたプッシュ通知を送信するための複数のオプションがあります
- カスタム目標追跡、UTMパラメータ、および高度な分析を備えています
そして、これはほんの始まりにすぎません。さらに進む前に、PushEngageの機能の全リストを確認してください。
PushEngageの最も素晴らしい点は、購入決定を下す前に試すことができる、永久無料プランがあることです。
プロのヒント:サービスを購入する前に、プッシュ通知のコスト分析に関する記事を確認してください。
Step #2: Install the PushEngage Plugin
Once you’re done creating your account, head over to the PushEngage dashboard and follow along:

サイト設定 » サイト詳細をクリックし、セットアップ手順はこちらをクリックボタンをクリックしてください。

WordPressタブをクリックし、PushEngage WordPressプラグインをインストールボタンをクリックして、ウェブサイトにプラグインをインストールします。

素晴らしい点: PushEngageアカウントを作成したときに、すでにウェブサイトとPushEngageアカウントを同期しています。したがって、PushEngageダッシュボードのインストールリンクをクリックして、PushEngage WordPressプラグインをウェブサイトに自動的にインストールします。
And you’re done! You have successfully set up a web notifications WordPress plugin on your website. You don’t have to login to your WordPress admin panel at all. For a more detailed guide, check out our article on how to install web notifications on WordPress.
Step #3: Add or Edit Your Push Notification Icon
Go back to your PushEngage dashboard. Click on Site Settings » Site Details and under Upload Your Site Icon, you can upload an image:
The image you upload is your push notification icon. Keep the dimensions of the image at 192px x192px for the best results and make sure that the image size is less than 1MB. You can use a JPG, PNG, or even a GIF for animated brand marks. Just makes sure that the icon is consistent with brand marks that you use on social network sites.
後でアイコンを編集する必要がある場合は、ここで編集します。別の画像をアップロードするだけで完了です!
Step #4: Send a Test Notification to Check Your Notification Icon
We recommend creating a website welcome message to test your push notifications. Welcome push notifications are great for:
- 確認: 新しい購読者が実際にウェブプッシュ通知に購読していることを確認したい場合。
- 再エンゲージメント: ウェルカムキャンペーンは、購読者をサイトに呼び戻すための優れた方法です。
- セール: 新規購読者に割引、無料ギフト、クーポン付きのウェルカムオファーを提供できます。
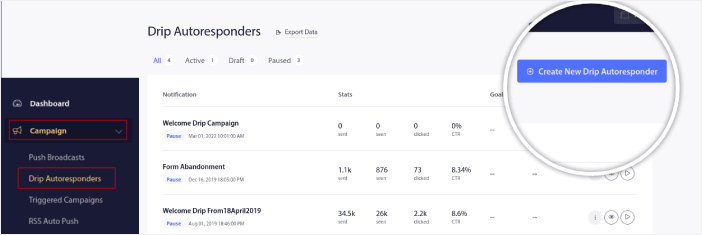
それでは、ウェルカムプッシュ通知キャンペーンを作成しましょう。PushEngageダッシュボードに移動し、キャンペーン » ドリップ自動応答 » 新規ドリップ自動応答の作成に移動します。
ドリップキャンペーンに、覚えやすい名前を付けます。次に、最初のプッシュ通知が訪問者のプッシュ通知購読直後に送信されるように設定します。

通知を編集して、ウェルカムメッセージのカスタムコンテンツを作成できます。完了したら、新しい通知の追加ボタンをクリックして、シーケンスに通知を追加します。新しい通知を編集し、各通知間のカスタム遅延を設定できます。
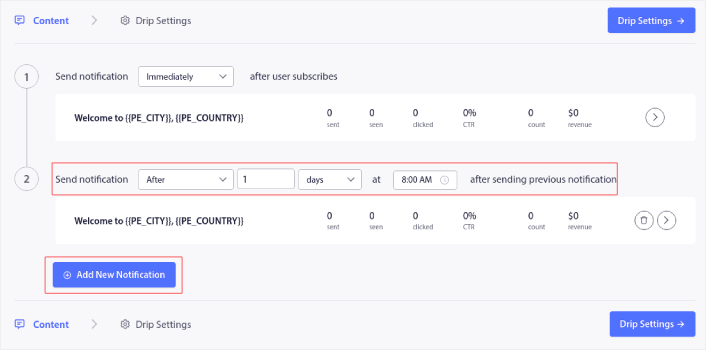
通知はいくつでも追加できますが、5〜7件の通知を含むウェルカムドリップを作成することをお勧めします。
その後、ドリップ設定でオーディエンスを選択します。
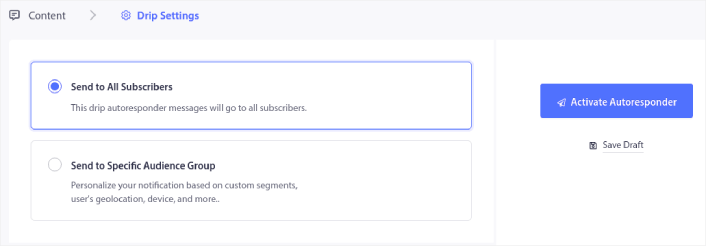
You can send different welcome drips for different segments by using the Send to Specific Audience Group option. This is especially useful when you’re segmenting visitors when they opt for push notifications.
When you’re happy with your targeting, click on the Activate Autoresponder button.
これで完了です!
If your push notifications were installed correctly, you should see a welcome notification like this one:

And as you can see, the notification icon is pretty prominent in our example!
If you’re new to push notifications, you should follow a full-blown push notification testing process before you go live. It’ll help you troubleshoot common issues with the functionality before your visitors see them and start complaining about a broken user experience.
What to do After You Add a Notifications Icon
Now that you know how to add a push notification icon, it’s time for you to start creating your own campaigns. But before you get started with the campaigns, you should study some great push notification examples first.
また、プッシュ通知が初めての場合は、キャンペーンを作成する前にプッシュ通知のベストプラクティスに関する記事を確認してください。私たちが積極的に推奨するベストプラクティスの一部は次のとおりです。
- 好奇心を刺激してクリック率を向上させる
- 各プッシュ通知をパーソナライズする
- リッチメディアで目立つ
- 休眠中のプッシュ購読者を再活性化する
- 顧客に常に情報を提供する
- 可能な限り絵文字を使用する
- 緊急性を演出する
プッシュ通知キャンペーンの作成にはPushEngageの使用をお勧めします。PushEngageは市場でNo.1のプッシュ通知ソフトウェアであり、あなたのキャンペーンは安全な手に委ねられます。
まだの場合は、今すぐPushEngageを始めましょう。


