
Looking for a simple way to add push notifications to your Volusion store?
You made the right decision to add push notifications to your site. You can create automated push notifications for eCommerce sites that generate traffic, engagement, and sales on autopilot.
Volusion is a great platform to launch your eCommerce business. Now, let’s grow it using push notifications.
In this article, we’re going to show you how to install push notifications to your Volusion store in 5 simple steps.
We’re going to use PushEngage to set up push notifications. PushEngage is the #1 push notification software in the world. So, if you haven’t already picked a vendor, you get started with PushEngage today.
But if you have a different vendor, don’t worry. The steps should be almost identical for any push notification software.
さあ、始めましょう。
How to Install Push Notifications on Volusion
Adding push notifications to a Volusion store is quite simple. All you have to do is follow along with this article.
すべてのステップに従えば、この記事の終わりまでには、このようなプッシュ通知を送信できるようになります。

始めましょう。
ステップ1:PushEngageアカウントの設定
PushEngageのホームページにアクセスし、開始するボタンをクリックします。

You can try out PushEngage for free. But if you’re serious about growing your business, you should select a paid plan to unlock the most powerful features and campaigns that PushEngage has to offer. Since Volusion is an eCommerce site builder, you should ideally get the Enterprise package to get full access to automated push notification campaigns.
PushEngageアカウントにサインアップしたら、PushEngageダッシュボードにアクセスし、設定 » サイト設定 » インストール設定に移動します。
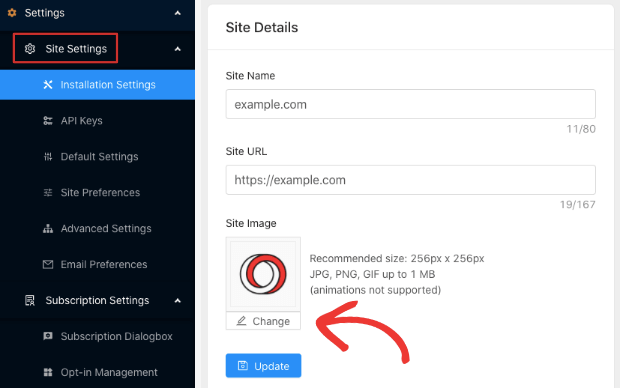
ここでロゴ、サイト名、サイトURLを設定できます。ブランド設定は後で行うこともできます。しかし、正直に言って、今すぐ正しく設定しておけば、後でテストするのがずっと簡単になります。
ステップ2:PushEngageからインストールコードを取得する
Before you can add push notifications to your Volusion site, you’ll need to get an installation code from your PushEngage dashboard.
設定 » サイト設定 » インストール設定に移動します。
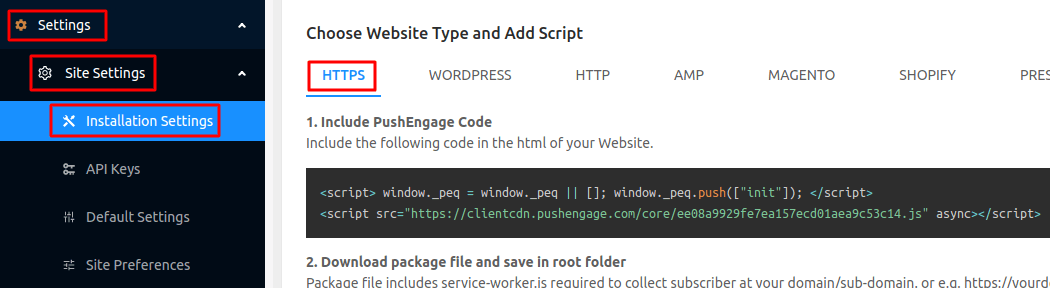
画像はHTTPSサイトのサンプルコードのみを示しています。SSL証明書がインストールされていない場合は、同じ画面のHTTPタブをクリックできます。そして取得するコードはサイト固有のものです。したがって、画像内のコードをコピーしないでください。ご自身のコードを取得してください!
そして、このJavaScriptコードスニペットをコピーする必要があります。すぐに必要になります。
Step #3: Place the Installation Code in Your Volusion Site
In your Volusion site, head over to Design » File Editor:
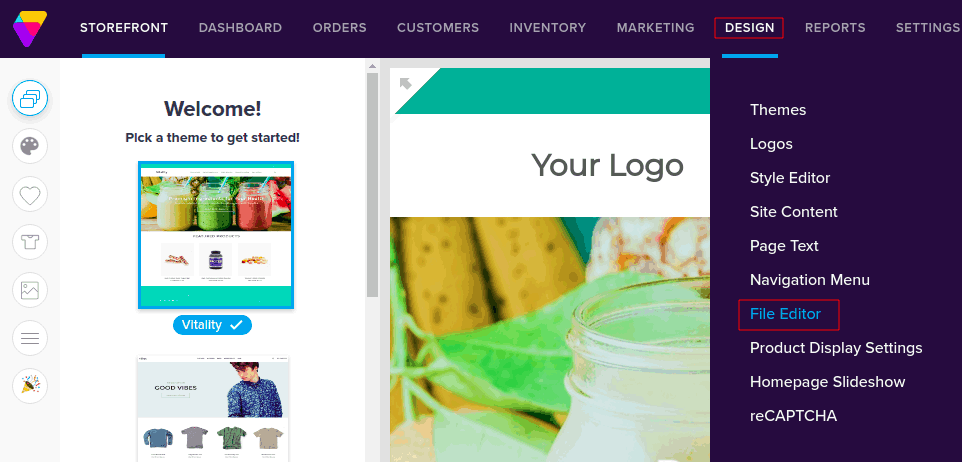
This will open up the File Editor and on the right-hand side, you’ll see a pane that lists theme files under Shortcuts:
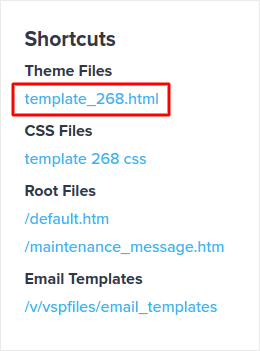
Click on the HTML file to edit it and insert your PushEngage Javascript code snippet right before </head>:
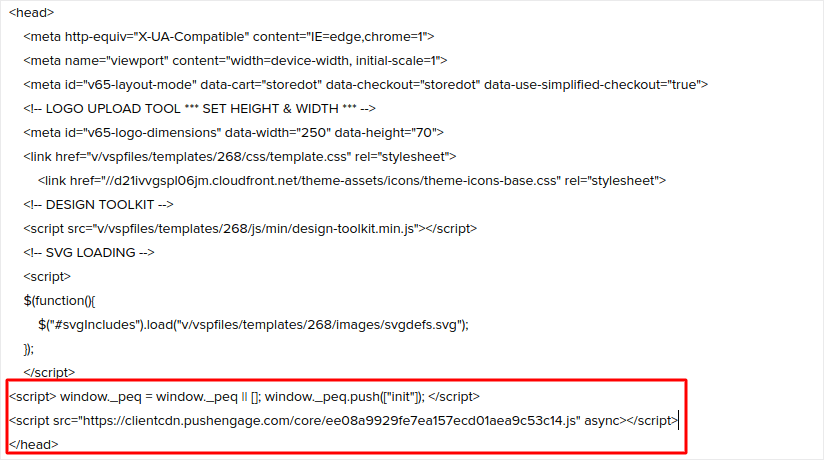
Finally, when you’re done, hit Save.
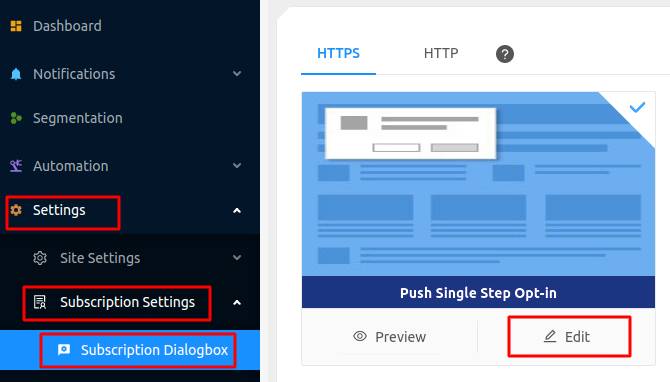
ステップ4:PushEngageオプトインを設定する
次に、PushEngageダッシュボードで、設定 » サブスクリプション設定 » サブスクリプションダイアログボックス » 編集に移動します。
ここでのアイデアは、訪問者に購読する確かな理由を与えることです。そのためのヘルプが必要な場合は、カスタムプッシュ通知オプトインを作成する方法 に関する記事を確認してください。
そして、開始するためのテンプレートが必要な場合は、コンバージョン率の高いプッシュ通知オプトインに関するこの記事を確認してください。
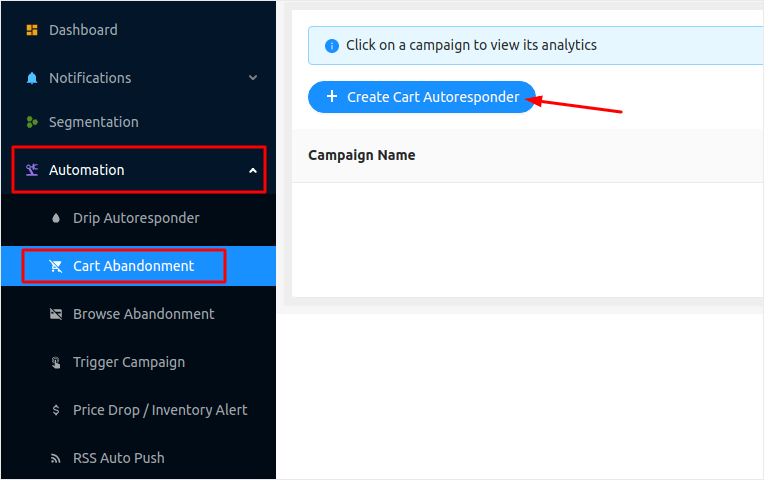
ステップ#5:最初のキャンペーンを作成する
Now that your Volusion site can send push notifications, let’s create an actual campaign.
eコマースサイトで作成できる最も優れたキャンペーンの1つは、カート放棄キャンペーンです。カート放棄キャンペーンは、すでに半分完了している販売を回収することで収益を増やすのに役立ちます。
PushEngageダッシュボードにアクセスし、 自動化 » カート放棄 » カート自動応答の作成に移動するだけです。
カート放棄キャンペーンの作成方法に関する記事に従って、次のような自動応答を作成して送信できます。
Pro-Tip: This is a good time to also test your push notifications and check that everything in your campaign is working fine.
まとめ
今回は以上です、皆さん!
If you enjoyed this article, and you managed to set up your first push notification campaign on your Volusion store, well done!
ストアの価格低下アラートの作成方法も確認してください。
まだ始めていない場合は、PushEngageを使い始めましょう。PushEngageは世界No.1のプッシュ通知ソフトウェアです。したがって、あなたのキャンペーンは安全な手に委ねられています。


