Looking for a guide to create waterfall push campaigns?
Waterfall notifications are gaining a lot of popularity these days. For a long time, you could only send waterfall email campaigns. But now, you can recreate the same effective campaigns and use the targeting options in push notification software to send waterfall push notifications.
But how do you get started? Do you need experience with waterfall campaigns? Do you need any experience setting up push notification campaigns?
In this article, we’re going to help you create waterfall push campaigns using an example. We’ll also answer all your questions about waterfall push notifications.
よさそうですね?さあ、始めましょう。
What Are Waterfall Push Campaigns?
A waterfall push campaign is a type of ad campaign for mobile devices. It works like this: you send push notifications to a group of people, but not all at once. Instead, you send the notification first to the people who are most likely to engage with the notification and take the action you want them to take.
If those people don’t respond, you move on to the next group of people, and so on.
The idea is to get as many people as possible to engage with the notification while spending the least amount of money. It’s called a “waterfall” because it’s like a series of steps that the network goes through, targeting different groups of people at each step.
Let me explain.
どのようなビジネスであっても、非常にエンゲージメントの高い購読者のグループが表示されます。彼らはあなたが販売するものをすべて購入し、喜んで証言やレビューを提供し、新しい顧客を紹介してくれます。
そして再び、あなたのビジネスにはまったく興味のない購読者のグループが表示されます。
プッシュ通知キャンペーンには詳細な分析が付属しています。そのため、購読者リストで両方のグループをかなり明確に見ることができます。そして素晴らしいのは、PushEngageでオーディエンスグループを作成することで、両方のタイプの購読者をリターゲティングできることです。
Then, you can create targeting options for your push notifications to retarget specific behavior on each notification you send. Once we get into our example, you’ll see more clearly how behavior targeting impacts a waterfall push campaign. For now, you should know that all push waterfall campaigns have two core components:
- 共通の目標を持つ一連のプッシュ通知
- さまざまなタイプの購読者をリターゲティングするためのオーディエンスグループ
Let’s check out why waterfall push campaigns are so effective next.
Why Send Waterfall Push Campaigns?
There are several advantages of using waterfall push campaigns to grow your brand:
- Efficient use of advertising budget: By targeting the most valuable users first, and then moving down the priority list, a waterfall push campaign can help to maximize the return on investment (ROI) for your advertising spend. This ensures that your advertising budget is being used as effectively as possible.
- Higher engagement rates: By targeting users who are more likely to engage with the ad, you increase the chances of getting a higher click-through rate and conversion rate, which can lead to increased revenue.
- Customizable targeting: With a waterfall push campaign, you can create different segments of users based on their demographics, behavior, and other factors. This allows you to tailor your messaging to each group and increase the likelihood of success.
- Real-time optimization: With a waterfall push campaign, you can track the performance of each segment in real-time and adjust your targeting strategy accordingly. This ensures that you are always optimizing for the best possible results.
Overall, waterfall push campaigns can be an effective way to reach your target audience and drive engagement and conversions, while minimizing wasted ad spend.
How to Send Waterfall Push Notifications
Now that we know what a waterfall push campaign is and why you should create them, let’s take a look at a real example with step-by-step instructions to create one.
Before you get started with sending waterfall push notifications, you need to select a push notification service. We recommend using PushEngage.
ステップ#1:無料のPushEngageアカウントを作成する
PushEngageにアクセスし、今すぐ無料で始める:をクリックしてください。

無料プランで始めることができます。しかし、最も強力なブラウザ通知を探している場合は、ビジネスニーズに基づいて有料プランを選択する必要があります。
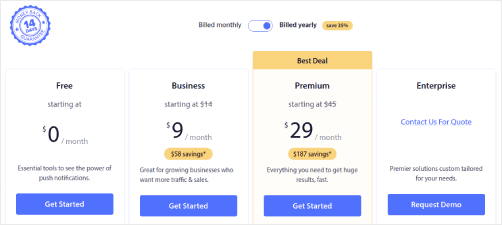
必要なプランがわかったら、始めるをクリックしてPushEngageアカウントを作成してください。
ステップ#2:PushEngageにサインアップする
次に、PushEngageアカウントを作成します。メールアドレスまたはGmail IDでサインアップすることから始めます。

次に、アカウントの詳細を入力します。

そして、プランを購入するためにクレジットカード情報を追加します。

無料アカウントを選択した場合、プランのアップグレードを選択するまで、クレジットカードに請求されることはありません。これで、PushEngageダッシュボードにアクセスする準備が整いました。登録を完了して即時アクセスを取得をクリックするだけです。
以前にOneSignalやPushAlertを使用したことがある場合、PushEngageはダッシュボードからよりクリーンなエクスペリエンスを提供することがわかります。OneSignalダッシュボードは高度なキャンペーン向けではありません。そのためには、OneSignalプラグインよりもAPIが必要になります。
ステップ#3:Webプッシュ通知WordPressプラグインをインストールする
アカウントの作成が完了しました。したがって、PushEngageダッシュボードにアクセスし、手順に従ってください。

サイト設定 » サイト詳細をクリックし、セットアップ手順はこちらをクリックボタンをクリックしてください。

WordPressタブをクリックし、PushEngage WordPressプラグインをインストールボタンをクリックして、ウェブサイトにプラグインをインストールします。

素晴らしい点: PushEngageアカウントを作成したときに、すでにウェブサイトとPushEngageアカウントを同期しています。したがって、PushEngageダッシュボードのインストールリンクをクリックして、PushEngage WordPressプラグインをウェブサイトに自動的にインストールします。
ステップ#4:WordPressウェブサイトをPushEngageに接続する
PushEngage WordPressプラグインのインストールと有効化が完了すると、PushEngageのオンボーディングウィザードが表示されます。

ウィザードは非常に簡単です。新規ユーザーの場合は、新規?無料アカウントを請求するをクリックします。すでにサインアップ済みの場合は、既存のアカウントを接続をクリックします。
次に、サインアップ中にサイトを登録した場合、登録済みサイトを接続の下にあるサイトを選択ドロップダウンからサイトを選択できます。

または、プレミアム以上の料金プランをお持ちの場合は、新しいサイトを登録をクリックして新しいサイトを追加できます。次のステップでは、オンボーディングウィザードが他の必須のWordPressプラグインをインストールするように促します。

各ステップを正しく実行すると、ウィザードからこの成功メッセージが表示されます。

これでキャンペーンを作成する準備ができました。
Step #5: Create Waterfall Push Campaigns
Finally, it’s time for our example. To show you a real use case for waterfall push campaigns, we’re going to take the example of Black Friday promotions. Our objective is to maximize the conversions on our Black Friday offer.
購読者をエンゲージメントレベルに基づいて再ターゲティングするために、すべての購読者に一斉送信を行います。その後、エンゲージメントレベルに基づいて、再ターゲティング用の異なるオーディエンスグループを作成します。
すべての購読者に通知を送信する方法
3つの通知で最大のリーチを獲得したいと考えています:
- 早期ブラックフライデーのお知らせ
- ブラックフライデーフラッシュセール
- サイバーマンデーセール
そのため、これらの3つの通知を全員に送信します。「オーディエンス」タブで、「すべての購読者に送信」を選択します。

全員への一斉送信をクリックしなかった購読者を再ターゲティングする方法
通知をすべての購読者に送信しない場合は、オーディエンスグループを作成する必要があります。たとえば、全員への一斉送信をクリックしなかった購読者をターゲットにしたい場合は、新しいオーディエンスグループを作成する必要があります。
WordPressダッシュボードで、オーディエンス » オーディエンスグループに移動し、「新しいオーディエンスグループを作成」をクリックします。

前回の通知をクリックしなかった購読者をターゲットにするには、最後のクリック日時でフィルタリングする必要があります。
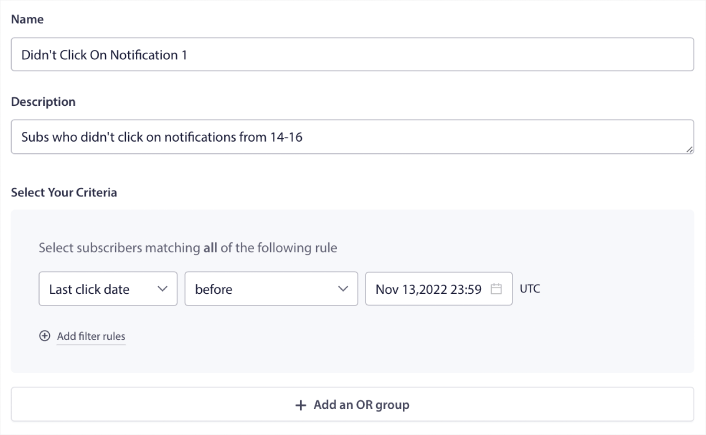
前回の通知を送信した日時より前の「最後のクリック日時」でフィルタリングします。たとえば、11月14日に最後のプッシュ通知を送信した場合、11月13日の深夜より前に通知をクリックした購読者をフィルタリングします。
注意:メールキャンペーンとは異なり、最後の通知のクリック率で実際にフィルタリングすることはできません。最も近い近似値は、日付範囲でのクリックをフィルタリングすることです。
完了したら、「通知を保存」をクリックします。
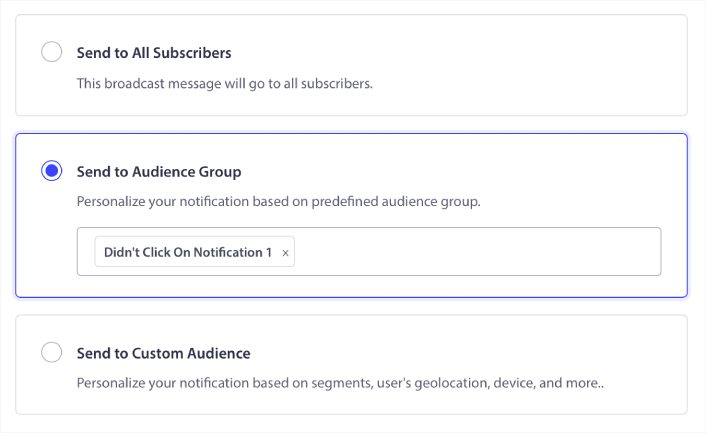
次に、プッシュ通知の一斉送信に戻り、「オーディエンスグループに送信」を選択します。ドロップダウンからグループを選択します。
全員への一斉送信をクリックした購読者を再ターゲティングする方法
最後の通知をクリックした購読者をターゲットにしたい場合は、別のオーディエンスグループを作成できます。
前回の通知を送信した日時より「後」であり、次の通知を送信したい日時より「前」の「最後のクリック日時」で購読者をフィルタリングします。
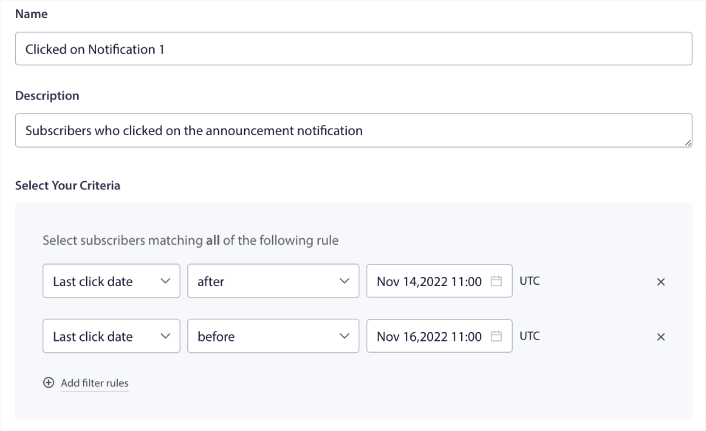
「フィルター条件を追加」をクリックすることで、フィルターに「AND」条件を追加できます。このようなフィルターは、クロスセルプッシュ通知に最適です。
これらのオーディエンスグループの結果は、より詳細なターゲティングです。そのため、毎回異なるオファーを送信してコンバージョン率を向上させることができます。
What to do After You Create Waterfall Push Campaigns
One of the most important things to remember about waterfall push campaigns is that you can only use this methodology on broadcast push notifications. Drip campaigns in push notifications don’t have targeting options that granular yet.
そのため、プッシュ通知のA/Bテストを必ず実施してください。また、記事を読んで、自動プッシュ通知を強化する方法を学ぶ時間を取ってください。まずはプッシュ通知のベストプラクティスに関する記事から始めましょう。
プッシュ通知が初めての場合は、公開する前に完全なプッシュ通知テストプロセスに従う必要があります。これにより、訪問者が問題に気づいてユーザーエクスペリエンスの低下を訴える前に、一般的な問題をトラブルシューティングできます。そして、間違いなくGoogleアナリティクスを設定してプッシュ通知を追跡する必要があります。
クリックした購読者またはクリックしなかった購読者を対象としたリターゲティングプッシュ通知。それがどのように機能するかお知らせください。それまでの間、これらのリソースを確認してください。
- 好奇心を刺激してプッシュ通知のクリックを増やす方法
- 各プッシュ通知をパーソナライズする方法
- リッチメディアでプッシュ通知を目立たせる方法
- 休眠中のプッシュ購読者を再エンゲージさせる方法
- 顧客に情報を提供するためにプッシュ通知を使用する方法
- クリック率を高めるためにプッシュ通知で絵文字を使用する方法
- 緊急性を醸成してコンバージョンを増やす方法
まだの場合は、PushEngage を使い始める。


