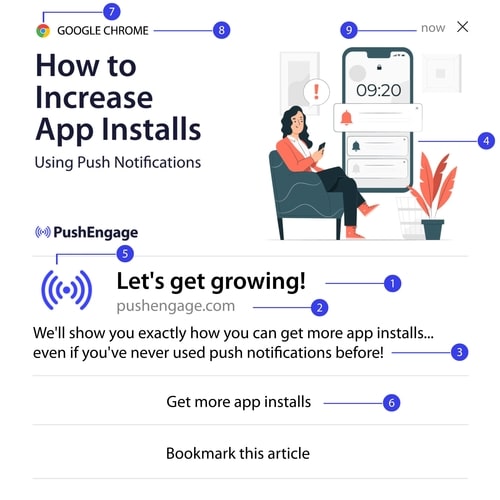
Still struggling to re-engage your Android app users once they close your app? You’re not alone. Most users abandon apps within days, and without the right tools to bring them back, they’re gone for good. That’s where Android push messages shine.
These small, timely alerts can re-engage users, boost repeat sessions, and drive conversions — even when they’re not actively using your app.
In this guide, we’ll break down:
- What Android push messages are
- How they work (with visuals)
- Why they matter for app growth
- And how to start using them effectively
Let’s dive in and turn your app into a retention engine.
今すぐモバイルアプリプッシュ通知を送信!
プッシュ通知は、リピートトラフィック、エンゲージメント、売上を自動で伸ばすのに役立つ、非常に効果的で低コストなマーケティングツールです。
- What Are Android Push Messages?
- Which Android Push Messages Service Should You Choose?
- How to Install Android Push Messages On Your Website
- How to Send App Push Messages on Android
- How Do Android Web Push Messages Work?
- How do Mobile Android Push Messages Work?
- What Are the Different Parts of Android Push Messages?
- プッシュ通知のオプトインのさまざまな種類
- Androidプッシュメッセージをパーソナライズする方法
- ターゲットを絞ったAndroidプッシュメッセージを作成する方法
- ターゲットを絞ったAndroidプッシュメッセージを送信する方法
- Androidプッシュメッセージのポップアップモーダルを作成する方法
- ターゲットを絞ったAndroidプッシュメッセージを送信する前にやること
- Androidプッシュメッセージを送信した後にやること
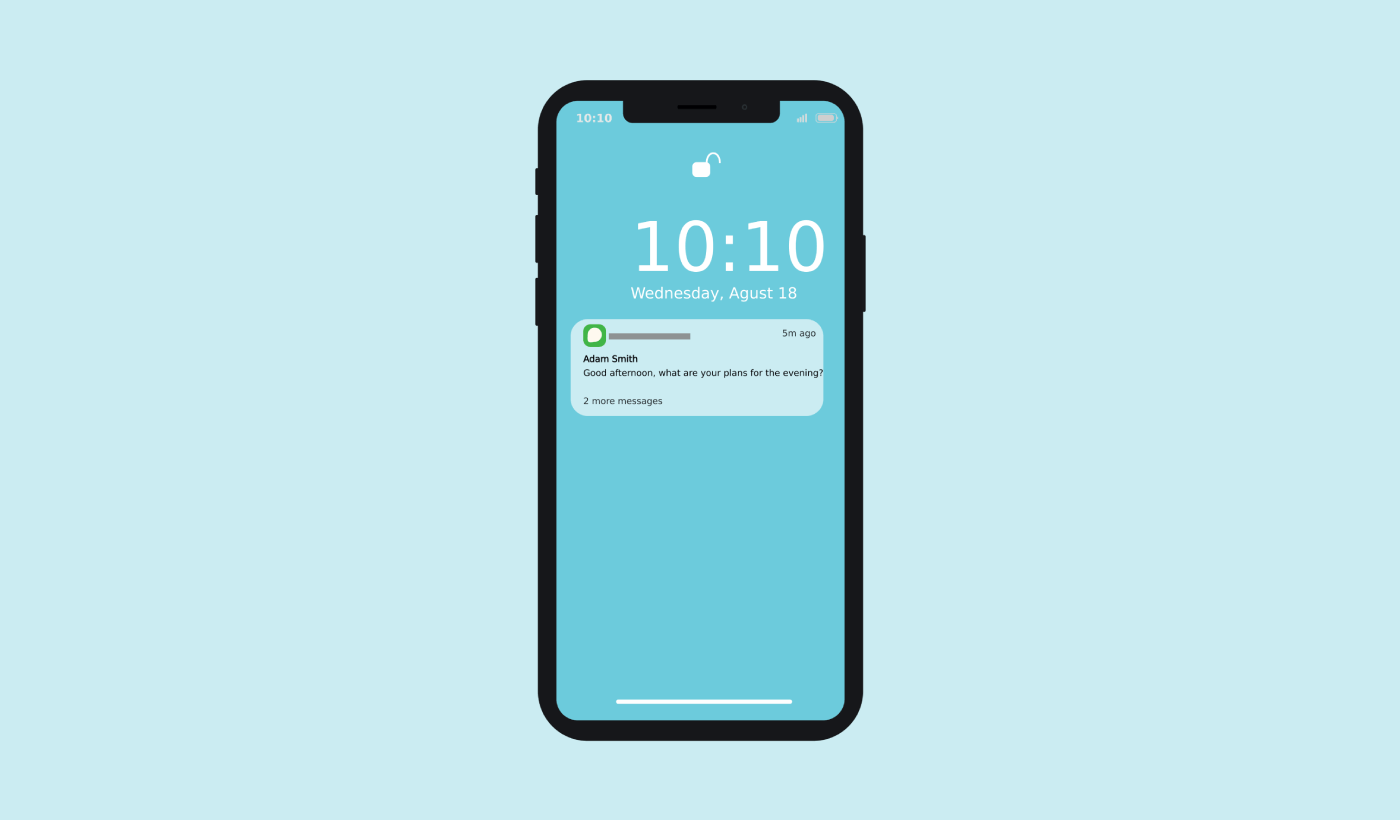
What Are Android Push Messages?
Androidプッシュメッセージとは、購読者のデバイスに表示され、ワンクリックで購読者をコンテンツにリダイレクトする、短くてクリック可能なポップアップメッセージです。
広義には、2種類のAndroidプッシュメッセージを送信できます。
- Androidウェブプッシュメッセージ:購読者のブラウザに配信されるブラウザプッシュメッセージ。プッシュ通知サービスが複数のブラウザと互換性がある限り、Androidデバイスの購読者をターゲットにできます。
- Androidモバイルプッシュメッセージ:GoogleのFirebase Cloud Messaging(FCM)を使用してAndroidモバイルアプリ経由で配信されるプッシュメッセージ。
したがって、アプリまたはシンプルなウェブサイトでAndroidプッシュメッセージを送信できます。プログレッシブウェブアプリ(PWA)を実行している場合は、両方のオーディエンスに同時にプッシュメッセージを送信できます。
ウェブプッシュ通知の送信を選択した場合、購読者がブラウザを使用していなくてもプッシュメッセージはポップアップ表示されます。これはメールの一斉送信のようなものですが、ウェブプッシュ通知では、購読者はメッセージを表示するためにアプリを使用する必要はありません。
しかし、アプリビジネスを運営していて、アプリユーザーにAndroidプッシュメッセージを送信したい場合は、それも可能です。
要するに:Androidプッシュメッセージは、オプトインした人にクリック可能なディープリンクまたはクリック可能なURLをコンテンツに送信する簡単な方法です。
プッシュ通知シーケンスを使用すると、オーディエンスはあなたを無視する言い訳がなくなります。ソーシャルメディアサイトとは異なり、広告料を支払わせるためにリーチを制限するアルゴリズムはありません。
重要:ウェブプッシュメッセージとアプリプッシュメッセージは、どのデバイスでも根本的に異なる方法で機能します。ウェブプッシュでは、プッシュメッセージを送信する前に、サイト訪問者から手動でオプトインする必要があります。アプリプッシュは、そのようなオプトインを必要としません。誰かがあなたのアプリをダウンロードした場合、デバイスで通知が有効になっていれば、メッセージを送信できます。
Which Android Push Messages Service Should You Choose?
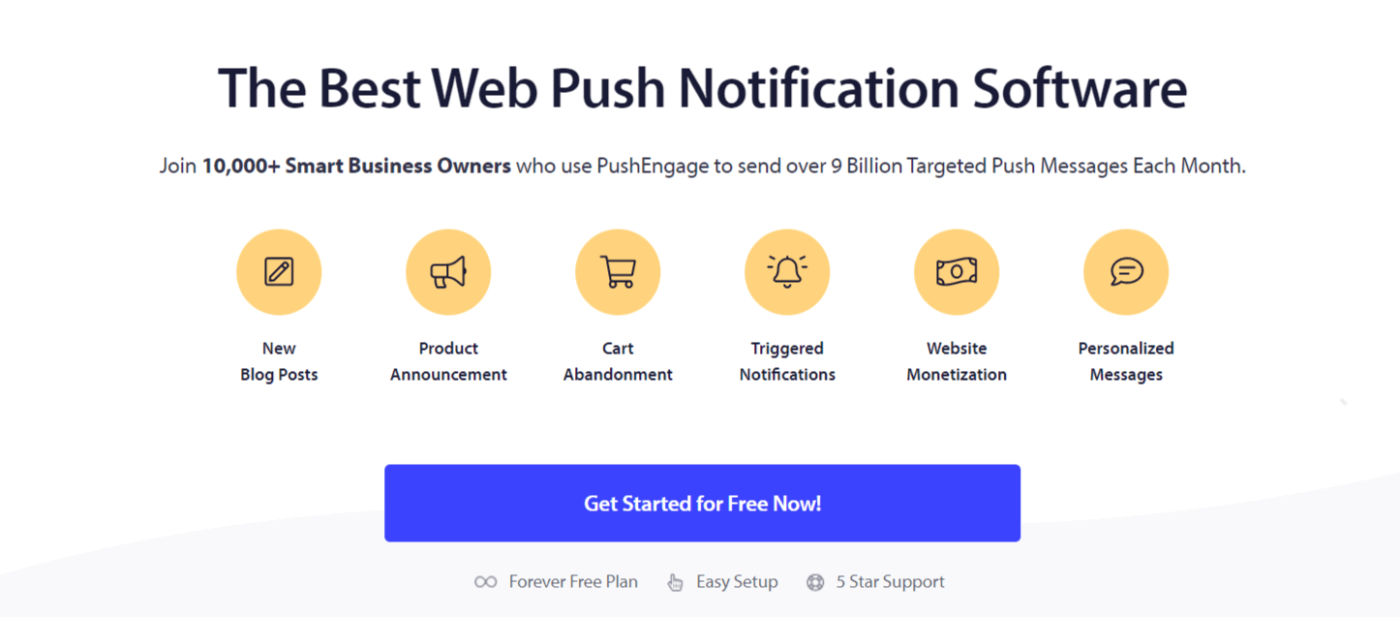
Androidプッシュメッセージの送信にはPushEngageの使用を強くお勧めします。
多くの無料プッシュメッセージングサービスは実際には無料トライアルであることを述べることから始めましょう。一部のプロバイダーはトライアルソフトウェアを提供していますが、他のプロバイダーは、選択できる永続的な無料プランを提供しています。ただし、そうする前に、プッシュ通知のコスト分析に関する記事をご覧ください。
私は最高のプッシュ通知アプリを比較し、それらが実際に提供しているものを分析するのに多くの時間を費やしました。
今のところ、PushEngageを選択すべき理由を簡単にまとめます。
Get a Low-Code Solution for Android Push Messages
Right till now, you had to use skeleton SDKs to send app push notifications. The problem with using those SDKs is that they are pretty bare bones.
Theoretically, you can send any type of mobile app push campaigns with them. But then, you also have to build:
- An interface to manage your campaigns
- An analytics suite to track your campaign performance
- Better support for rich media and in-app redirection links (or deep links)
- Processes to liaise between marketing and development teams
All for the sake of introducing a single channel of growth. Using the old tools to send mobile app push notifications is tedious, expensive, resource-intensive, and time-consuming. And of course, it requires deep coding skills in your team to develop and manage everything you build.
With the new PushEngage Android and iOS SDKs, you can send mobile app push using the same reliable software for great delivery rates. But we’ve built several layers on top that make it super easy to build custom integrations with your app. And PushEngage manages the entire SDK. So, you don’t even have to spend a ton of time and money to manage your integrations.
あなたがする必要があるのは、構築することだけです!
You can send broadcast notifications directly from your PushEngage dashboard once you’ve set up your app to send mobile app push notifications using PushEngage’s SDK. Yes, you still have to add code to your app and develop the connectors between your app and the PushEngage API. But once that’s done, you can easily create mobile app push campaigns from a pre-built software interface that also comes with:
- エンゲージメントの高いプッシュキャンペーンタイプ
- Proven campaign templates with high conversion rates
- Automated campaigns to promote your content whenever you publish
- 複数のターゲティングおよびキャンペーンスケジュールオプション
- Web push campaigns as a complementary growth channel
- データに基づいたパーソナライゼーションを使用したオーディエンス維持率の向上
- 目標追跡と高度な分析
- スマートA/Bテスト
- 専任のサクセスマネージャー
And so much more. We just took the pain out of developing Android and iOS mobile push campaigns for your app.
Establish Your Brand Identity
You can easily set an icon for Android mobile app push:
As well as a display image to make your mobile app push notifications more clickable:
You can do the same for iOS mobile app push as well. Set a media image for your iOS app push notification to make your campaign more eye-catching:
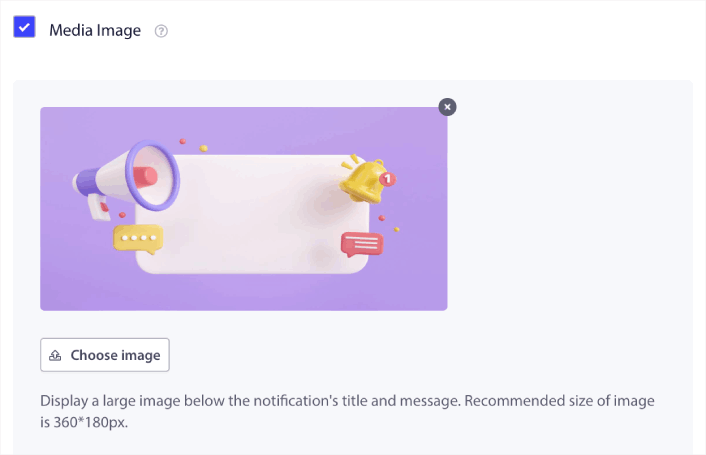
In other words, you can preserve your brand design guidelines pretty easily when you send mobile push notifications. And all that, from an easy-to-use interface that you’ll never have to manage!
Send More Targeted and Personalized Messages
For Android app push, you can create Groups and Channels to customize exactly what your notifications look, feel, and sound like.
A Group is a collection of notification types with a common name.
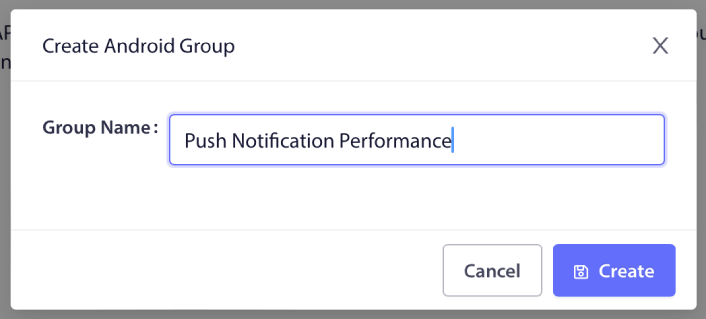
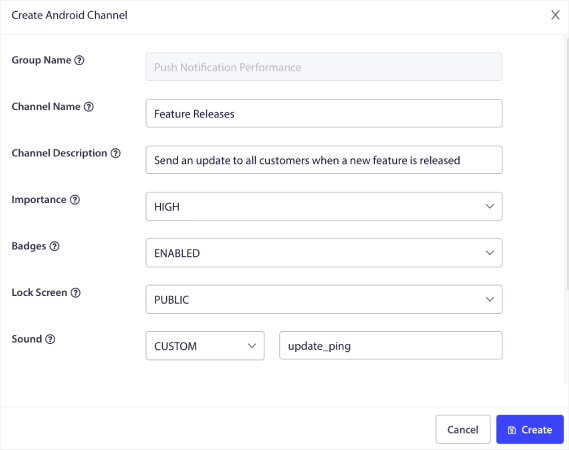
Think of it as categories in a blog. Inside each Group, you can add Channels:

A channel describes how your app notifications will behave when your users receive the notification. Will it show up over the lock screen? Should it show the app icon as the badge? What priority level will it have for your users? Do you want a custom notification sound to play when your users receive it?
All these settings can be configured within a channel.
For an iOS mobile app notification, there’s no concept of Group and Channel. However, you can create personalized notifications using other settings. You can set a notification sound, a category for your notifications, and a common thread ID to bundle them together.
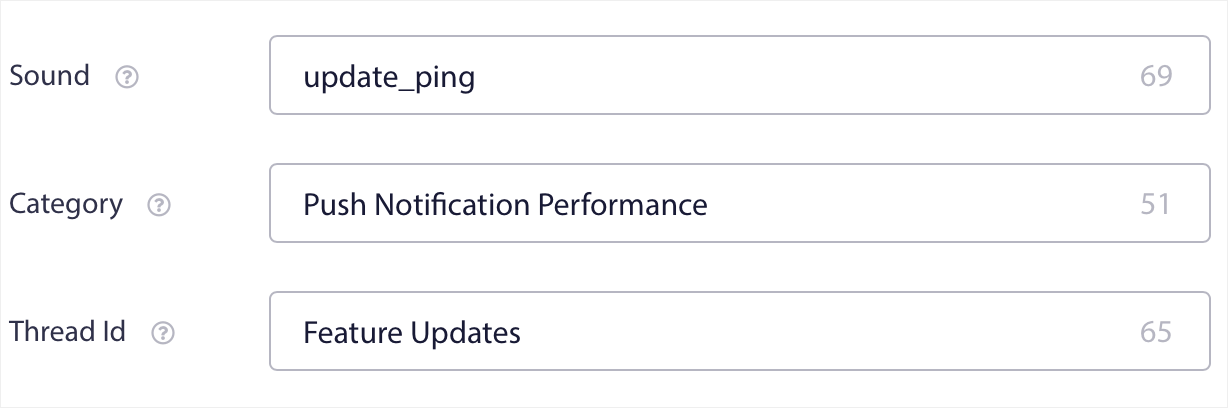
You can even set a custom badge for that notification that shows how many unread notifications the user has received from your app.
Redirect Your Users to Any Link Inside Your App Or Outside It
Mobile app push has a unique feature called Deep Links. Deep links are like URLs, but ones that point to a screen inside your app. You can send your users to any screen you want using a Deep Link from the PushEngage dashboard, or you could send them to any regular URL on the web.
This means that you can get your users to open your app when you want to.
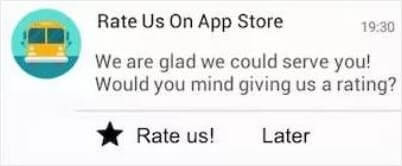
Or, even redirect them to the App Store or your website to leave a review of your app.
Of course, these are only basic ideas. You can use these links to run complex, multi-step engagement campaigns both inside and outside your app!
How to Install Android Push Messages On Your Website
We recommend using PushEngage to get started with Android web push messages for free. Every time you publish a blog post, PushEngage will automatically send out a push notification to all your subscribers.
Let’s start growing your audience with Android push messages for free.
ステップ#1:無料のPushEngageアカウントを作成する
Head over to PushEngage and click on Get Started for Free:
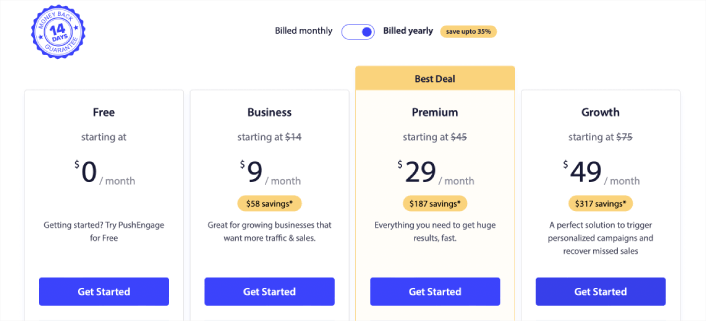
Select the Free plan or whichever suits your needs the best:
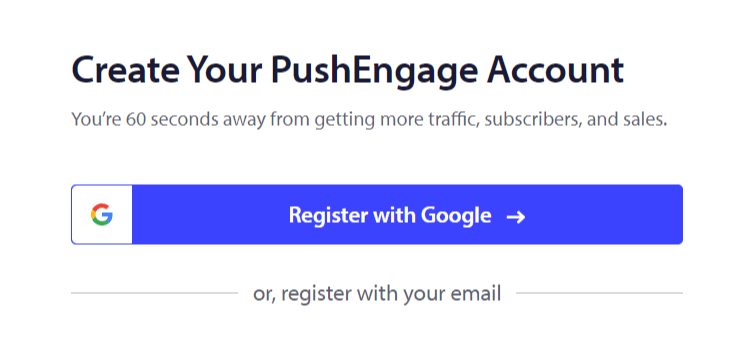
ステップ#2:PushEngageにサインアップする
Signup for the plugin with your user details or your Gmail ID:
指示に従ってアカウントの設定を完了してください。
Step #3: Install the WordPress Plugin
NOTE: If your website isn’t built using WordPress, you can install Android push messages using other methods. We don’t cover those methods in this article but check out our installation guide if you’re interested.
サインアップすると、PushEngageダッシュボードに移動します。

Head over to Site Settings »Site Details:

Click on the Click Here For Setup Instruction button:

Then, click on the Install WordPress Plugin button:

If you’ve already set up your site’s URL, PushEngage will install itself automatically on your site.
ステップ#4:WordPressウェブサイトをPushEngageに接続する
PushEngage WordPressプラグインのインストールと有効化が完了すると、PushEngageのオンボーディングウィザードが表示されます。

ウィザードは非常にわかりやすいです。新規ユーザーの場合は、新規?無料アカウントを請求をクリックしてください。すでにサインアップ済みの場合、既存のアカウントを接続をクリックしてください。
次に、サインアップ中にサイトを登録した場合、登録済みサイトを接続の下にあるサイトを選択ドロップダウンからサイトを選択できます:

または、 プレミアムプラン以上をお持ちの場合は、新規サイトを登録をクリックして新しいサイトを追加できます。次のステップでは、オンボーディングウィザードが他の 必須のWordPressプラグインをインストールするように促します。

各ステップを正しく実行すると、ウィザードからこの成功メッセージが表示されます。

You are now ready to create campaigns and push notification popup modals. The best place to start is to install a web notifications WordPress plugin.
How to Send App Push Messages on Android
Implementing push notifications for your Android application is now possible with PushEngage. Simply integrate the SDK once, and empower your marketing team to send contextual and personalized messages to your Android app users. You would need help of your developer to get this running for you.
Set Up a Firebase Project
Before you get started with app push notifications, you need to ensure that you have an existing Firebase account. Log in to your Firebase console, using your Google account, and click Add Project or select an existing project.

Enter a project name and click Continue. On the next screen, click Create project with your project name.

Then, click on Continue. Once Firebase is done configuring your account, you can click on Create Project.

最後に、Androidアイコンをクリックして、プロジェクトにAndroidアプリを追加します。

次に、Androidアプリのパッケージ名を入力します。統合しようとしているAndroidアプリの名前を使用することをお勧めします。登録をクリックします。

google-services.jsonファイルをダウンロードし、Androidアプリモジュールのルートディレクトリに配置します。

Firebaseコンソールで、左上にある[プロジェクトの概要]の横にある[設定アイコン]をクリックし、[プロジェクトの設定]を選択します。
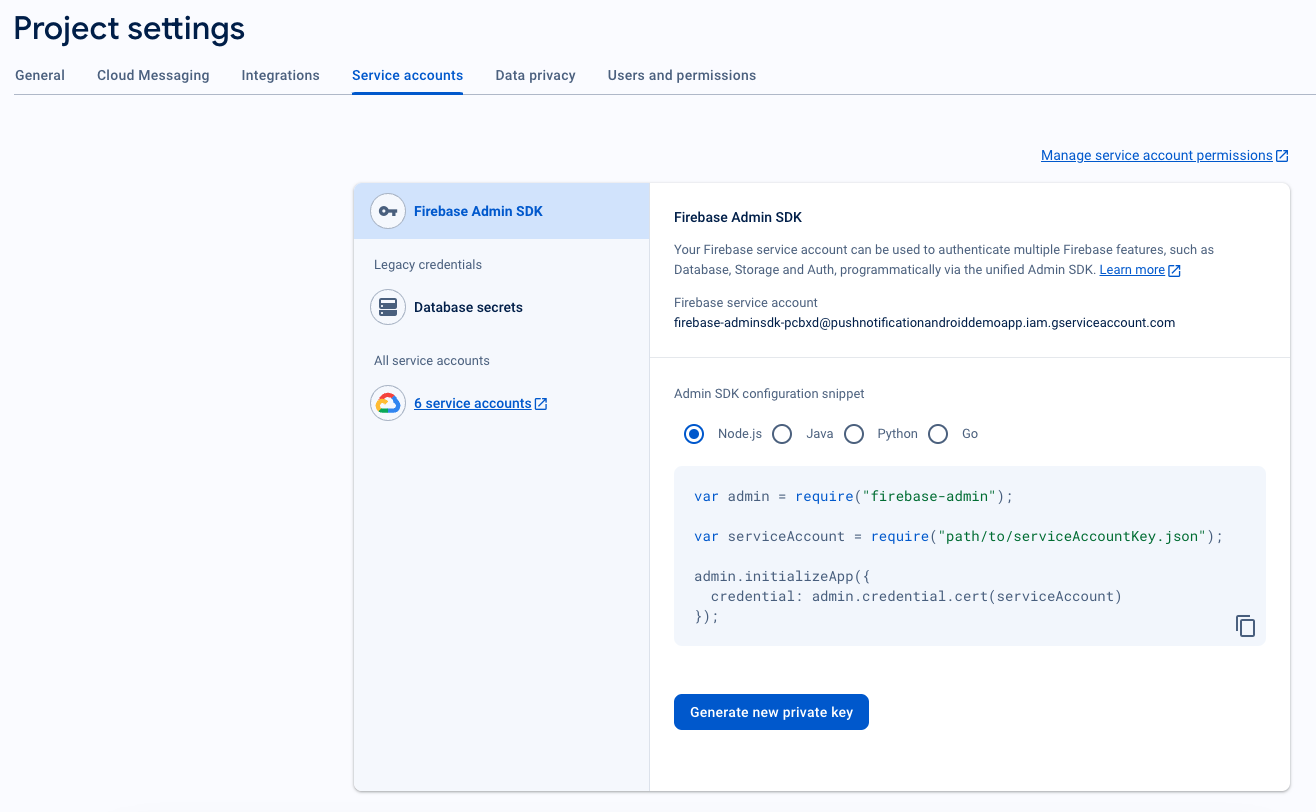
[新しい秘密鍵を生成]をクリックします。
重要:前の手順でダウンロードした.jsonファイルを安全な場所に保管してください。PushEngageダッシュボードで設定する際に必要になります。
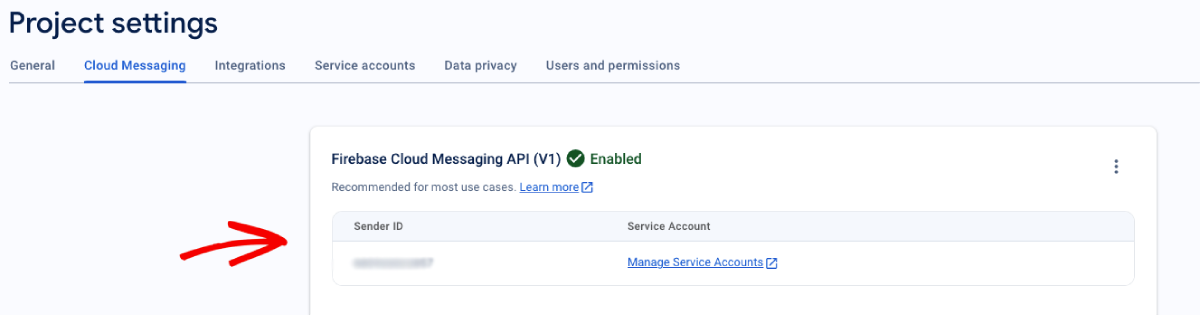
Firebaseコンソールで、左上にある[プロジェクトの概要]の横にある[設定アイコン]をクリックし、「[プロジェクトの設定]」を選択します。[Cloud Messaging]タブに移動し、[Sender ID]を見つけます。
Integrate FCM with PushEngage Dashboard
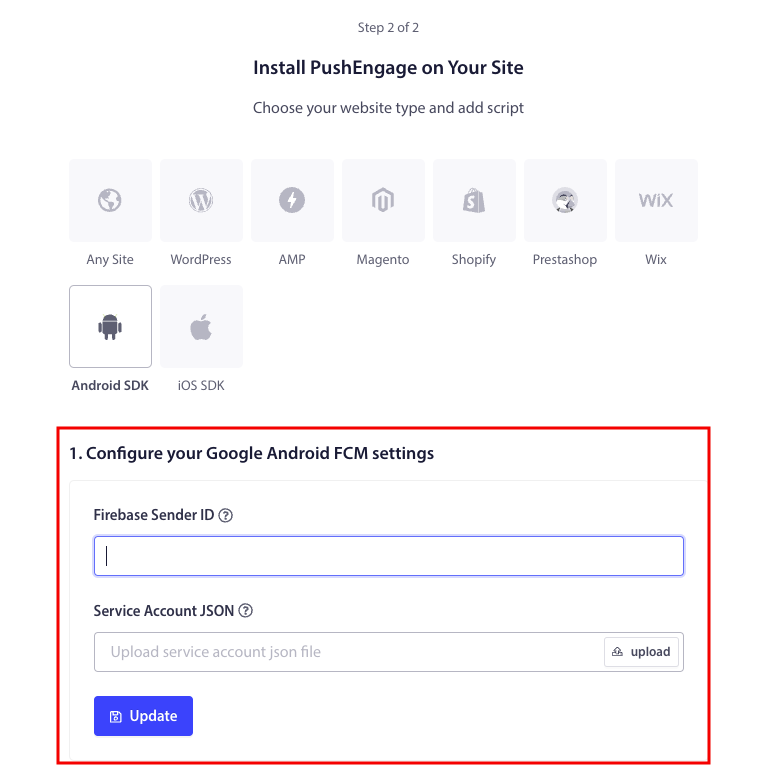
Firebaseでプロジェクトを作成したら、PushEngageダッシュボードにSender IDを統合できます。PushEngageアカウントで、[サイト設定] » [インストール]に移動し、[Android SDK]タブを選択します。
ここで、Sender IDとService Account JSONを設定できます。
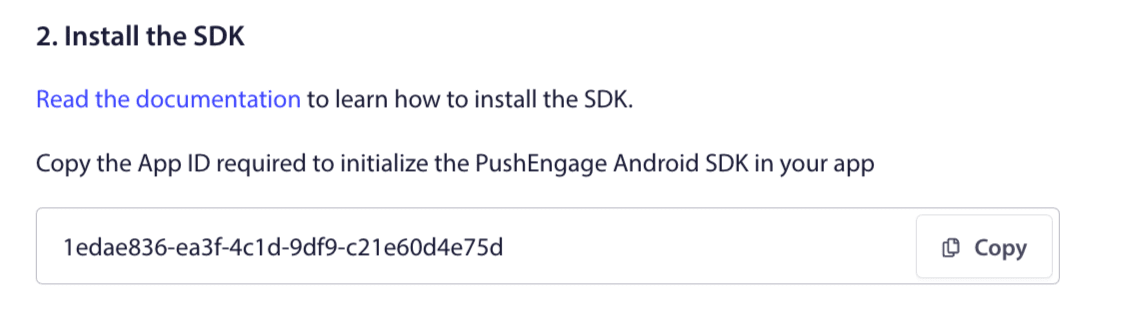
アプリケーションでPushEngage Android SDKを初期化するために必要なApp IDをコピーします。
Add SDK Dependencies
次にSDK依存関係を追加します。ルートのbuild.gradleに次の行を追加します。
1. プロジェクトで集中リポジトリ宣言を使用していない場合は、プロジェクトレベルのbuild.gradleファイルに次の行を追加します。それ以外の場合は、2番目のセクションに進むことができます。
// Project level build file where you can add configuration options common to all sub-projects/modules.
buildscript {
   repositories {
       google()
       jcenter()
   }
   dependencies {
       // ...
       // Add this line
       classpath "com.google.gms:google-services:4.3.10"

   }
}

allprojects {
   repositories {
      // ...
      // Check that you have the following line (if not, add it):
      google()
      maven {url 'https://jitpack.io' }
   }
}
プロジェクトで集中リポジトリ宣言を使用している場合は、settings.gradleファイルに次を追加します。
dependencyResolutionManagement {
    repositoriesMode.set(RepositoriesMode.FAIL_ON_PROJECT_REPOS)
    repositories {
        //add this line
        maven { url 'https://jitpack.io' }
    }
次に、アプリケーションレベルの“build.gradle”ファイルに次を追加します。
plugins {
   id 'com.android.application'
   // Add this line
   id 'com.google.gms.google-services'
}

dependencies {
   // ...
   // Add the following lines
   implementation 'com.github.awesomemotive:pushengage-android-sdk:0.0.5'
   implementation platform('com.google.firebase:firebase-bom:26.1.1')
}
Initialize the Android Push Messages SDK
PushEngage SDK初期化コードブロックを、ApplicationクラスのonCreateメソッドに追加します。PUSHENGAGE_APP_IDは、PushEngageダッシュボードから取得したApp IDに置き換える必要があります。
注意:モバイルアプリケーションにPushEngageを拡張するカスタムクラスがない場合は、Applicationクラスを拡張するクラスを作成する必要があります。
Javaでの例を次に示します。
public class PEApplication extends Application {
@Override
public void onCreate() {
super.onCreate();

// PushEngage SDK Initialization code
PushEngage pushEngage = new PushEngage.Builder()
.addContext(getApplicationContext())
.setAppId("PUSHENGAGE_APP_ID")
.build();
// The small icon is displayed on the top status bar and in the notification.
// By default PushEngage displays a bell icon, however It is recommended to
// customize this so users easily recognize notifications from your app.
PushEngage.setSmallIconResource("your_icon_name");
}
}
Kotlinでの例を次に示します。
class PEApplication : Application() {
   override fun onCreate() {
       super.onCreate()
       // PushEngage SDK Initialization code
       val pushEngage = PushEngage.Builder()
           .addContext(applicationContext)
           .setAppId("PUSHENGAGE_APP_ID")
           .build()
        // The small icon is displayed on the top status bar and in the notification.
       // By default PushEngage displays a bell icon, however It is recommended to
       // customize this so users easily recognize notifications from your app.
       PushEngage.setSmallIconResource("your_icon_name");
   }
}
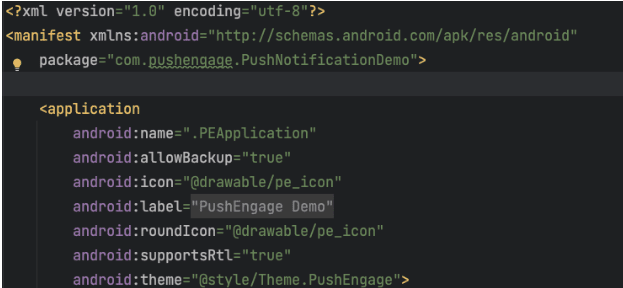
Applicationクラスを拡張するカスタムクラス名を登録するには、アプリケーションのManifest.xmlファイルに移動します。“android:name=.”PEApplication”,”という行を見つけ、“PEApplication”をカスタムクラスの名前に置き換えます。次のようになります。
上記の手順をすべて構成したら、Androidアプリケーションにプッシュ通知を送信できます。物理デバイスでアプリケーションをビルドして実行し、PushEngageダッシュボードからテストプッシュ通知を送信します。
Handle Notification Permissions for Android 13 and Above
Android 13では、一部のデバイスに通知を送信する前に権限が必要になります。そのため、Android 13以降を実行している場合は、権限に必要なコードは次のとおりです。
 @RequiresApi(api = Build.VERSION_CODES.TIRAMISU)
    private void requestNotificationPermissionIfNeeded() {
        int permissionState = ContextCompat.checkSelfPermission(this, android.Manifest.permission.POST_NOTIFICATIONS);

        if (permissionState == PackageManager.PERMISSION_DENIED) {
            ActivityCompat.requestPermissions(this, new String[]{android.Manifest.permission.POST_NOTIFICATIONS}, 100);
        }
    }
通知権限プロンプトの結果を処理できます:
@Override
    public void onRequestPermissionsResult(int requestCode, String[] permissions, int[] grantResults) {
        super.onRequestPermissionsResult(requestCode, permissions, grantResults);
        if (requestCode == 100) {
            if (grantResults.length > 0 && grantResults[0] == PackageManager.PERMISSION_GRANTED) {
                PushEngage.subscribe();
            } else {
                Log.d("MainActivity", "onRequestPermissionsResult: Permission denied");
            }
        }
    }
これで完了です。PushEngageダッシュボードに戻り、同じダッシュボードから直接Androidプッシュメッセージを送信できるようになりました。
Android SDKについてさらに詳しく知りたい場合は、詳細なAPIドキュメントをご覧ください。
How Do Android Web Push Messages Work?
それでは、Androidウェブプッシュメッセージがどのように機能するかを技術的に掘り下げてみましょう。
簡単に言うと、新しい訪問者があなたのウェブサイトに入るたびに、プッシュ通知購読者になるように促されます。
次に、PushEngageのようなウェブプッシュ通知サービスを使用して、購読者に送信したいAndroidプッシュメッセージを作成およびスケジュールします。リストのすべての購読者に送信するか、購読者の特定のセグメントに送信するかを選択できます。
まず、Drip Autoresponderを作成します。
最後に、デバイスがオンラインになり、推奨されるアクションを実行すると、購読者はプッシュメッセージを受信します。

これらはすべて完全に真実ですが、これはバックグラウンドで起こることのほんの一部です。それでは、技術的な詳細を見てみましょう。しかし、まず、まだ行っていない場合は、今日PushEngageを使い始めましょう。
まず、PushEngageには、購読者のデバイスに接続してAndroidプッシュメッセージを送信するサーバーがあります。これらのサーバーは、購読者の名前やメールアドレスなどの個人情報を保存しません。
では、これらのサーバーは何を保存するのでしょうか?
PushEngageと当社のサーバーにとって、購読者は、購読者のデバイスとブラウザに基づいて生成される一意のハッシュ番号です。さらに、サーバーは購読者のジオロケーションを保存することもできます。
これらのサーバーに直接アクセスすることはできません。PushEngageダッシュボードを使用して、プッシュ通知キャンペーンを作成、最適化、管理することしかできません。
つまり、PushEngageはあなたのサービスプロバイダーです。これは、コーディングや元のサーバーのメンテナンス方法について何も知る必要がないことを意味します。私たちはそれらすべてをあなたのために処理します。あなたが心配する必要があるのは、キャンペーンの設定と利益を上げることだけです!
さて、サーバーがハッシュ番号のみを保存し、個人情報は保存しない場合、パーソナライズされたプッシュ通知がどのように機能するか疑問に思っているかもしれません。ここでサービスプロバイダーAPIが登場します。あなたにとっては、PushEngage Javascript APIになります。
このAPIを使用して、お持ちの他のCRMまたはデータベースに接続できます。これにより、購読者の個人情報を使用して、パーソナライズされたAndroidプッシュメッセージを送信できます。
PushEngage APIを使用して、カート放棄キャンペーンなどの高度なキャンペーンを送信することもできます。
How do Mobile Android Push Messages Work?
Androidプッシュメッセージは、Firebase Cloud Messaging (FCM)と呼ばれるサービスを介してユーザーに配信されます。アプリがプッシュ通知を送信するときにバックグラウンドで起こることは次のとおりです。
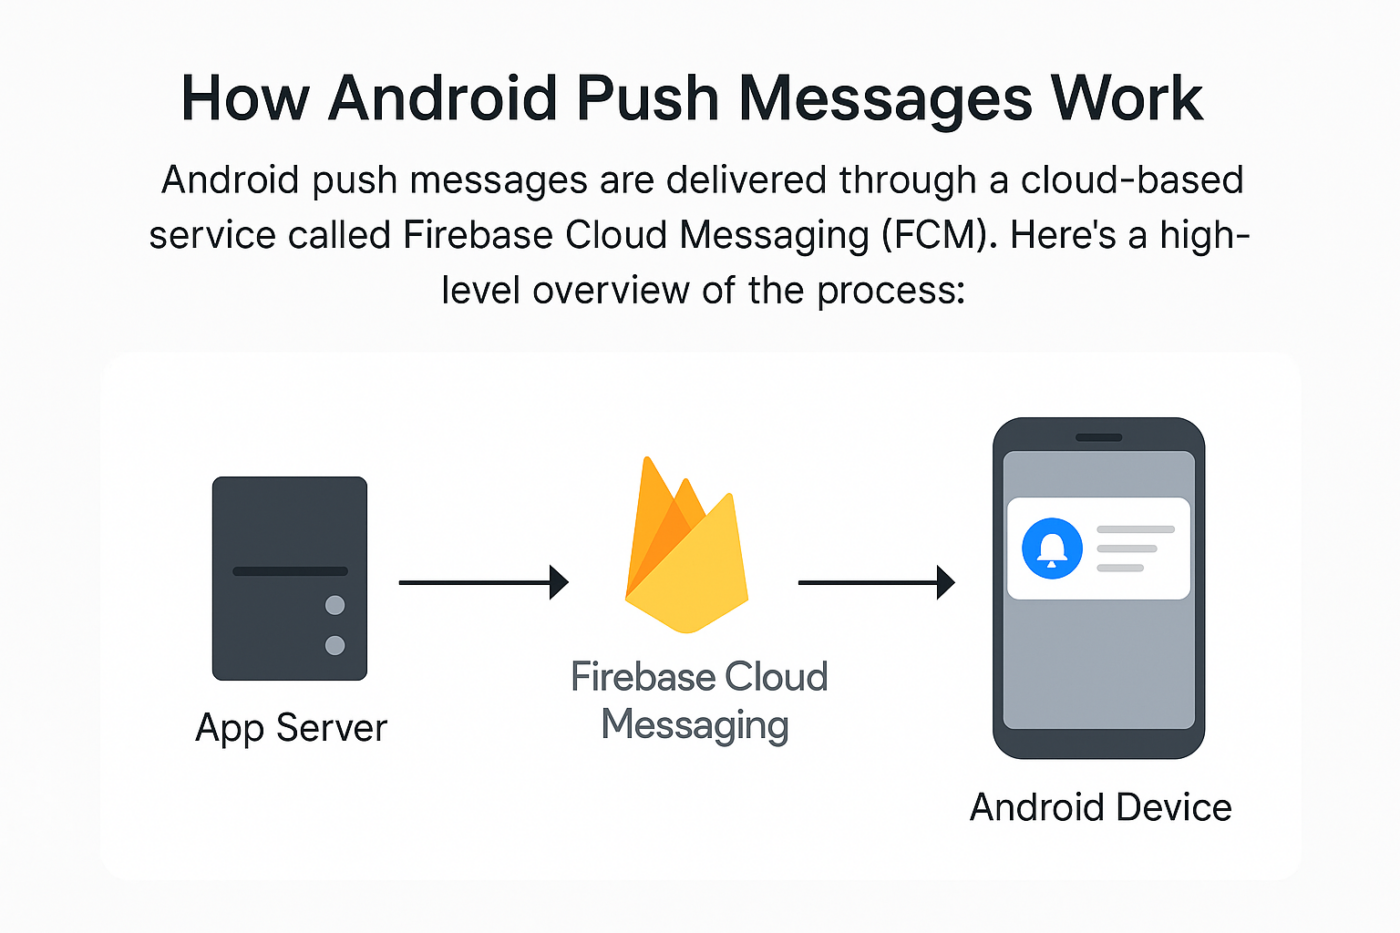
ステップ1:ユーザーがアプリをインストールする
ユーザーがアプリをダウンロードして開くと、アプリはFirebase Cloud Messaging (FCM)に登録され、一意のデバイス トークンを取得します。
ステップ 2: サーバーが通知を準備する
バックエンド(またはPushEngageのような通知プロバイダー)は、リッチメディアと共にメッセージを作成し、それを受信するユーザーを選択します。また、プッシュメッセージごとに本格的な自動化プロセスを設定します。
ステップ 3: PushEngage が FCM に送信する
通知はFirebase Cloud Messagingに送信されます。これは、サーバーとユーザーの電話の間の中間者として機能します。
ステップ 4: FCM が Android デバイスに配信する
FCM は、アプリが閉じている場合でも、プッシュメッセージをユーザーの Android デバイスに安全にルーティングします。
ステップ 5: ユーザーが通知を確認する
Android OS は、デバイスの設定に応じて、プッシュ通知をステータスバー、ロック画面、またはバナーとして表示します。
What Are the Different Parts of Android Push Messages?
Android プッシュメッセージの仕組みを理解したところで、カスタマイズできる(またはできない)プッシュ通知のさまざまな部分を見てみましょう。
#1. Push Notification Title
タイトルは、プッシュ通知の中で最も目立つテキストです。明確な視認性のために 60〜80 文字に制限されています。このタイトルの目的は、購読者の注意を引くことです。そのため、タイトル全体がはっきりと見えるようにすることが重要です。
購読者が気に入るような、 killer なタイトルを作成するために、プッシュ通知のコピーライティングガイドをご覧ください。
#2. The Domain
プッシュ通知のドメインは、単にウェブサイトの URL です。これも変更できません。しかし、ブラウザアイコンとは異なり、ドメインはブランド認知度を高めるため、はっきりと見える必要があります。
ここで、PushEngage のサブドメインにプッシュ通知データを保存するオプションがあります。サブドメインを使用すると、プッシュ通知のこの部分は、ブランドの代わりに PushEngage サブドメインの URL を表示します。
ブランド価値が低下する可能性があるため、このオプションの使用はお勧めしません。
#3. Push Notification Content
通知コンテンツには、通知全体の中で最も多くのテキストが含まれます。タイトルと同様に、視認性のために 120〜150 文字に制限されています。より多くの文字を使用することもできますが、短く簡潔に保つことをお勧めします。
通常、この部分は、タイトルに追加のコンテキストを提供する、またはオファーを完了するための方法として機能します。テキスト自体にコールトゥアクションを使用する必要はありません。プッシュ通知では、コールトゥアクションボタンを追加できます。
プロのヒント: 地域言語を使用して、プッシュ通知をよりパーソナライズされたものにすることができます。エンゲージメントを高めるために、Phoot がローカル言語をプッシュ通知に使用した方法に関するこのケーススタディをお読みください。
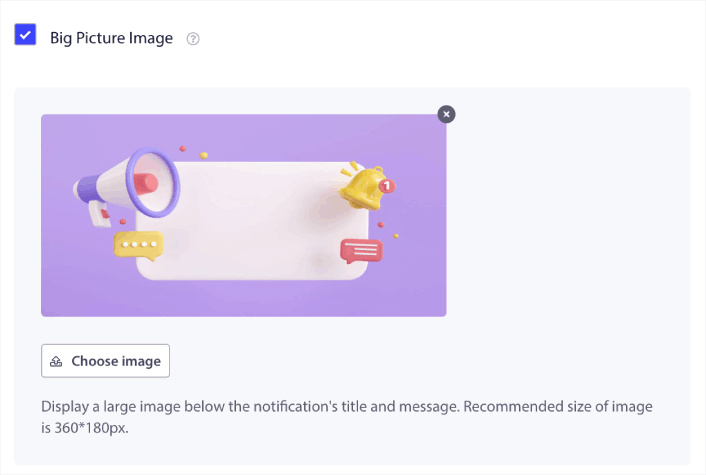
#4. Notification Large Image
大きな画像は、通知の中で最初に目に入るものです。通常は 360x180 の画像で、プッシュ通知の中で最も魅力的な部分となります。
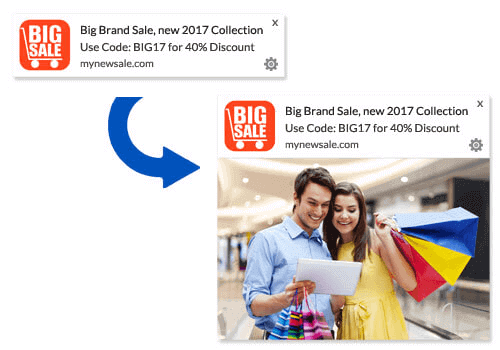
The notification image is also entirely optional. You can choose to not use one if you like. Using a notification image can make your push notification feel like an advertisement. This can cause the notification to be ignored by many subscribers.
But if you do it right, images can improve CTR (click-through rates) by up to 62%. Check out our study on the impact of images in push notifications by industry.
If you’re not sure whether you should use a large image, we suggest A/B testing the notification with and without the image.
#5. Push Notification Icon
The push notification icon is like the site icon on your website, but for your push campaigns. It’s an image that’s 192×192 or larger to represent your business. Typically, this will be your site icon and you can only set this one time for all your Android push messages.
Pro Tip: If you rebrand at any time, remember to change the push notification icon in PushEngage as well. Also, remember that you can’t use animated images for your icon. So, GIFs won’t work here.
#6. 行動喚起ボタン
Every push notification supports up to 2 buttons. We recommend using customized call-to-action buttons for your campaigns. You can even add separate URLs and button icons for each CTA.
Check out this list of web push notification tricks for some nice CTA ideas.
#7. ブラウザアイコン
The smallest part of the push notification is the browser icon that denotes which browser your subscriber is using currently. It’s one of the most overlooked parts because you can’t change this in any way and for the most part, a subscriber won’t notice the browser icon either.
#8. ブラウザのラベル
The browser label is just the text version of a browser icon. Like the icon, you can’t change the browser name label.
#9. Time Stamp
The timestamp is a simple way for your subscribers to know when the message was received. It’s system generated and you can’t change this either.
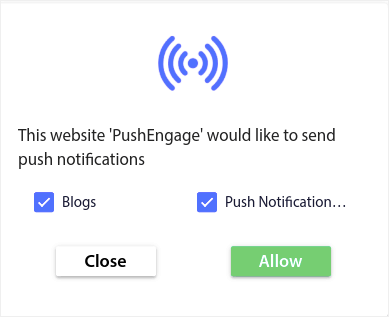
プッシュ通知のオプトインのさまざまな種類
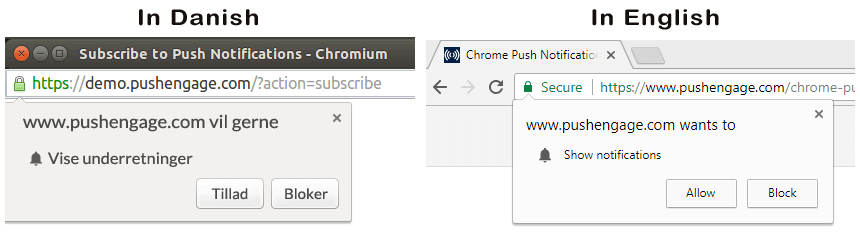
Every web push notification campaign begins with consent. It’s an extension of Seth Godin’s idea of permission marketing. The idea is very simple: before you send your web visitors any content that they may or may not want to see, ask for permission.
The process of getting permission to send any push notification is called “opting in”. So, before you can send out a push notification campaign, you first need your website visitors to opt-in and subscribe to your notifications.
If you’re a content creator on YouTube, then you’re already familiar with how subscribers work. The only difference is that you don’t own the list of your YouTube subscribers and you can’t control the notifications you send them.
With PushEngage, you do own that list because that information is stored on your domain. Now, there are two types of opt-ins you can use for your website:
- Single Opt-ins
- Double Opt-ins
The primary difference between them is very clear. Single opt-ins ask for permission to send push messages only once. Double opt-ins ask each subscriber to confirm their decision.
So, which one should you choose?
シングルオプトインは、ダブルオプトインよりも最大150%多くの購読者を獲得できることがわかっています。この件で苦労している場合は、オプトイン率を高める方法に関する記事をご覧ください。
法的な観点から、GDPRではシングルオプトインのみが要求されます。しかし、ダブルオプトインでは、購読者が実際にコンテンツを求めているため、エンゲージメントが大幅に向上します。ただし、純粋なオプトイン数という点では、シングルステップオプトインの方がはるかに効果的です。
考慮すべきもう1つの点は、シングルオプトインを使用するには、ウェブサイトにSSL証明書をインストールする必要があるということです。しかし、セキュアなウェブサイトがなくても、ツーステップオプトインをインストールできます。
したがって、SSL証明書がインストールされている場合は、シングルオプトインを使用してください。そうでない場合は、WordPressウェブサイトにSSL証明書をインストールする方法に関するこの記事をご覧ください。
注意:Android 13以降を使用している場合を除き、アプリのプッシュ通知にオプトインは必要ありません。
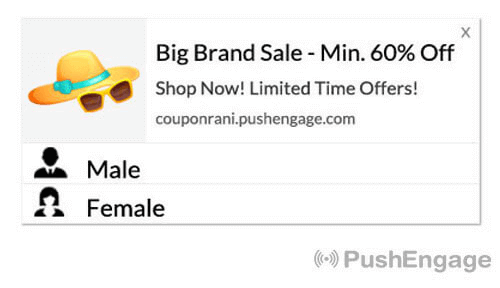
Androidプッシュメッセージをパーソナライズする方法
キャンペーンを作成する前に、セグメントとオーディエンス グループを設定して、パーソナライズされた プッシュ メッセージを送信する必要があります。
プッシュ通知購読者向けのセグメントとオーディエンスグループを作成することで得られるパーソナライゼーションのレベルを超えるものはありません。 PushEngage » オーディエンスにアクセスし、すぐにセグメントとオーディエンスグループの作成を開始してください。
セグメントタブの下で、新しいセグメントを作成したり、既存のセグメントを編集したりできます:

さらに深いパーソナライゼーションが必要な場合は、オーディエンスグループタブでオーディエンスグループを作成してください:

プッシュ通知セグメントとパーソナライズされたプッシュ通知が初めての方は、セグメントの作成方法に関する記事と、高度なオーディエンスグルーピングに関する発表をご覧ください。
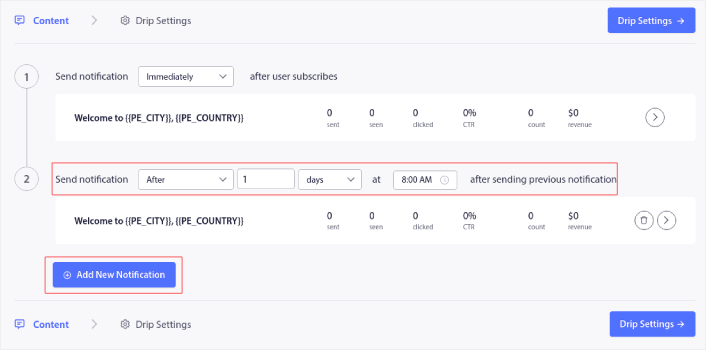
ターゲットを絞ったAndroidプッシュメッセージを作成する方法
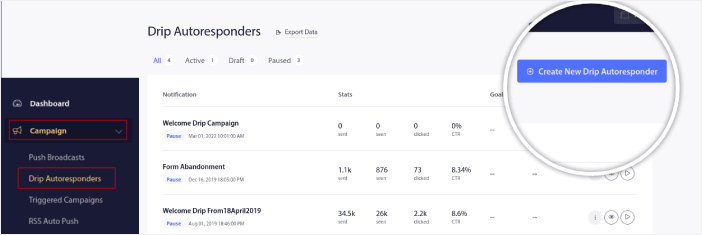
PushEngage ダッシュボードに移動し、キャンペーン » ドリップ自動応答 に進み、新しいドリップ自動応答を作成 をクリックします。

次に、キャンペーンに名前を付け(「ウェルカムドリップ」のような名前をお勧めします)、コンテンツの下で、「ユーザー登録直後に通知を送信」というオプションを選択します。

この時点で、通知の横にある矢印をクリックして、通知の内容を編集できます。
PushEngageのプレミアムまたはエンタープライズプランをご利用の場合、複数の通知を追加して一連の自動ウェルカムメッセージを作成できます。新しい通知を追加をクリックしてコンテンツを編集するだけです。
完了したら、ドリップ設定をクリックし、ウェルカムキャンペーンをすべての購読者に送信するオプションを選択します。

次に、下にスクロールして独自のUTMパラメータを設定し、プッシュ通知を追跡します。

完了したら、上にスクロールして戻り、自動応答を有効にするボタンをクリックします。

これで完了です!
ターゲットを絞ったAndroidプッシュメッセージを送信する方法
「PushEngageダッシュボード」に移動し、「キャンペーン」→「プッシュブロードキャスト」に移動して、「新しいプッシュブロードキャストを作成」ボタンをクリックします。

「Content」タブで、プッシュ通知のコンテンツを追加します。

また、クリック率を向上させるためにA/Bテストを設定したり、より多くの表示回数を獲得するためにプッシュブロードキャストをスケジュールしたりすることもできます。いずれの場合も、最良の結果を得るために、プッシュ通知のベストプラクティスを確認してください。
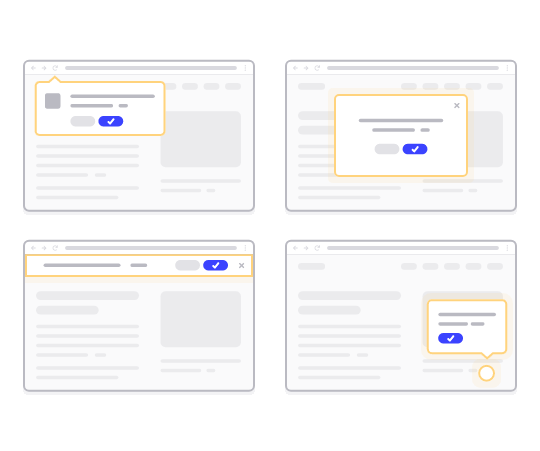
Androidプッシュメッセージのポップアップモーダルを作成する方法
プッシュ通知ポップアップモーダルとは、ウェブサイト訪問者にメッセージや通知を表示するために、ウェブサイトまたはモバイルアプリのインターフェイスの上に表示される小さなウィンドウです。
ポップアップモーダルは、さまざまなイベントによってトリガーされる可能性があります。ページ訪問時、スクロール深度時、さらにはボタンクリックのようなカスタムアクション時にトリガーされるようにポップアップを設定できます。
通常、ポップアップモーダルには、「購読」や「許可」などの行動喚起が表示され、訪問者からAndroidプッシュメッセージを送信する許可を得ます。このチュートリアルに従えば、次のようなポップアップを作成できます。
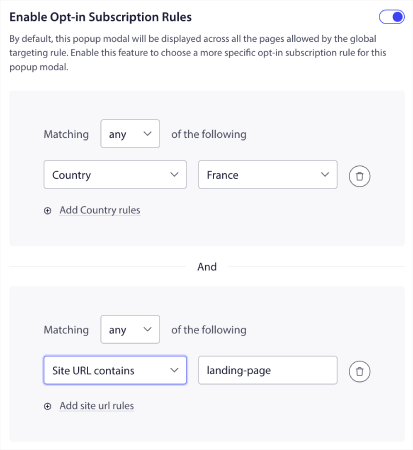
登録者を直接セグメント化できるポップアップモーダルを作成したり、ジオロケーションやブラウザなどのデフォルト属性で登録者を収集するだけの通常のポップアップを作成したりできます。
WordPressダッシュボードに戻ります。PushEngage » デザインに移動します。
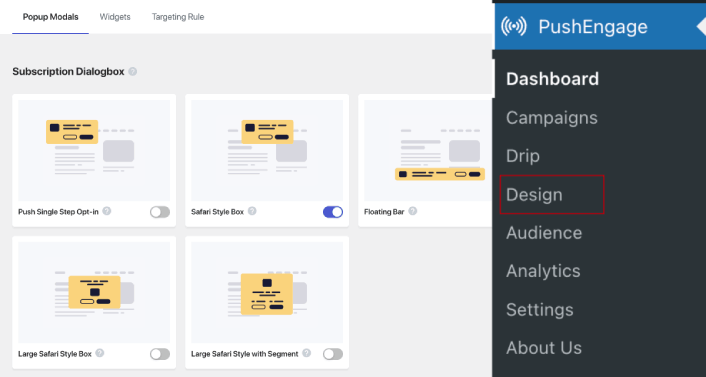
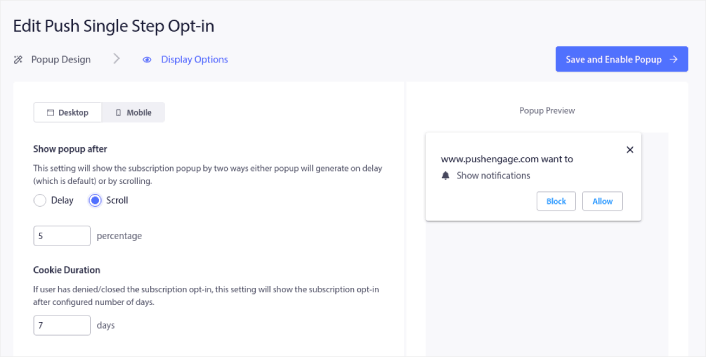
そして、好きなだけ多くのポップアップモーダルを設定できます。もちろん、各ポップアップモーダルの「表示オプション」で、異なる時間にトリガーされるようにすることができます。
ここでのアイデアは、訪問者に購読する確かな理由を与えることです。そのためのヘルプが必要な場合は、カスタムプッシュ通知オプトインを作成する方法 に関する記事を確認してください。
よりターゲットを絞ったポップアップモーダルを作成したい場合は、「ターゲティングルール」タブの下にあるターゲティングルールを使用できます。
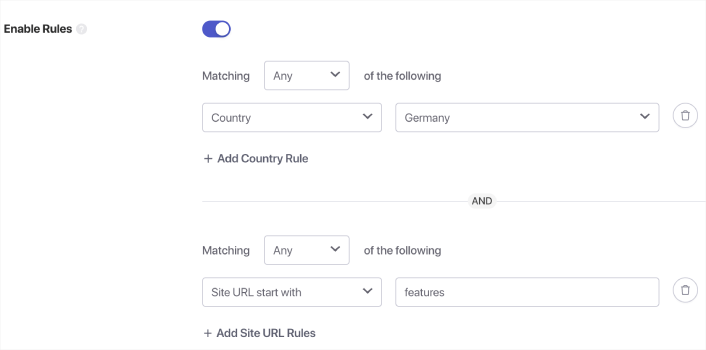
これらはグローバルなターゲティングルールであり、個々のポップアップモーダルのターゲティングルールよりも優先されます。ただし、必要に応じて、それらを編集することで、各モーダルに堅牢なターゲティングルールを作成できます。
たとえば、さまざまな国の訪問者をターゲットにするために、さまざまな言語でポップアップモーダルを作成できます。
開始するためにクリック率の高いテンプレートが必要な場合は、コンバージョン率の高いプッシュ通知オプトイン に関するこの記事を確認してください。
ターゲットを絞ったAndroidプッシュメッセージを送信する前にやること
ほぼ完了です。
プッシュ通知の送信を開始する前に、ウェブサイトにサブスクリプションのオプトインを設定する必要があります。オプトインは、ウェブ訪問者をプッシュ通知の購読者に変換します。したがって、これは重要な要素です。
インスピレーションが必要な場合は、コンバージョン率の高いプッシュ通知オプトインに関するこの記事を確認できます。オプトインの設定が完了したら、サイトは登録者情報を収集できます。しかし、オプトインが正常に機能していることをどのように確認しますか?
したがって、賢明なのは、ウェルカムプッシュ通知を設定することです。
ヒント: 本格的なプッシュ通知のテストに時間をかけるべきです。これにより、最も一般的な問題がトラブルシューティングされ、後で問題を解決しようと時間を無駄にすることはありません。
Androidプッシュメッセージを送信した後にやること
今回は以上です、皆さん!
この記事がお役に立った場合は、ぜひ下記のコメント欄にご記入ください。
Androidプッシュメッセージの開始は、気が遠くなるように思えるかもしれません。しかし、目標追跡と分析に注意を払っていれば、問題ないはずです。さらに重要なのは、プッシュ通知キャンペーンの助けを借りて、はるかに多くの利益を得られることです。開始に役立つクールなリソースをいくつか紹介します。
- リターゲティングプッシュ通知を使用して収益を2倍にする方法
- プッシュ通知の並べ替え方法と、成果の出るキャンペーンの見つけ方
- プッシュ通知購読者リストをクリーンアップする方法(簡単)
- RSSプッシュ通知を自動送信する方法
- プッシュ通知を使用してニュースサイトを宣伝する方法
- クロスセルプッシュ通知を使用して売上を2倍にする方法
- 閲覧放棄プッシュ通知の使用方法(4つのステップ)
プッシュ通知が初めての場合は、PushEngageを試してみてください。PushEngageは市場でNo.1のプッシュ通知ソフトウェアです。あなたのキャンペーンは安全な手に委ねられます。
ですので、まだの場合は、今すぐPushEngageを使い始めましょう!


