هل تبحث عن طريقة سهلة لإرسال إشعارات دفع RSS؟
يعد إنشاء المحتوى وإدارة المدونة باستمرار عملاً شاقًا. ولكن إذا كنت تدير عملاً تجاريًا جادًا، فأنت تعلم أن مجرد إنشاء المحتوى لا يكفي. يجب أن تكون قادرًا على الترويج لمحتواك أيضًا.
وتعد إشعارات الدفع طريقة رائعة لاكتساب المشتركين بطريقة فعالة من حيث التكلفة. ما يجعل إشعارات الدفع جيدة جدًا كأداة تسويق هو أنه يمكن أتمتتها بالكامل.
هنا يأتي دور إشعارات دفع RSS.
إذا قمت بإعداد إشعارات دفع RSS بالطريقة الصحيحة، ففي كل مرة تنشر فيها محتوى على موقعك، سيحصل المشتركون تلقائيًا على إشعار دفع يوجههم إلى المحتوى الخاص بك.
وفي هذا المقال، سنوضح لك بالضبط كيفية إعداد الدفع التلقائي لـ RSS على موقعك.
كيفية تمكين إشعارات دفع RSS في أي موقع
يمكنك إعداد إشعارات دفع RSS لأي نوع من مواقع الويب طالما أن لديها موجز RSS. إذا لم تكن متأكدًا مما إذا كان موقعك يحتوي على موجز RSS، فما عليك سوى الانتقال إلى عنوان URL "yoursite.com/rss" للتحقق (استبدل "yoursite" في المثال باسم موقعك الفعلي).
ولإرسال إشعارات دفع RSS، ستحتاج أيضًا إلى موفر إشعارات دفع. في هذا المقال، سنوضح لك كيفية استخدام PushEngage لإرسال الدفع التلقائي لـ RSS. PushEngage هو برنامج إشعارات الدفع رقم 1 في العالم. لذا، ستكون حملاتك في أيد أمينة.
لنبدأ.
الخطوة # 1: تثبيت PushEngage
توجه إلى الصفحة الرئيسية لـ PushEngage وانقر على زر البدء:

يمكنك اختيار الخطة المجانية لتجربة PushEngage، أو اختيار خطة مدفوعة إذا كنت جادًا في تنمية عملك. تتضمن الخطط المدفوعة خيارات استهداف جمهور أفضل وميزات أتمتة الحملات.
بمجرد التسجيل للحصول على حساب، انتقل إلى لوحة تحكم PushEngage وانتقل إلى إعدادات الموقع » تفاصيل الموقع:

هنا يمكنك تخصيص شكل علامتك التجارية في إشعارات الدفع التي ترسلها. تفضل بضبط شعار وعنوان URL للموقع لإشعارات الدفع الخاصة بك.
سيشاهد مشتركو إشعارات الدفع الخاصة بك اسم الموقع و صورة الموقع و عنوان URL للموقع في إشعاراتك. لذلك، يجب عليك إعداد هذه الأمور الآن حتى تتمكن من اختبار إشعارات الدفع الخاصة بك لاحقًا.
بمجرد الانتهاء من ذلك، ستحتاج إلى الانتقال إلى لوحة تحكم PushEngage والحصول على رمز التثبيت. انقر فوق الزر انقر هنا للحصول على تعليمات الإعداد:

انسخ رمز التثبيت:
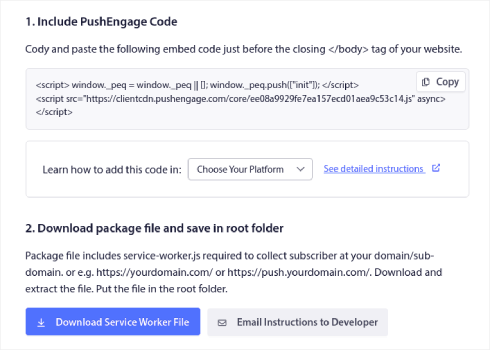
وبعد ذلك، ستحتاج إلى لصق رمز التثبيت في <head> HTML لموقعك. إذا لم تكن متأكدًا من كيفية القيام بذلك، فراجع هذه المقالة حول كيفية تثبيت إشعارات دفع الويب على أي موقع.
أو، إذا كنت تدير موقع WordPress، يمكنك تثبيت برنامج المكون الإضافي لإشعارات الويب. يتولى المكون الإضافي عملية التثبيت بأكملها بنفسه. وأنت جاهز لإعداد حملات إشعارات الدفع الخاصة بك بعد ذلك.
الخطوة # 2: إنشاء حملة إشعارات دفع RSS جديدة
Once you’ve installed PushEngage on your site, head over to your PushEngage dashboard and go to Campaign » RSS Auto Push and click on Create New Campaign:

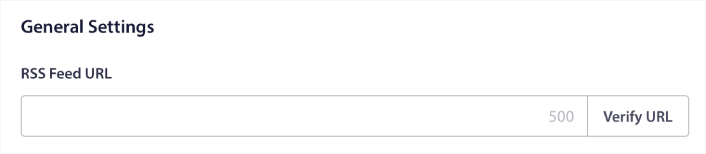
This will create a brand new RSS push notification campaign. You can set up multiple RSS feed campaigns in PushEngage. Start by giving your campaign a descriptive name. Then, paste in the URL for your RSS feed:
Step #3: Setup RSS Notification Settings
Next, you want to set the Campaign Frequency:
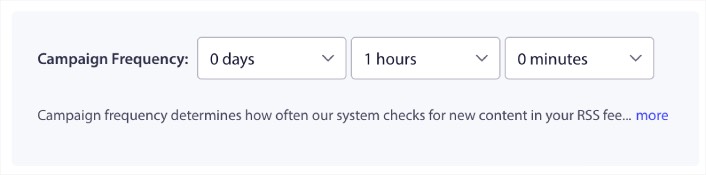
The Campaign Frequency is how often the RSS feed campaign looks for new content in your blog to send an automated push notification. The minimum value is 15 minutes and the maximum value is 7 days.
We recommend looking for content to promote once every 2 days unless you’re a news agency. For news agencies, you should keep it to 15 minutes. Keep in mind that PushEngage will only look for new content after you set up and publish your RSS feed campaign.
Step #4: Select Posts to Promote
You can select what posts to promote. You can choose between Only the latest item or All items. If you set up the RSS push notifications to select only the latest item, PushEngage only sends the latest post:
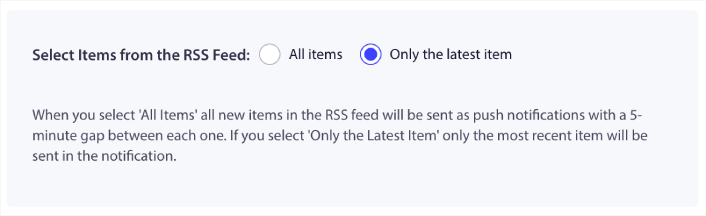
Or, you can select the All items options. In this case, the campaign will select all the posts on your site and send out push notifications for each with a 5-minute gap between them.
Step #5: Set an RSS Push Notifications Icon
Your push notification icon establishes your brand identity in your RSS push notifications. We recommend using your brand mark so that your subscribers know instantly that the notification is from your brand.
Now, there are two options here. You can either upload the notification icon manually:
And that’s really simple to do. Just click on Change image and upload your notification icon. Or, you can fetch it from your RSS feed:
You can either select the item element or the attribute inside an element to dynamically select your notification icon from the feed. Typically, most RSS feeds will hold the site icon inside the media:content item element. Even more specifically, it’s usually inside the media:thumbnail attribute of the media:content element.
To target the element, you can select the Item Element Value option and set it to media:content. Or, you can select the Element Attribute Value option and set it to media:content > media:thumbnail.
NOTE: We recommend using this option only if you know how to read XML. RSS feeds might not contain the site icon in the same XML tags as our example. So, if you’re not sure how to fetch the notification icon from the RSS feed, we recommend uploading it manually instead.
Step #6: Select Large Image for RSS Feed Notifications
Now, we’re going to select the large image for your RSS feed notifications. Again, there are two ways to do this. You can let PushEngage automatically find the image from the RSS feed:

Or, you can manually select which image you want from the feed:
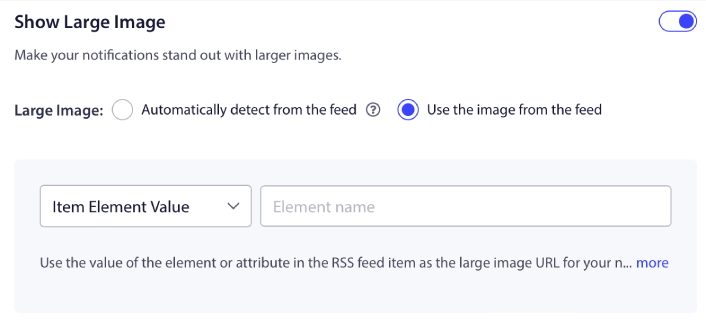
This is exactly the same as selecting the notification icon from the RSS feed. You can once again, select the image from XML element that contains it or you can select the specific attribute that contains your preferred image.
NOTE: We only recommend selecting a URL from your RSS feed if you know how to read XML. If you’re not sure how to read XML, it’s better to let PushEngage find the best image for your notifications.
Step #7: Set Push Notification Duration
The push notification duration is how long the notification stays in your subscriber’s notification tray before it get automatically deleted.
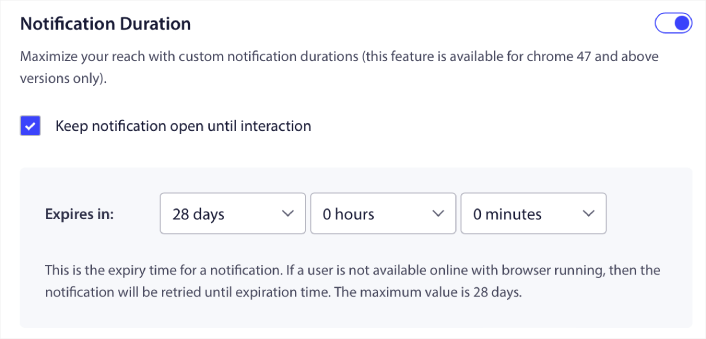
If you don’t want to overwhelm your subscribers with a bunch of unread notifications, it’s probably best to let the push notifications expire in a couple of days.
Unlike broadcast notifications or even other automated push notifications, you can’t really schedule RSS push notifications. So, you always have the option to keep the notification open until your subscriber interacts with it, even within the expiry limit.
Step #8: Set UTM Parameters
We’re almost done. Scroll down to set your own UTM parameters to track the push notifications:
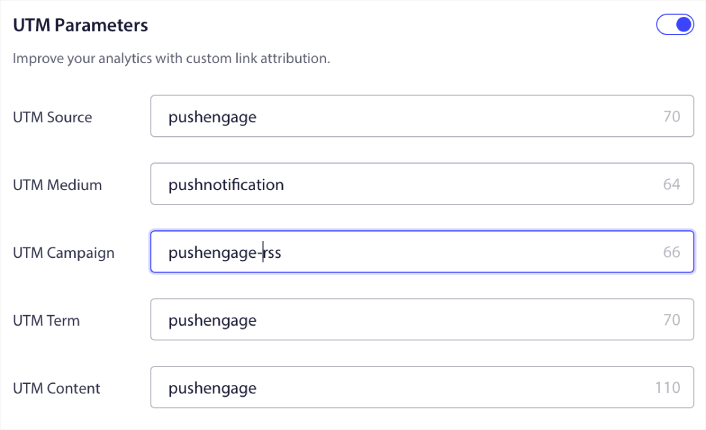
This way, you can attribute your traffic from these push notifications easily in Google Analytics.
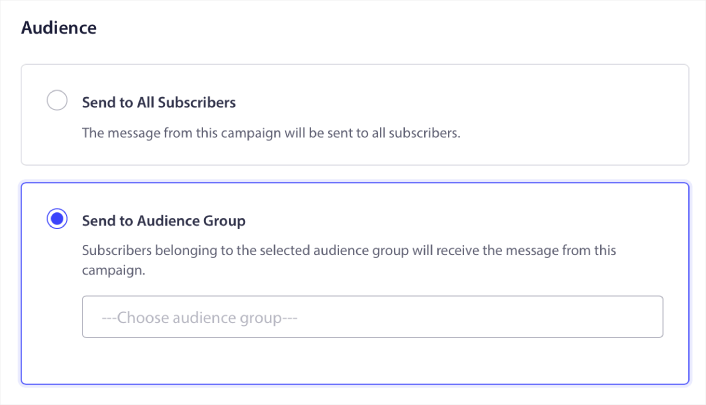
Step #9: Select Audience Group
Finally, we’re going to select an Audience Group to send your RSS push notifications. You either send the RSS feed campaign to all your subscribers, or you can create Audience Groups to send personalized push notifications even from your RSS feed.
And that’s it! That’s really all there is to it.
Now, every time you publish a new post, any push notification subscribers in the selected Audience Group will automatically receive a push notification about your new content.
What to do After You Set Up RSS Push Notifications
If you’re new to sending push notifications, you should follow a full-blown push notification testing process before you go live. It will help you troubleshoot common issues before your visitors see them and start complaining about a broken user experience.
وإذا لم تكن قد فعلت ذلك بالفعل، فتابع وجرب PushEngage. PushEngage هي الخدمة رقم 1 لإشعارات الدفع في العالم. لذا، إذا كنت جادًا بشأن تنمية عملك، فيجب عليك الاستثمار في PushEngage.
RSS push notifications are great. But you should start creating more targeted push notifications for better results. Creating custom push notification campaigns might take time, but they’re really worth it. Check out these articles before you make up your mind:
- كيفية تحويل المشتركين إلى مشترين باستخدام إشعارات الدفع عبر الويب
- أفضل ممارسات إشعارات الدفع
- 21 أفضل أمثلة لرسائل الترحيب بالموقع يمكنك استخدامها
- لماذا تعد إشعارات الدفع الترحيبية مهمة
- كيفية إجراء اختبارات A/B لإشعارات الدفع (أفضل الممارسات)
تساعد الإشعارات الفورية الشركات على النمو في جميع أنحاء العالم. هل ستنتظر حتى يبدأ منافسوك في استخدامها قبل أن تبدأ؟


