
Are you trying to figure out how to sell memberships online?
Membership sites let you charge users for access to restricted content so you can skyrocket your website’s revenue. In other words, you can easily monetize a community and sell products, courses, and merchandise to your community. You can even sell exclusive access to specific content or your time by creating site memberships.
But how do you do it?
In this article, we’ll show you step-by-step how to sell memberships with zero coding experience.
يبدو جيدًا؟ دعنا نتعمق.
PushEngage هو المكون الإضافي رقم 1 للإشعارات الفورية في العالم. احصل عليه مجانًا!
- Why Should You Sell Memberships On Your Site?
- How to Sell Memberships From Scratch
- Step #1: Get Powerful Hosting to Sell Memberships
- Step #2: How to Sell Memberships With a WordPress Membership Plugin
- Step #3: How to Configure MemberPress on Your Site
- Step #4: How to Set Up Payment Methods and Sell Memberships Online
- Step #5: How to Create Membership Levels
- Step #6: How to Set Membership Access Levels
- Step #7: How to Sell Memberships With Members-Only Content
- Step #8: How to Create a Pricing Page to Sell Memberships
- Step #9: How to Create a Login and Signup Form
- How to Sell Memberships Faster
- #1. How to Sell Memberships Using Welcome Push Notifications
- #2. How to Sell More Memberships Using Cart Abandonment Push Notifications
- #3. How to Get More Members With Browse Abandonment Push Notifications
- #4. إشعارات الدفع للتجارة الإلكترونية للبيع المتقاطع
- #5. How to Sell Memberships Using Recurring Sales
- What to do After You Know How to Sell Memberships
Why Should You Sell Memberships On Your Site?
A membership site requires visitors to log in or sign up to access certain pages, posts, or features. This makes it a great option for businesses, organizations, or individuals who want to keep certain information or content private and only available to members.
So, why should you create a WordPress member site? Well, here are a few good reasons:
- Protect sensitive information: If you have information that you don’t want just anyone to see, a WordPress member site can keep that information secure. Only the people who have signed up and logged in can access it.
- Build a community: By having a member site, you can create a sense of community among your members. They’ll be able to connect with each other and share information or ideas.
- Offer exclusive content: Membership sites can offer exclusive content or resources only available to members. This could be anything from premium blog posts, special discounts, or early access to new products.
- Charge an access fee: If you have valuable information or resources, you can charge people a membership fee to access them. This can be a great way to generate income for your business or organization.
- Easy management options: WordPress makes it easy to manage your member site. You can add and remove members, control who can see what content, and even send emails to all of your members with just a few clicks.
So, those are just a few reasons to sell memberships to your exclusive content.
Whether you’re looking to protect sensitive information, build a community, offer exclusive content, generate extra income, or just make your website easier to manage, a WordPress membership website can help you get it done!
How to Sell Memberships From Scratch
The good news is that selling memberships on WordPress is pretty easy even without any coding. All you need is a WordPress membership plugin to import powerful features to your site directly. We’ll talk about this in more detail soon. But before we think of how to sell memberships, let’s build a membership site.
Step #1: Get Powerful Hosting to Sell Memberships
Before you start building a WordPress member site, you need a reliable WordPress hosting service. We recommend using Bluehost to create your WordPress site.
Bluehost is one of the most popular WordPress web hosting services. It’s officially recommended by both WordPress and WooCommerce as a WordPress hosting service. The beautiful part is that you can get shared hosting to run a WordPress site, which is pretty affordable.
Over time, as your site scales, you can also upgrade to a higher plan to accommodate your growth. And yes, you get an SSL certificate and a domain name for a year as part of your hosting plan with Bluehost.
You don’t have to worry about your website being slow just because there’s a spike in traffic. And any WordPress hosting plan with Bluehost comes with an amazing 1-click install for WordPress.
If you’ve never built a WordPress site before, check out this tutorial on how build a WordPress website from scratch.
Again, keep in mind that this is only the cost of setting up your site. You’ll need to spend more money to extend your store’s functionality using themes and plugins.
On top of that, prices start at just $2.75 per month.
- Speed: 689 ms
- Uptime: 99.99%
- Customer Support: 4/5
Get started with Bluehost today!
Step #2: How to Sell Memberships With a WordPress Membership Plugin
WordPress membership plugins convert a regular WordPress site into a member site simply by clicking a few buttons. You don’t have to code anything into your site. So, they will reduce the time it takes to launch your members-only site.
Not to mention, you get all the support you need from the plugin developers. In simple terms, you won’t need a development team to maintain your site for you.
If you’re wondering how to sell memberships with minimal coding, we recommend using MemberPress.
MemberPress هي واحدة من أسهل إضافات مواقع العضوية على ووردبريس استخدامًا. كما أنها تأتي مع مجموعة كاملة من الميزات الرائعة لمساعدتك في تنمية مجتمع أعضائك وتحقيق الدخل منه.
للبدء، كل ما عليك فعله هو:
- تثبيت الإضافة
- تكوين بوابة الدفع الخاصة بك
- إنشاء مستويات عضوية مختلفة
- إضافة مزايا لكل مستوى عضوية
- إضافة بعض المنتجات
And you’re good to go! After that, it’s a simple matter of inviting people to join your membership program.
You can restrict access to different pages, post types, tags, and categories based on custom membership levels. The best part is that you get a course builder as well. So, if you’re thinking of creating courses for your members, you can do that without installing any other plugin.
انقر هنا للبدء مع MemberPress.
Step #3: How to Configure MemberPress on Your Site
Setting up MemberPress is super easy. If you’ve never used WordPress plugins before, check out this tutorial on how to install a WordPress plugin. Once you’re done installing the plugin, head over to your WordPress dashboard and go to MemberPress » Settings.

This will take you to the License settings, where you can enter your MemberPress license key.
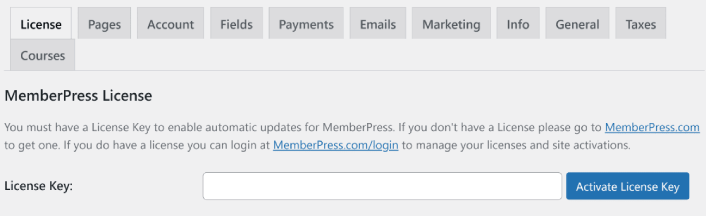
Paste in your license key and hit the Activate License Key button. You will now get full access to all MemberPress features to sell memberships.
Step #4: How to Set Up Payment Methods and Sell Memberships Online
For any member site to work, you need to accept and process payments to allow access to your premium content. So, we’re going to set up payment options for your subscribers next.
To add a payment method, visit the Settings page of MemberPress. Click on the Payments tab and click on Add Payment Method.
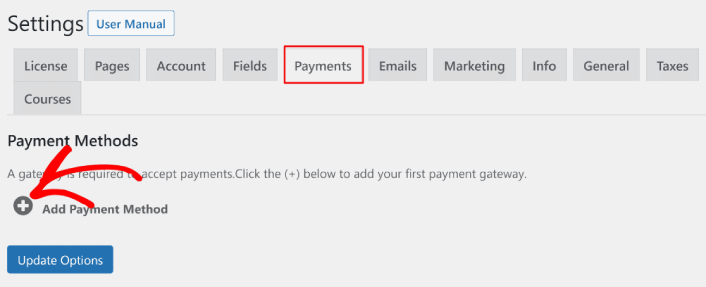
MemberPress lets you accept payments with Stripe, PayPal, and Authorize.net. We recommend using WP Simple Pay to accept Stripe payments on your site.
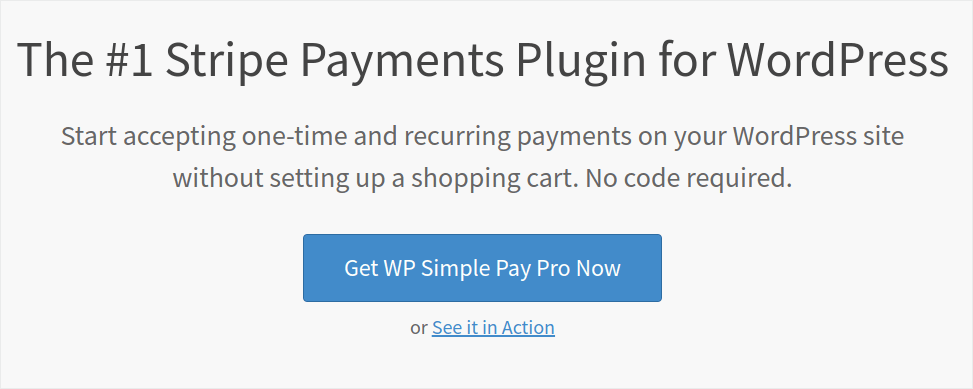
WP Simple Pay is exactly what it sounds like. It makes online payments simple on your WordPress site. It’s easy to use, highly reliable, and it requires zero coding to set up.
أفضل جزء؟ يساعدك WP Simple Pay على التركيز على إنشاء المنتجات وبيعها دون الحاجة إلى القلق بشأن قبول المدفوعات من جميع أنحاء العالم.
يتم تخزين جميع معلومات العملاء والمدفوعات في حساب Stripe الخاص بك، وليس على موقع ووردبريس الخاص بك. نتيجة لذلك، لن تؤدي الإضافة إلى إبطاء موقعك مثل البدائل الأخرى. يوفر WP Simple Pay أبسط طريقة لإضافة مدفوعات Stripe إلى موقع ووردبريس الخاص بك.
If you’re not sure if it’s the right Stripe plugin for you, check out our review of WP Simple Pay.
Step #5: How to Create Membership Levels
Once you’re done setting up the payment gateway on your site, go ahead and create membership levels for your members. If you’re a streamer, or if you’ve watched live streamers on Twitch or YouTube before you probably know how Patreon and YouTube memberships work.
You need to create varying levels or tiers of membership at different price points. Each level should have different perks for your members. If you’re a Twitch or YouTube streamer, then knowing how to sell memberships on WordPress is way better than Patreon or YouTube memberships because you get more control over your content and earnings.
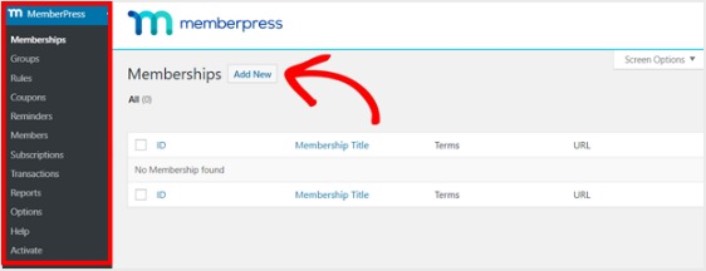
Head over to MemberPress » Memberships and click Add New to create your membership tiers.
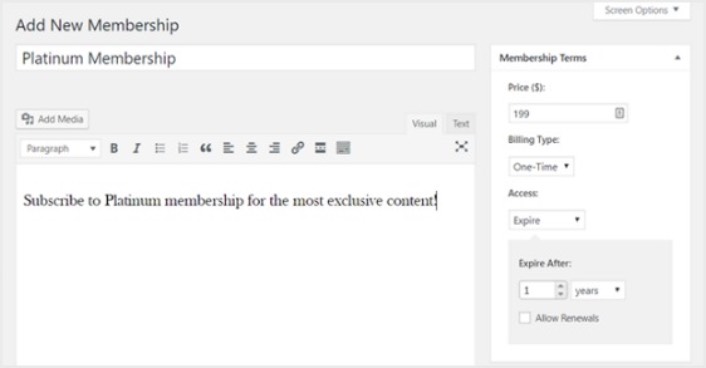
Next, enter a title and description for your membership level in the editor. Then, set the price, billing type, and access time from the Membership Terms section on the right.
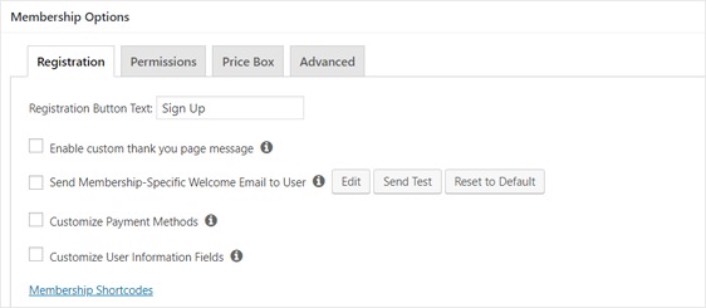
After that, you’ll want to scroll down to the Membership Options section to customize it the way you want it. And don’t forget to click on the other tabs to configure the Permissions and Price Box as well.
Then, simply publish your membership tiers.
Step #6: How to Set Membership Access Levels
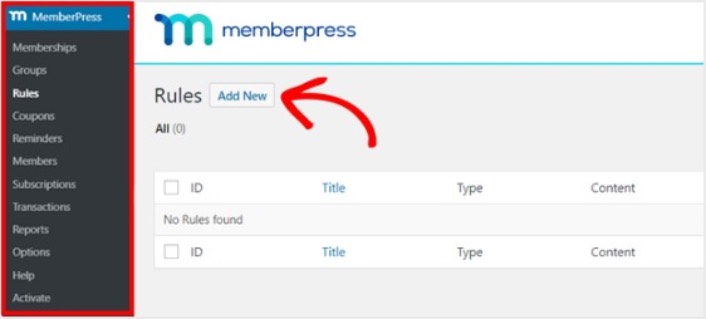
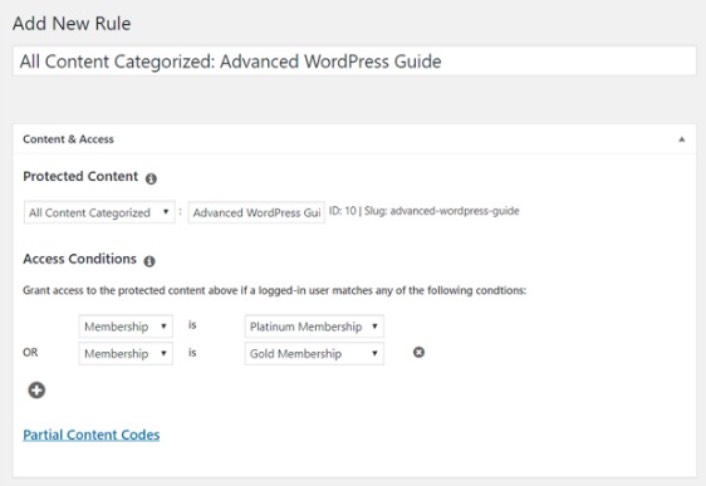
Not every member should get access to everything if you have multiple membership tiers. So, you’ll need to restrict access on your membership website. Go to MemberPress » Rules and click on Add New.
You can select all the content under a specific category to be made accessible only by users with the 2 most expensive membership plans. In this example, we selected the Advanced WordPress Guide category.
Next head to the Drip/Expiration settings.

If you choose to enable the Drip option, this will let you gradually release content. The Expiration option lets you choose the time when the content is no longer available.
Step #7: How to Sell Memberships With Members-Only Content
Next, you want to upload the content for your paying members. You’ll also need to restrict access to it based on membership levels. You can add content with a post or page. So for this example, we’ll create content to link to the access rule we created in the last step.
Create a new post and add the content you want to it. Next, select the Advanced WordPress Guide category.

Next, scroll down to the MemberPress Unauthorized Access section.
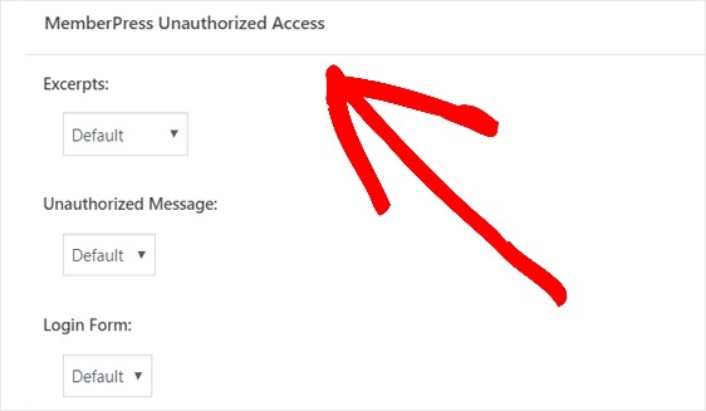
This is where you can set up how much of your members only content your non-members can see. And when everything is configured the way you’d like it, publish your page. Then, you can head to Posts » All Posts to see which content access is restricted to certain membership levels.

You can even create full-blown online courses using MemberPress. But this is all about creating content to sell. How to sell memberships online? That’s next.
Step #8: How to Create a Pricing Page to Sell Memberships
We’re almost all the way through. By now, you have membership tiers and premium content for each tier. Next, you’ll need to create a pricing page for your memberships.
Go to MemberPress » Groups and click on the Add New button.
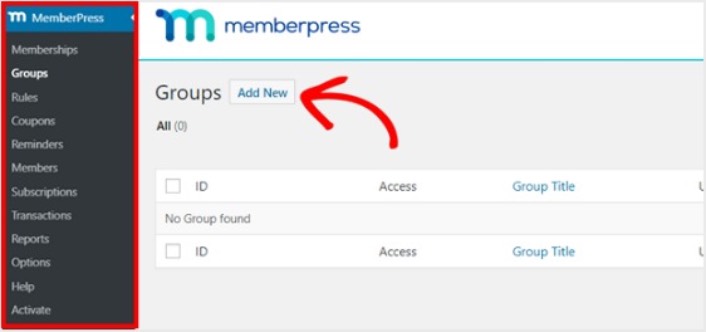
Name your group something like Pricing Plans so people know what the page is about. After that, scroll down to the Group Options section. Here, you can add the memberships you want to show on your pricing page.
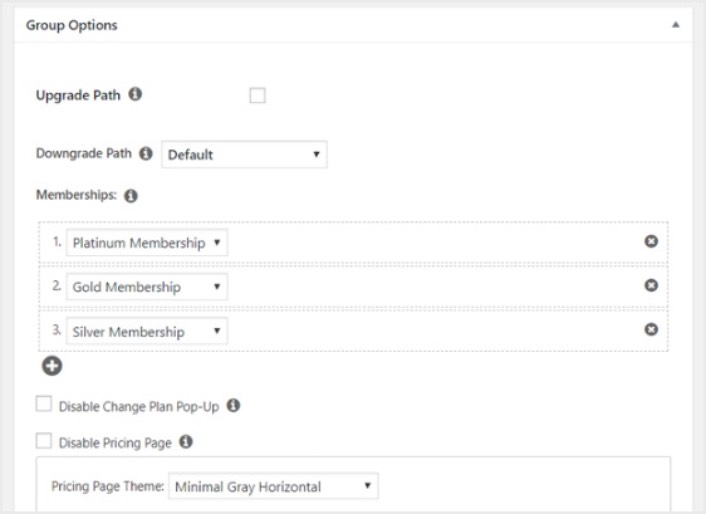
Pro Tip: You can also change the pricing page theme on this page. We recommend using SeedProd to build custom themes and pages in WordPress.
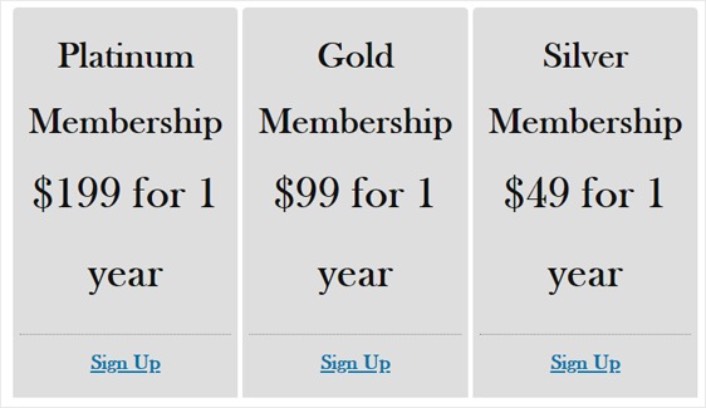
Publish this page when you’re ready, and preview it to check it out. If you followed every step, it should look something like this:
Now, you need to make sure that your WordPress member site redirects unauthorized users to the pricing page. Copy the URL for your pricing page and go to MemberPress » Options and scroll down to the Unauthorized Access section.
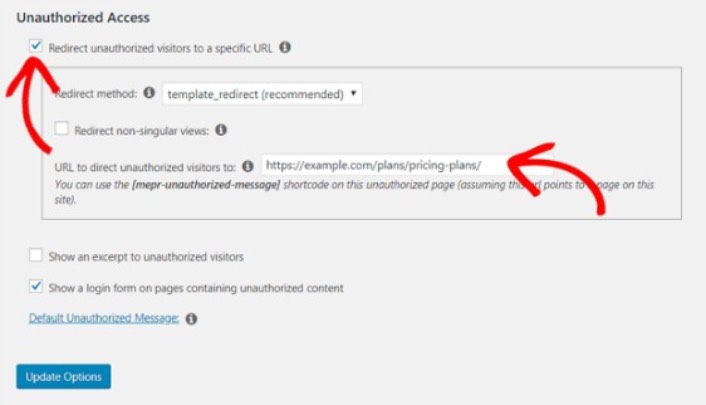
Check the box next to Redirect unauthorized visitors to a specific URL and paste the URL to your pricing page. Finally, click on Update Options to save your changes.
Step #9: How to Create a Login and Signup Form
You need to give your registered users a way to sign in and access their content. And you also need to create a form to accept new members.
The simplest way to do this is to use the MemberPress login widget. MemberPress already has a login and signup form module that you can simply import without any custom coding.
Go to Appearance » Widgets in your WordPress dashboard and drag the MemberPress login widget to a widget-ready area on your site.
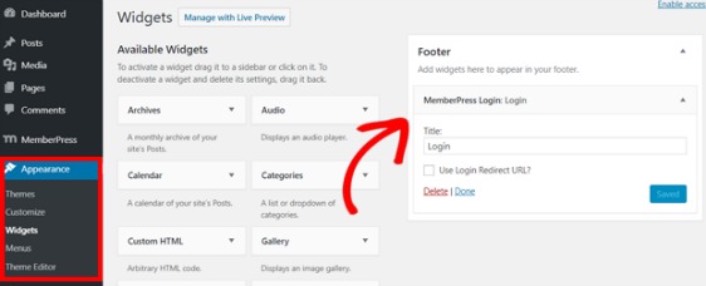
The example shows us adding it to the footer. But you can also add it to the sidebar if your like.
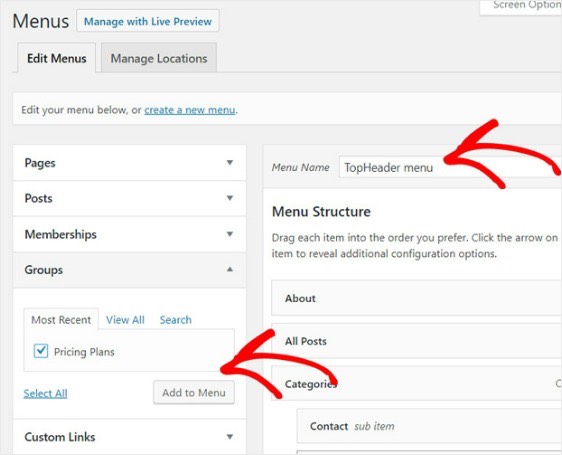
Finally, you need to advertise your Pricing Plans page by adding it to the site navigation menu. Go to Appearance » Menus and create a new menu or choose an existing one. Then, select Pricing Plans from the left under Groups and click on the Add to Menu button.
And that’s it! You’ve successfully created a member site. Now, it’s time to figure out how to sell memberships faster.
How to Sell Memberships Faster
You should consider using push notifications with your membership plugin. Most membership plugins come with automated email campaigns to engage and retain members. But we recommend using push notifications to grow traffic, engagement, and sales on your memberships alongside your email campaigns.
Let’s check out how to sell memberships faster using push campaigns.
PushEngage هو البرنامج رقم 1 لإشعارات الدفع في العالم. ومن السهل جدًا إعداد إشعارات الترحيب باستخدام PushEngage. يمكنك الاطلاع على القائمة الكاملة للميزات في مراجعتنا لـ PushEngage. أو، يمكنك أيضًا إلقاء نظرة على أفضل خدمات إشعارات الدفع في العالم واختيار الخدمة المناسبة لك.
أو، يمكنك ببساطة البدء فورًا باستخدام PushEngage.
#1. How to Sell Memberships Using Welcome Push Notifications
سواء كان لديك متجر جديد أو متجر قائم، فإن رسائل الترحيب عبر الموقع الإلكتروني ضرورية للغاية.
- التأكيد: تريد التأكد من أن مشتركك الجديد قد اشترك بالفعل في إشعارات الدفع الخاصة بك على الويب.
- إعادة المشاركة: حملات الترحيب هي طريقة رائعة لجذب المشتركين للعودة إلى موقعك.
- المبيعات: يمكنك منح المشتركين الجدد عرض ترحيبي بخصومات وهدايا مجانية وكوبونات.
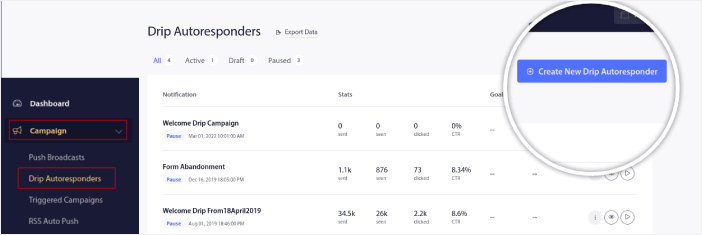
لنقم بإنشاء حملة إشعارات دفع ترحيبية الآن. توجه إلى لوحة تحكم PushEngage الخاصة بك وانتقل إلى الحملات » الردود الآلية المتسلسلة » إنشاء رد آلي متسلسل جديد:
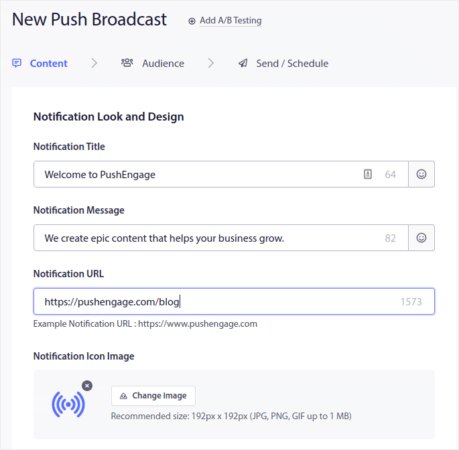
امنح حملتك المتسلسلة اسمًا يمكنك تذكره بسهولة. ثم، اضبط أول إشعار دفع ليتم إرساله فور اشتراك الزائر في إشعارات الدفع الخاصة بك.

يمكنك تعديل الإشعار لإنشاء محتوى مخصص لرسالة الترحيب الخاصة بك. عند الانتهاء، انقر فوق الزر إضافة إشعار جديد لإضافة المزيد من الإشعارات إلى التسلسل. يمكنك تعديل الإشعارات الجديدة وتعيين تأخير مخصص بين كل إشعار.
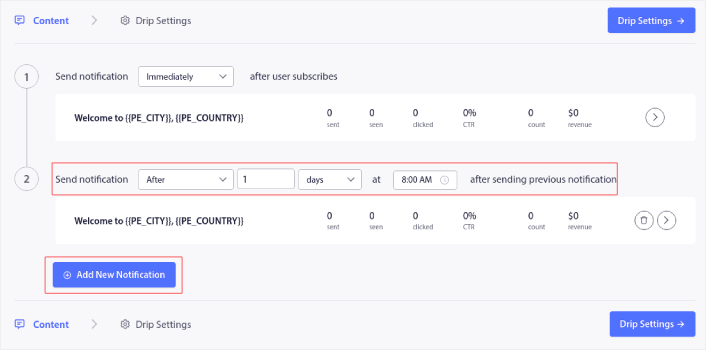
يمكنك إضافة أكبر عدد تريده من الإشعارات، ولكننا نوصي بإنشاء تسلسل ترحيبي يتكون من 5-7 إشعارات.
بعد ذلك، حدد جمهورك في إعدادات التسلسل:
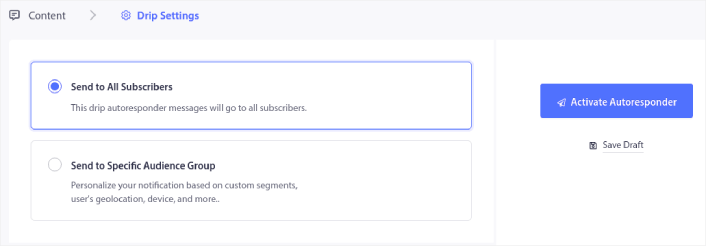
يمكنك إرسال تسلسلات ترحيبية مختلفة لشرائح مختلفة باستخدام خيار الإرسال إلى مجموعة جمهور محددة. هذا مفيد بشكل خاص عندما تقوم بتقسيم الزوار عند اختيارهم لإشعارات الدفع. عندما تكون راضيًا عن استهدافك، انقر فوق الزر تفعيل الرد الآلي. وهكذا تكون قد انتهيت!
#2. How to Sell More Memberships Using Cart Abandonment Push Notifications
تخلي عربة التسوق هو عندما يضيف عميل محتمل منتجًا إلى عربة التسوق ولا يكمل عملية الدفع. بعبارة أخرى، يتخلون عن منتجاتك لسبب ما ويواصلون ببساطة.
يمكن أن يكون تخلي عربة التسوق عبر الإنترنت بسبب مشكلة كبيرة في واجهة المستخدم أو نقص الثقة، أو حتى بعض الرسوم المخفية. إذا كنت تدير متجرًا جديدًا، فيجب عليك الاطلاع على مقالتنا حول كيفية تقليل تخلي عربة التسوق.
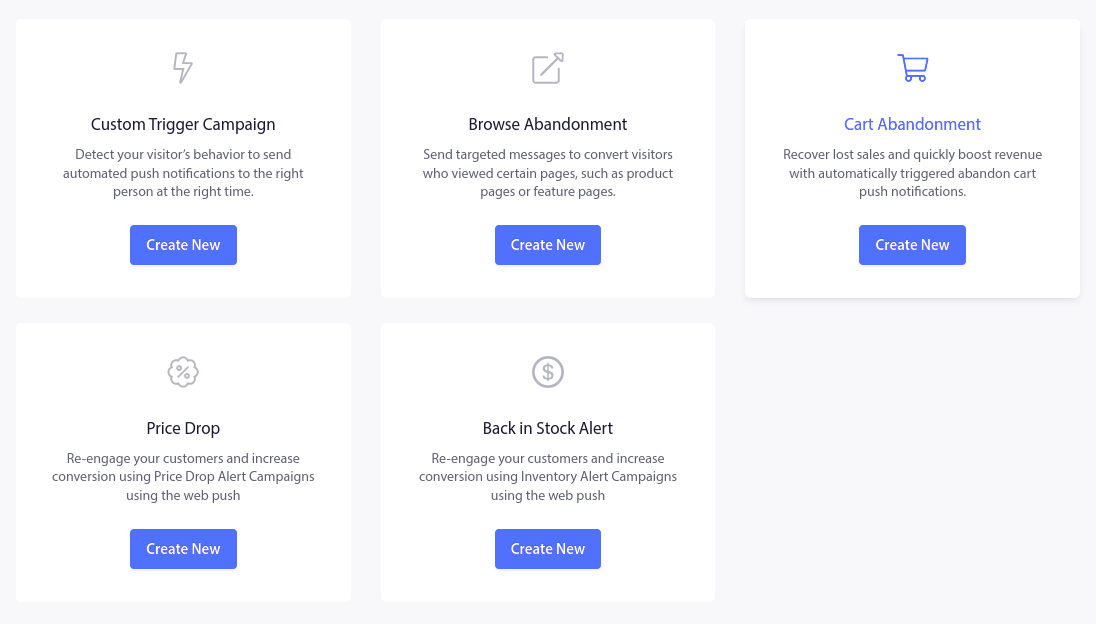
الآن، حان الوقت لإنشاء حملة التخلي عن عربة التسوق الخاصة بك. توجه إلى الحملات » الحملات المشغلة وانقر فوق إنشاء حملة مشغلة جديدة:

بعد ذلك، من قوالب الحملات، حدد التخلي عن عربة التسوق وانقر فوق إنشاء جديد:
إذا كنت بحاجة إلى برنامج تعليمي مفصل حول إنشاء حملة تخلي عن عربة التسوق، فراجع هذه المقالة حول كيفية إعداد إشعارات دفع التخلي عن عربة التسوق.
#3. How to Get More Members With Browse Abandonment Push Notifications
إشعار التخلي عن التصفح هو إشعار دفع آلي يتم إرساله عندما يقرر شخص يتصفح موقعك مغادرته دون اتخاذ أي إجراء. يمكن أن يؤدي إرسال تذكير للزائر بأنه كان مهتمًا بشيء ما على موقعك إلى زيادة معدلات التحويل بشكل كبير.
تُستخدم حملات التخلي عن التصفح بشكل شائع من قبل مواقع التجارة الإلكترونية. ولكن هذا لا يعني أن بوابة السفر أو موقع إخباري (أو أي موقع ويب، في الواقع) لا يمكنه استخدامها.
ينتهي إشعار التخلي عن التصفح عندما يضيف زائرك شيئًا إلى سلة التسوق الخاصة به. بعد ذلك، يتولى إشعار التخلي عن سلة التسوق مهمة تحويلهم إلى عملاء يدفعون.
هنا تأتي حملات التخلي عن التصفح. باستخدام أمثلة البريد الإلكتروني للتخلي عن التصفح في هذه المقالة، يمكنك الاستهداف والإقناع والتحويل:
- العملاء الذين أضافوا منتجًا إلى قائمة الرغبات، ولكن ليس إلى سلة التسوق الخاصة بهم
- العملاء الذين شاهدوا منتجًا أكثر من مرة
- العملاء الذين تصفحوا أكثر من 3 منتجات في نفس الفئة
- العملاء الذين بحثوا في الموقع عن منتج معين
- العملاء الذين بقوا في صفحة منتج لمدة 3 دقائق على الأقل ولم يشتروا
توجه إلى لوحة تحكم PushEngage الخاصة بك وانتقل إلى الحملات » الحملات المشغلة. ثم انقر فوق إنشاء مستجيب تلقائي جديد للتصفح:
وبعد ذلك، حدد نوع حملة التخلي عن التصفح من قائمة أنواع الحملات وانقر فوق إنشاء جديد:

حتى الآن، يجب أن تكون قادرًا على رؤية لوحة إعداد الحملة. قم بإنشاء حملتك ضمن المحتوى:
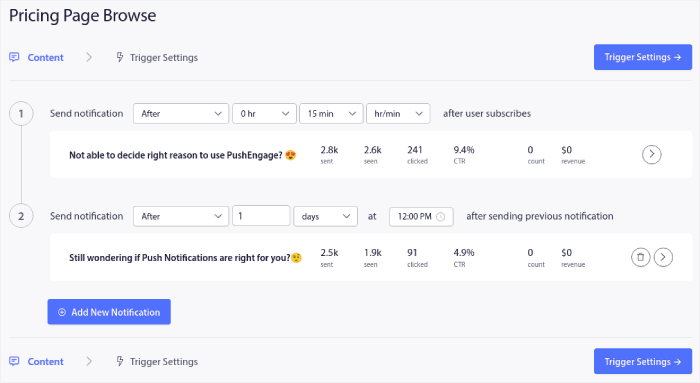
معظم هذا واضح ومباشر. قم بتسمية حملتك وأنشئ سلسلة من إشعارات الدفع للتخلي عن التصفح. عند الانتهاء، انقر فوق إعدادات المشغل.
حان الوقت لإعداد مشغل التخلي عن التصفح:
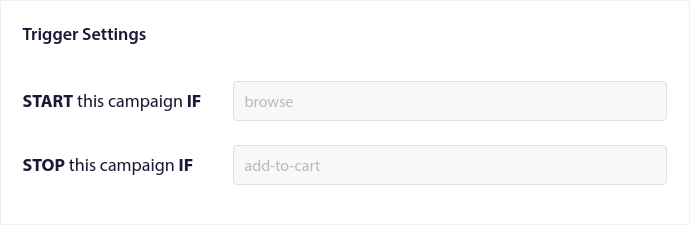
هذه هي القيم الافتراضية لقالب حملة التخلي عن التصفح. لذلك، لا تحتاج إلى تغيير أي شيء هنا.
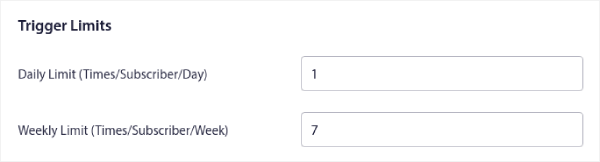
يمكنك تعيين حدود المشغل بناءً على عدد المرات التي تريد فيها إرسال إشعارات الدفع:
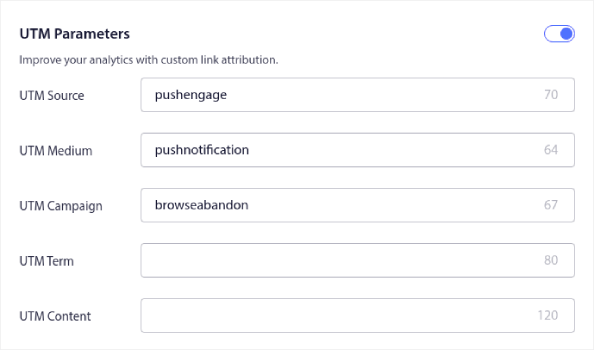
ويمكنك أيضًا إعداد معلمات UTM هنا:
وتمكين تتبع الأهداف أيضًا:
إذا كنت جديدًا في تحليلات إشعارات الدفع، فراجع دليلنا لتتبع الأهداف لإشعارات الدفع.
#4. إشعارات الدفع للتجارة الإلكترونية للبيع المتقاطع
البيع المتقاطع هو بيع منتجات ذات صلة أو مكملة للعميل. إنها واحدة من أكثر طرق التسويق فعالية. يمكنك بسهولة زيادة متوسط قيمة طلبك (AOV) باستخدام حملات البيع المتقاطع.
وفقًا لأمازون، تأتي 35٪ من مبيعاتها من البيع المتقاطع. إشعارات البيع المتقاطع هي حملات تقوم ببيع المنتجات بشكل متقاطع تلقائيًا لعملائك. تساعدك إشعارات البيع المتقاطع على زيادة المبيعات حيث من المرجح أن تبيع لعميل حالي بنسبة 60-70٪.
من السهل جدًا أيضًا إعداد حملة بيع متقاطع لموقع التجارة الإلكترونية الخاص بك باستخدام الإشعارات.
- قم بإنشاء شرائح بناءً على فئات المنتجات وأضف عميلاً إلى الشريحة ذات الصلة عند إجراء عملية شراء
- حدد المنتجات للترويج المتقاطع تحت كل شريحة
- أنشئ إشعارًا متسلسلًا لكل شريحة وأرسل المنتج أو قائمة المنتجات ذات الصلة للترويج المتقاطع
الأمر بهذه البساطة.
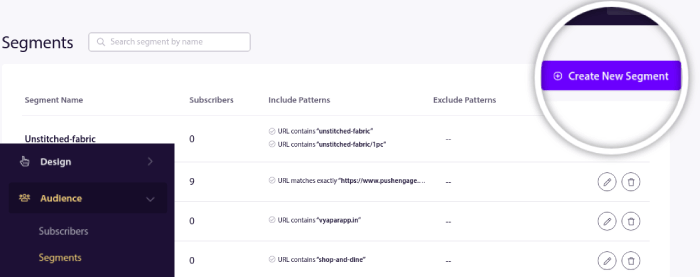
ارجع إلى لوحة تحكم PushEngage الخاصة بك وانتقل إلى الجمهور » الشرائح وقم بإنشاء الشرائح الخاصة بك:
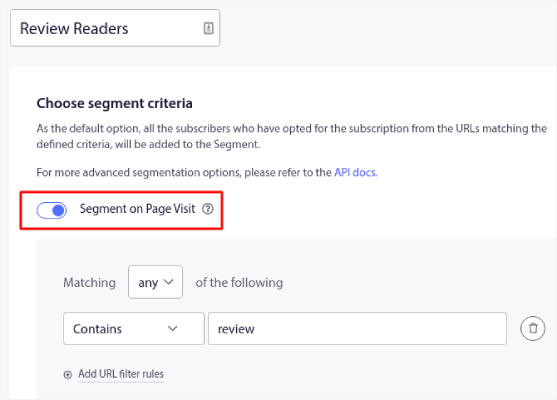
ستحتاج إلى تقسيم زوارك عندما يزورون منتجًا في فئة معينة:
بعد ذلك، ابحث عن منتج لبيعه بشكل إضافي لكل شريحة وأنشئ ردًا آليًا متسلسلًا للترويج له.
#5. How to Sell Memberships Using Recurring Sales
يمكنك جدولة الإشعارات لتتكرر كل أسبوع. أو كل بضعة أيام. يستخدم العديد من عملاء PushEngage الجدولة المتكررة ويحبون هذه الميزة تمامًا. لقد أحدثت فرقًا كبيرًا بشكل خاص لمواقع التجارة الإلكترونية.
لماذا قد تستخدم الجدولة المتكررة؟
تخيل أن لديك تخفيضات أسبوعية لسوق السلع المستعملة. أو تخفيضات نهاية الأسبوع. أو تخفيضات لتصفية المخزون. أو حتى تخفيضات سريعة شهرية.
هذه أحداث مباشرة تستمر في التكرار بانتظام.
هل تريد حقًا إنشاء إشعار دفع مختلف كل أسبوع؟ خاصة إذا كنت تعلم مسبقًا أن هذه التخفيضات ستكون جزءًا كبيرًا من استراتيجية التسويق الخاصة بك؟
أم تفضل إنشاء الإشعار مرة واحدة وجدولته ليتم إرساله كل أسبوع في وقت محدد؟
هذا بالضبط ما يمكن أن تفعله إشعارات الدفع المتكررة لك. إنها الطريقة المثلى لتوفير الكثير من الوقت والطاقة. بدلاً من إضاعة الوقت في إشعارات جديدة، يمكنك ببساطة الاستمرار في تحسين الحملة الحالية.
كما أنه من السهل جدًا القيام بذلك. ما عليك سوى التوجه إلى لوحة تحكم PushEngage وإنشاء بث ضمن بث الدفع:

بعد ذلك، أنشئ إشعار دفع جديدًا لإرساله. قم بتخصيص المحتوى ضمن علامة التبويب المحتوى:
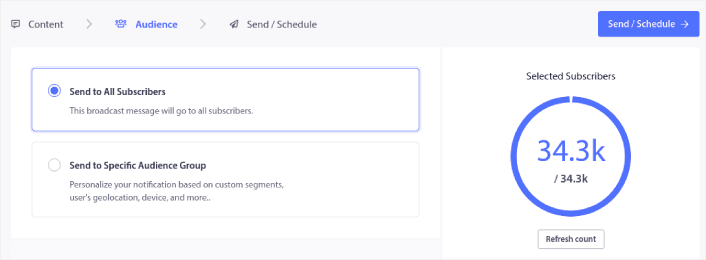
بعد ذلك، حدد جمهورك ضمن الجمهور:
وأخيرًا، ضمن إرسال/جدولة، يمكنك جدولة الإشعار كإشعار دفع متكرر:
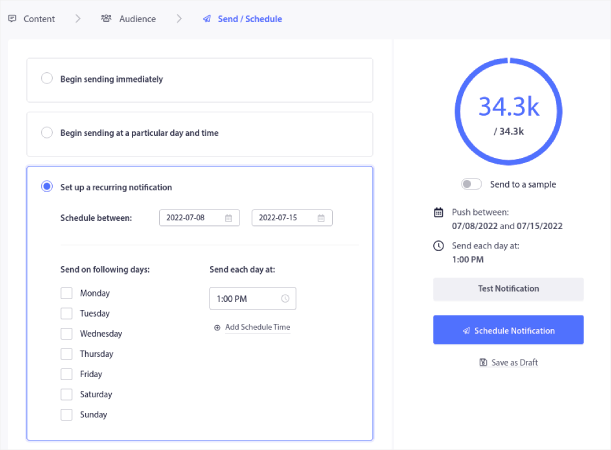
يمكنك بسهولة إنشاء أي جدول تريده لإشعارات الدفع الخاصة بك بما في ذلك الأيام والتواريخ والأوقات المخصصة.
What to do After You Know How to Sell Memberships
Now that you know how to sell memberships, you should get right into growing your business.
هل تعلم أن إشعارات الدفع تأتي مع الكثير من الحملات الآلية أيضًا؟ ألقِ نظرة على بعض الحملات التي يمكن أن تساعدك في تنمية عضوياتك بسرعة:
- حملات التنقيط والاستجابات التلقائية لإشعارات الدفع عبر الويب
- 5 فوائد لاستخدام حملة إشعارات دفع للعربات المتروكة
- كيفية تحويل المشتركين إلى مشترين باستخدام إشعارات الدفع عبر الويب
- كيفية إضافة إضافة إشعارات الويب لـ WordPress إلى موقعك
وإذا كنت قد بدأت للتو في استخدام إشعارات الدفع، فنحن نوصي باستخدام PushEngage. PushEngage هو برنامج إشعارات الدفع رقم 1 في العالم. لذا، ستكون حملاتك في أيدٍ أمينة.


