If email open rates are dropping and your social posts are getting buried, it might be time to try something different. A web push notification campaign could be exactly what you need.
Web push is fast, direct, and shows up right when your subscriber is online. No inbox. No algorithm. Just a quick message that brings people back to your site when it matters most.
In this guide, I’ll show you how to set up your first web push notification campaign using PushEngage. It’s easier than you might think, and you’ll see how even a simple campaign can drive real results.
يبدو جيدًا؟ دعنا نتعمق في الأمر.
Send Web Push Notifications Today!
تعد إشعارات الدفع أداة تسويقية فعالة للغاية ومنخفضة التكلفة لمساعدتك على زيادة حركة المرور المتكررة والمشاركة والمبيعات تلقائيًا.
Why Web Push Works (Even When Other Channels Don’t)
Web push notifications cut through the noise in a way that email and social just can’t.
- You don’t need a phone number or email address to grow your list
- Messages show up while your subscriber is actively browsing
- You can automate everything — from cart recovery to product drops
- It works across devices and browsers (no app required)
It’s like having your own private traffic channel… one that actually gets noticed. Think about it… when was the last time you ignored a browser notification that popped up with your name, a juicy headline, and a call to action you cared about?
⚡ Instant Visibility: Unlike emails that sit unread for days, push notifications hit instantly. Right on the user’s screen. Desktop, mobile, doesn’t matter. You’re not waiting for them to open an inbox. You’re showing up exactly when it matters.
🧠 Zero Memory Required: Users don’t need to remember your website. Or your product. Or even their login.
Once they subscribe, you can re-engage them anytime — no forms, no friction, no fuss. It’s like having a fast lane straight into their attention span.
📈 Stupid-High Engagement: Web push CTRs often 2–3x email. Why? Because it’s short. Unexpected. And native to how people browse. Plus, no one’s inbox is drowning in push notifications (yet). So you stand out.
💸 You Own the Channel: No algorithms. No bidding. No social feed shenanigans. Push subscribers are yours. You decide what they see and when. It’s your audience, not rented from Meta or Google.
🧪 Perfect for Testing: Need to know if a headline works? If people care about a new feature? Push is the fastest A/B testing tool you didn’t know you had. Send a headline variation. See which one gets more clicks. Learn fast. Move faster.
Web push is the rare channel that’s cheap, high-converting, and brutally effective when used right.
And the best part… it takes under 10 minutes to launch your first campaign.
Let’s build one.
A Breakdown of Web Push Notification Campaign Types
In the broadest sense, there are 3 types of web push notification campaigns:
- Broadcast notifications
- Drip web push notification campaigns
- Triggered web push notification campaigns
Broadcasts are push notifications that you send out as a single notification. You can schedule them, but they will only fire off once. Triggered campaigns involve setting up a push notification, defining a trigger to set it off, and a workflow to control its scheduling. Automated drip notifications are a series of notifications that set off automatically at specific times or when specific conditions are met.
For all intents and purposes, triggered campaigns and automated drip campaigns look the same from the outside. The critical difference is that trigger campaigns are way more flexible and customizable. If you consider that push notifications cost way less than most other channels, it makes perfect sense to use a combination of all three to grow your business.
If you’re new to push notifications, we strongly recommend starting your journey using proven templates.
NOTE: Most triggered campaigns need some development experience. You’d need to use an API to make the best use of triggered notifications. However, there are some triggered notifications that you can send straight off the rack. If you’re curious, check our article on eCommerce push notifications for a better idea.
The Best Service to Send a Web Push Notification Campaign
Let’s start things off by saying that most of the “free push notification services” out there are actually free trials. Some of the providers we’ve listed here are trial software, while others have a forever-free plan that you can opt for.
There are some other freemium options, such as Firebase Cloud Messaging (FCM), but that’s not really a good option at all. You can read more about why FCM can’t compete with a service provider like PushEngage. But for now, just take our word for it and jump into the better options.
نوصي باستخدام PushEngage.

PushEngage هو المكون الإضافي رقم 1 لإشعارات الدفع في العالم.
تساعدك إشعارات الدفع على زيادة حركة مرور موقعك الإلكتروني ومشاركتك تلقائيًا. وإذا كنت تدير متجرًا عبر الإنترنت، فإن PushEngage يساعدك أيضًا على زيادة مبيعاتك من خلال مساعدتك في إنشاء إشعارات دفع آلية للتجارة الإلكترونية.
يمكنك البدء مجانًا، ولكن إذا كنت جادًا بشأن تنمية عملك، فيجب عليك شراء خطة مدفوعة. أيضًا، قبل شراء أي خدمة إشعارات دفع، يجب عليك الاطلاع على هذا الدليل حول تكاليف إشعارات الدفع.
إليك نظرة سريعة على ما تحصل عليه مع PushEngage:
- حملات آلية عالية التحويل
- خيارات استهداف متعددة وجدولة حملات
- تتبع الأهداف والتحليلات المتقدمة
- اختبار A/B ذكي
- قوالب حملات الدفع
- خيارات تقسيم قوية
- مدير نجاح مخصص
وهذا بالكاد يخدش السطح. تحقق من القائمة الكاملة لميزات PushEngage قبل المتابعة.
ولكن الجزء الأكثر جاذبية في PushEngage هو أنه يمكنك البدء بخطة مجانية دائمة. ويمكنك استخدامه لتنمية عملك بالفعل باستخدام خيارات تخصيص متعددة.
سترى أن PushEngage هو الخيار الأفضل بلا منازع إذا كنت ترغب في زيادة حركة المرور والمشاركة والمبيعات لعملك. وإذا كانت ميزانيتك محدودة، يمكنك دائمًا أن تكون مبدعًا بعض الشيء مع إشعارات الدفع الخاصة بك.
ملاحظة: إذا كنت تدير موقع WordPress، فيجب عليك تثبيت وتفعيل إضافة PushEngage لـ WordPress.
يسمح الإصدار المجاني بما يصل إلى 200 مشترك و 30 إشعارًا مدى الحياة. هذا جيد بما يكفي لوضع عملك في نقطة يمكنك فيها تحمل الخطط المدفوعة بسهولة والتي تبدأ من 9 دولارات شهريًا لـ 100,000 مشترك.

ولا تقلق إذا كنت لا تعرف شيئًا على الإطلاق عن البرمجة. يمكنك تثبيت PushEngage باستخدام أحد أدلة التثبيت العديدة لأي موقع ويب ونظام إدارة محتوى.
Pushengage’s AI-powered optimization helps you craft better titles and messages, leading to increased engagement and campaign success. Ever wished that your push notifications would write themselves? Well, now they can!
In all likelihood, you can cut down campaign creation time for push broadcasts, drip campaigns, and automated trigger campaigns by as much as 50% while improving the quality of your copywriting.
The PushEngage AI uses high-performing campaigns as a reference point for all copywriting and will always stick to best practices by default.
And the best part is that it works for web push, Android native notifications, iOS native notifications, Flutter notifications, and React Native notifications from the same dashboard!
You can use AI text generation for any campaign type. For this example, I’m using a push broadcast to demonstrate the capabilities. But if you want to see its full potential in action, watch this video!
Create a new campaign or choose any from the Templates. You can then click on Generate Text Button.
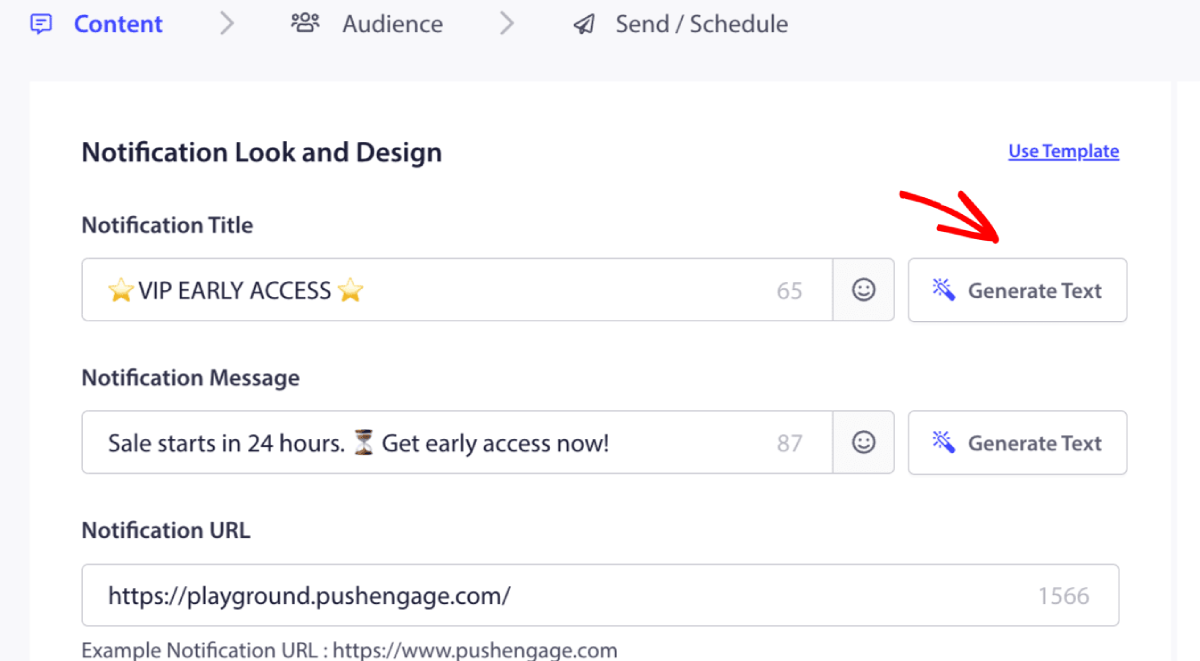
It will open up a small window for the web push notification campaign title & message. You can start by adding any keywords that will act as a prompt for the AI. The prompt can be as detailed as you like.
You can also set the tone for the web push notification campaign title or message. The tone of the conversation is very important in deciding the type of campaign that will be created. Make sure that it resonates with your brand style.
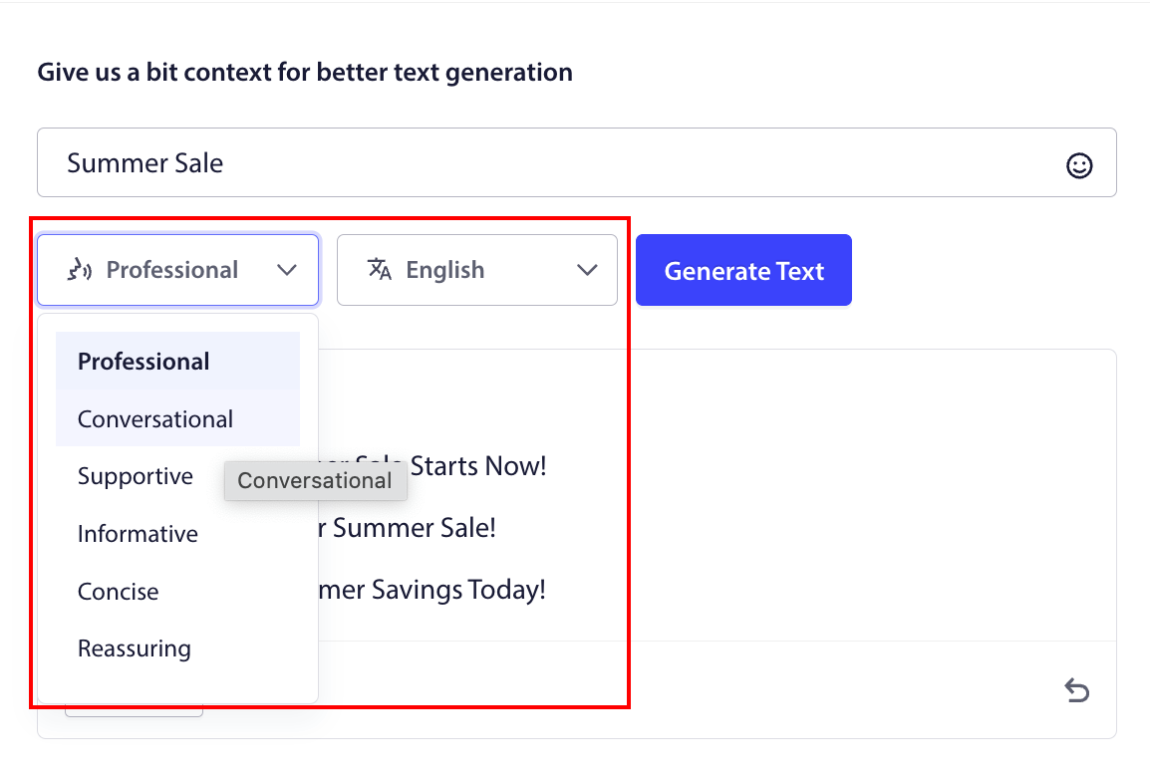
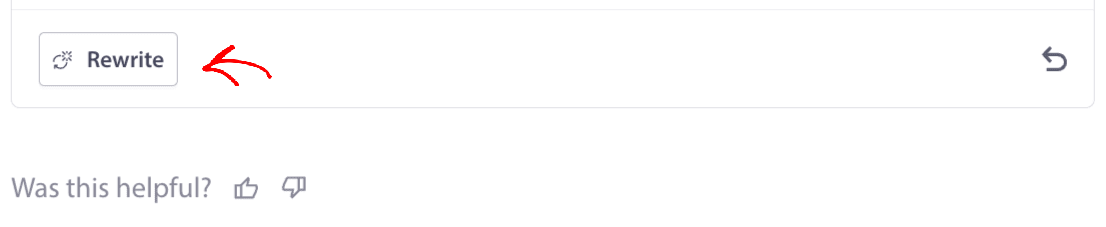
Once it’s set, you can click on the Generate Text button. Not happy with the generated text? Simply click the Rewrite button!
You can actually craft copy in ANY LANGUAGE!
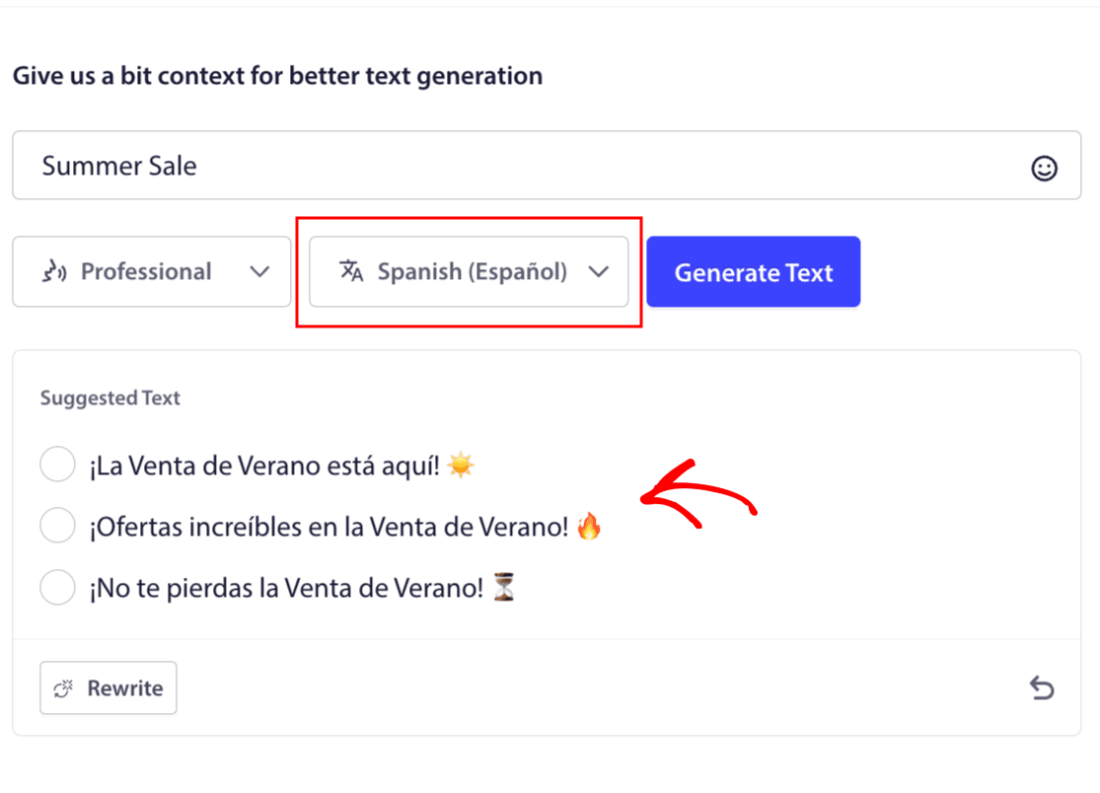
This level of built-in multi-language support simply doesn’t exist in any other push notification software. And don’t worry, the translations are dead on! So, you can send geo-specific campaigns very easily now. Select the right Audience Group, select the language, and let our AI do its magic.
How to Send a Web Push Notification Campaign
Now that you know what a web push notification campaign is and what service you need to send them, it’s time to check out how to send different notifications.
Here’s what web push campaigns look like in the wild:
🛒 E-commerce:
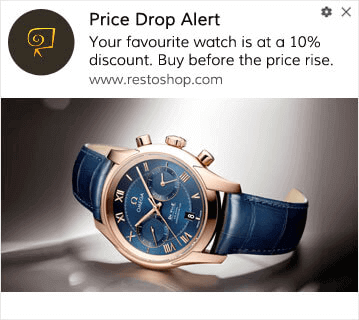
- Welcome discount: “Thanks for subscribing! Here’s 10% off.”
- Price drop alert: “The jacket you liked? It’s finally on sale.”
- Product drops: “New arrivals just landed. Be the first to shop.”
📚 Publishers & Bloggers:
- New post alert: “Don’t miss this week’s breakdown on [Topic].”
- Weekly digest: “Your Friday readlist is here.”
- Lead magnet delivery: “Here’s your free guide. Let us know what you think.”
💼 SaaS & Tools:
- Feature updates: “We just launched something new. Try it free.”
- Trial reminders: “Your free trial ends tomorrow.”
- Abandoners: “Still thinking it over? Here’s 20% off to try us out.”
Start small. Steal these. Tweak them to match your tone. Done.
For practical purposes, we aren’t talking about custom triggered campaigns you can create using an API service here. If you’re more interested in custom notifications, you should check out our documentation.
#1. Welcome Web Push Notification Campaign
A welcome web push notification campaign is a simple push notification meant to welcome any new subscriber.
You can also send an offer or a gift for subscribing to your push notifications. This is pretty common with a lot of our customers. You can use your welcome push notifications to:
- مشاركة كوبون ترحيبي
- تقديم ميزات مميزة
- إرسال توصيل مجاني
- تقديم هدايا مجانية
- توجيه المشترك الخاص بك من خلال جولة تعريفية
الآن، دعنا نعدّ إشعار الدفع الترحيبي الأول الخاص بك باستخدام PushEngage.
Here is how to Enable Welcome Notifications in PushEngage. Go to the PushEngage dashboard and head over to Campaign » Drip Autoresponders and click on Create New Drip Autoresponder:

بعد ذلك، قم بتسمية حملتك (نقترح شيئًا مثل رسالة ترحيب متسلسلة)، وتحت المحتوى، حدد الخيار الذي يقول، “إرسال إشعار فور اشتراك المستخدم“):

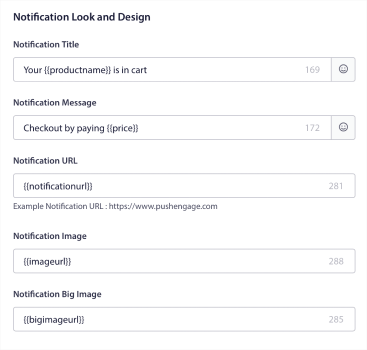
في هذه المرحلة، يمكنك النقر فوق السهم بجوار الإشعار لتعديل محتوى إشعارك. إذا كان لديك خطة Premium أو Enterprise مع PushEngage، فستتمكن من إضافة أكثر من إشعار واحد لإنشاء سلسلة من رسائل الترحيب الآلية. فقط انقر فوق إضافة إشعار جديد وقم بتحرير المحتوى.
بمجرد الانتهاء، انقر فوق إعدادات الحملة التلقائية وحدد الخيار لإرسال حملة الترحيب الخاصة بك إلى جميع المشتركين:

بعد ذلك، قم بالتمرير لأسفل لتعيين معلمات UTM الخاصة بك لـ تتبع الإشعارات الفورية:

وعندما تنتهي، قم بالتمرير لأعلى مرة أخرى وانقر فوق الزر تفعيل الرد الآلي:

Now you know why setting up a welcome push notification campaign is important. You also know how to set it up. Go ahead and activate welcome push notifications to re-engage new subscribers, or check out this article on website welcome messages for inspiration.
#2. Abandoned Cart Web Push Notification Campaign
يحدث التخلي عن سلة التسوق عندما يضيف عميل محتمل منتجًا إلى سلة التسوق ولا يكمل عملية الدفع.
وظيفتك هي تقليل التخلي عن سلة التسوق قدر الإمكان.
One way to recover your lost sales is to use a cart abandonment web push notification campaign. Cart abandonment recovery campaigns target subscribers with an abandoned cart and send them follow-ups, reminders, offers, coupons, and discounts.

فكرة بسيطة: اجعل أكبر عدد ممكن من الأشخاص يشترون شيئًا.
لإشعارات الدفع الخاصة بالتخلي عن سلة التسوق تأثير حقيقي جدًا على أرباحك. على سبيل المثال، تحقق WickedWeasel ما بين 2000 دولار و 4000 دولار أسبوعيًا من المبيعات الإضافية من حملة إشعارات الدفع الخاصة بالتخلي عن سلة التسوق.
الآن، دعنا نقم بإعداد أول حملة تخلي عن سلة التسوق الخاصة بك مع PushEngage.
Go to the PushEngage dashboard and head over to Campaign » Triggered Campaigns, and click on Create New Triggered Campaign:

ثم، حدد قالب Cart Abandonment وانقر على Create New:
ويمكنك البدء في صياغة رد آلي لسلة التسوق المهجورة. ضمن علامة التبويب المحتوى، يمكنك إنشاء سلسلة من إشعارات الدفع:
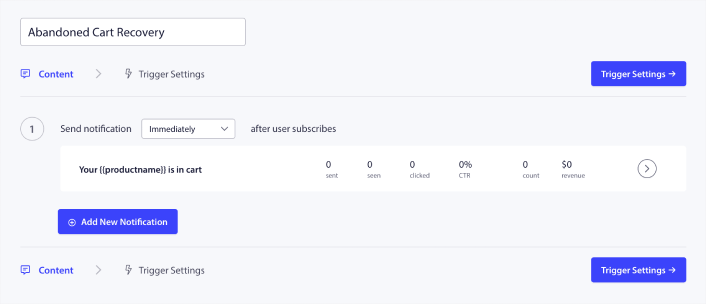
To edit a notification, simply click the arrowhead next to it, and you can customize the push notification:
لمزيد من الدروس التعليمية، تحقق من هذه المقالة حول كيفية إعداد إشعارات الدفع لسلة التسوق المهجورة.
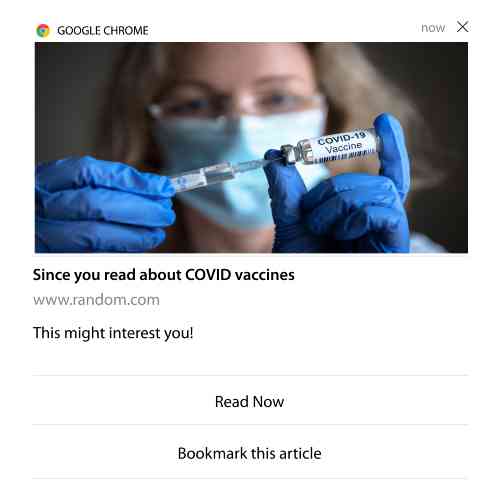
#3. Browse Abandonment Web Push Notification Campaigns
التخلي عن التصفح هو بالضبط ما يبدو عليه. يحدث عندما يتصفح زائر موقعك الإلكتروني ثم يقرر المغادرة فجأة. تُعرف هذه الحوادث أيضًا باسم التخلي عن مسار التحويل من قبل بائعين آخرين.
يعد التخلي عن التصفح حدثًا شائعًا جدًا في كل الصناعات تقريبًا.
ومن الصعب جدًا تقليله أو التحكم فيه لأنه لا توجد طريقة لتحفيز مستخدم عشوائي للبقاء على موقعك الإلكتروني. هذا هو المكان الذي تكون فيه حملات التخلي عن التصفح قوية جدًا.
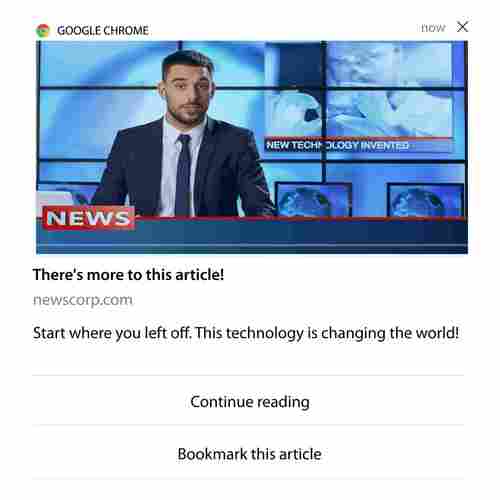
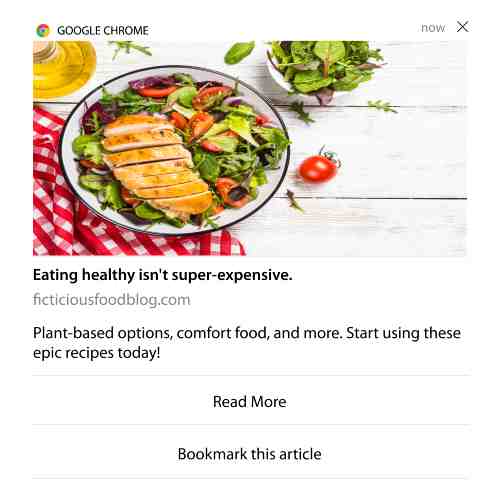
إليك مثال على إشعارات الدفع الخاصة بالتخلي عن التصفح لناشر:
الجزء المثير للإعجاب في PushEngage هو أنه يمكنك إعداد حملات لأي صناعة تقريبًا. لذلك، يمكنك إرسال إشعارات دفع خاصة بالتخلي عن التصفح لمواقع SaaS والسفر أيضًا.
إذًا، كيف تقوم بإعداد حملات التخلي عن التصفح؟
مع التخلي عن سلة التسوق، يوجد معيار واضح جدًا لتشغيل إشعارات الدفع الخاصة بك. بالنسبة للتخلي عن التصفح، قد ترغب في النظر في معايير مثل:
- تمت إضافة المنتج إلى قائمة الرغبات
- تم النظر في نفس المنتج أكثر من X مرات
- تم تصفح أكثر من X منتجات في نفس الفئة
- بحثوا في الموقع عن منتج معين
- البقاء على الموقع لمدة X دقائق على الأقل قبل المغادرة
الفكرة وراء هذه الحملة لموقع تجارة إلكترونية هي جعل المشترك يضيف المنتج إلى سلة التسوق الخاصة به. بالنسبة للناشرين، يمكن أن يكون نقرة أو تنزيلًا للمقال الذي كانوا يقرؤونه.
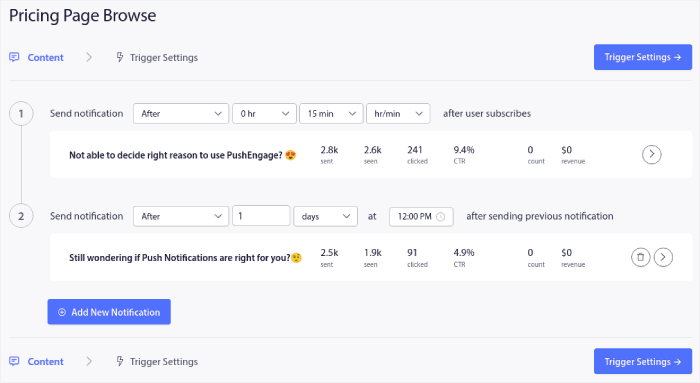
توجه إلى لوحة تحكم PushEngage مرة أخرى وانتقل إلى الحملة » الحملات المشغلة لإنشاء حملة مشغلة جديدة:

بعد ذلك، قم بإنشاء حملة تصفح مهجورة جديدة بالنقر فوق الزر إنشاء جديد:

بعد ذلك، ستتمكن من إعداد تسلسل إشعارات الدفع بالكامل مع تأخير بين كل إشعار:
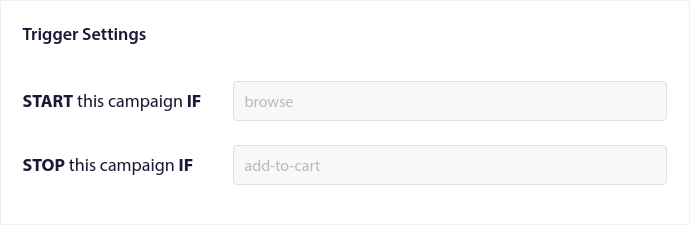
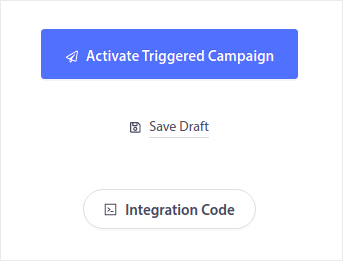
إذا كنت جديدًا على الإشعارات الفورية، فيجب عليك الاطلاع على مقالتنا حول أفضل ممارسات الإشعارات الفورية. عندما تكون راضيًا عن محتوى إشعارك الفوري، انقر فوق إعدادات المشغل. سترى أن الشروط الخاصة بحملة التخلي عن التصفح قد تم تكوينها مسبقًا في التسلسل.
انقر فوق الزر رمز التكامل للحصول على مقتطف الرمز الذي تحتاجه لتضمين حملة التخلي عن التصفح على موقعك.
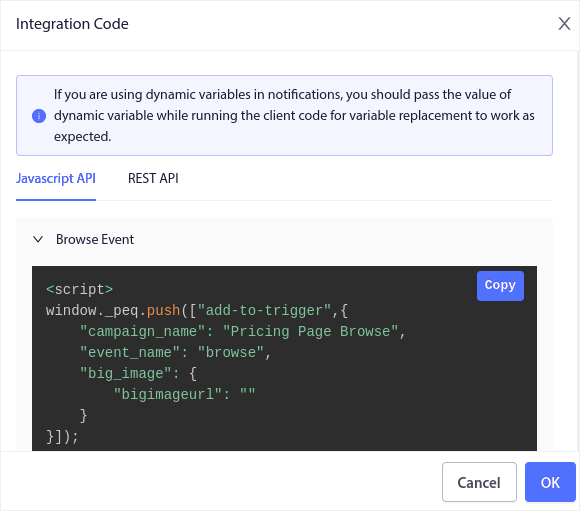
بعد ذلك، انسخ الرمز والصقه في موقعك. تريد لصق هذا الرمز في قسم <head> في HTML للصفحة التي تريد تتبعها. أخيرًا، انقر فوق الزر تفعيل الحملة المشغلة:
وأنت انتهيت!
#4. RSS Feed Web Push Notification Campaign
يتيح لك RSS Auto Push أتمتة إشعاراتك عبر RSS.
يتحقق PushEngage كل 10 دقائق من وجود منشور جديد مضاف إلى موجز RSS الخاص بك. إذا تم العثور على منشور جديد، يقوم PushEngage بتحويله إلى إشعار دفع ويرسله إلى جميع المشتركين لديك. أفضل جزء هو أن هذا يحدث تلقائيًا بالكامل.
حملات موجز RSS مثالية للناشرين ومواقع الأخبار:
إذا كنت ناشرًا كبيرًا وتنشر أكثر من منشور واحد كل 30 دقيقة، فإن PushEngage يحتفظ بفاصل زمني قدره 5 دقائق بين إشعاري منشورين.
قبل أن ننتقل إلى أي شيء آخر، يجب عليك الاطلاع على هذه المقالة حول كيفية استخدام خلاصات RSS لمزيد من النصائح والحيل الرائعة.
Now, let’s go set up an RSS feed web push notification campaign on PushEngage.
Create a New RSS Web Push Notification Campaign
Once you’ve installed PushEngage on your site, head over to your PushEngage dashboard and go to Campaign » RSS Auto Push and click on Create New Campaign:

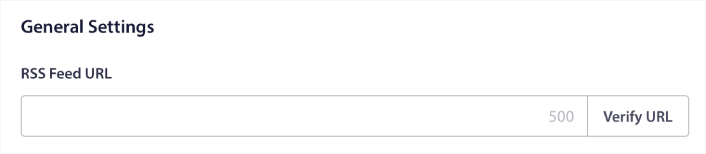
This will create a brand new RSS web push notification campaign. You can set up multiple RSS feed campaigns in PushEngage. Start by giving your campaign a descriptive name. Then, paste in the URL for your RSS feed:
Set Up RSS Notification Settings
Next, you want to set the Campaign Frequency:
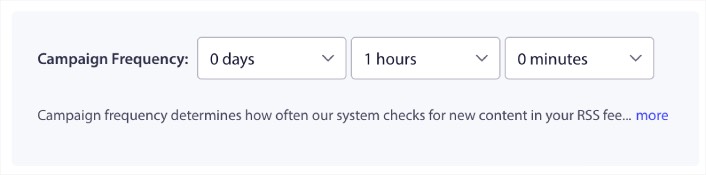
The Campaign Frequency is how often the RSS feed web push notification campaign looks for new content in your blog to send an automated push notification. The minimum value is 15 minutes, and the maximum value is 7 days.
نوصي بالبحث عن محتوى للترويج له مرة كل يومين ما لم تكن وكالة أنباء. بالنسبة لوكالات الأنباء، يجب أن تبقيه عند 15 دقيقة. ضع في اعتبارك أن PushEngage سيبحث فقط عن محتوى جديد بعد إعداد ونشر حملة موجز RSS الخاصة بك.
تحديد المنشورات للترويج لها
You can select what posts to promote. You can choose between Only the latest item or All items. If you set up the RSS push notifications to select only the latest item, PushEngage only sends the latest post:
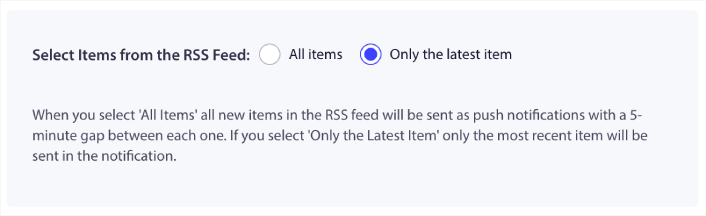
Or, you can select the All items options. In this case, the campaign will select all the posts on your site and send out a web push notification campaign for each with a 5-minute gap between them.
Set an RSS Push Notifications Icon
Your push notification icon establishes your brand identity in your RSS push notifications. We recommend using your brand mark so that your subscribers know instantly that the notification is from your brand.
الآن، هناك خياران هنا. يمكنك إما تحميل أيقونة الإشعار يدويًا:
And that’s really simple to do. Just click on Change image and upload your notification icon. Or, you can fetch it from your RSS feed:
You can either select the item element or the attribute inside an element to dynamically select your notification icon from the feed. Typically, most RSS feeds will hold the site icon inside the media:content item element. Even more specifically, it’s usually inside the media:thumbnail attribute of the media:content element.
To target the element, you can select the Item Element Value option and set it to media:content. Or, you can select the Element Attribute Value option and set it to media:content > media:thumbnail.
NOTE: We recommend using this option only if you know how to read XML. RSS feeds might not contain the site icon in the same XML tags as our example. So, if you’re not sure how to fetch the notification icon from the RSS feed, we recommend uploading it manually instead.
Select Large Image for RSS Feed Notifications
Now, we’re going to select the large image for your RSS feed web push notifications. Again, there are two ways to do this. You can let PushEngage automatically find the image from the RSS feed:

أو، يمكنك يدويًا تحديد الصورة التي تريدها من الموجز:
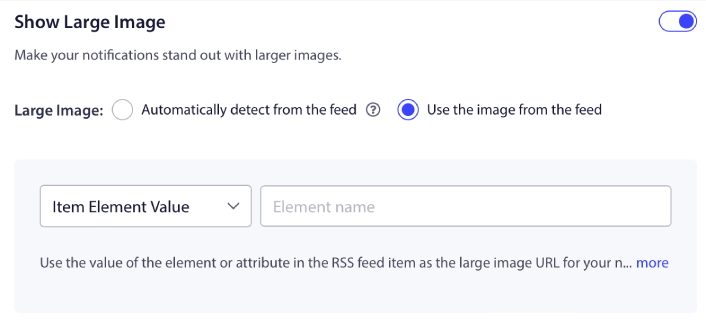
هذا هو نفس تحديد أيقونة الإشعار من موجز RSS بالضبط. يمكنك مرة أخرى، تحديد الصورة من عنصر XML الذي يحتوي عليها أو يمكنك تحديد السمة المحددة التي تحتوي على صورتك المفضلة.
NOTE: We only recommend selecting a URL from your RSS feed if you know how to read XML. If you’re not sure how to read XML, it’s better to let PushEngage find the best image for your notifications.
Set Web Push Notification Campaign Duration
The web push notification campaign duration is how long the notification stays in your subscriber’s notification tray before it gets automatically deleted.
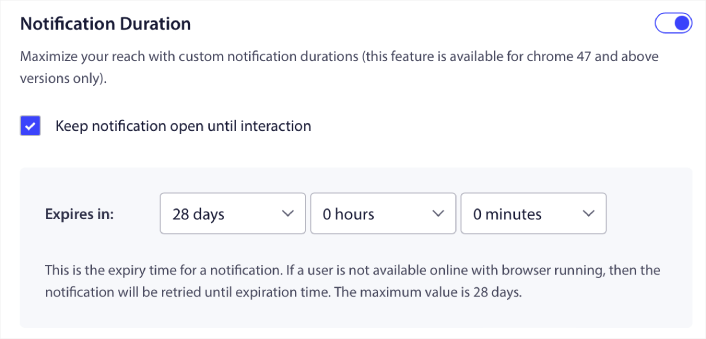
إذا كنت لا ترغب في إرهاق مشتركيك بالكثير من الإشعارات غير المقروءة، فمن الأفضل ترك الإشعارات الفورية تنتهي صلاحيتها في غضون يومين.
Unlike broadcast notifications or even other automated web push notifications, you can’t really schedule RSS push notifications. So, you always have the option to keep the notification open until your subscriber interacts with it, even within the expiry limit.
Set UTM Parameters
لقد انتهينا تقريبًا. قم بالتمرير لأسفل لتعيين معلمات UTM الخاصة بك لـ تتبع الإشعارات الفورية:
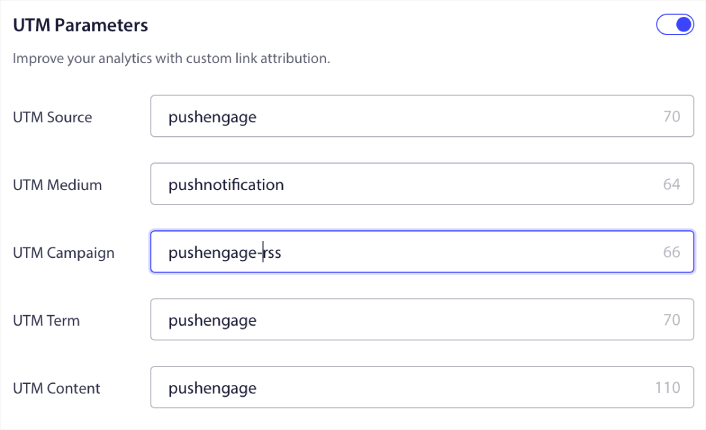
بهذه الطريقة، يمكنك بسهولة تحديد مصدر الزيارات من هذه الإشعارات الفورية في تحليلات جوجل.
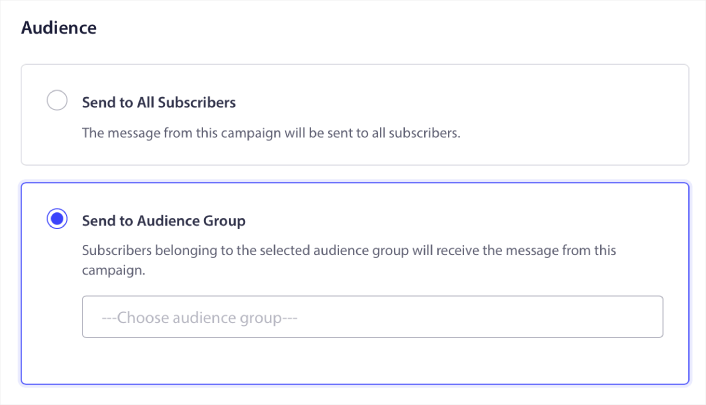
Select Audience Group
Finally, we’re going to select an Audience Group to send your RSS web push notification campaign. You can either send the RSS feed campaign to all your subscribers, or you can create Audience Groups to send personalized push notifications even from your RSS feed.
وهذا كل شيء! هذا حقًا كل ما في الأمر.
الآن، في كل مرة تنشر فيها منشورًا جديدًا، سيتلقى أي مشتركين في الإشعارات الفورية في مجموعة الجمهور المحددة تلقائيًا إشعارًا فوريًا حول المحتوى الجديد الخاص بك.
هذا كل شيء! لقد تم إعدادك. في كل مرة تنشر فيها منشورًا جديدًا، سيتم إرساله تلقائيًا إلى جميع المشتركين لديك.
#5. إشعارات إعادة المشاركة الآلية
يمكنك إعداد حملات إعادة مشاركة آلية للمشتركين الذين لم يتفاعلوا مع المحتوى الخاص بك لفترة.
ولكن لماذا قد تفعل ذلك في المقام الأول؟
ماذا عن هذا:
- تكلفة اكتساب عملاء جدد تزيد بـ 5 مرات عن تكلفة الاحتفاظ بالعملاء الحاليين
- من السهل استهداف وإعادة تسويق جمهور معروف نفهم تفضيلاته الشخصية بالفعل.
- على المدى الطويل، يقدم العملاء المتفاعلون المزيد من الأعمال للشركة مقارنة بشخص بالكاد يتواصل مع علامتك التجارية.
تمكنت Ofertia من زيادة المستخدمين المتكررين بنسبة 39% باستخدام إشعارات الدفع التي تقدم عروضًا مخصصة. هم ليسوا الوحيدين أيضًا. يمكنك استخدام هذا لموقع تجارة إلكترونية لتحقيق تأثير كبير:
هناك العديد من الطرق لإعادة إشراك المشتركين لديك.
Picture this:
- A user visits your site. Sees a subtle opt-in. Clicks “Allow.”
- Instantly gets a welcome notification with a discount or the next step.
- Leaves your site…
- Later that day, they see a reminder: “Still thinking about it?”
- They click, come back, and buy.
That’s a basic push funnel — and you didn’t lift a finger once it was live.
Now, imagine layering in segmentation and automated campaigns. That’s when it gets fun. Using dynamic segments, you can figure out a lot about your subscribers and send them personalized content that they’ll love.
في لوحة تحكم PushEngage الخاصة بك، توجه إلى التجزئة وأنشئ شريحة جديدة:
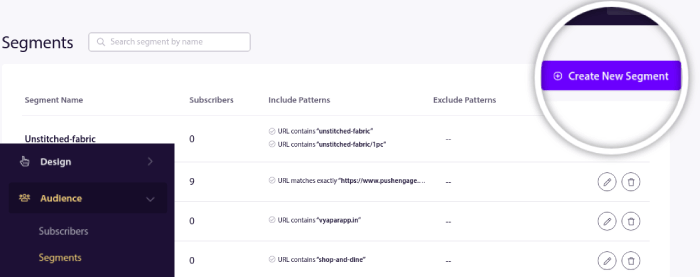
يتيح لك هذا إنشاء شرائح بناءً على سلوك وأنماط التصفح. يمكنك بالفعل إعداد تسلسل من عمليات AND/OR التي تحدد متى تتلقى شرائح معينة إشعارات فورية آلية.
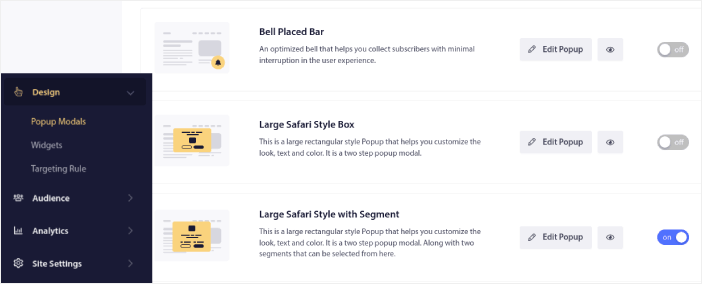
يمكنك حتى تقسيم المستخدمين عند اشتراكهم في الإشعارات الفورية. توجه إلى التصميم » نوافذ منبثقة وحدد نمط سفاري كبير مع شريحة.
إذا كنت بحاجة إلى المزيد من الطرق لتقسيم المستخدمين لديك، يمكنك إنشاء شرائح مخصصة بناءً على إجراءات المستخدم باستخدام واجهة برمجة تطبيقات JavaScript الخاصة بـ PushEngage.
#6. Page Visit Web Push Notification Campaign
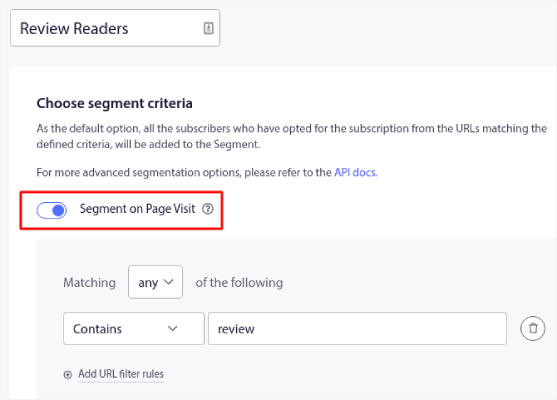
مشغلات زيارة الصفحة هي امتداد لشرائح إشعارات الدفع. كل ما عليك فعله هو إنشاء شريحة عندما يتصفح زائر الويب عنوان URL يحتوي على عبارة أو نمط معين.
بعد ذلك، توجه ببساطة إلى الجمهور » الشرائح واضبط جمهورك على شريحة معينة:
يتيح لك هذا إنشاء إشعارات دفع مخصصة وآلية حقًا.
وأفضل جزء هو أنه يمكنك إنشاء شرائح مخصصة في PushEngage في غضون دقيقتين.
#7. إشعارات فورية آلية من النقرات
لا يمكنك إنشاء إشعارات دفع يتم تشغيلها عندما ينقر المشتركون على إشعار تم تسليمه باستخدام PushEngage.
ولكن هناك حل بديل ذكي جدًا.
You can create a segment based on the URL that a particular notification leads to. Every time someone lands on this URL, they get added to the segment, and you can use this segment to send targeted notifications.
تعد حملات النقر على إشعارات الدفع في الأساس امتدادًا لتقسيم الجمهور القياسي لحملات التنقيط.
اطلع على هذا البرنامج التعليمي حول كيفية إنشاء زر للنقر للاشتراك.
#8. إشعارات فورية آلية متكررة
تخيل أن لديك...
- بيع أسبوعي لسوق السلع المستعملة؛
- أو بيع نهاية الأسبوع؛
- أو بيع لتصفية المخزون؛
- أو بيع فلاش شهري.
ما مدى عدم ملاءمة إنشاء إشعارات دفع لكل حدث يدويًا؟
لحسن الحظ، يمكنك تعيين إشعارات متكررة مع PushEngage.
الإشعارات المتكررة هي إشعارات دفع مجدولة وآلية لحدث متكرر. يمكنك إعدادها مرة واحدة، وتحديد جدول زمني، وتنتهي.
هذه مجرد إحدى الطرق التي يستخدم بها MyDeal إشعارات الدفع. تأكد من قراءة دراسة الحالة الكاملة!
توجه إلى الحملة وأضف إشعارًا آليًا في لوحة تحكم PushEngage الخاصة بك. ثم، قم بالتمرير لأسفل إلى قسم الجدولة وانتقل إلى علامة التبويب إرسال/جدولة:
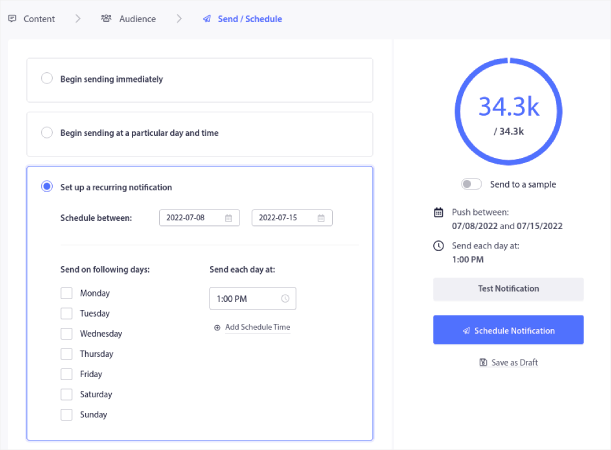
فقط قم بإعداد التوقيت وانتهيت!
#9. إشعارات المنطقة الزمنية للمشترك
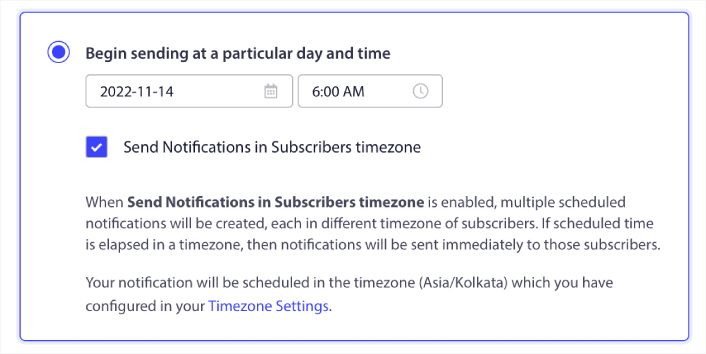
Subscriber timezone notifications are exactly what they sound like. You send automated push notifications to your subscribers in their time zone.
لماذا هذا أمر مهم جدًا؟
تحصل إشعارات المنطقة الزمنية للمشترك على معدلات فتح أعلى. عادةً، يتم تسليم أي إشعار دفع حتى لو كان مشتركك غير متصل بالإنترنت. تتراكم هذه الإشعارات بعد ذلك ويتم تجاهلها عندما يتصل مشتركك بالإنترنت أخيرًا.
On the other hand, a subscriber time zone web push notification campaign will get delivered when you KNOW your subscriber is most likely online.
نصيحة احترافية: استخدم اختبار A/B لمعرفة الوقت المثالي لإرسال إشعار دفع لمشتركيك.
تبدو إشعارات المنطقة الزمنية للمشترك أكثر تخصيصًا. وإذا كنت ذكيًا بشأن ذلك، يمكنك دمجها مع بيانات تحديد الموقع الجغرافي لتخصيص إشعاراتك بشكل أكبر. هذا بالضبط ما فعله Phooto عندما استخدموا اللغات المحلية لزيادة معدلات الفتح لديهم بشكل كبير.
لنقم بإعداد إشعارات المنطقة الزمنية للمشترك في PushEngage الآن.
عند إنشاء إشعار جديد، توجه إلى خيارات الجدولة وانقر فوق مربع الاختيار الذي يقول إرسال الإشعارات في المنطقة الزمنية للمشترك:
هذا كل شيء! سيتعين عليك القيام بنفس الشيء لحملات التنقيط الخاصة بك أيضًا، ولكن النتائج تستحق الجهد المبذول للنقر على زر واحد لكل حملة.
Start with 1–2 messages per week. Ramp up once you see what’s working.
Here’s a simple cadence to start with:
- Week 1: Welcome message + 1 product or content push
- Week 2: Reminder or discount follow-up
- Week 3: New drop, blog post, or feature highlight
If users stop clicking, pull back. If they keep clicking? Double down.
نصيحة احترافية: كانت آخر تكتيكين تدور حول جدولة إشعارات الدفع. ولكن هاتين الطريقتين ليستا الوحيدتين لجدولة إشعارات الدفع الآلية. اطلع على مقالتنا حول كيفية جدولة إشعارات الدفع لمزيد من الحيل الرائعة.
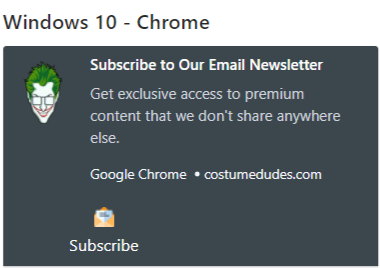
#10. إشعارات الاشتراك عبر البريد الإلكتروني
Email marketing has long been the best way to generate and nurture leads. The best part about automated push notifications is that you can generate more email subscribers using them.
It’s really simple to set up, and using a combination of email and web push notification campaigns is way more effective than using one or the other.
كل ما عليك فعله هو إرسال إشعار مشغل يطلب من المستخدم الاشتراك في إشعارات البريد الإلكتروني.
ما عليك سوى إنشاء زر دعوة مخصصة للإجراء (CTA) وإدراج رابط اشتراك كعنوان URL للزر. هذا كل ما تحتاجه حقًا. إذا لم تكن متأكدًا من كيفية الحصول على زر اشتراك، فما عليك سوى المتابعة.
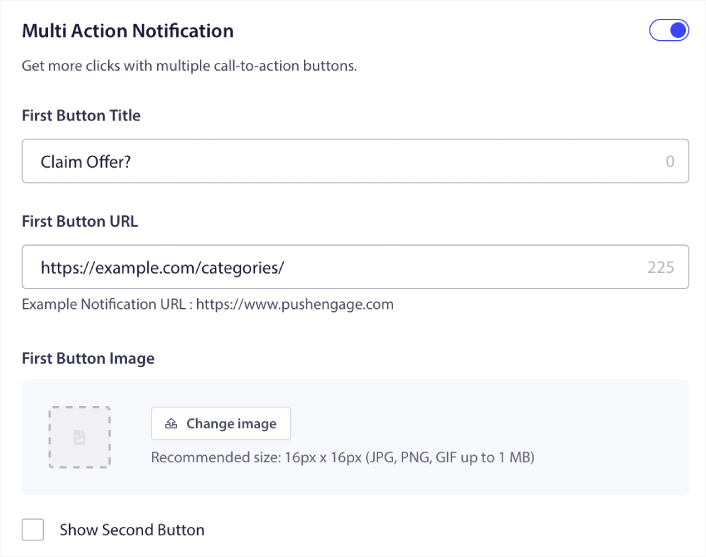
في أي إشعار، يمكنك التمرير لأسفل وتشغيل الأزرار متعددة الإجراءات:
يجب أن يكون عنوان URL رابطًا إلى نموذج اشتراك البريد الإلكتروني. يمكنك إنشاء واحد باستخدام أي مزود خدمة بريد إلكتروني تقريبًا مثل Drip. كل ما عليك فعله هو النقر على خيارات المشاركة لنموذج الاشتراك ونسخ عنوان URL هذا. ثم، الصقه في عنوان URL للزر الخاص بإشعار الدفع الخاص بك.
اطلع على برنامجنا التعليمي حول الأزرار متعددة الإجراءات لمزيد من التفاصيل. يمكنك حتى إضافة أيقونة بريد إلكتروني إلى زر الخاص بك لجعله واضحًا جدًا أنك تطلب من المستخدمين الاشتراك في إشعارات البريد الإلكتروني الخاصة بك:
نصيحة احترافية: يمكنك استخدام نفس الفكرة لتنمية قناة YouTube الخاصة بك أيضًا. فقط أضف ‘?sub_confirmation=1’ في نهاية عنوان URL الخاص بقناتك والصقه في عنوان URL لزر إشعار الدفع الخاص بك.
في كل مرة ينقر فيها شخص ما على زر الاشتراك في إشعار الدفع الخاص بك، سيتم إعادة توجيهه إلى قناة YouTube الخاصة بك وسيتم مطالبتهم بالاشتراك فيها.
Segmentation Ideas You Can Steal
Segments are a really great way to send targeted push campaigns. And it should be a big part of your push notification marketing strategy. But how do you get started? What kinds of segments should you be creating?
للبدء، لا ينبغي أن تركز على إنشاء نوع واحد فقط من الشرائح. سنرشدك خلال الأنواع المختلفة من التقسيم التي وجدنا أنها الأكثر تأثيرًا.
Here are a few high-impact segments worth setting up:
- Engaged shoppers: People who clicked 2+ notifications in the past week
- Cart abandoners: People who visited a product but didn’t purchase
- Category fans: Users who keep checking one product category (e.g., “Sneakerheads”)
- Geo-targeted: Tailor messages based on country or city
The more specific you get, the more clicks you’ll earn. If you’re an advanced marketer, you should craft segments the way you would for an email campaign with different segmentation models:
- Geographic segments
- Behavioral segments
- Occasion-based segments
- Cultural segments
- Demographic segments
- Psychographic segments
Dynamic segments let you talk to subscribers like real people… not just traffic stats.
And if you’d like to further personalize your messaging, you can use audience groups.
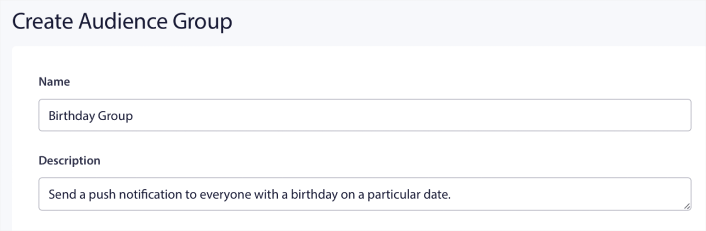
How to Create a Push Notifications Audience Group
To get started, head over to your PushEngage dashboard and go to Audience » Audience Groups and click the Create New Audience Group button:

قبل أن تتمكن من استخدام مجموعات الجمهور الخاصة بك لإرسال بث إشعارات مستهدف، ستحتاج إلى إنشاء مجموعة جمهور بقواعد لإنشاء تلك المجموعة. يمكنك البدء باسم ووصف لمجموعة الجمهور الخاصة بك.
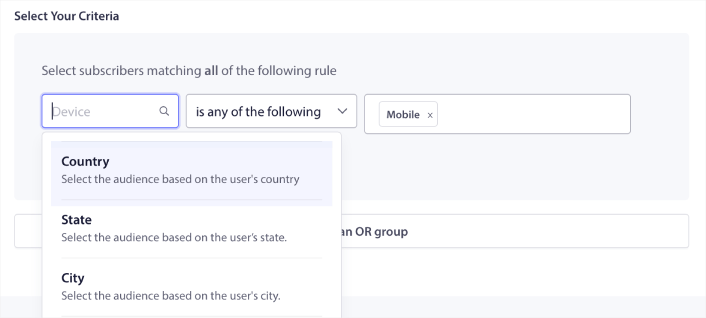
إنشاء معايير اختيار
Next, create a selection criterion to filter and target the right audience:
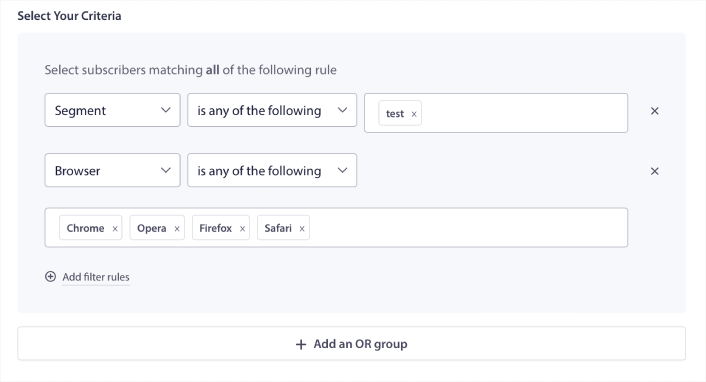
You can click Add filter rules to select subscribers who match ALL the filter rules or, you can click Add an OR group to create a filter where the subscribers meet at least one of the selection criteria.
سلوك المستخدم هو الطريقة الأساسية لاستهداف مشتركي إشعارات الدفع الخاصة بك. كما ذكرنا سابقًا، عادةً ما تجمع شرائح المشتركين الزوار الذين يحبون تصفح محتوى مشابه. ولكن حتى ضمن هذه المجموعة من المشتركين الذين يحبون نفس المحتوى، هناك تخصيصات صغيرة يمكنك إجراؤها.
والأهم من ذلك، يمكنك تجميع شرائح متعددة من المشتركين لإرسال رسالة مشتركة وذات صلة إليهم.
التصفية حسب شريحة المشترك
If you haven’t already, you should start segmenting your push notification subscribers right away. Otherwise, this filter simply won’t work. But if you already have segments, then you can select multiple segments as the base for your audience group.

بعد ذلك، يمكنك إضافة عوامل تصفية أخرى لتحسين استهدافك.
التصفية حسب سمة المشترك
While attributes are mostly for drip push notifications, you can use them for push broadcasts as well. Now, push notification attributes are mostly useful for eCommerce sites. But you can also use them to send personalized push notifications if you have a Customer Relationship Management (CRM) tool.
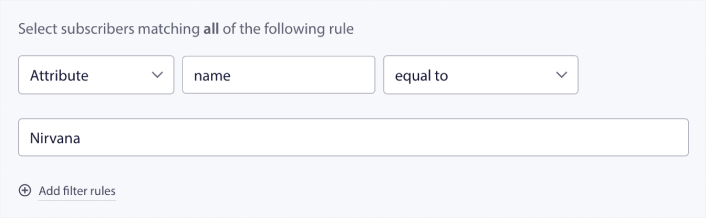
يمكن للسمات الاحتفاظ بمعلومات شخصية مثل أسماء المشتركين، تاريخ الميلاد، وأي معلومات أخرى تخزنها في نظام إدارة علاقات العملاء الخاص بك لحملات التسويق المخصصة.
التصفية حسب جهاز المشترك ومتصفحه
في كثير من الحالات، من الضروري معرفة كيف يتلقى المشتركون رسائلك.
هناك قصة رائعة حقًا عن مايكل جاكسون. في كل مرة يسجل فيها أغنية، كان يستمع إليها عبر الراديو. ليس في جناح التسجيل الخاص به الذي تبلغ قيمته مليون دولار بجودة صوت فائقة، بل عبر راديو رخيص مثل معظم جمهوره لاحقًا. إذا أحب كيف بدت الأغنية حتى على أرخص جهاز في السوق، فإنه يوافق على إصدار الأغنية.
No wonder Billie Jean went Platinum 29 times!
بالنسبة لإشعارات الدفع الخاصة بك، فالأمر لا يختلف.
التصفية حسب متصفح المشترك
Different browsers have different character limits for push notifications. So, when you send a push broadcast you need to be wary of these limits. The cool thing is that you can save different audience groups to retarget different browsers. You don’t need to create segments each time.

التصفية حسب جهاز المشترك
There’s a difference in the types of rich push notifications you can send to iOS, Android, and Windows devices. So, not every campaign you send out will look the same on all devices. In fact, many push notification types won’t even show up on all devices. Different devices also have different screen sizes. So, you may want to optimize how your push notifications look before sending them.
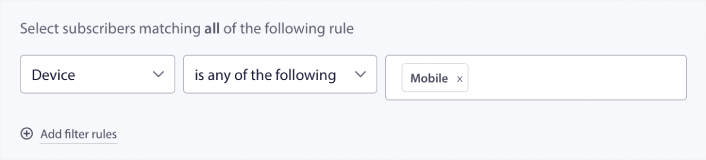
ولكن الآن بعد أن أصبح بإمكانك تصفية جمهورك حسب أجهزتهم، فلا ينبغي أن تكون هذه مشكلة بعد الآن.
كيفية التصفية حسب الموقع الجغرافي
يمكنك أيضًا التصفية حسب الموقع الجغرافي لتخصيص حملاتك بشكل أكبر. يسمح لك الفلتر بتحديد مجموعة جمهور حسب البلد والمدينة والولاية:
Phooto used geolocation to send push notifications in local languages. And it helped them skyrocket their engagement rates quickly. Read the full case study.
كيفية التصفية حسب مقاييس التفاعل
واحدة من أفضل الأشياء في مجموعات الجمهور هي أنها يمكن أن تساعدك في إنشاء حملات إعادة استهداف باستخدام إشعارات الدفع. يمكنك تصفية جمهورك حسب:
- تاريخ الاشتراك
- تاريخ آخر إرسال
- تاريخ آخر نقرة
- تاريخ آخر مشاهدة
يمكن أن يساعدك استخدام هذه المقاييس في إعادة استهداف المشتركين ذوي معدلات التفاعل المنخفضة أو البيع للمشتركين ذوي معدلات التفاعل العالية.
أو، يمكنك تصفية الجمهور حسب:
- إجمالي عدد مرات الإرسال
- إجمالي عدد المشاهدات
- إجمالي عدد النقرات
يمكن أن تساعدك هذه الأرقام في العثور على المشتركين الذين يتلقون أقل عدد من الرسائل منك حتى تتمكن من إيجاد طرق أفضل لتخصيص الإشعارات. يمكنك أيضًا العثور على المشتركين الذين يتفاعلون مع إشعارات الدفع الخاصة بك في أغلب الأحيان.
Pro Tip: Combine two or more filters to find the best ways to re-engage with your subscribers. For instance, subscribers with a high Total View Count and high Total Click Count will give you subscribers who have been engaging with you for a while. These are loyal subscribers who deserve a reward.
كيفية التصفية حسب المعرفات
المعرفات هي الطريقة التي تحدد بها PushEngage المشتركين لديك. نظرًا لأن PushEngage متوافق مع اللائحة العامة لحماية البيانات افتراضيًا، فإن برنامجنا لا يخزن أبدًا أي بيانات تعريف شخصية لأي من المشتركين لديك. بدلاً من ذلك، نقوم بتعيين معرف ملف تعريف ومعرف تجزئة للمشترك لكل مشترك.
Keep in mind, you’ll be using profile IDs and subscriber hashes mostly as part of advanced campaigns. In other words, you’ll need to use the PushEngage API to create custom campaigns that use these identifiers.
المعرفات مذهلة لإرسال إشعارات الدفع للمعاملات مثل هذا:
They’re great for custom eCommerce push notifications. So, we don’t really recommend using them for anything besides testing push broadcasts from the dashboard.
What to Do After You Set Up Web Push Notification Campaigns
Launching a web push notification campaign won’t guarantee success. As with any marketing tool, you need to test and improve your messaging and your segments.
Don’t get lost in the weeds. Focus on three numbers:
- Click-through rate (CTR): Are people engaging?
- Opt-in rate: Is your prompt working?
- Unsubscribes: Are you sending too much?
Bonus if you’re tracking revenue per send — but even without it, CTR and opt-in rate give you a fast feedback loop. Unfortunately, you can’t A/B test automated notifications directly. But these resources will help you get on the fast track:
- كيفية تثبيت إضافة ووردبريس للإشعارات على موقعك
- كيفية إجراء اختبارات A/B لإشعارات الدفع (أفضل الممارسات)
- 7 من أفضل ممارسات الإشعارات الفورية للحصول على زيارات فورية
- 21 أفضل إضافات ووردبريس للتجارة الإلكترونية في عام 2022 (مجانية ومدفوعة)
- 7 أفضل إضافات ووردبريس للأخبار في عام 2022 (مقارنة)
Also, PushEngage comes with its fair share of integrations. You can even set up some custom triggers using Zapier. These are fairly advanced campaigns, and we recommend setting them up only once you’re familiar with our other built-in automation.
You should also know that the PushEngage Javascript API is very flexible, and you can set up custom triggers for pretty much any action on your website.
بمجرد مرورك بكل هذه الموارد، ستدرك أن PushEngage هو البرنامج رقم 1 لإشعارات الدفع في السوق.
لذا، إذا لم تكن قد فعلت ذلك بالفعل، ابدأ مع PushEngage اليوم!


