
Looking for a way to add push notifications to the AMP version of your site? Adding AMP push notifications can be a little technical. But we’re going to help you do it the easy way.
AMP or Accelerated Mobile Pages are essentially a mobile version of your site. So, if you’re not setting up web push on your AMP site, then you’re going to lose a bunch of subscribers because a huge part of your audience will use mobile devices to visit your site.
In this article, we’re going to use PushEngage to install AMP push notifications because it’s way easier than doing things manually.
دعنا نتعمق.
How to Install AMP Push Notifications
Installing AMP push notifications is a really quick and easy process. Just follow these steps and by the end of this article, you should be able to send push campaigns from your site like this one:

Looks good, doesn’t it? Let’s dive in.
الخطوة #1: إعداد حساب PushEngage الخاص بك
توجه إلى الصفحة الرئيسية لـ PushEngage وانقر على زر ابدأ:

يمكنك اختيار الخطة المجانية لتجربة PushEngage، أو اختيار خطة مدفوعة إذا كنت جادًا في تنمية عملك. تأتي الخطط المدفوعة مع المزيد من خيارات الحملات والقدرة على بناء قوائم مشتركين أكبر.
بمجرد التسجيل في حساب PushEngage الخاص بك، توجه إلى لوحة تحكم PushEngage الخاصة بك وانتقل إلى إعدادات الموقع » تفاصيل الموقع:

يمكنك تعيين شعارك واسم موقعك وعنوان URL لموقعك هنا. من المهم جدًا ترتيب هذه الأمور الآن حتى تتمكن من اختبار الإعداد بالكامل لاحقًا.
Step #2: Get the AMP Push Notifications Installation Code
To install web push on your AMP site, you’ll need to get an installation code. In your Site Settings screen, scroll down and click on the Click Here For Setup Instruction button:

Head over to the AMP tab to get installation settings.
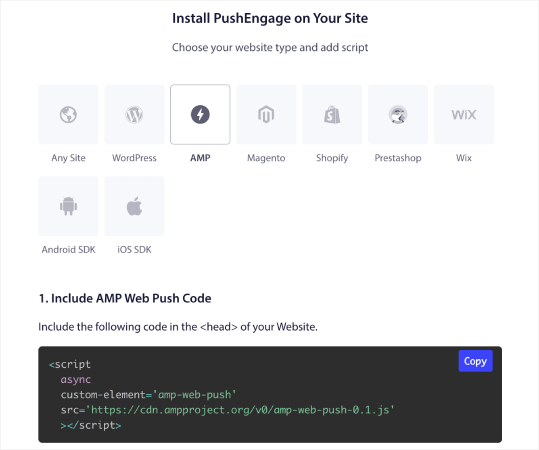
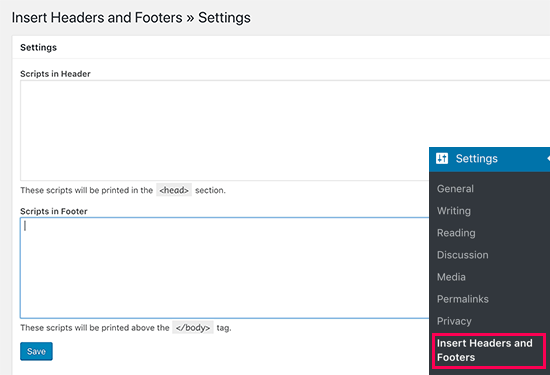
Copy this code. You’ll need to paste this code in the HTML <head> of your site. If you’re running a WordPress site with an AMP version, the simplest way to do this is to use the Insert Headers and Footers plugin. It’s a free plugin where you can paste in the AMP installation code without having to go into the actual HTML of your site:
Step #3: Install Service Worker on Your AMP Site
Next, download the package file that includes the service worker.

يشمل ذلك:
- service-worker.js
- amp-helper-frame.html
- amp-permission-dialog.html
Unzip the package and place these files in the root folder of your server. This part is super important. If you skip this step, your site won’t be able to collect push subscribers.
Pro Tip: If you’re not sure what the root folder is and how you can upload files there, you should check out this article on the WordPress File and Directory Structure. It’s a really simple guide for beginners and you get a lot of insight into how WordPress works.
Step #4: Add the AMP Push HTML Code to Your Site
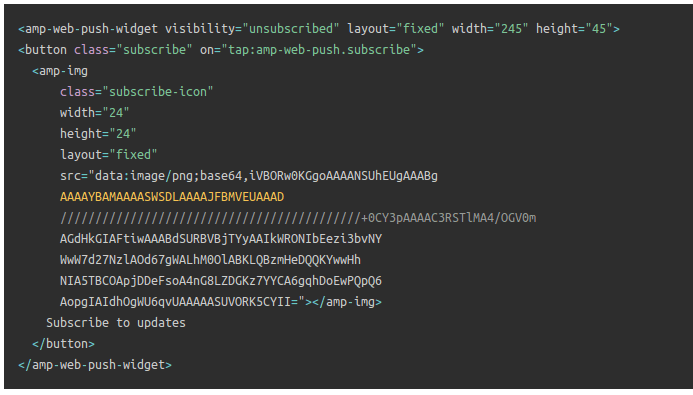
Next, add the HTML code to enable a subscribe on click button and a button to unsubscribe from push campaigns.
This code enables the service worker file you uploaded and allows your site to display subscribe and unsubscribe buttons. To collect subscribers, you need to give your visitors a simple way to subscribe to your push campaigns. The unsubscribe button will give your active subscribers a way to opt out if they’re not interested in your content. Both are pretty important.
Add the `Subscribe to updates’ button where you want it to show up on your site:
And add an ‘Unsubscribe from updates’ button:
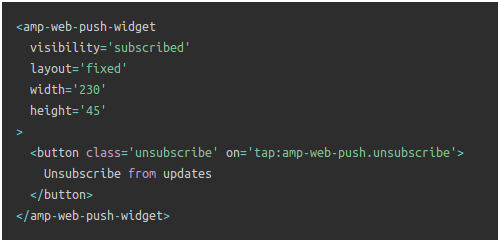
The Unsubscribe button is going to be a simple ‘tap to unsubscribe’ button. You get a lot more customization options for the non-AMP version of your site on both mobile and desktop devices. So, we recommend that you add AMP CSS to your <body> section.
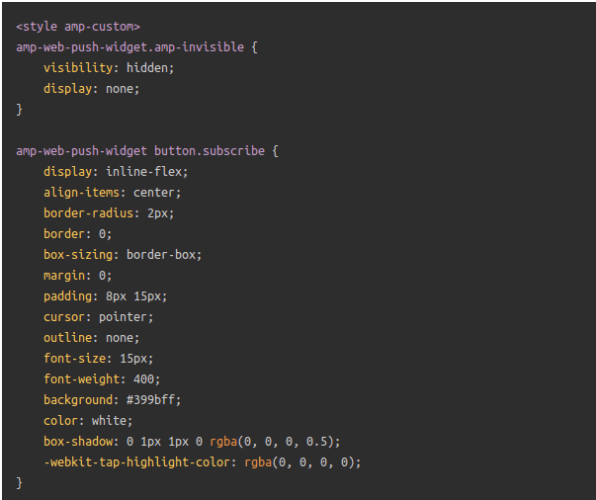
This code snippet is meant to customize the look and feel of both Subscribe and Unsubscribe buttons. If you’d like to play around with these styles, go for it. Just make sure that you don’t change the AMP HTML tags that the code is styling.
And that’s it. You’re done.
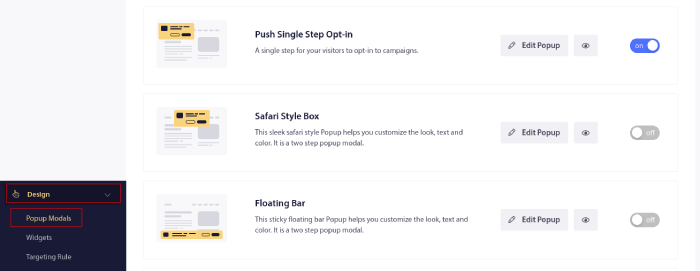
Step #5: Configuring the PushEngage Opt-In
الآن، عد إلى لوحة تحكم PushEngage الخاصة بك. انتقل إلى التصميم » نوافذ منبثقة وحدد الاشتراك الذي تختاره:
الفكرة هنا هي منح زوارك سببًا وجيهًا للاشتراك. إذا كنت بحاجة إلى بعض المساعدة في ذلك، فراجع مقالتنا حول كيفية إنشاء خيار اشتراك مخصص للإشعارات الفورية.
وإذا كنت ترغب في الحصول على بعض القوالب للبدء، يجب عليك الاطلاع على هذا المقال حول نماذج الاشتراك في الإشعارات الفورية عالية التحويل.
BONUS Step: Create a Welcome Campaign
بمجرد الانتهاء من إعداد الاشتراك، يمكن لموقعك جمع المشتركين.
But how do you know if your push campaigns are working properly?
We recommend that you create a welcome push notification to test if your setup went smoothly. A welcome notification is a web push notification you send a new subscriber to confirm their subscription and welcome them on board.
انتقل إلى لوحة تحكم PushEngage وتوجه إلى الحملة » الردود الآلية المتسلسلة وانقر على إنشاء رد آلي متسلسل جديد:

بعد ذلك، قم بتسمية حملتك (نقترح شيئًا مثل رسالة ترحيب متسلسلة)، وتحت المحتوى، حدد الخيار الذي يقول، “إرسال إشعار فور اشتراك المستخدم“):

في هذه المرحلة، يمكنك النقر فوق السهم بجوار الإشعار لتعديل محتوى إشعارك. إذا كان لديك خطة Premium أو Enterprise مع PushEngage، فستتمكن من إضافة أكثر من إشعار واحد لإنشاء سلسلة من رسائل الترحيب الآلية. فقط انقر فوق إضافة إشعار جديد وقم بتحرير المحتوى.
بمجرد الانتهاء، انقر فوق إعدادات الحملة التلقائية وحدد الخيار لإرسال حملة الترحيب الخاصة بك إلى جميع المشتركين:

Then, scroll down to set your own UTM parameters to track the push campaigns:

وعندما تنتهي، قم بالتمرير لأعلى مرة أخرى وانقر فوق الزر تفعيل الرد الآلي:

وهذا كل ما في الأمر!
You have successfully set up AMP web push notifications on your website. It’s time to head back to your PushEngage dashboard and start creating your push campaigns.
What to do After You Add AMP Push Notifications to Your Site
هذا كل شيء لهذا اليوم أيها الأصدقاء!
If you’re new to push campaigns, you should follow a full-blown push notification testing process before you go live. It’ll help you troubleshoot common issues before your visitors see them and start complaining about a broken user experience.
يجب عليك أيضًا الاطلاع على بعض حملات الإشعارات الفورية الآلية الأخرى مثل:
نوصي بالتواصل مع مديري نجاح العملاء لدينا إذا واجهت أي صعوبة في أي من هذه الأمور. يسعدنا جدًا مساعدتك في أي مشكلة.
وإذا لم تكن قد قمت بذلك بالفعل، فابدأ بتجربة PushEngage. PushEngage هي الخدمة رقم 1 للإشعارات الفورية في العالم. لذلك، إذا كنت جادًا بشأن تنمية عملك، فإن PushEngage هو الخيار المناسب لك.


Thanks for this tips & information. Its very easy to understand.
good explanation