Looking for a simple way to add push notifications to your Instapage?
That’s a really great idea. Instapage is a website builder that enables you to create instant web pages. It’s super easy to create a website and start selling a product or a service.
But once your site is live, how do you get traffic? How do you build engagement? How do get more sales?
That’s where push notifications can be super effective as a marketing tool because they can generate repeat traffic and sales without having to run paid ads. You can also create automated campaigns to boost engagement and sales with very little effort.
In this article, we’re going to show you step-by-step how you can add push notifications to an Instapage site in less than 10 minutes.
دعنا نتعمق.
How to Install Push Notifications on Instapage
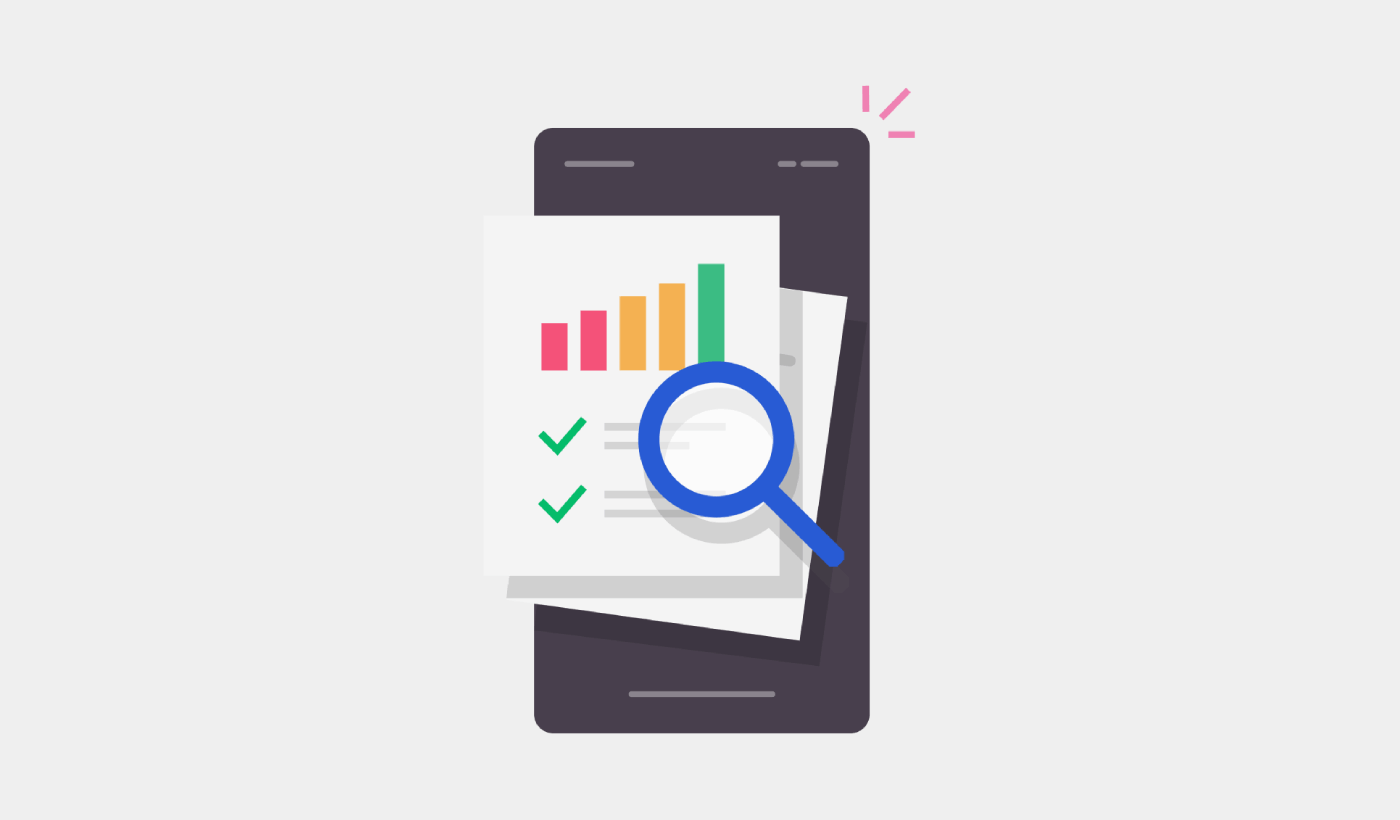
Adding push notifications to an Instapage site is quite simple. Just follow the steps in this article. If you follow every step, by the end of this article, you should be able to send push notifications like this one:

هيا بنا!
الخطوة #1: إعداد حساب PushEngage الخاص بك
توجه إلى الصفحة الرئيسية لـ PushEngage وانقر على زر البدء:

يمكنك تجربة PushEngage مجانًا. إذا كنت تدير مدونة صغيرة تحتاج إلى زيارات متكررة وتفاعل، فهذا جيد بما فيه الكفاية على الأرجح. ولكن إذا كنت جادًا بشأن المبيعات، فيجب عليك الحصول على حزمة Enterprise وفتح الحملات الآلية.
بمجرد التسجيل في حساب PushEngage الخاص بك، توجه إلى لوحة تحكم PushEngage وانتقل إلى الإعدادات » إعدادات الموقع » إعدادات التثبيت:
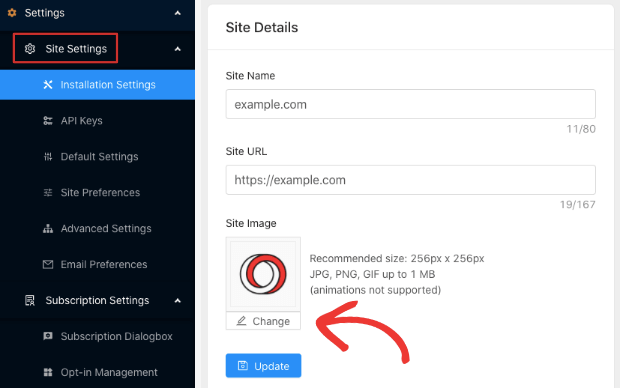
يمكنك تعيين شعارك واسم موقعك وعنوان URL لموقعك هنا. من المهم جدًا ترتيب هذه الأمور الآن حتى تتمكن من اختبار الإعداد بالكامل لاحقًا.
الخطوة #2: الحصول على رمز التثبيت من PushEngage
لتثبيت إشعارات الدفع، ستحتاج إلى الحصول على رمز تثبيت من لوحة تحكم PushEngage الخاصة بك. توجه إلى الإعدادات » إعدادات الموقع » إعدادات التثبيت:
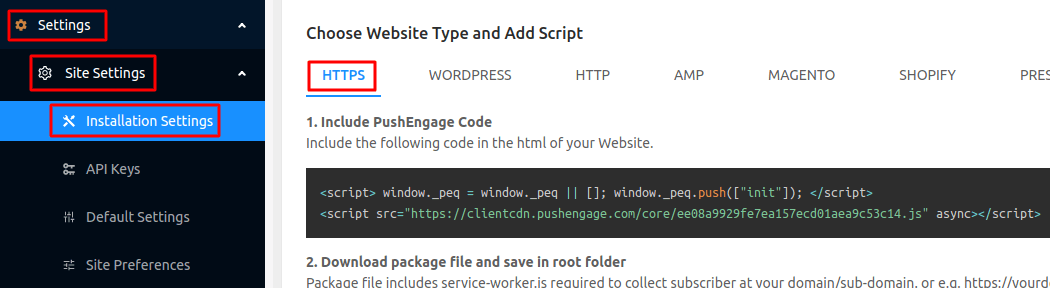
اعتمادًا على ما إذا كان موقعك يحتوي على شهادة SSL مثبتة، انتقل إلى علامة التبويب HTTP أو علامة التبويب HTTPS للحصول على رمز التثبيت الخاص بك.
انسخ مقتطف رمز جافا سكريبت هذا. ستحتاجه قريبًا.
Step #3: Place the Installation Code in Your Instapage Site
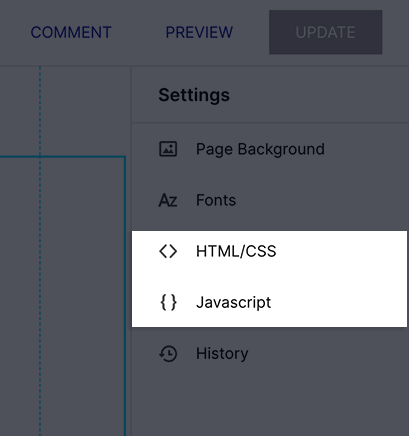
Log in to your Instapage dashboard and in the site builder, head over to Settings and click on Javascript:
Then, simply paste the code snippet you got from your PushEngage dashboard in the popup window:
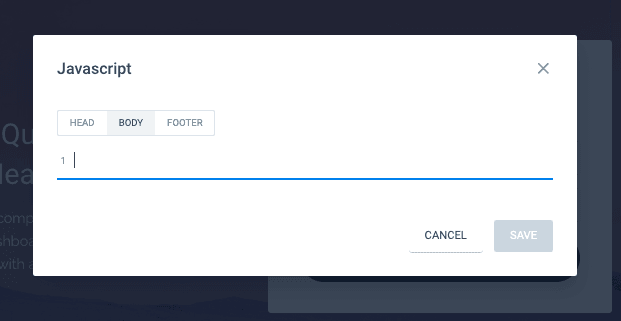
This is typically where you would place your Google Analytics code, Facebook Pixel, and other tracking code as well. When you’re done, hit Save.
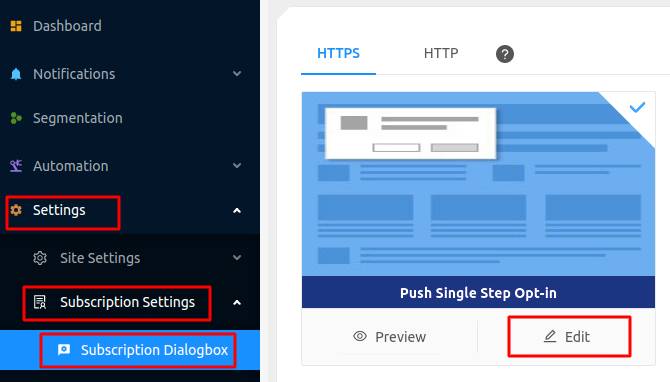
الخطوة #4: تكوين موافقة PushEngage
الآن، عد إلى لوحة تحكم PushEngage الخاصة بك. انتقل إلى الإعدادات » إعدادات الاشتراك » مربع حوار الاشتراك » تحرير:
الفكرة هنا هي منح زوارك سببًا وجيهًا للاشتراك. إذا كنت بحاجة إلى بعض المساعدة في ذلك، فراجع مقالتنا حول كيفية إنشاء خيار اشتراك مخصص للإشعارات الفورية.
وإذا كنت ترغب في الحصول على بعض القوالب للبدء، يجب عليك الاطلاع على هذا المقال حول نماذج الاشتراك في الإشعارات الفورية عالية التحويل.
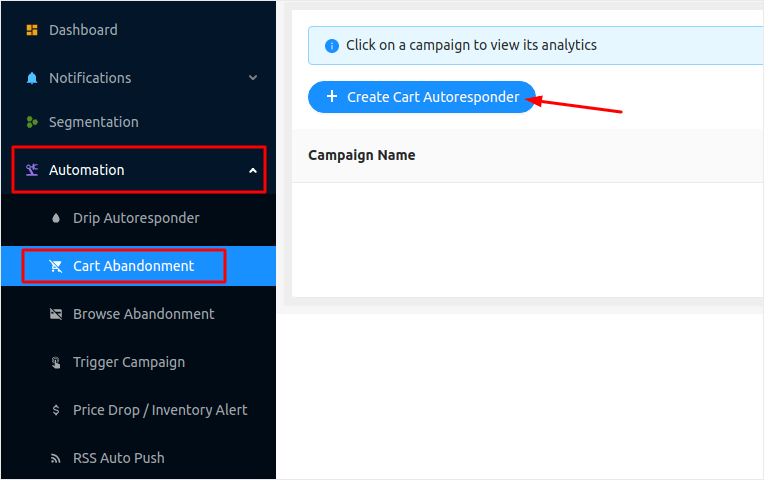
الخطوة #5: إنشاء حملتك الأولى
Now that your Instapage site can send push notifications, you should create an actual campaign.
Since you’re likely going to sell a product on your landing page, let’s set up an abandoned cart reminder for your store.
تساعد حملة سلة التسوق المهجورة في تحقيق إيرادات إضافية عن طريق تحويل السلات المهجورة. إنها مجرد تذكير يبيع الكثير من المنتجات تلقائيًا. لذا، فهي حملة رائعة لدعم أي صفحة هبوط تحقق مبيعات مباشرة.
ما عليك سوى التوجه إلى لوحة تحكم PushEngage الخاصة بك والانتقال إلى الأتمتة » التخلي عن سلة التسوق » إنشاء رد تلقائي لسلة التسوق:
إذا كنت جديدًا في إنشاء حملات تسويق آلية، يمكنك ببساطة متابعة مقالتنا حول كيفية إعداد حملة إشعارات دفع لسلة التسوق المهجورة. اتبع كل خطوة، ويمكنك إعداد إشعارات دفع مثل هذه:
فقط في حال كنت تتساءل، لا تحتاج إلى أن تكون علامة تجارية مشهورة لكي تكون حملات إشعارات الدفع الخاصة بك فعالة. في الواقع، تم بناء PushEngage لمساعدة الشركات الصغيرة على النمو باستخدام إشعارات الدفع.
But before you start marketing your landing page, you should fix any issues with your push notification subscription process. Check out this article on testing your push notifications. If everything’s working perfectly, you’re done!
خاتمة
هذا كل شيء لهذا اليوم أيها الأصدقاء!
You just added push notifications to your Instapage site. Then, you created a powerful push notification campaign to boost your growth. All that, in less than 10 minutes!
Check out how to create automated push notification campaigns as well. Most push campaigns are simple and effective. So, we recommend setting up multiple campaigns for your site. Here are a few great ones to start with:
- كيفية إرسال إشعارات دفع RSS تلقائيًا
- كيفية إعداد إشعارات دفع التخلي عن سلة التسوق باستخدام GTM
- كيفية جدولة إشعارات الدفع بالطريقة السهلة [دليل 5 دقائق]
وإذا لم تكن قد فعلت ذلك بالفعل، فابدأ باستخدام PushEngage. PushEngage هو البرنامج رقم 1 للإشعارات الفورية في العالم. لذا، فإن حملاتك في أيد أمينة.


