Looking for a guide to create waterfall push campaigns?
Waterfall notifications are gaining a lot of popularity these days. For a long time, you could only send waterfall email campaigns. But now, you can recreate the same effective campaigns and use the targeting options in push notification software to send waterfall push notifications.
But how do you get started? Do you need experience with waterfall campaigns? Do you need any experience setting up push notification campaigns?
In this article, we’re going to help you create waterfall push campaigns using an example. We’ll also answer all your questions about waterfall push notifications.
يبدو جيدًا؟ دعنا نتعمق.
What Are Waterfall Push Campaigns?
A waterfall push campaign is a type of ad campaign for mobile devices. It works like this: you send push notifications to a group of people, but not all at once. Instead, you send the notification first to the people who are most likely to engage with the notification and take the action you want them to take.
If those people don’t respond, you move on to the next group of people, and so on.
The idea is to get as many people as possible to engage with the notification while spending the least amount of money. It’s called a “waterfall” because it’s like a series of steps that the network goes through, targeting different groups of people at each step.
Let me explain.
With any business your run, you’ll see a group of subscribers who are extremely engaged. They buy anything you sell, happily offer testimonials and reviews, and refer new customers to you.
And then again, you’ll see subscribers who simply aren’t interested in anything about your business.
Push notification campaigns come with detailed analytics. So, you can see both groups pretty clearly in your subscriber list. And the cool thing is that you can create Audience Groups in PushEngage to retarget both types of subscribers.
Then, you can create targeting options for your push notifications to retarget specific behavior on each notification you send. Once we get into our example, you’ll see more clearly how behavior targeting impacts a waterfall push campaign. For now, you should know that all push waterfall campaigns have two core components:
- A set of push notifications with a common goal
- Audience groups to retarget different types of subscribers
Let’s check out why waterfall push campaigns are so effective next.
Why Send Waterfall Push Campaigns?
There are several advantages of using waterfall push campaigns to grow your brand:
- Efficient use of advertising budget: By targeting the most valuable users first, and then moving down the priority list, a waterfall push campaign can help to maximize the return on investment (ROI) for your advertising spend. This ensures that your advertising budget is being used as effectively as possible.
- Higher engagement rates: By targeting users who are more likely to engage with the ad, you increase the chances of getting a higher click-through rate and conversion rate, which can lead to increased revenue.
- Customizable targeting: With a waterfall push campaign, you can create different segments of users based on their demographics, behavior, and other factors. This allows you to tailor your messaging to each group and increase the likelihood of success.
- Real-time optimization: With a waterfall push campaign, you can track the performance of each segment in real-time and adjust your targeting strategy accordingly. This ensures that you are always optimizing for the best possible results.
Overall, waterfall push campaigns can be an effective way to reach your target audience and drive engagement and conversions, while minimizing wasted ad spend.
How to Send Waterfall Push Notifications
Now that we know what a waterfall push campaign is and why you should create them, let’s take a look at a real example with step-by-step instructions to create one.
Before you get started with sending waterfall push notifications, you need to select a push notification service. We recommend using PushEngage.
الخطوة رقم 1: إنشاء حساب PushEngage مجاني
توجه إلى PushEngage وانقر على ابدأ الآن مجانًا:

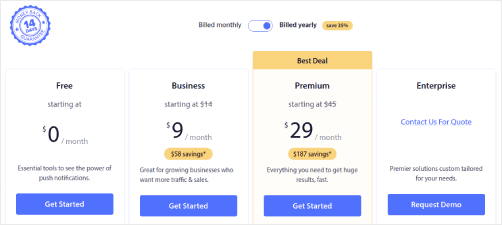
يمكنك البدء بالخطة المجانية. ولكن إذا كنت تبحث عن أقوى إشعارات المتصفح، فيجب عليك اختيار خطة مدفوعة بناءً على احتياجات عملك:
بمجرد معرفة الخطة التي تريدها، انقر على ابدأ لإنشاء حساب PushEngage الخاص بك.
الخطوة رقم 2: التسجيل في PushEngage
الآن، حان وقت إنشاء حساب PushEngage الخاص بك. ابدأ بالتسجيل باستخدام عنوان بريد إلكتروني أو معرف Gmail:

ثم، املأ تفاصيل حسابك:

وأضف معلومات بطاقتك الائتمانية لشراء خطتك:

إذا اخترت الحساب المجاني، فلن يتم خصم أي أموال من بطاقتك الائتمانية حتى تختار ترقية خطتك. والآن، أنت جاهز للوصول إلى لوحة تحكم PushEngage الخاصة بك. فقط انقر على إكمال التسجيل والحصول على وصول فوري.
إذا كنت قد استخدمت OneSignal أو PushAlert من قبل، فسترى أن PushEngage يمنحك تجربة أنظف بكثير من لوحة التحكم. لوحة تحكم OneSignal ليست مخصصة للحملات المتقدمة. لهذا الغرض، ستحتاج إلى واجهة برمجة التطبيقات (API) أكثر من إضافة OneSignal.
الخطوة رقم 3: تثبيت إضافة ووردبريس للإشعارات عبر الويب
لقد انتهيت من إنشاء حسابك. لذا، توجه إلى لوحة تحكم PushEngage واتبع الخطوات التالية:

انقر على إعدادات الموقع » تفاصيل الموقع وانقر على زر انقر هنا للحصول على تعليمات الإعداد:

انقر على علامة التبويب WordPress وانقر على زر تثبيت إضافة PushEngage لـ WordPress لتثبيت الإضافة على موقعك.

الجزء الرائع هنا: عندما أنشأت حساب PushEngage الخاص بك، قمت بالفعل بمزامنة موقعك مع حساب PushEngage الخاص بك. لذا، انقر على رابط التثبيت في لوحة تحكم PushEngage لتثبيت إضافة PushEngage WordPress تلقائيًا على موقعك.
الخطوة رقم 4: ربط موقع WordPress الخاص بك بـ PushEngage
عند الانتهاء من تثبيت وتفعيل إضافة PushEngage لـ WordPress، سترى معالج الإعداد لـ PushEngage:

المعالج مباشر إلى حد ما. إذا كنت مستخدمًا جديدًا، فانقر على جديد؟ احصل على حسابك المجاني. وإذا كنت قد سجلت بالفعل، فانقر على ربط حسابك الحالي.
بعد ذلك، يمكنك تحديد موقعك من القائمة المنسدلة تحديد موقع ضمن ربط موقع مسجل إذا كنت قد سجلت موقعًا بالفعل أثناء التسجيل:

أو، يمكنك النقر على تسجيل موقع جديد لإضافة موقع جديد إذا كان لديك خطة تسعير مميزة أو أعلى. في الخطوة التالية، سيطلب منك معالج الإعداد تثبيت إضافات WordPress أخرى ضرورية.

إذا اتبعت كل خطوة بشكل صحيح، فسترى رسالة النجاح هذه من المعالج:

You are now ready to create campaigns.
Step #5: Create Waterfall Push Campaigns
Finally, it’s time for our example. To show you a real use case for waterfall push campaigns, we’re going to take the example of Black Friday promotions. Our objective is to maximize the conversions on our Black Friday offer.
لإعادة استهداف المشتركين بناءً على سلوكهم، سنرسل بثًا لجميع المشتركين لدينا. بعد ذلك، بناءً على مستويات تفاعلهم، سنقوم بإنشاء مجموعات جمهور مختلفة لإعادة الاستهداف.
كيفية إرسال إشعارك إلى جميع المشتركين
نريد أقصى وصول لـ 3 إشعارات:
- إعلان مبكر عن الجمعة السوداء
- تخفيضات الجمعة السوداء السريعة
- تخفيضات الاثنين السيبراني
لذلك، نرسل هذه الإشعارات الثلاثة إلى الجميع. في علامة التبويب الجمهور، حدد إرسال إلى جميع المشتركين:

كيفية إعادة استهداف المشتركين الذين لم ينقروا على البث إلى الجميع
إذا كنت لا ترسل الإشعار إلى جميع المشتركين، فستحتاج إلى إنشاء مجموعة جمهور. على سبيل المثال، إذا كنت ترغب في استهداف المشتركين الذين لم ينقروا على البث إلى الجميع، فستحتاج إلى إنشاء مجموعة جمهور جديدة.
في لوحة تحكم ووردبريس الخاصة بك، انتقل إلى الجمهور » مجموعات الجمهور وانقر فوق إنشاء مجموعة جمهور جديدة:

لاستهداف المشتركين الذين لم ينقروا على آخر إشعار، ستحتاج إلى التصفية حسب تاريخ آخر نقرة:
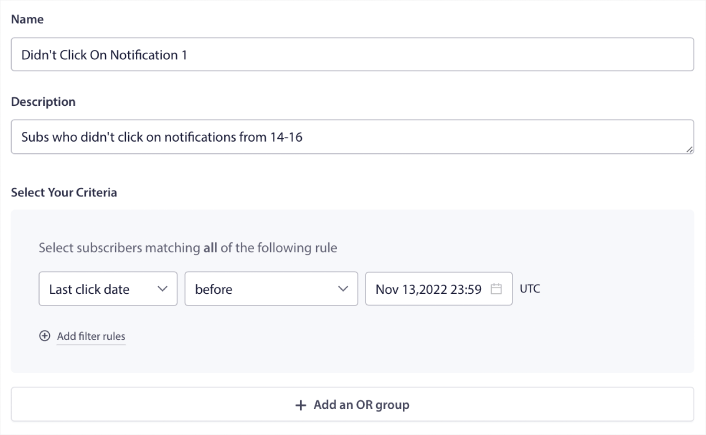
قم بالتصفية حسب تاريخ آخر نقرة قبل التاريخ الذي أرسلت فيه إشعارك السابق. لذا، إذا أرسلت آخر إشعار دفع في 14 نوفمبر، فقم بالتصفية للمشتركين الذين نقروا على الإشعارات فقط قبل 13 نوفمبر منتصف الليل.
ملاحظة: على عكس حملة البريد الإلكتروني، لا يمكنك فعليًا التصفية حسب نسبة النقر إلى الظهور على آخر إشعار. أقرب تقريب هو التصفية للنقرات في نطاق زمني.
عند الانتهاء، انقر فوق حفظ الإشعار.
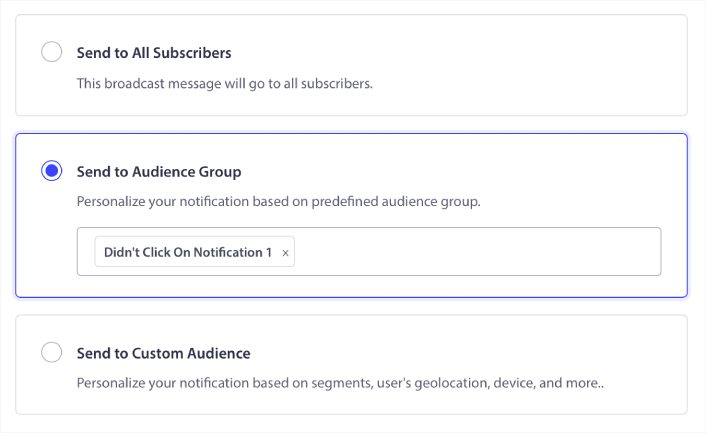
بعد ذلك، عد إلى بث إشعارات الدفع الخاصة بك وحدد إرسال إلى مجموعة جمهور. من القائمة المنسدلة، حدد مجموعتك:
كيفية إعادة استهداف المشتركين الذين نقروا على البث إلى الجميع
إذا كنت ترغب في استهداف المشتركين الذين نقروا على آخر إشعار لك، يمكنك إنشاء مجموعة جمهور أخرى.
قم بتصفية المشتركين حسب تاريخ آخر نقرة بعد التاريخ الذي أرسلت فيه إشعارك السابق وقبل التاريخ الذي تريد إرسال إشعارك التالي فيه:
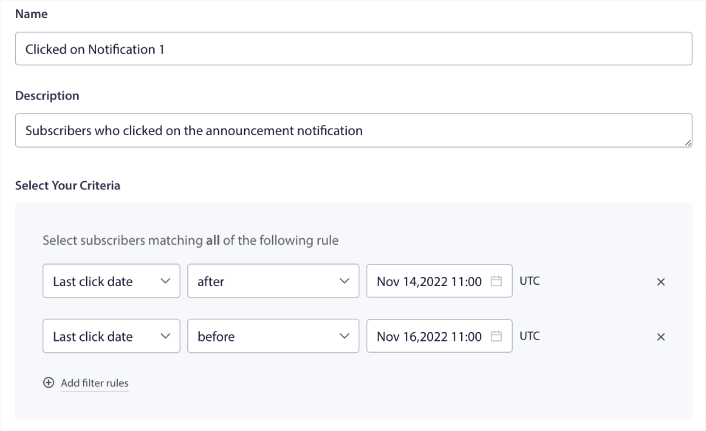
يمكنك إضافة معايير و إلى عامل التصفية الخاص بك عن طريق النقر فوق إضافة قواعد التصفية. عامل تصفية مثل هذا رائع لإشعارات الدفع للبيع المتقاطع.
نتيجة مجموعات الجمهور هذه هي استهداف أكثر تفصيلاً. لذلك، في كل مرة، يمكنك إرسال عروض مختلفة لتحسين معدلات التحويل الخاصة بك.
What to do After You Create Waterfall Push Campaigns
One of the most important things to remember about waterfall push campaigns is that you can only use this methodology on broadcast push notifications. Drip campaigns in push notifications don’t have targeting options that granular yet.
لذلك، تأكد من اختبار A/B لإشعارات الدفع الخاصة بك. نقترح أيضًا أن تأخذ بعض الوقت لقراءة مقالاتنا ومعرفة كيفية تعزيز إشعارات الدفع الآلية الخاصة بك. ابدأ بمقالنا حول أفضل ممارسات إشعارات الدفع.
إذا كنت جديدًا في مجال الإشعارات الفورية، فيجب عليك اتباع عملية اختبار الإشعارات الفورية كاملة قبل أن تبدأ. سيساعدك ذلك في استكشاف المشكلات الشائعة وإصلاحها قبل أن يراها زوارك ويبدأوا في الشكوى من تجربة مستخدم معطلة. وبالتأكيد يجب عليك إعداد Google Analytics لـ تتبع الإشعارات الفورية.
إعادة استهداف إشعارات الدفع لاستهداف المشتركين الذين نقروا عليها أو لم ينقروا عليها. أخبرنا كيف يعمل ذلك معك. في غضون ذلك، تحقق من هذه الموارد:
- كيفية زيادة النقرات على إشعارات الدفع الخاصة بك بالفضول
- كيفية تخصيص كل إشعار دفع
- كيفية التميز بالوسائط الغنية في إشعارات الدفع الخاصة بك
- كيفية إعادة تنشيط المشتركين الخاملين في إشعارات الدفع
- كيفية استخدام إشعارات الدفع لإبقاء العملاء على اطلاع
- كيفية استخدام الرموز التعبيرية في إشعارات الدفع الخاصة بك لزيادة معدلات النقر
- كيفية زيادة التحويلات عن طريق خلق شعور بالإلحاح
وإذا لم تكن قد فعلت ذلك بالفعل، ابدأ مع PushEngage.


