Looking for a guide to creating drip campaigns to boost your sales?
Marketing is incomplete today without automation. Sure, you can collect subscribers and send out push notifications and emails. What then? Keep selling them on your business with every newsletter and hope that your subscribers convert?
There’s no way to:
- Personalize your campaigns
- Get new customers on autopilot
- Retain existing customers with your content
- Upsell or cross-sell products
- Recover lost sales
Unless… you use drip campaigns that convert.
In this article, we’ll show you how to set up drip campaigns and make the most of them. The best part? You don’t need any previous experience.
يبدو جيدًا؟ دعنا نتعمق.
What Are Drip Campaigns?
Think of drip campaigns like setting up a bunch of emails or even push notifications to be sent out automatically, sort of like a sprinkler system for your garden. Instead of watering plants, you’re sending out messages to people who are interested in what you’ve got to say or sell.
إليك كيفية عمل ذلك:
- It’s not magic, it’s automated: Once you set it up, these messages keep going out on their own. You don’t have to keep sending them manually.
- You can talk to the right people: You can send different messages to different groups of people. For example, someone who just signed up might get a friendly “hello” message, while someone else who’s been around for a while might get special deals or updates.
- It’s personal: These messages can use the person’s name or talk about things they’ve shown interest in. It makes them feel like you’re really talking to them, not just sending the same thing to everyone.
- Timing is everything: The messages are sent at times that make the most sense – like right after someone signs up or looks at something on your site.
- Each message has a job: Every email or notification is meant to do something specific, like help people get to know your product better or remind them about something they looked at but didn’t buy.
- You can see how it’s doing: You can check out things like how many people open the messages or click on links inside them. This helps you know if your messages are working well.
Drip campaigns aren’t just for emails – they work app push notifications and web push notifications as well. They’re great for keeping in touch with people who are interested in your stuff, without overwhelming them. It’s a smart way to keep people engaged and interested in what you’re doing.
Types of Drip Campaigns
Let’s dive into the different types of drip campaigns. Just like ice cream comes in all sorts of varieties, drip campaigns have different types too. Each kind is tailored for a specific purpose or audience. Here are some of the most common ones:
- Welcome Series: This is like saying “Hi!” to someone new. When someone signs up for your emails or notifications, you send them a few friendly messages to introduce them to your brand or service. It’s like rolling out the red carpet for your new guests.
- Onboarding Campaigns: Think of this as a helpful guide. When someone buys a product or signs up for a service, these messages walk them through how to use it, offer helpful tips, or show them things they might not know about. It’s like giving a tour to someone new in town.
- Abandoned Cart Reminders: Ever put something in your online shopping cart and then forget about it? These campaigns are little nudges to remind people about stuff they were interested in but didn’t buy. It’s like a gentle tap on the shoulder saying, “Hey, did you forget about this?”
- Re-engagement Campaigns: These are for reaching out to people who used to interact with your brand but haven’t in a while. It’s like calling up an old friend and saying, “Hey, let’s catch up!” You might offer them a special deal or just remind them about your brand.
- Educational Content: Here, the goal is to teach your audience something valuable related to your product or industry. It’s like a mini-course, delivered in small, digestible messages. Think of it as a series of fun and informative lessons.
- Product Updates: Got something new or improved? This type of campaign keeps your audience in the loop about new features, products, or services. It’s like showing off your latest gadget to friends.
- Event Invites: Hosting a webinar, workshop, or another event? These campaigns are all about getting people excited and signed up for your events. It’s like sending out cool invitations to a party.
- Seasonal Campaigns: These are tied to specific times of the year, like holidays, seasons, or special events. It’s like decorating your store for Christmas or having a summer sale.
Each type of drip campaign has its own charm and purpose. By matching the right type of campaign with your audience and goals, you can create meaningful connections and keep your audience engaged in a way that feels natural and not too sales-y.
How to Create Push Notification Drip Campaigns
تثبيت الإشعارات الفورية على موقع ويب ليس بالأمر الصعب. ولكنه يتضمن بعض الخطوات وستحتاج إلى اتباع هذا الدليل خطوة بخطوة.
لا تقفز إلى الأمام في أي وقت وستكون بخير.
Before you create a welcome push notification campaign, you need to select a push notification service. A push notification service is a software that allows you to create push campaigns without any coding.
We recommend using PushEngage.

PushEngage هو المكون الإضافي رقم 1 لإشعارات الدفع في العالم.
تساعدك إشعارات الدفع على زيادة حركة مرور موقعك الإلكتروني ومشاركتك تلقائيًا. وإذا كنت تدير متجرًا عبر الإنترنت، فإن PushEngage يساعدك أيضًا على زيادة مبيعاتك من خلال مساعدتك في إنشاء إشعارات دفع آلية للتجارة الإلكترونية.
يمكنك البدء مجانًا، ولكن إذا كنت جادًا بشأن تنمية عملك، فيجب عليك شراء خطة مدفوعة. أيضًا، قبل شراء أي خدمة إشعارات دفع، يجب عليك الاطلاع على هذا الدليل حول تكاليف إشعارات الدفع.
إليك نظرة سريعة على ما تحصل عليه مع PushEngage:
- حملات آلية عالية التحويل
- خيارات استهداف وجدولة حملات متعددة
- تتبع الأهداف وتحليلات متقدمة
- اختبار A/B ذكي
- مدير نجاح مخصص
سترى أن PushEngage هو الخيار الأفضل بلا منازع إذا كنت ترغب في زيادة حركة المرور والمشاركة والمبيعات لعملك. وإذا كانت ميزانيتك محدودة، يمكنك دائمًا أن تكون مبدعًا بعض الشيء مع إشعارات الدفع الخاصة بك.
ملاحظة: إذا كنت تدير موقع WordPress، فيجب عليك تثبيت وتفعيل إضافة PushEngage لـ WordPress.
هيا بنا!
الخطوة رقم 1: إنشاء حساب PushEngage مجاني
توجه إلى PushEngage وانقر على ابدأ مجانًا الآن:
يمكنك البدء بالخطة المجانية. ولكن إذا كنت تتطلع إلى إرسال إشعارات فورية مستهدفة، فيجب عليك اختيار خطة النمو (Growth Plan). بمجرد معرفة الخطة التي تريدها، انقر على ابدأ لإنشاء حساب PushEngage الخاص بك.
الخطوة رقم 2: التسجيل في PushEngage
الآن، حان وقت إنشاء حساب PushEngage الخاص بك. ابدأ بالتسجيل باستخدام عنوان بريد إلكتروني أو معرف Gmail:

ثم، املأ تفاصيل حسابك:

وأضف معلومات بطاقتك الائتمانية لشراء خطتك:

إذا اخترت الحساب المجاني، فلن يتم خصم أي أموال من بطاقتك الائتمانية حتى تختار ترقية خطتك. والآن، أنت جاهز للوصول إلى لوحة تحكم PushEngage الخاصة بك. فقط انقر على إكمال التسجيل والحصول على وصول فوري.
إذا كنت قد استخدمت OneSignal أو PushAlert من قبل، فسترى أن PushEngage يمنحك تجربة أنظف بكثير من لوحة التحكم. لوحة تحكم OneSignal ليست مخصصة للحملات المتقدمة. لهذا الغرض، ستحتاج إلى واجهة برمجة التطبيقات (API) أكثر من إضافة OneSignal.
الخطوة رقم 3: تثبيت إضافة ووردبريس للإشعارات عبر الويب
NOTE: If you’re not running a WordPress site, you should check out our installation guides to get started.
لقد انتهيت من إنشاء حسابك. لذا، توجه إلى لوحة تحكم PushEngage واتبع الخطوات:

انقر على إعدادات الموقع » تفاصيل الموقع وانقر على الزر انقر هنا للحصول على تعليمات الإعداد:

انقر على علامة التبويب WordPress وانقر على الزر تثبيت المكون الإضافي لـ PushEngage لـ WordPress لتثبيت المكون الإضافي على موقعك.

الجزء الرائع هنا: عندما أنشأت حساب PushEngage الخاص بك، قمت بالفعل بمزامنة موقعك مع حساب PushEngage الخاص بك. لذا، انقر على رابط التثبيت في لوحة تحكم PushEngage لتثبيت إضافة PushEngage WordPress تلقائيًا على موقعك.
الخطوة رقم 4: ربط موقع WordPress الخاص بك بـ PushEngage
عند الانتهاء من تثبيت وتفعيل إضافة PushEngage لـ WordPress، سترى معالج الإعداد لـ PushEngage:

المعالج سهل الاستخدام للغاية. إذا كنت مستخدمًا جديدًا، فانقر على جديد؟ احصل على حسابك المجاني. وإذا كنت قد سجلت بالفعل، فانقر على ربط حسابك الحالي.
بعد ذلك، يمكنك تحديد موقعك من القائمة المنسدلة تحديد موقع ضمن ربط موقع مسجل إذا كنت قد سجلت موقعًا بالفعل أثناء التسجيل:

أو، يمكنك النقر على تسجيل موقع جديد لإضافة موقع جديد إذا كان لديك خطة تسعير مميزة أو أعلى. في الخطوة التالية، سيطلب منك معالج الإعداد تثبيت إضافات WordPress الضرورية الأخرى.

إذا اتبعت كل خطوة بشكل صحيح، فسترى رسالة النجاح هذه من المعالج:

أنت الآن جاهز لإنشاء الحملات ونوافذ المنبثقة للإشعارات الفورية.
Step #4: Send Personalized Drip Campaigns
Before you create a campaign, you should set up segments and audience groups to send personalized push messages.
لا شيء يضاهي مستوى التخصيص الذي يمكنك الحصول عليه عن طريق إنشاء شرائح ومجموعات جمهور لمشتركي إشعارات الدفع الخاصة بك. انتقل إلى PushEngage » الجمهور وابدأ في إنشاء الشرائح ومجموعات الجمهور على الفور.
ضمن علامة التبويب الشرائح، يمكنك إنشاء شرائح جديدة أو تعديل الشرائح الحالية:

وإذا كنت بحاجة إلى تخصيص أعمق، فأنشئ مجموعة جمهور في علامة التبويب مجموعات الجمهور:

إذا كنت جديدًا على شرائح إشعارات الدفع و إشعارات الدفع المخصصة، فيجب عليك الاطلاع على مقالتنا حول كيفية إنشاء الشرائح وإعلاننا حول تجميع الجمهور المتقدم.
Step #5: Create Your Drip Push Notifications Campaign
Go to PushEngage dashboard and head over to Campaign » Drip Autoresponders and click on Create New Drip Autoresponder:

Then, name your campaign (we suggest something like Welcome Drip), and under Content, select the option that says, “Send notification immediately after user subscribes“):

في هذه المرحلة، يمكنك النقر على السهم بجوار الإشعار لتعديل محتوى إشعارك.
If you have a Premium or Enterprise plan with PushEngage, you’ll be able to add more than one notification to create a sequence of automated welcome messages. Just click on Add New Notification and edit the content.
Once you’re done, click on Drip Settings and select the option to send your welcome campaign to all subscribers:

Then, scroll down to set your own UTM parameters to track the push notifications:

And when you’re done, scroll back up and click the Activate Autoresponder button:

وأنت انتهيت!
How to Create Email Drip Campaigns
Setting up those nifty automated drip campaigns in WordPress? You can do that easily with an email marketing tool. Follow along with the rest of this guide and you’re all set!
Step #1: Select an Email Drip Service
We suggest giving Constant Contact a whirl. It’s like the superstar of email marketing services. Super user-friendly and it comes with a cool drag-and-drop feature for crafting emails.

Constant Contact هي أفضل خدمة تسويق عبر البريد الإلكتروني لإعداد الردود الآلية لعملك. إنها سهلة الاستخدام للغاية وتقدم الكثير من ميزات الأتمتة لتحسين حملات البريد الإلكتروني الخاصة بك.
Here’s what makes Constant Contact such a great choice for setting up email marketing campaigns:
- منشئ سحب وإفلات سهل لإنشاء رسائل البريد الإلكتروني
- مئات من قوالب البريد الإلكتروني المصممة مسبقًا
- رسائل الترحيب، عروض عيد الميلاد، والردود الآلية لسلات التسوق المهجورة
- أدوات بناء القوائم ونماذج الاشتراك لتنمية جمهورك
- اختبار A/B للبريد الإلكتروني المستهدف
- تكامل مع أنظمة إدارة علاقات العملاء (CRMs) والخدمات الخارجية
- دعم ممتاز عبر الدردشة الحية والهاتف
Not to mention, Constant Contact has a forms plugin for WordPress that you can use for lead generation. You can also nurture and close your leads with autoresponders.
But hey, this isn’t the only game in town. Most of the big email marketing services, like Brevo (you might know it as Sendinblue), HubSpot, and others, they’ve got this drip email magic too.
With a few clicks, you can get those automated emails rolling out to your subscribers. Plus, Constant Contact plays nice with WordPress plugins like WPForms and OptinMonster. And if you’re into eCommerce, using WooCommerce or Shopify, it’s got you covered for reaching out to new customers or reminding folks about those items they left in their carts.
Ready to give it a go? Pop over to the Constant Contact website, sign up, and guess what? You get to try it out with a 60-day free trial. It’s like test driving a car but for email marketing. This way, you can see if it’s the right fit before you decide to go for a paid plan.
Step #2: Create an Email List
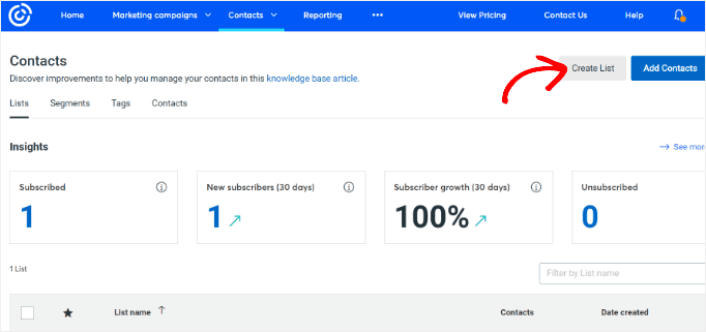
After creating an account, you can visit the Constant Contact dashboard to create a contact list.
Constant Contact will have already created a default list for you. However, you can create your own list by going to the Contacts tab in the top menu and then clicking the Create List button.
You can connect your WordPress newsletter form with Constant Contact and start building an email list. You should also check out our blog post on how to add a WordPress blog subscription widget.
Step #3: Create Marketing Drip Campaigns
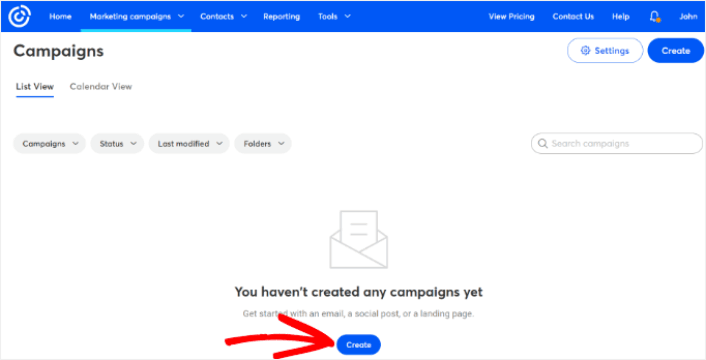
Now that you’ve added subscribers to your Constant Contact list, the next step is to create an automated drip campaign. Head over to the Marketing Campaigns tab and then click the Create button.
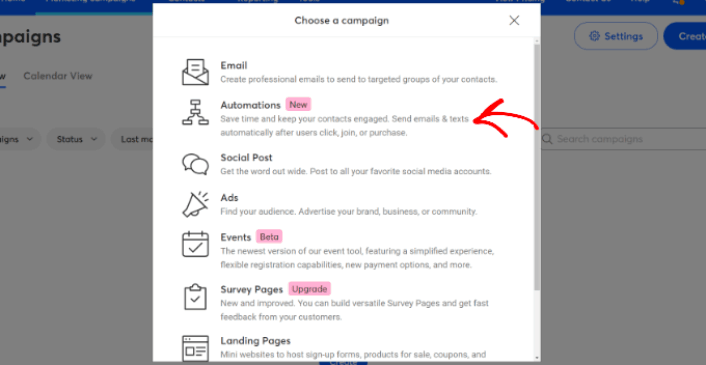
Constant Contact will show you multiple options for creating a campaign. Go ahead and select the Automations campaign.
From here, you can choose from several pre-built campaign templates to set up a drip campaign. You can create a Custom Automation to start from scratch, or you can quickly get started using any of the campaign templates.
For this tutorial, we will select the Create custom path template to get started. Select the Subscribes for email option and then click the Next button.
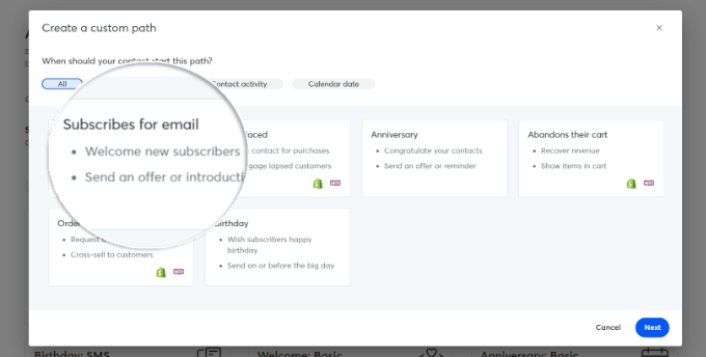
Give your custom path a name and you’re done! This template will trigger a drip campaign any time someone new subscribes to your email list. So, it’s perfect for a welcome campaign. If you’re looking to create an onboarding campaign, you can use tags to put them on a separate drip campaign.
Step #4: Create a Campaign Flow
However, you can simply drag actions and rules from the menu on the left onto the path. For instance, you add different actions like sending an email or sending an SMS to your workflow.
There are also different rules that help you customize your automation. You can add a time delay and specify when the next email should be sent. Similarly, there is a conditional split option that lets you set up Yes and No conditions and split the path.
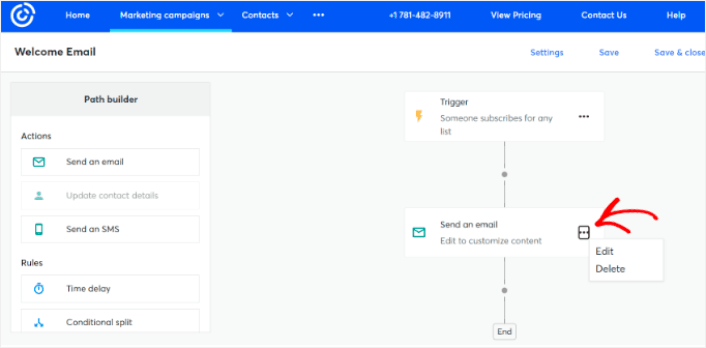
Tweaking your automated workflow is a breeze too. Just spot the three dots icon and give it a click. Choose Edit to make changes. Say you want to change up the Send an email action.
Once you do that, a popup window shows up. Here’s where you can either whip up a brand new email or use one you’ve already made.
Since it’s your first time setting up this workflow, go ahead and pick Create a new email. Put in a cool name for your email, then hit Continue. And just like that, you’re on your way to customizing your email workflow!
Step #5: Creating Your Email Campaign
You can search for a template based on the occasion or use a blank template to create an email from scratch.
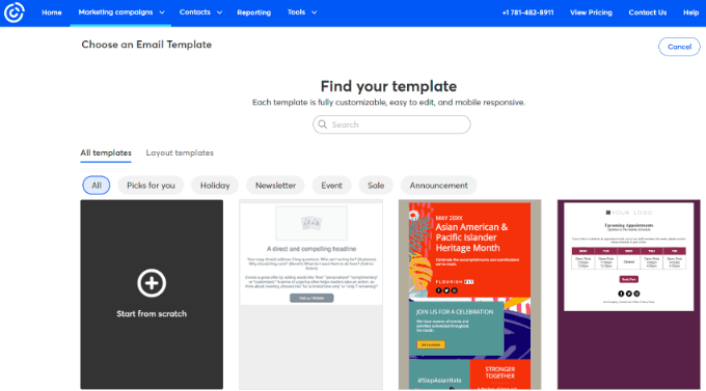
Once you select a template, the email editor will launch.
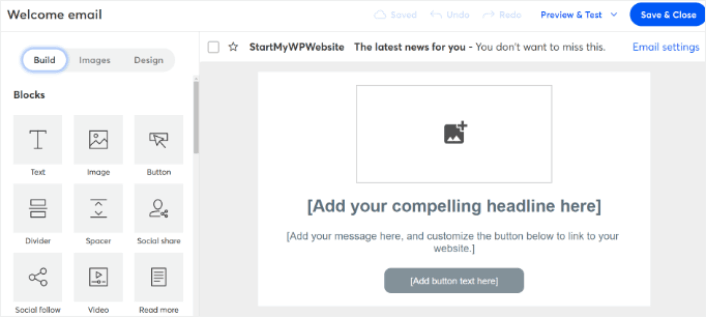
When you are done, hit the Save & Close button at the top. This will take you back to the Path Builder in Constant Contact. Go ahead and finish your automation path by adding as many actions and rules to your path and editing each one of them.
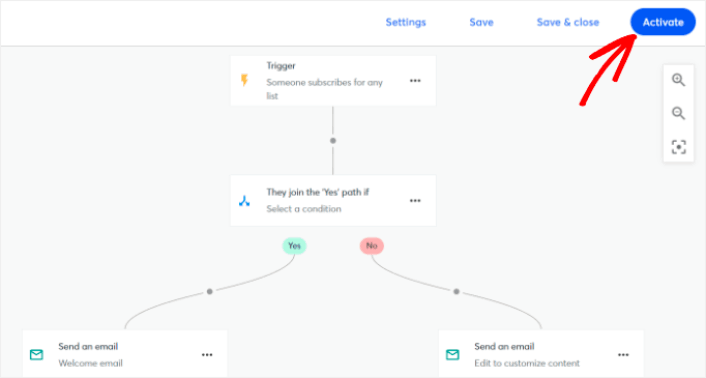
After creating an automated workflow, you can simply click the Activate button at the top. And you’re done!
What to do After You Create a Drip Campaign
هذا كل شيء لهذا اليوم أيها الأصدقاء!
إذا وجدت هذا المقال مفيدًا، فتأكد من ترك تعليق أدناه.
Getting started with drip campaigns can seem intimidating. But if you keep an eye on goal tracking and analytics, you should be fine. More importantly, you’ll make a lot more profit with the help of push notification campaigns. Here are a few cool resources to get you started:
- كيفية استخدام إشعارات الدفع لإعادة الاستهداف لمضاعفة إيراداتك
- كيفية فرز إشعارات الدفع الخاصة بك والعثور على الحملات الناجحة
- كيفية تنظيف قوائم المشتركين في الإشعارات الفورية (سهل)
- كيفية إرسال إشعارات دفع RSS تلقائيًا
- كيفية استخدام الإشعارات الفورية للترويج لموقع إخباري
- كيفية استخدام إشعارات البيع المتقاطع الفورية لمضاعفة مبيعاتك
- كيفية استخدام إشعارات الدفع للتخلي عن التصفح (4 خطوات)
إذا كنت جديدًا في مجال إشعارات الدفع، فيجب عليك تجربة PushEngage. PushEngage هو البرنامج رقم 1 لإشعارات الدفع في السوق. وستكون حملاتك في أيد أمينة.
لذا، إذا لم تكن قد فعلت ذلك بالفعل، فابدأ باستخدام PushEngage اليوم!


